start stop button KIA SPORTAGE 2022 Owners Manual
[x] Cancel search | Manufacturer: KIA, Model Year: 2022, Model line: SPORTAGE, Model: KIA SPORTAGE 2022Pages: 630, PDF Size: 9.69 MB
Page 16 of 630
25
Your vehicle at a glance
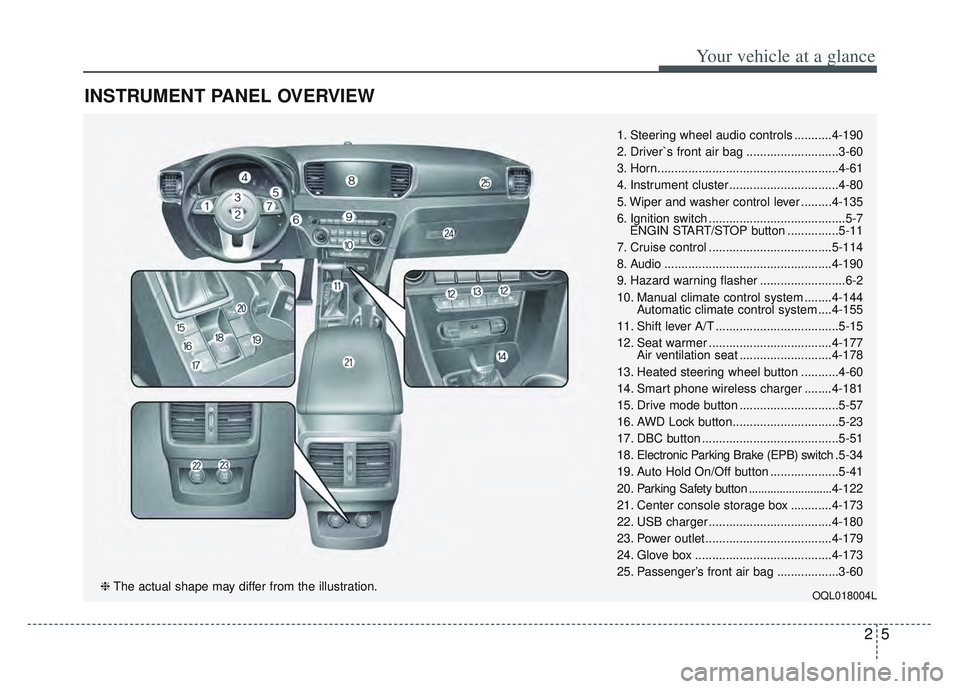
INSTRUMENT PANEL OVERVIEW
1. Steering wheel audio controls ...........4-190
2. Driver`s front air bag ...........................3-60
3. Horn.....................................................4-61
4. Instrument cluster ................................4-80
5. Wiper and washer control lever .........4-135
6. Ignition switch ........................................5-7ENGIN START/STOP button ...............5-11
7. Cruise control ....................................5-114
8. Audio .................................................4-190
9. Hazard warning flasher .........................6-2
10. Manual climate control system ........4-144 Automatic climate control system ....4-155
11. Shift lever A/T ....................................5-15
12. Seat warmer ....................................4-177 Air ventilation seat ...........................4-178
13. Heated steering wheel button ...........4-60
14. Smart phone wireless charger ........4-181
15. Drive mode button .............................5-57
16. AWD Lock button...............................5-23
17. DBC button ........................................5-51
18. Electronic Parking Brake (EPB) switch .5-34
19. Auto Hold On/Off button ....................5-41
20. Parking Safety button ...........................4-122
21. Center console storage box ............4-173
22. USB charger ....................................4-180
23. Power outlet.....................................4-179
24. Glove box ........................................4-173
25. Passenger’s front air bag ..................3-60
OQL018004L❈ The actual shape may differ from the illustration.
Page 102 of 630
413
Features of your vehicle
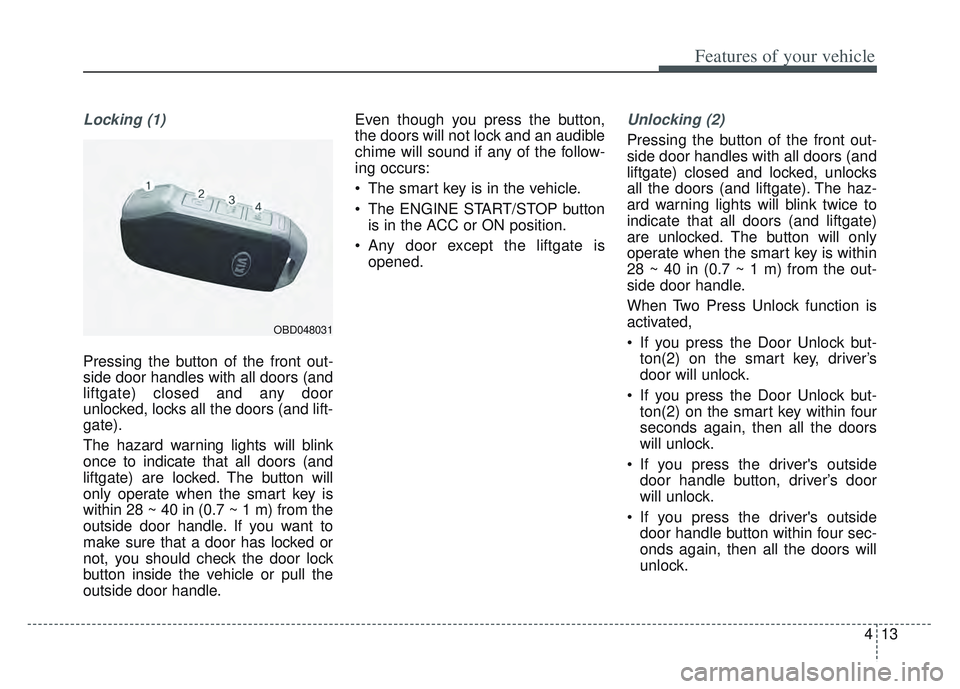
Locking (1)
Pressing the button of the front out-
side door handles with all doors (and
liftgate) closed and any door
unlocked, locks all the doors (and lift-
gate).
The hazard warning lights will blink
once to indicate that all doors (and
liftgate) are locked. The button will
only operate when the smart key is
within 28 ~ 40 in (0.7 ~ 1 m) from the
outside door handle. If you want to
make sure that a door has locked or
not, you should check the door lock
button inside the vehicle or pull the
outside door handle. Even though you press the button,
the doors will not lock and an audible
chime will sound if any of the follow-
ing occurs:
The smart key is in the vehicle.
The ENGINE START/STOP button
is in the ACC or ON position.
Any door except the liftgate is opened.
Unlocking (2)
Pressing the button of the front out-
side door handles with all doors (and
liftgate) closed and locked, unlocks
all the doors (and liftgate). The haz-
ard warning lights will blink twice to
indicate that all doors (and liftgate)
are unlocked. The button will only
operate when the smart key is within
28 ~ 40 in (0.7 ~ 1 m) from the out-
side door handle.
When Two Press Unlock function is
activated,
If you press the Door Unlock but-ton(2) on the smart key, driver’s
door will unlock.
If you press the Door Unlock but- ton(2) on the smart key within four
seconds again, then all the doors
will unlock.
If you press the driver's outside door handle button, driver’s door
will unlock.
If you press the driver's outside door handle button within four sec-
onds again, then all the doors will
unlock.
OBD048031
Page 103 of 630

Features of your vehicle
14
4
✽ ✽
NOTICE
You can active or deactivate the Two
Press Unlock function from the User
Settings mode in the LCD display.
Refer to “User Settings” in this
chapter.
Liftgate unlocking (3)
If you are within 28 ~ 40 in (0.7 ~ 1 m)
from the outside liftgate handle, with
your smart key in possession, the lift-
gate will unlock and open when you
press the liftgate handle switch.
The hazard warning lights will blink
twice to indicate that the liftgate is
unlocked.
Also, once the liftgate is opened and
then closed, the liftgate will lock
automatically.
Panic (4)
1. Press the panic button (4) for more than 1 second.
2. The horn sounds and hazard warning light flash for about 27
seconds.
✽ ✽NOTICE
To stop the horn and lights, press
any button on the smart key.
Engine start
You can start the engine without insert-
ing the key. For detailed information
refer to the “ENGINE START/STOP
button” in chapter 5.
Page 106 of 630
417
Features of your vehicle
Smart key immobilizer system
Your vehicle is equipped with an
electronic engine immobilizer system
to reduce the risk of unauthorized
vehicle use.
Your immobilizer system is com-
prised of a small transponder in the
smart key and electronic devices
inside the vehicle.
With the immobilizer system, whenev-
er you turn the ENGINE START/STOP
button to the ON position by pressing
the button while carrying the smart
key, it verifies if the smart key is valid.
If the key is determined to be valid,
the engine will start.
If the key is determined to be invalid,
the engine will not start.
✽ ✽ NOTICE
Do not put metal accessories near
the ignition switch.
Metal accessories may interrupt the
transponder signal and may prevent
the engine from being started.CAUTION - Smart key
damage
Do not drop, get wet or expose
the smart key to heat or sun-light, or it will be damaged.
Page 107 of 630
Features of your vehicle
18
4
To deactivate the immobilizer
system:
Turn the ENGINE START/STOP but-
ton to the ON position by pressing
the button while carrying the smart
key.
In order to prevent theft of your vehi-
cle, do not leave spare keys any-
where in your vehicle.
To activate the immobilizer system:
Turn the ENGINE START/STOP but-
ton to the OFF position. The immobi-
lizer system activates automatically.
Without a valid smart key for your
vehicle, the engine will not start.
✽ ✽ NOTICE
When starting the engine, do not use
the key with other immobilizer keys
around. Otherwise the engine may
not start or may stop soon after it
starts. Keep each key separate in
order to avoid a starting malfunction.
✽ ✽NOTICE
If you need additional keys or lose
your keys, contact an authorized
Kia dealer.✽ ✽NOTICE - Immobilizer alter-
ations
Do not change, alter or adjust the
immobilizer system because it could
cause the immobilizer system to
malfunction.
CAUTION- Immobilizer
damage
Do not expose your immobilizersystem to moisture, static elec-tricity or rough handling. Thismay damage your immobilizer.
Page 111 of 630
Features of your vehicle
22
4
✽ ✽
NOTICE
• Avoid trying to start the engine
while the alarm is activated. The
vehicle starting motor is disabled
during the theft-alarm stage.
- If the system is not disarmed withthe transmitter, insert the key
into the ignition switch, turn the
ignition switch to the ON position
and wait for 30 seconds. Then the
system will be disarmed.
- If the system is not disarmed with the smart key, press the engine
start/stop button with smart key.
The side with the lock button
should contact the engine
start/stop button directly.
• If you lose your keys, consult your authorized Kia dealer.
✽ ✽ NOTICE
Malfunctions caused by improper
alterations, adjustments or modifi-
cations to the theft-alarm system are
not covered by your vehicle manu-
facturer warranty.
CAUTION - Adjusting
alarm system
Do not change, alter or adjust
the theft-alarm system becauseit could cause the theft-alarmsystem to malfunction andshould only be serviced by anauthorized Kia dealer.
Page 167 of 630
Features of your vehicle
78
4
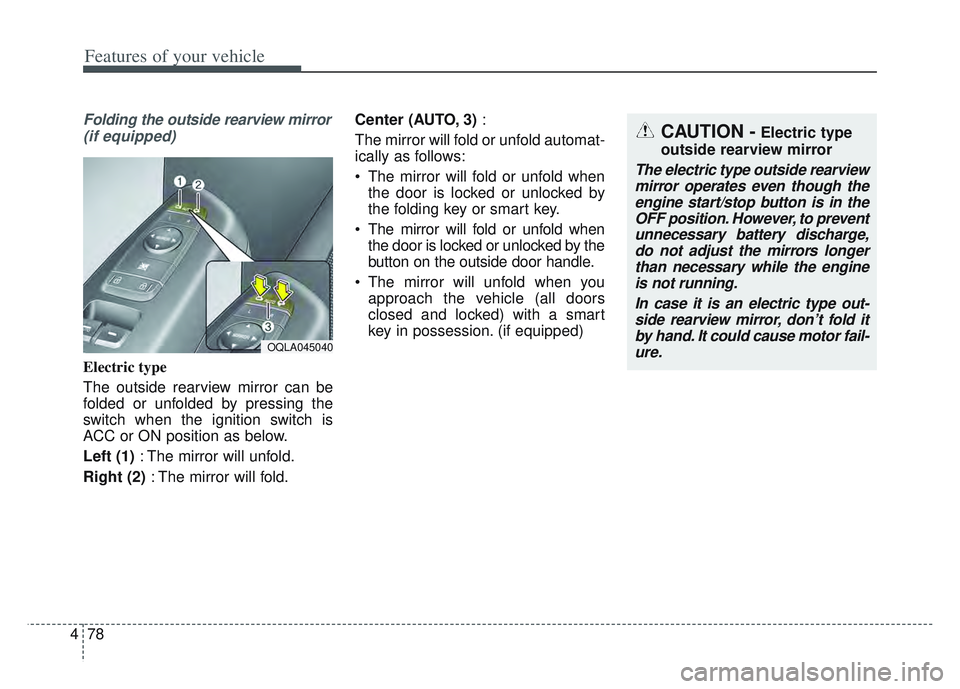
Folding the outside rearview mirror
(if equipped)
Electric type
The outside rearview mirror can be
folded or unfolded by pressing the
switch when the ignition switch is
ACC or ON position as below.
Left (1) : The mirror will unfold.
Right (2) : The mirror will fold. Center (AUTO, 3)
:
The mirror will fold or unfold automat-
ically as follows:
The mirror will fold or unfold when the door is locked or unlocked by
the folding key or smart key.
The mirror will fold or unfold when the door is locked or unlocked by the
button on the outside door handle.
The mirror will unfold when you approach the vehicle (all doors
closed and locked) with a smart
key in possession. (if equipped)
OQLA045040
CAUTION -Electric type
outside rearview mirror
The electric type outside rearview mirror operates even though theengine start/stop button is in theOFF position. However, to preventunnecessary battery discharge,do not adjust the mirrors longerthan necessary while the engineis not running.
In case it is an electric type out-side rearview mirror, don’t fold itby hand. It could cause motor fail-ure.
Page 170 of 630
481
Features of your vehicle
Instrument Cluster Control
Adjusting Instrument ClusterIllumination
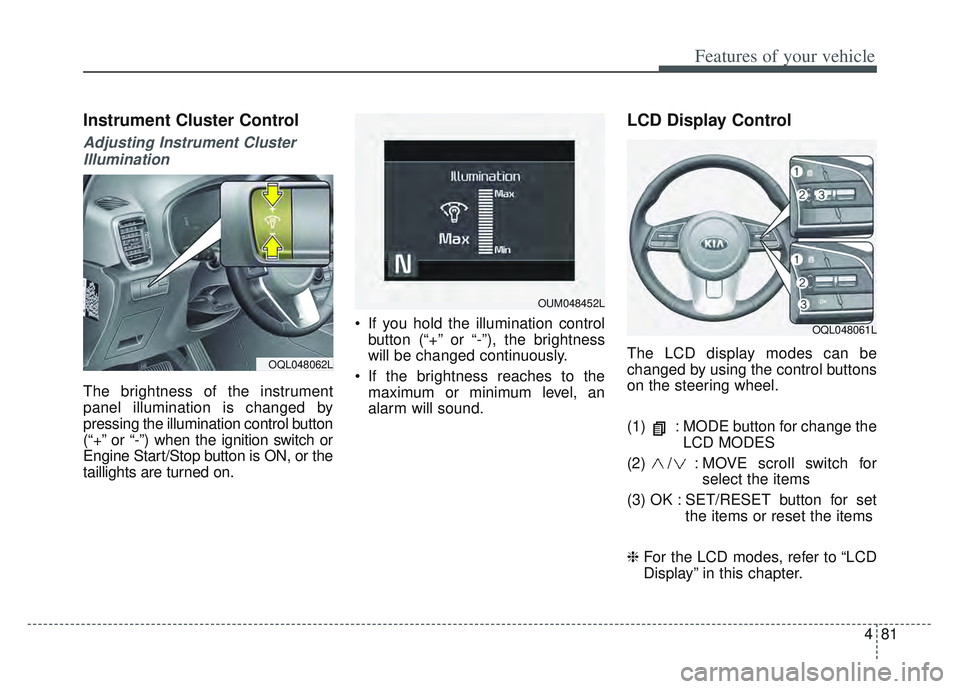
The brightness of the instrument
panel illumination is changed by
pressing the illumination control button
(“+” or “-”) when the ignition switch or
Engine Start/Stop button is ON, or the
taillights are turned on. If you hold the illumination control
button (“+” or “-”), the brightness
will be changed continuously.
If the brightness reaches to the maximum or minimum level, an
alarm will sound.
LCD Display Control
The LCD display modes can be
changed by using the control buttons
on the steering wheel.
(1) : MODE button for change the LCD MODES
(2) / : MOVE scroll switch for select the items
(3) OK : SET/RESET button for set the items or reset the items
❈ For the LCD modes, refer to “LCD
Display” in this chapter.OQL048062L
OQL048061L
OUM048452L
Page 171 of 630
Features of your vehicle
82
4
Gauges
Speedometer
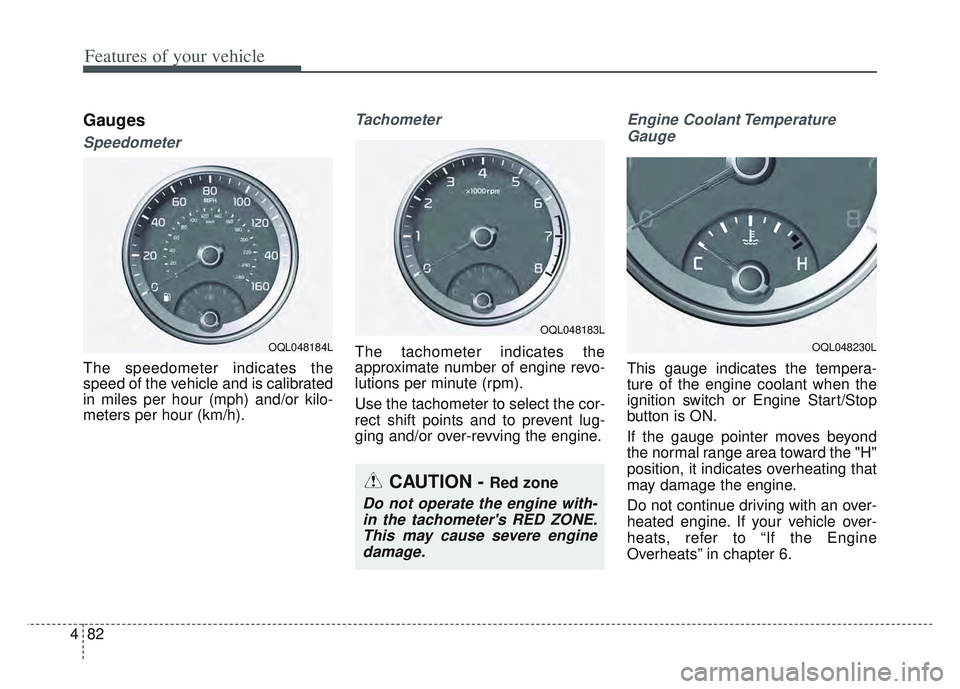
The speedometer indicates the
speed of the vehicle and is calibrated
in miles per hour (mph) and/or kilo-
meters per hour (km/h).
Tachometer
The tachometer indicates the
approximate number of engine revo-
lutions per minute (rpm).
Use the tachometer to select the cor-
rect shift points and to prevent lug-
ging and/or over-revving the engine.
Engine Coolant Temperature
Gauge
This gauge indicates the tempera-
ture of the engine coolant when the
ignition switch or Engine Start/Stop
button is ON.
If the gauge pointer moves beyond
the normal range area toward the "H"
position, it indicates overheating that
may damage the engine.
Do not continue driving with an over-
heated engine. If your vehicle over-
heats, refer to “If the Engine
Overheats” in chapter 6.
OQL048184L
CAUTION - Red zone
Do not operate the engine with-in the tachometer's RED ZONE.This may cause severe enginedamage.
OQL048183L
OQL048230L
Page 177 of 630
Features of your vehicle
88
4
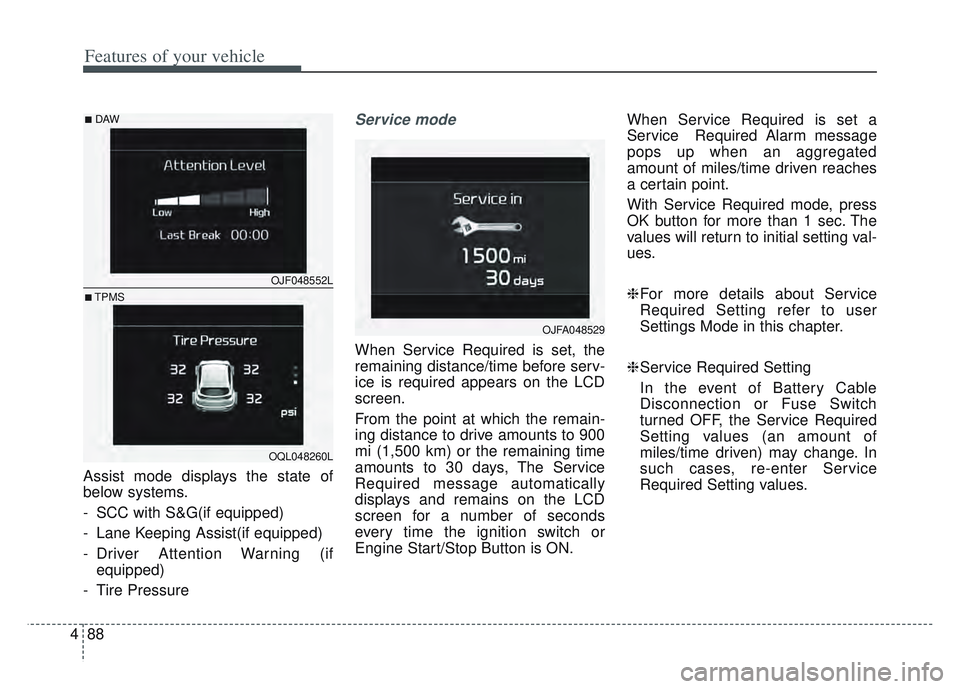
Assist mode displays the state of
below systems.
- SCC with S&G(if equipped)
- Lane Keeping Assist(if equipped)
- Driver Attention Warning (if
equipped)
- Tire Pressure
Service mode
When Service Required is set, the
remaining distance/time before serv-
ice is required appears on the LCD
screen.
From the point at which the remain-
ing distance to drive amounts to 900
mi (1,500 km) or the remaining time
amounts to 30 days, The Service
Required message automatically
displays and remains on the LCD
screen for a number of seconds
every time the ignition switch or
Engine Start/Stop Button is ON. When Service Required is set a
Service Required Alarm message
pops up when an aggregated
amount of miles/time driven reaches
a certain point.
With Service Required mode, press
OK button for more than 1 sec. The
values will return to initial setting val-
ues.
❈
For more details about Service
Required Setting refer to user
Settings Mode in this chapter.
❈ Service Required Setting
In the event of Battery Cable
Disconnection or Fuse Switch
turned OFF, the Service Required
Setting values (an amount of
miles/time driven) may change. In
such cases, re-enter Service
Required Setting values.
OJFA048529
OJF048552L
OQL048260L
■DAW
■TPMS