warning lights KIA SPORTAGE 2022 Owners Manual
[x] Cancel search | Manufacturer: KIA, Model Year: 2022, Model line: SPORTAGE, Model: KIA SPORTAGE 2022Pages: 630, PDF Size: 9.69 MB
Page 71 of 630
Safety features of your vehicle
54
3
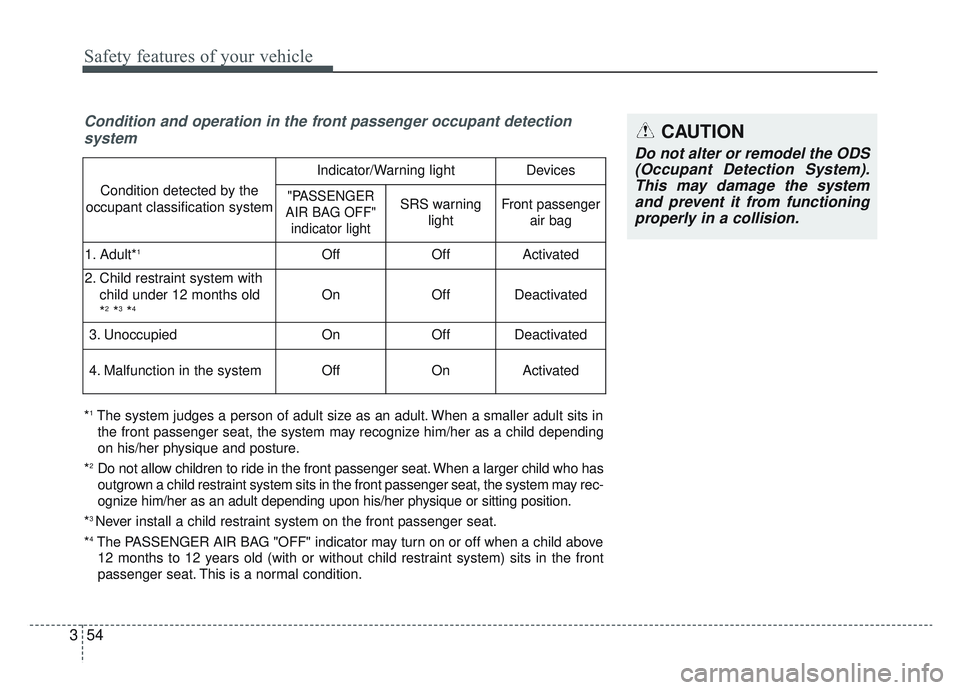
Condition and operation in the front passenger occupant detection
system
*1The system judges a person of adult size as an adult. When a smaller adult sits in
the front passenger seat, the system may recognize him/her as a child depending
on his/her physique and posture.
*
2Do not allow children to ride in the front passenger seat. When a larger child who has
outgrown a child restraint system sits in the front passenger seat, the system may rec-
ognize him/her as an adult depending upon his/her physique or sitting position.
*
3 Never install a child restraint system on the front passenger seat.
*
4The PASSENGER AIR BAG "OFF" indicator may turn on or off when a child above 12 months to 12 years old (with or without child restraint system) sits in the front
passenger seat. This is a normal condition.
Condition detected by the
occupant classification system
Indicator/Warning lightDevices
"PASSENGER
AIR BAG OFF" indicator lightSRS warning lightFront passenger air bag
1. Adult*1OffOffActivated
2. Child restraint system with
child under 12 months old
*
2*3*4OnOffDeactivated
3. Unoccupied OnOffDeactivated
4. Malfunction in the systemOffOnActivated
CAUTION
Do not alter or remodel the ODS(Occupant Detection System).This may damage the systemand prevent it from functioningproperly in a collision.
Page 72 of 630
355
Safety features of your vehicle
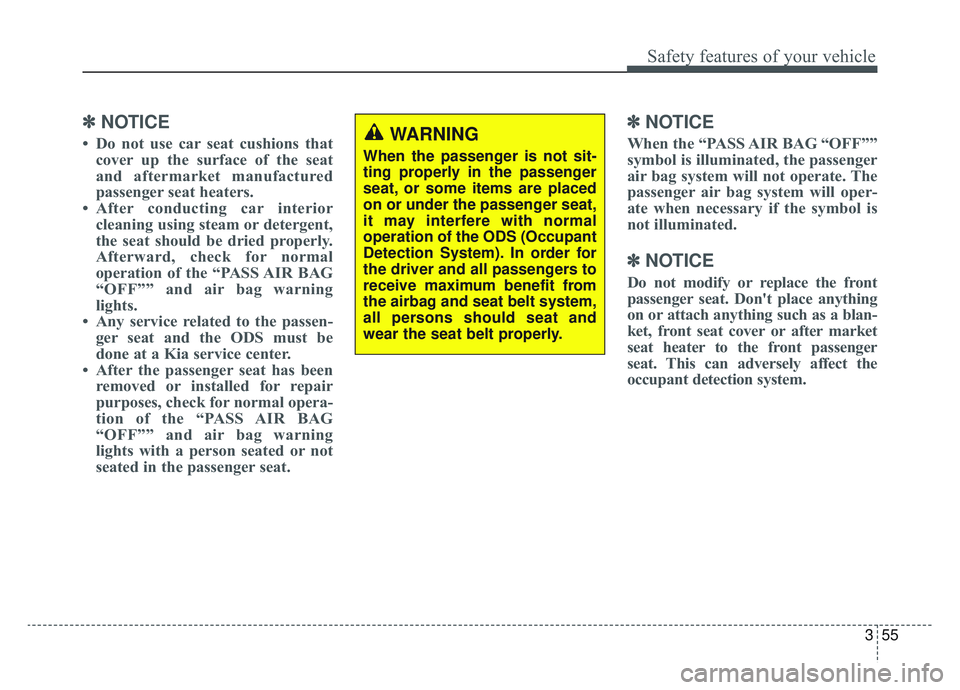
✽ ✽NOTICE
• Do not use car seat cushions that
cover up the surface of the seat
and aftermarket manufactured
passenger seat heaters.
• After conducting car interior cleaning using steam or detergent,
the seat should be dried properly.
Afterward, check for normal
operation of the “PASS AIR BAG
“OFF”” and air bag warning
lights.
• Any service related to the passen- ger seat and the ODS must be
done at a Kia service center.
• After the passenger seat has been removed or installed for repair
purposes, check for normal opera-
tion of the “PASS AIR BAG
“OFF”” and air bag warning
lights with a person seated or not
seated in the passenger seat.
✽ ✽ NOTICE
When the “PASS AIR BAG “OFF””
symbol is illuminated, the passenger
air bag system will not operate. The
passenger air bag system will oper-
ate when necessary if the symbol is
not illuminated.
✽ ✽NOTICE
Do not modify or replace the front
passenger seat. Don't place anything
on or attach anything such as a blan-
ket, front seat cover or after market
seat heater to the front passenger
seat. This can adversely affect the
occupant detection system.
WARNING
When the passenger is not sit-
ting properly in the passenger
seat, or some items are placed
on or under the passenger seat,
it may interfere with normal
operation of the ODS (Occupant
Detection System). In order for
the driver and all passengers to
receive maximum benefit from
the airbag and seat belt system,
all persons should seat and
wear the seat belt properly.
Page 91 of 630
Steering wheel . . . . . . . . . . . . . . . . . . . . . . . . . . . . . 4-58
• Electronic Power Steering (EPS) . . . . . . . . . . . . . . . . 4-58
• Tilt and telescopic steering . . . . . . . . . . . . . . . . . . . . . 4-59
• Heated steering wheel . . . . . . . . . . . . . . . . . . . . . . . . . 4-60
• Horn . . . . . . . . . . . . . . . . . . . . . . . . . . . . . . . . . . . . \
. . . 4-61
Mirrors . . . . . . . . . . . . . . . . . . . . . . . . . . . . . . . . . . 4-62\
• Inside rearview mirror . . . . . . . . . . . . . . . . . . . . . . . . 4-62
• Outside rearview mirror. . . . . . . . . . . . . . . . . . . . . . . 4-76
Instrument cluster . . . . . . . . . . . . . . . . . . . . . . . . . 4-80
• Instrument cluster control . . . . . . . . . . . . . . . . . . . . . 4-81
• LCD display control . . . . . . . . . . . . . . . . . . . . . . . . . . 4-81
• Gauges . . . . . . . . . . . . . . . . . . . . . . . . . . . . . . . . . . . . \
. 4-82
• Transmission shift indicator . . . . . . . . . . . . . . . . . . . . 4-85
LCD display . . . . . . . . . . . . . . . . . . . . . . . . . . . . . . 4-86
• LCD modes. . . . . . . . . . . . . . . . . . . . . . . . . . . . . . . . . . 4-86\
• User settings mode. . . . . . . . . . . . . . . . . . . . . . . . . . . . 4-89
Trip modes (Trip computer) . . . . . . . . . . . . . . . . . 4-94
• Trip modes . . . . . . . . . . . . . . . . . . . . . . . . . . . . . . . . . . 4-94\
• Fuel economy . . . . . . . . . . . . . . . . . . . . . . . . . . . . . . . . 4-94
• Warning messages . . . . . . . . . . . . . . . . . . . . . . . . . . . . 4-97
Warning and indicator lights . . . . . . . . . . . . . . . 4-104
• Warning lights . . . . . . . . . . . . . . . . . . . . . . . . . . . . . . 4-104
• Indicator lights . . . . . . . . . . . . . . . . . . . . . . . . . . . . . . 4-111
Rear View Monitor (RVM) . . . . . . . . . . . . . . . . . 4-117Reverse Parking Distance Warning (PDW). . . . 4-118
• Operation of Reverse Parking Distance Warning . . . 4-118
• Non-operational conditions of Reverse Parking
Distance Warning . . . . . . . . . . . . . . . . . . . . . . . . . . 4-119
• Reverse Parking Distance Warning precautions . . 4-119
• Self-diagnosis . . . . . . . . . . . . . . . . . . . . . . . . . . . . . . . 4-121
Forward/Reverse Parking Distance Warning (PDW) . . . . . . . . . . . . . . . . . . . . . . . . . . . . . . . . . 4-122
• Operation of Parking Distance Warning . . . . . . . . 4-122
• Non-operational conditions of Parking Distance
Warning . . . . . . . . . . . . . . . . . . . . . . . . . . . . . . . . . . 4-12\
4
• Self-diagnosis . . . . . . . . . . . . . . . . . . . . . . . . . . . . . . . 4-126
Lighting . . . . . . . . . . . . . . . . . . . . . . . . . . . . . . . . . 4-127
• Battery saver function. . . . . . . . . . . . . . . . . . . . . . . . 4-127
• Daytime running light . . . . . . . . . . . . . . . . . . . . . . . . 4-127
• Lighting control . . . . . . . . . . . . . . . . . . . . . . . . . . . . . 4-127
• High beam operation. . . . . . . . . . . . . . . . . . . . . . . . . 4-129
• High Beam Assist (HBA) . . . . . . . . . . . . . . . . . . . . . 4-130
• Turn signals and lane change signals . . . . . . . . . . . 4-132
• Front fog light . . . . . . . . . . . . . . . . . . . . . . . . . . . . . . 4-133
• Check headlight . . . . . . . . . . . . . . . . . . . . . . . . . . . . . 4-133
• Dynamic Bending Light (DBL) . . . . . . . . . . . . . . . . 4-134
Wipers and washers . . . . . . . . . . . . . . . . . . . . . . . 4-135
• Windshield wipers . . . . . . . . . . . . . . . . . . . . . . . . . . . 4-135
• Front windshield washers . . . . . . . . . . . . . . . . . . . . . 4-136
4
Page 95 of 630

Features of your vehicle
64
Door Lock (1)
1. Close all doors, engine hood andliftgate.
2. Press the lock button(1).
3. All doors and liftgate will lock. The hazard warning lights will blink
once.
4. If the lock button is pressed once more within 4 seconds, the hazard
warning lights will blink.
5. Make sure that doors are locked by checking the door lock button inside
or pulling the outside door handle.
Door Unlock (2)
1. Press the unlock button(2).
2. The driver's door will unlock. Thehazard warning lights will blink two
times.
3. Press the unlock button(2) twice within 4 seconds and all doors and
liftgate will unlock. The hazard
warning lights will blink two times.
✽ ✽NOTICE
You can activate or deactivate the
Two Turn Unlock function.
Refer to "User settings" in this
chapter.
WARNING- Ignition key
Never leave the keys in your
vehicle with unsupervised chil-
dren. Leaving children unat-
tended in a vehicle with a man-
ual ignition key or a smart key
is dangerous. Children copy
adults and they could place the
key in the ignition switch or
press the start button. The key
would enable children to oper-
ate power windows or other
controls, or even make the vehi-
cle move, which could result in
serious bodily injury or death.
OBD048030
Page 102 of 630
413
Features of your vehicle
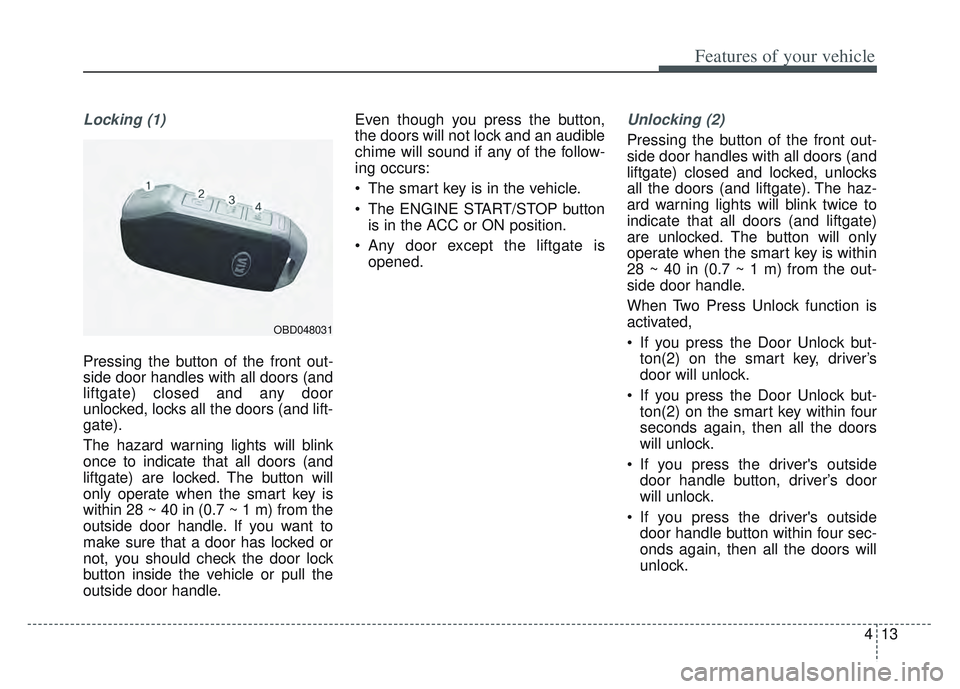
Locking (1)
Pressing the button of the front out-
side door handles with all doors (and
liftgate) closed and any door
unlocked, locks all the doors (and lift-
gate).
The hazard warning lights will blink
once to indicate that all doors (and
liftgate) are locked. The button will
only operate when the smart key is
within 28 ~ 40 in (0.7 ~ 1 m) from the
outside door handle. If you want to
make sure that a door has locked or
not, you should check the door lock
button inside the vehicle or pull the
outside door handle. Even though you press the button,
the doors will not lock and an audible
chime will sound if any of the follow-
ing occurs:
The smart key is in the vehicle.
The ENGINE START/STOP button
is in the ACC or ON position.
Any door except the liftgate is opened.
Unlocking (2)
Pressing the button of the front out-
side door handles with all doors (and
liftgate) closed and locked, unlocks
all the doors (and liftgate). The haz-
ard warning lights will blink twice to
indicate that all doors (and liftgate)
are unlocked. The button will only
operate when the smart key is within
28 ~ 40 in (0.7 ~ 1 m) from the out-
side door handle.
When Two Press Unlock function is
activated,
If you press the Door Unlock but-ton(2) on the smart key, driver’s
door will unlock.
If you press the Door Unlock but- ton(2) on the smart key within four
seconds again, then all the doors
will unlock.
If you press the driver's outside door handle button, driver’s door
will unlock.
If you press the driver's outside door handle button within four sec-
onds again, then all the doors will
unlock.
OBD048031
Page 103 of 630

Features of your vehicle
14
4
✽ ✽
NOTICE
You can active or deactivate the Two
Press Unlock function from the User
Settings mode in the LCD display.
Refer to “User Settings” in this
chapter.
Liftgate unlocking (3)
If you are within 28 ~ 40 in (0.7 ~ 1 m)
from the outside liftgate handle, with
your smart key in possession, the lift-
gate will unlock and open when you
press the liftgate handle switch.
The hazard warning lights will blink
twice to indicate that the liftgate is
unlocked.
Also, once the liftgate is opened and
then closed, the liftgate will lock
automatically.
Panic (4)
1. Press the panic button (4) for more than 1 second.
2. The horn sounds and hazard warning light flash for about 27
seconds.
✽ ✽NOTICE
To stop the horn and lights, press
any button on the smart key.
Engine start
You can start the engine without insert-
ing the key. For detailed information
refer to the “ENGINE START/STOP
button” in chapter 5.
Page 109 of 630

Features of your vehicle
20
4
This system is designed to provide
protection from unauthorized entry
into the vehicle. This system is oper-
ated in three stages: the first is the
"Armed" stage, the second is the
"Theft-alarm" stage, and the third is
the "Disarmed" stage. If triggered,
the system provides an audible
alarm with blinking of the hazard
warning lights.
Armed stage
Park the vehicle and stop the engine.
Arm the system as described below.
1. Remove the ignition key from the
ignition switch and exit the vehicle.
2. Make sure that all doors (and lift- gate) and engine hood are closed
and latched.
3. Lock the doors using the transmit- ter of the keyless entry system (or
smart key) or ignition key.
After completion of the steps above,
the hazard warning lights will blink
(for smart key, the chime also
sounds) once to indicate that the
system is armed. If any door (or liftgate) or engine
hood remains open, the hazard
warning lights and the chime will not
operate and the theft-alarm will not
arm. If all doors and liftgate and
engine hood are closed after the lock
button is pressed, the hazard warn-
ing lights blink once.
The system can also be armed by
locking the doors with the key from
the front doors; however, the hazard
warning lights will not blink using this
method.
✽ ✽
NOTICE
The theft-alarm system can be deac-
tivated by an authorized Kia dealer.
If you want this feature, consult an
authorized Kia dealer.
THEFT-ALARM SYSTEM
Armed
stage
Theft-alarm stageDisarmedstage
Page 110 of 630
421
Features of your vehicle
Do not arm the system until all
passengers have left the vehicle. If
the system is armed while a pas-
senger(s) remains in the vehicle,
the alarm may be activated when
the remaining passenger(s) leave
the vehicle. If any door (or liftgate
) or engine hood is opened within
30 seconds after the system
enters the armed stage, the sys-
tem is disarmed to prevent an
unnecessary alarm.Theft-alarm stage
The alarm will be activated if any of
the following occurs while the system
is armed.
A front or rear door is opened with-out using the ignition key or trans-
mitter (or smart key).
The liftgate is opened without using the transmitter (or smart key).
The engine hood is opened.
The horn will sound and the hazard
warning lights will blink continuously
for approximately 27 seconds, and
repeat the horn 3 times unless the
system is disarmed. To turn off the
system, unlock the doors with the igni-
tion key or transmitter (or smart key).
Disarmed stage
The system will be disarmed when
The doors (and liftgate) are unlocked with the transmitter (or
smart key) or the ignition key.
After depressing the unlock button,
the hazard warning lights will blink
and the chime will sound twice (in
smart key) to indicate that the sys-
tem is disarmed.
After depressing the unlock button, if
any door (or liftgate) is not opened
within 30 seconds, the system will be
rearmed.
Page 127 of 630
Features of your vehicle
38
4
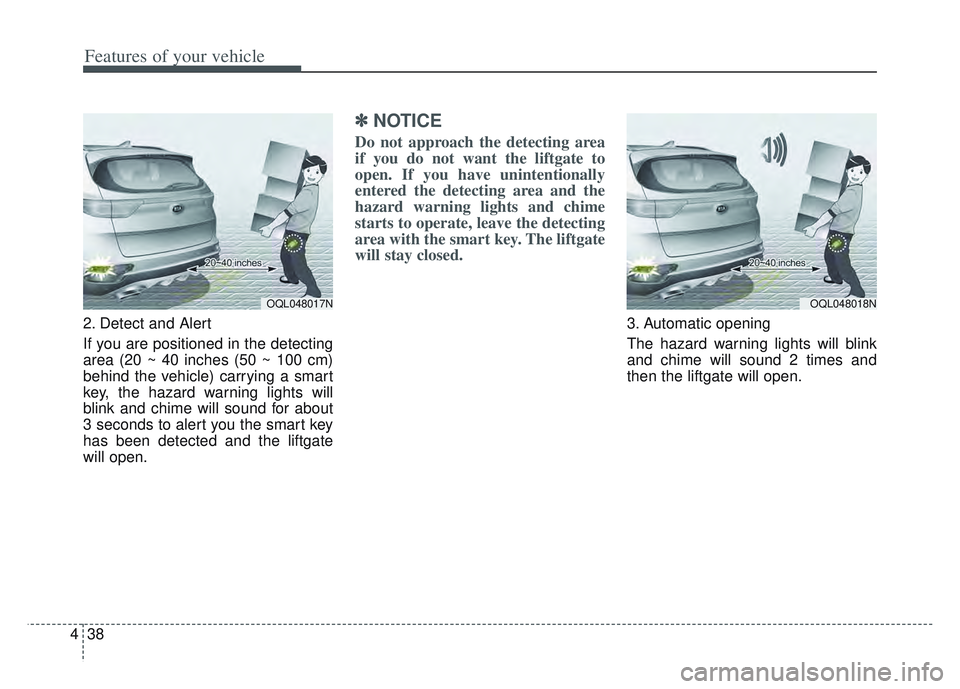
2. Detect and Alert
If you are positioned in the detecting
area (20 ~ 40 inches (50 ~ 100 cm)
behind the vehicle) carrying a smart
key, the hazard warning lights will
blink and chime will sound for about
3 seconds to alert you the smart key
has been detected and the liftgate
will open.
✽ ✽
NOTICE
Do not approach the detecting area
if you do not want the liftgate to
open. If you have unintentionally
entered the detecting area and the
hazard warning lights and chime
starts to operate, leave the detecting
area with the smart key. The liftgate
will stay closed.
3. Automatic opening
The hazard warning lights will blink
and chime will sound 2 times and
then the liftgate will open.
OQL048018NOQL048017N
Page 148 of 630
459
Features of your vehicle
(Continued)
• When the charging system warninglight comes on due to the low volt-
age (When the alternator or bat-
tery) does not operate normally or
malfunctions), the steering wheel
may require increased steering
effort.Tilt and telescopic steering
Tilt and telescopic steering allows
you to adjust the steering wheel
before you drive. You can also raise it
to give your legs more room when
you exit and enter the vehicle.
The steering wheel should be posi-
tioned so that it is comfortable for
you to drive, while permitting you to
see the instrument panel warning
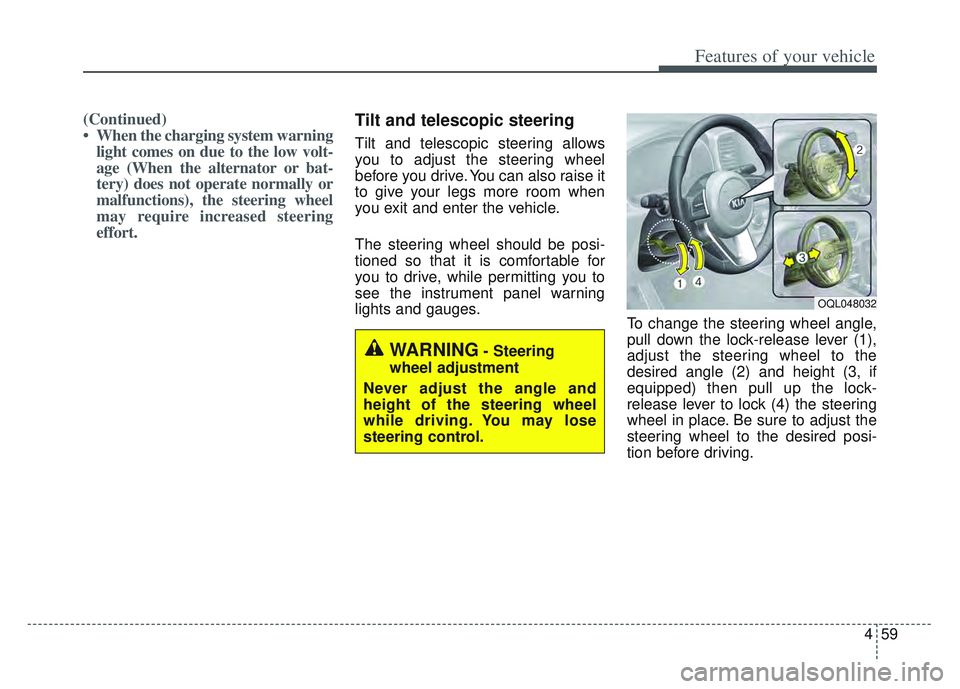
lights and gauges. To change the steering wheel angle,
pull down the lock-release lever (1),
adjust the steering wheel to the
desired angle (2) and height (3, if
equipped) then pull up the lock-
release lever to lock (4) the steering
wheel in place. Be sure to adjust the
steering wheel to the desired posi-
tion before driving.
WARNING- Steering
wheel adjustment
Never adjust the angle and
height of the steering wheel
while driving. You may lose
steering control.
OQL048032