check KIA STINGER 2018 User Guide
[x] Cancel search | Manufacturer: KIA, Model Year: 2018, Model line: STINGER, Model: KIA STINGER 2018Pages: 551, PDF Size: 13.75 MB
Page 65 of 551
349
Safety features of your vehicle
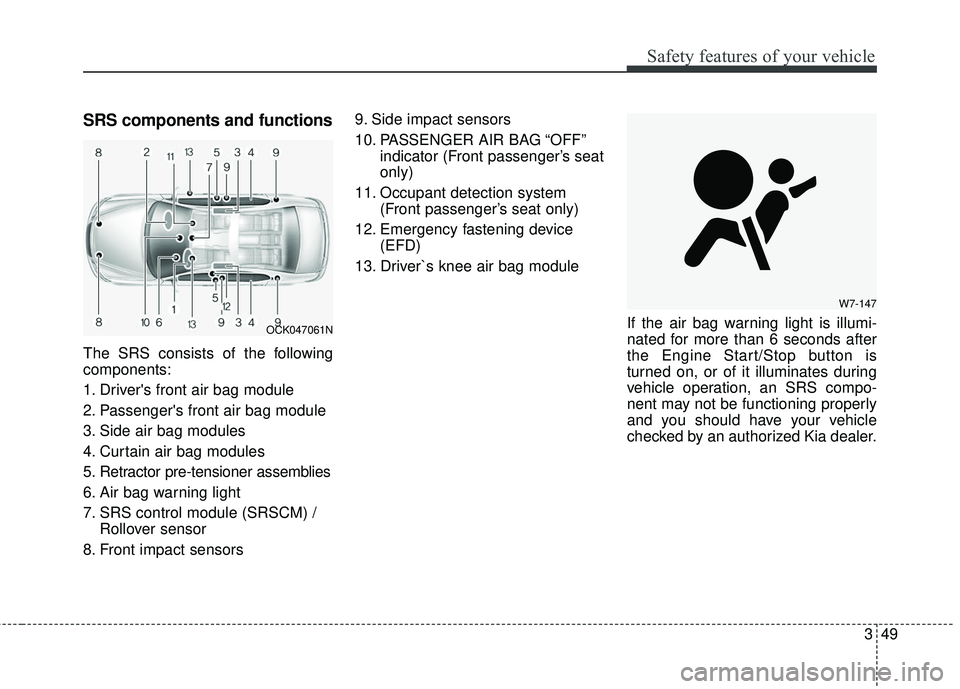
SRS components and functions
The SRS consists of the following
components:
1. Driver's front air bag module
2. Passenger's front air bag module
3. Side air bag modules
4. Curtain air bag modules
5. Retractor pre-tensioner assemblies
6. Air bag warning light
7. SRS control module (SRSCM) /Rollover sensor
8. Front impact sensors 9. Side impact sensors
10. PASSENGER AIR BAG “OFF”
indicator (Front passenger’s seat
only)
11. Occupant detection system (Front passenger’s seat only)
12. Emergency fastening device (EFD)
13. Driver`s knee air bag module
If the air bag warning light is illumi-
nated for more than 6 seconds after
the Engine Start/Stop button is
turned on, or of it illuminates during
vehicle operation, an SRS compo-
nent may not be functioning properly
and you should have your vehicle
checked by an authorized Kia dealer.
W7-147
OCK047061N
Page 71 of 551
355
Safety features of your vehicle
✽ ✽NOTICE
• Do not use car seat cushions that
cover up the surface of the seat
and aftermarket manufactured
passenger seat heaters.
• After conducting car interior clean- ing using steam or detergent, the
seat should be dried properly.
Afterward, check for normal oper-
ation of the “PASS AIR BAG
“OFF” and air bag warning lights.
• Any service related to the passen- ger seat and the ODS must be
done at Kia service center.
• After the passenger seat has been removed or installed for repair
purposes, check for normal opera-
tion of the “PASS AIR BAG
“OFF” and air bag warning lights
with a person seated or not seated
in the passenger seat.
✽ ✽ NOTICE
When the “PASS AIR BAG “OFF”
symbol is illuminated, the passenger
air bag system will not operate. The
passenger air bag system will oper-
ate when necessary if the symbol is
not illuminated.
✽ ✽NOTICE
Do not modify or replace the front
passenger seat. Don't place anything
on or attach anything such as a blan-
ket, front seat cover or after market
seat heater to the front passenger
seat. This can adversely affect the
occupant detection system.
WARNING - ODS System
Riding in an improper position
adversely affects the Occupant
Detection System and may
result in the deactivation of the
front passenger airbag. It is
important for the driver to
instruct the passenger as to the
proper seating instructions as
contained in this manual.
Page 79 of 551
363
Safety features of your vehicle
The side air bag is supplemental tothe driver's and the passenger's
seat belt systems and is not a sub-
stitute for them. Therefore your
seat belts must be worn at all times
while the vehicle is in operation.
For best protection from the side air bag system and to avoid being
injured by the deploying side air
bag, both front seat occupants
should sit in an upright position
with the seat belt properly fas-
tened. The driver's hands should
be placed on the steering wheel at
the 9:00 and 3:00 positions. The
passenger's arms and hands
should be placed on their laps. If seat or seat cover is damaged,
have the vehicle checked and
repaired by an authorized Kia deal-
er. Inform the dealer that your vehi-
cle is equipped with side air bags
and an occupant detection system.
WARNING- Flying objects
Do not place any objects (an
umbrella, bag, etc.) between the
front door and the front seat.
Such objects may become dan-
gerous projectiles if the side
airbag inflates.
WARNING- Deployment
Do not install any accessories
including seat covers, on the
side or near the side air bag as
this may affect the deployment
of the side air bags.WARNING- Unexpected deployment
Avoid impact to the side impact
airbag sensor when the Engine
Start/Stop button is ON to pre-
vent unexpected deployment of
the side air bag.WARNING - No attaching
objects
Do not place any objects over the air bag or between the air
bag and yourself. Also, do not
attach any objects around the
area the air bag inflates such
as the door, side door glass,
front and rear pillar.
Do not put any objects between the side airbag label
and seat cushion. It could
cause harm if the vehicle is in
a crash severe enough to
cause the air bags to deploy.
Never place or insert any object into any small opening
near side airbag labels
attached to the vehicle seats.
When the air bag deploys, the
object may affect the deploy-
ment and result in unexpected
accident or bodily harm.
Do not install any accessories on the side or near the side air
bags.
Page 82 of 551
Safety features of your vehicle
66
3
Problems may arise if the sensor
installation angles are changed due
to the deformation of the front
bumper, front end module, body or
front doors where side collision sen-
sors are installed. Have the vehicle
checked and repaired by an author-
ized Kia dealer.
Installing bumper guards (or side
step or running board) or replacing a
bumper (or front door module) with
non-genuine parts may adversely
affect your vehicle’s collision and air
bag deployment performance.Air bag inflation conditions
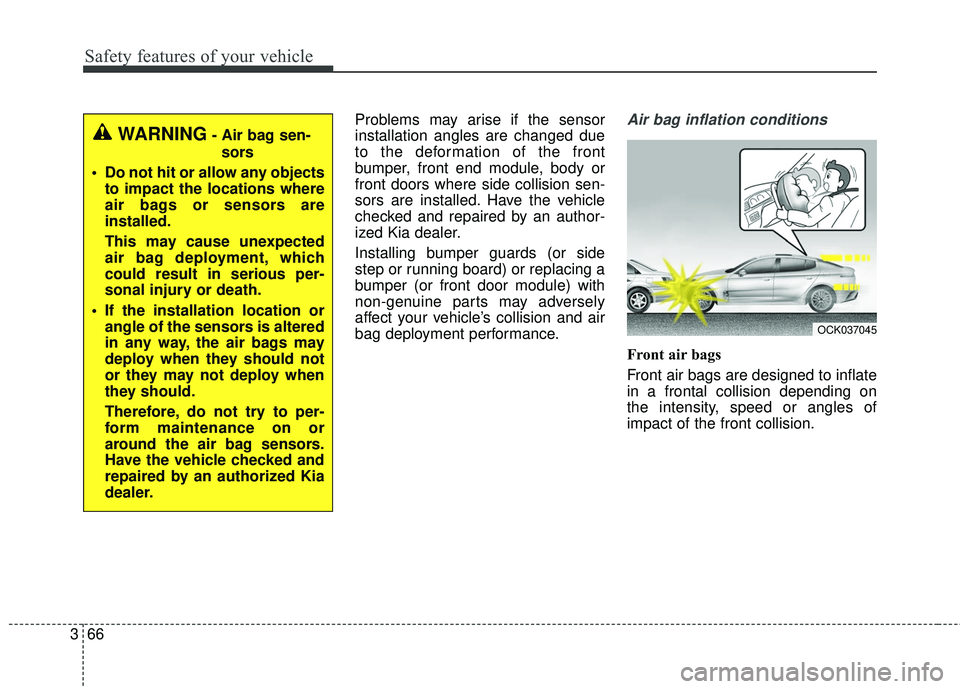
Front air bags
Front air bags are designed to inflate
in a frontal collision depending on
the intensity, speed or angles of
impact of the front collision.
OCK037045
WARNING- Air bag sen-
sors
Do not hit or allow any objects to impact the locations where
air bags or sensors are
installed.
This may cause unexpected
air bag deployment, which
could result in serious per-
sonal injury or death.
If the installation location or angle of the sensors is altered
in any way, the air bags may
deploy when they should not
or they may not deploy when
they should.
Therefore, do not try to per-
form maintenance on or
around the air bag sensors.
Have the vehicle checked and
repaired by an authorized Kia
dealer.
Page 89 of 551

Mirrors . . . . . . . . . . . . . . . . . . . . . . . . . . . . . . . . . . 4-55\
• Inside rearview mirror . . . . . . . . . . . . . . . . . . . . . . . . 4-55
• Automatic-dimming function . . . . . . . . . . . . . . . . . . . 4-57
• Compass function . . . . . . . . . . . . . . . . . . . . . . . . . . . . 4-57
• Programming HomeLink
®. . . . . . . . . . . . . . . . . . . . . 4-60
• Standard programming . . . . . . . . . . . . . . . . . . . . . . . 4-60
• Rolling code programming . . . . . . . . . . . . . . . . . . . . . 4-61
• Gate operator & Canadian programming . . . . . . . . 4-62
• Operating HomeLink
®. . . . . . . . . . . . . . . . . . . . . . . . 4-62
• Reprogramming a single HomeLink®button. . . . . . 4-62
• Erasing HomeLink®buttons . . . . . . . . . . . . . . . . . . . 4-63
• Outside rearview mirror. . . . . . . . . . . . . . . . . . . . . . . 4-64
Instrument cluster . . . . . . . . . . . . . . . . . . . . . . . . . 4-67
• Instrument cluster control . . . . . . . . . . . . . . . . . . . . . 4-68
• LCD display control . . . . . . . . . . . . . . . . . . . . . . . . . . 4-68
• Gauges . . . . . . . . . . . . . . . . . . . . . . . . . . . . . . . . . . . . \
. 4-69
• Transaxle Shift Indicator . . . . . . . . . . . . . . . . . . . . . . 4-72
LCD windows . . . . . . . . . . . . . . . . . . . . . . . . . . . . . 4-73
• Over view . . . . . . . . . . . . . . . . . . . . . . . . . . . . . . . . . . . 4-\
73
• Trip information (Trip computer) . . . . . . . . . . . . . . . 4-73
• LCD modes. . . . . . . . . . . . . . . . . . . . . . . . . . . . . . . . . .\
4-77
• Distance to empty . . . . . . . . . . . . . . . . . . . . . . . . . . . . 4-81
• User settings mode. . . . . . . . . . . . . . . . . . . . . . . . . . . . 4-82
• Warning message . . . . . . . . . . . . . . . . . . . . . . . . . . . . . 4-87
Warning and indicator lights . . . . . . . . . . . . . . . . 4-92
• Warning lights . . . . . . . . . . . . . . . . . . . . . . . . . . . . . . . 4-92
• Indicator lights. . . . . . . . . . . . . . . . . . . . . . . . . . . . . . 4-100
Head Up Display (HUD) . . . . . . . . . . . . . . . . . . . 4-105
• Description . . . . . . . . . . . . . . . . . . . . . . . . . . . . . . . . . 4-105
• Head up display ON/OFF . . . . . . . . . . . . . . . . . . . . . 4-106
• Head up display information . . . . . . . . . . . . . . . . . . 4-106
• Head up display setting. . . . . . . . . . . . . . . . . . . . . . . 4-106
Parking assist system . . . . . . . . . . . . . . . . . . . . . . 4-107
• Operation of the parking assist system . . . . . . . . . . 4-107
• Non-operational conditions of parking assist system . . . . . . . . . . . . . . . . . . . . . . . . . . . . . . . . . . . . \
4-109
• Self-diagnosis . . . . . . . . . . . . . . . . . . . . . . . . . . . . . . . 4-111
Rearview camera . . . . . . . . . . . . . . . . . . . . . . . . . 4-112
360° camera monitoring system . . . . . . . . . . . . . 4-113
Lighting . . . . . . . . . . . . . . . . . . . . . . . . . . . . . . . . . 4-114
• Battery saver function . . . . . . . . . . . . . . . . . . . . . . . . 4-114
• Daytime running light . . . . . . . . . . . . . . . . . . . . . . . . 4-114
• Lighting control . . . . . . . . . . . . . . . . . . . . . . . . . . . . . 4-114
• High beam operation . . . . . . . . . . . . . . . . . . . . . . . . . 4-116
• High beam assist . . . . . . . . . . . . . . . . . . . . . . . . . . . . 4-117
• Turn signals and lane change signals. . . . . . . . . . . . 4-119
• Check headlight . . . . . . . . . . . . . . . . . . . . . . . . . . . . . 4-120
4
Page 90 of 551
• Headlight leveling device . . . . . . . . . . . . . . . . . . . . . 4-120
• Dynamic Bending Light (DBL) . . . . . . . . . . . . . . . . 4-121
Wipers and washers . . . . . . . . . . . . . . . . . . . . . . . 4-122
• Windshield wipers . . . . . . . . . . . . . . . . . . . . . . . . . . . 4-122
• Front windshield washers . . . . . . . . . . . . . . . . . . . . . 4-124
Interior lights . . . . . . . . . . . . . . . . . . . . . . . . . . . . 4-126
• Automatic turn off function . . . . . . . . . . . . . . . . . . . 4-126
• Room lamp . . . . . . . . . . . . . . . . . . . . . . . . . . . . . . . . . 4-126
• Map lamp . . . . . . . . . . . . . . . . . . . . . . . . . . . . . . . . . . 4-12\
7
• Liftgate room lamp . . . . . . . . . . . . . . . . . . . . . . . . . . 4-128
• Vanity mirror lamp . . . . . . . . . . . . . . . . . . . . . . . . . . 4-128
• Glove box lamp . . . . . . . . . . . . . . . . . . . . . . . . . . . . . 4-128
• Door courtesy lamp . . . . . . . . . . . . . . . . . . . . . . . . . . 4-129
Welcome system . . . . . . . . . . . . . . . . . . . . . . . . . . 4-130
• Headlight (Headlamp) escort function . . . . . . . . . . 4-130
• Interior light. . . . . . . . . . . . . . . . . . . . . . . . . . . . . . . . 4-130
• Pocket lamp . . . . . . . . . . . . . . . . . . . . . . . . . . . . . . . . 4-130
Defroster . . . . . . . . . . . . . . . . . . . . . . . . . . . . . . . . 4-131
• Rear window defroster . . . . . . . . . . . . . . . . . . . . . . . 4-131
Automatic climate control system . . . . . . . . . . . 4-132
• Automatic heating and air conditioning . . . . . . . . . 4-133
• Manual heating and air conditioning . . . . . . . . . . . 4-135
• System operation . . . . . . . . . . . . . . . . . . . . . . . . . . . . 4-142
• Climate control air filter. . . . . . . . . . . . . . . . . . . . . . 4-144• Checking the amount of air conditioner refrigerant and
compressor lubricant . . . . . . . . . . . . . . . . . . . . . . . 4-144
Windshield defrosting and defogging . . . . . . . . . 4-146
• Automatic climate control system . . . . . . . . . . . . . . 4-146
• Defogging logic. . . . . . . . . . . . . . . . . . . . . . . . . . . . . . 4-147
• Automatic ventilation . . . . . . . . . . . . . . . . . . . . . . . . 4-149
• Smart ventilation . . . . . . . . . . . . . . . . . . . . . . . . . . . . 4-149
Storage compartments . . . . . . . . . . . . . . . . . . . . . 4-150
• Center console storage . . . . . . . . . . . . . . . . . . . . . . . 4-150
• Glove box . . . . . . . . . . . . . . . . . . . . . . . . . . . . . . . . . . 4-15\
0
• Sunglass holder . . . . . . . . . . . . . . . . . . . . . . . . . . . . . 4-151
Interior features . . . . . . . . . . . . . . . . . . . . . . . . . . 4-152
• Cup holder . . . . . . . . . . . . . . . . . . . . . . . . . . . . . . . . . 4-152
• Seat warmer . . . . . . . . . . . . . . . . . . . . . . . . . . . . . . . . 4-153
• Air ventilation seat . . . . . . . . . . . . . . . . . . . . . . . . . . 4-154
• Sunvisor . . . . . . . . . . . . . . . . . . . . . . . . . . . . . . . . . . . 4-\
155
• Power outlet . . . . . . . . . . . . . . . . . . . . . . . . . . . . . . . . 4-156
• USB charger . . . . . . . . . . . . . . . . . . . . . . . . . . . . . . . . 4-157
• Wireless smart phone charging system . . . . . . . . . . 4-157
• Coat hook . . . . . . . . . . . . . . . . . . . . . . . . . . . . . . . . . . 4-16\
1
• Floor mat anchor (s) . . . . . . . . . . . . . . . . . . . . . . . . . 4-162
• Luggage net (Holder) . . . . . . . . . . . . . . . . . . . . . . . . 4-162
4
Page 93 of 551
Features of your vehicle
64
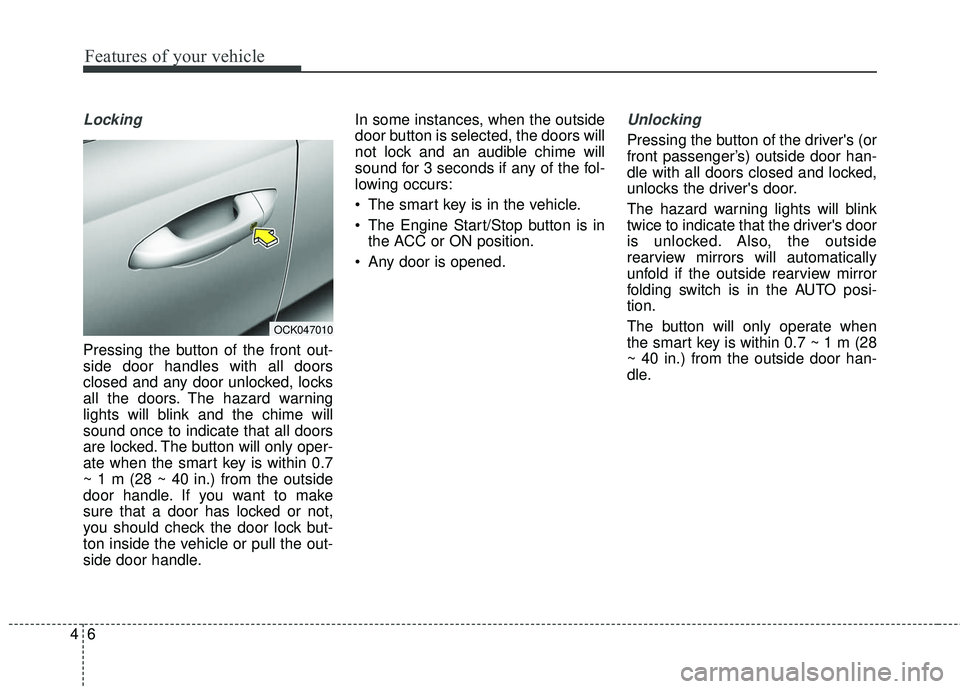
Locking
Pressing the button of the front out-
side door handles with all doors
closed and any door unlocked, locks
all the doors. The hazard warning
lights will blink and the chime will
sound once to indicate that all doors
are locked. The button will only oper-
ate when the smart key is within 0.7
~ 1 m (28 ~ 40 in.) from the outside
door handle. If you want to make
sure that a door has locked or not,
you should check the door lock but-
ton inside the vehicle or pull the out-
side door handle.In some instances, when the outside
door button is selected, the doors will
not lock and an audible chime will
sound for 3 seconds if any of the fol-
lowing occurs:
• The smart key is in the vehicle.
The Engine Start/Stop button is in
the ACC or ON position.
Any door is opened.
Unlocking
Pressing the button of the driver's (or
front passenger’s) outside door han-
dle with all doors closed and locked,
unlocks the driver's door.
The hazard warning lights will blink
twice to indicate that the driver's door
is unlocked. Also, the outside
rearview mirrors will automatically
unfold if the outside rearview mirror
folding switch is in the AUTO posi-
tion.
The button will only operate when
the smart key is within 0.7 ~ 1 m (28
~ 40 in.) from the outside door han-
dle.
OCK047010
Page 99 of 551
Features of your vehicle
12
4
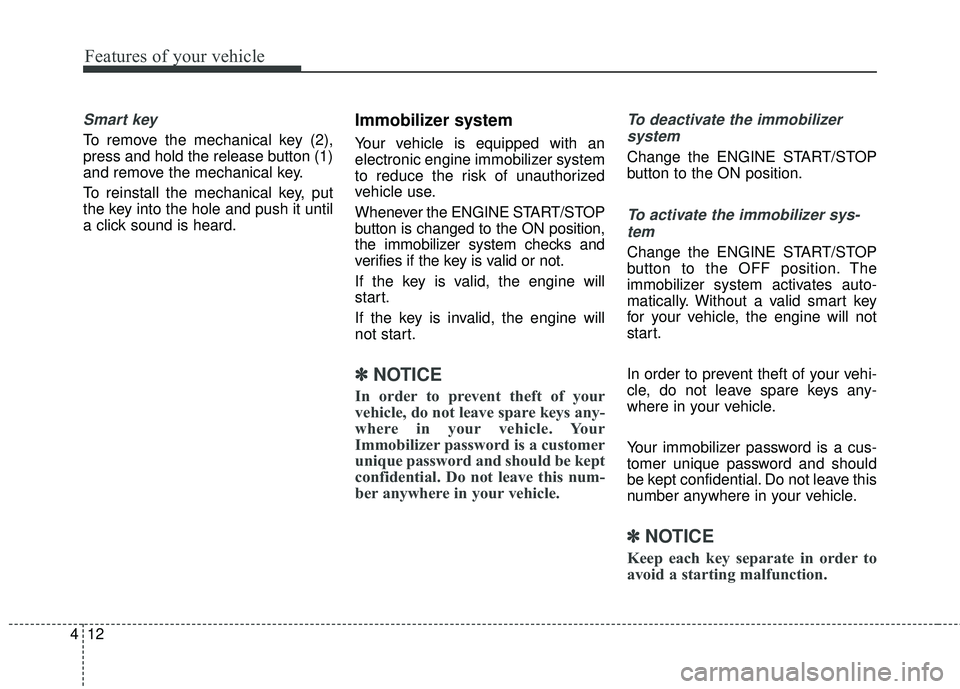
Smart key
To remove the mechanical key (2),
press and hold the release button (1)
and remove the mechanical key.
To reinstall the mechanical key, put
the key into the hole and push it until
a click sound is heard.
Immobilizer system
Your vehicle is equipped with an
electronic engine immobilizer system
to reduce the risk of unauthorized
vehicle use.
Whenever the ENGINE START/STOP
button is changed to the ON position,
the immobilizer system checks and
verifies if the key is valid or not.
If the key is valid, the engine will
start.
If the key is invalid, the engine will
not start.
✽ ✽
NOTICE
In order to prevent theft of your
vehicle, do not leave spare keys any-
where in your vehicle. Your
Immobilizer password is a customer
unique password and should be kept
confidential. Do not leave this num-
ber anywhere in your vehicle.
To deactivate the immobilizer
system
Change the ENGINE START/STOP
button to the ON position.
To activate the immobilizer sys-tem
Change the ENGINE START/STOP
button to the OFF position. The
immobilizer system activates auto-
matically. Without a valid smart key
for your vehicle, the engine will not
start.
In order to prevent theft of your vehi-
cle, do not leave spare keys any-
where in your vehicle.
Your immobilizer password is a cus-
tomer unique password and should
be kept confidential. Do not leave this
number anywhere in your vehicle.
✽ ✽ NOTICE
Keep each key separate in order to
avoid a starting malfunction.
Page 114 of 551
427
Features of your vehicle
Automatic stop and Reverse
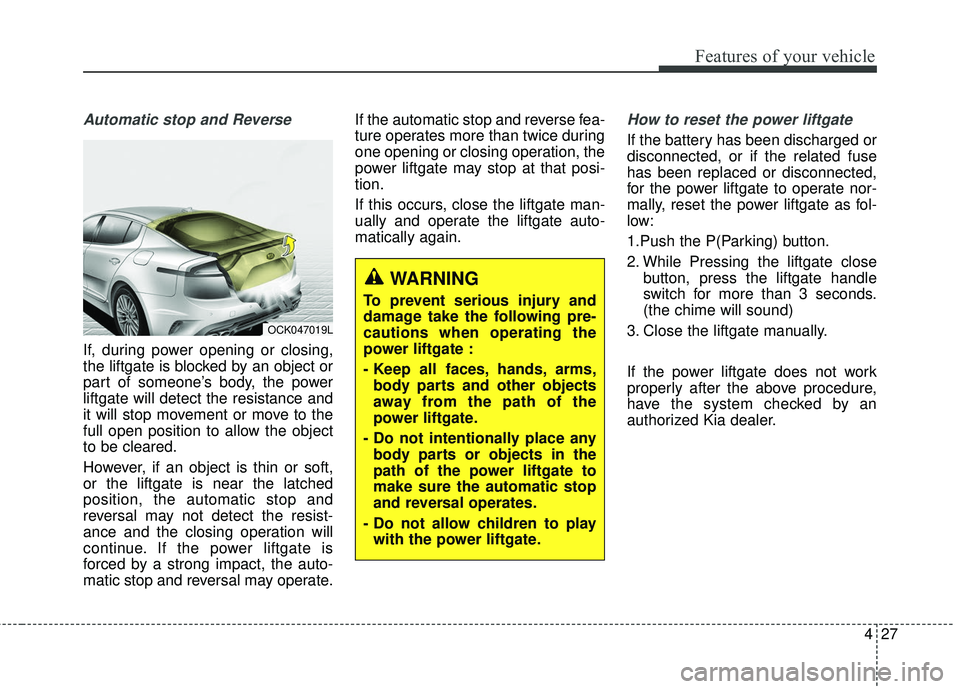
If, during power opening or closing,
the liftgate is blocked by an object or
part of someone’s body, the power
liftgate will detect the resistance and
it will stop movement or move to the
full open position to allow the object
to be cleared.
However, if an object is thin or soft,
or the liftgate is near the latched
position, the automatic stop and
reversal may not detect the resist-
ance and the closing operation will
continue. If the power liftgate is
forced by a strong impact, the auto-
matic stop and reversal may operate.If the automatic stop and reverse fea-
ture operates more than twice during
one opening or closing operation, the
power liftgate may stop at that posi-
tion.
If this occurs, close the liftgate man-
ually and operate the liftgate auto-
matically again.
How to reset the power liftgate
If the battery has been discharged or
disconnected, or if the related fuse
has been replaced or disconnected,
for the power liftgate to operate nor-
mally, reset the power liftgate as fol-
low:
1.Push the P(Parking) button.
2. While Pressing the liftgate close
button, press the liftgate handle
switch for more than 3 seconds.
(the chime will sound)
3. Close the liftgate manually.
If the power liftgate does not work
properly after the above procedure,
have the system checked by an
authorized Kia dealer.
OCK047019L
WARNING
To prevent serious injury and
damage take the following pre-
cautions when operating the
power liftgate :
- Keep all faces, hands, arms, body parts and other objects
away from the path of the
power liftgate.
- Do not intentionally place any body parts or objects in the
path of the power liftgate to
make sure the automatic stop
and reversal operates.
- Do not allow children to play with the power liftgate.
Page 124 of 551
437
Features of your vehicle
If the power window switch is pulled
up continuously again within 5 sec-
onds after the window is lowered by
the automatic window reversal fea-
ture, the automatic window reversal
will not operate.
The automatic reverse feature for the
driver’s and front passenger’s win-
dow is only active when the “auto up”
feature is used by fully pulling up the
switch. The automatic reverse fea-
ture will not operate if the window is
raised using the halfway position on
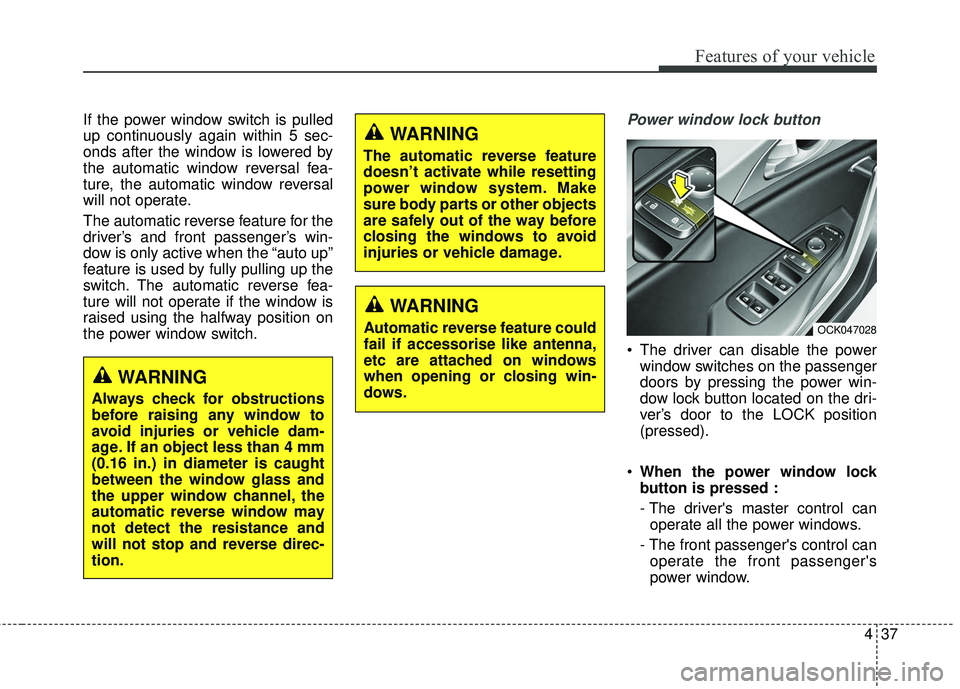
the power window switch.Power window lock button
The driver can disable the powerwindow switches on the passenger
doors by pressing the power win-
dow lock button located on the dri-
ver’s door to the LOCK position
(pressed).
When the power window lock
button is pressed :
- The driver's master control can
operate all the power windows.
- The front passenger's control can operate the front passenger's
power window.
OCK047028
WARNING
Always check for obstructions
before raising any window to
avoid injuries or vehicle dam-
age. If an object less than 4 mm
(0.16 in.) in diameter is caught
between the window glass and
the upper window channel, the
automatic reverse window may
not detect the resistance and
will not stop and reverse direc-
tion.
WARNING
The automatic reverse feature
doesn’t activate while resetting
power window system. Make
sure body parts or other objects
are safely out of the way before
closing the windows to avoid
injuries or vehicle damage.
WARNING
Automatic reverse feature could
fail if accessorise like antenna,
etc are attached on windows
when opening or closing win-
dows.