sensor KIA STINGER 2018 Workshop Manual
[x] Cancel search | Manufacturer: KIA, Model Year: 2018, Model line: STINGER, Model: KIA STINGER 2018Pages: 551, PDF Size: 13.75 MB
Page 412 of 551
What to do in an emergency
12
6
Changing a tire with TPMS
If you have a flat tire, the Low Tire
Pressure telltale will come on. Have
the flat tire repaired by an authorized
Kia dealer as soon as possible or
replace the flat tire with the spare
tire.
Each wheel is equipped with a tire
pressure sensor mounted inside the
tire behind the valve stem. You must
use TPMS specific wheels. It is rec-
ommended that you always have
your tires serviced by an authorized
Kia dealer. Even if you replace the low pressure
tire with the spare tire, the Low Tire
Pressure telltale will remain on until
the low pressure tire is repaired and
placed on the vehicle.
After you replace the low pressure
tire with the spare tire, the TPMS
malfunction indicator may illuminate
after a few minutes because the
TPMS sensor mounted on the spare
wheel is not initiated.
Once the low pressure tire is inflated
again to the recommended pressure
and installed on the vehicle or the
TPMS sensor mounted on the
replaced spare wheel is initiated by
an authorized Kia dealer, the TPMS
malfunction indicator and the low tire
pressure telltale will turn off within a
few minutes of driving.
If the indicator has not disappeared
after a few minutes of driving, please
visit an authorized Kia dealer.
If an original mounted tire is replaced
with the spare tire, the TPMS sensor
on the replaced spare wheel should
be initiated and the TPMS sensor on
the original mounted wheel should be
deactivated. If the TPMS sensor on
the original mounted wheel located in
the spare tire carrier still activates,
the tire pressure monitoring system
may not operate properly. Have the
tire with TPMS serviced or replaced
by an authorized Kia dealer.
You may not be able to identify a low
tire by simply looking at it. Always
use a good quality tire pressure
gauge to measure the tire's inflation
pressure. Please note that a tire that
is hot (from being driven) will have a
higher pressure measurement than a
tire that is cold (from sitting station-
ary for at least 3 hours and driven
less than 1.6 km (1 mile) during that
3 hour period).
CAUTION- Repair Agents
Never use a puncture-repairing
agent not approved by Kia torepair and/or inflate a low pres-sure tire. The sealant notapproved by Kia may damagethe tire pressure sensor.
Page 413 of 551
613
What to do in an emergency
Allow the tire to cool before measur-
ing the inflation pressure. Always be
sure the tire is cold before inflating to
the recommended pressure.
A cold tire means the vehicle has
been sitting for 3 hours and driven for
less than 1.6 km (1 mile) in that 3
hour period.
Never use tire sealant if your vehicle
is equipped with a Tire Pressure
Monitoring System. The liquid
sealant can damage the tire pres-
sure sensors.
The TPMS cannot alert you tosevere and sudden tire damage
caused by external factors such as
nails or road debris.
If you feel any vehicle instability, immediately take your foot off the
accelerator, apply the brakes grad-
ually and with light force, and slow-
ly move to a safe position off the
road.✽ ✽ NOTICE - Protecting TPMS
Tampering with, modifying, or dis-
abling the Tire Pressure Monitoring
System (TPMS) components may
interfere with the system's ability to
warn the driver of low tire pressure
conditions and/or TPMS malfunc-
tions. Tampering with, modifying,
or disabling the Tire Pressure
Monitoring System (TPMS) compo-
nents may void the warranty for
that portion of the vehicle.
This device complies with
Industry Canada licence-exempt
RSS standard(s).
Operation is subject to the following
two conditions:
(1) This device may not cause inter-
ference, and
(2) This device must accept any interference, including interfer-
ence that may cause undesired
operation of the device.
Page 424 of 551
What to do in an emergency
24
6
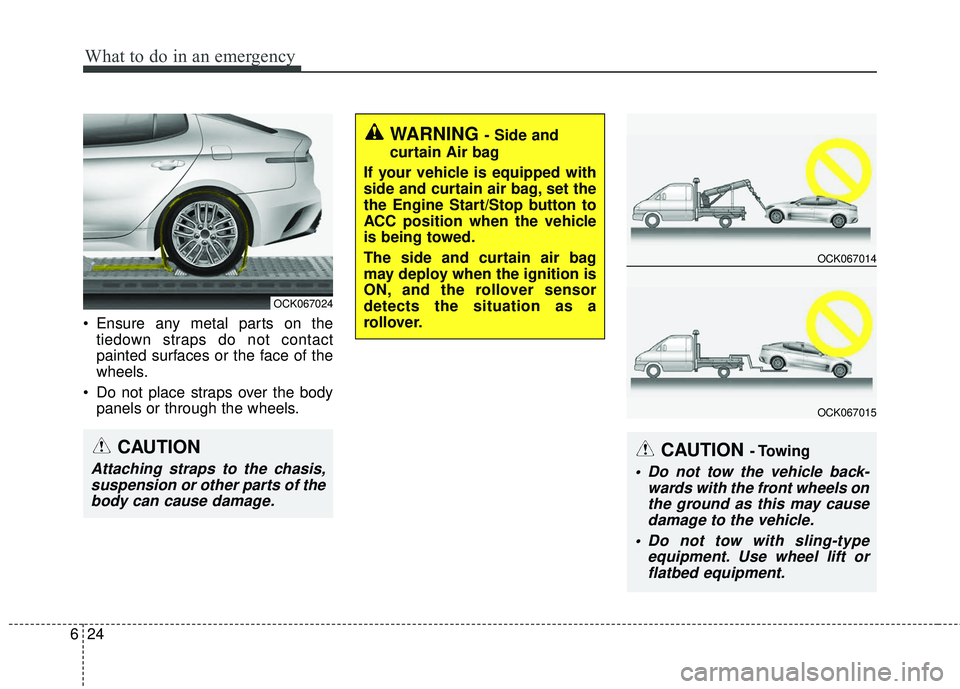
Ensure any metal parts on the
tiedown straps do not contact
painted surfaces or the face of the
wheels.
Do not place straps over the body panels or through the wheels.
WARNING - Side and
curtain Air bag
If your vehicle is equipped with
side and curtain air bag, set the
the Engine Start/Stop button to
ACC position when the vehicle
is being towed.
The side and curtain air bag
may deploy when the ignition is
ON, and the rollover sensor
detects the situation as a
rollover.
OCK067024
CAUTION
Attaching straps to the chasis, suspension or other parts of thebody can cause damage.
OCK067014
OCK067015
CAUTION - Towing
Do not tow the vehicle back- wards with the front wheels onthe ground as this may causedamage to the vehicle.
Do not tow with sling-type equipment. Use wheel lift orflatbed equipment.
Page 457 of 551
729
Maintenance
AIR CLEANER
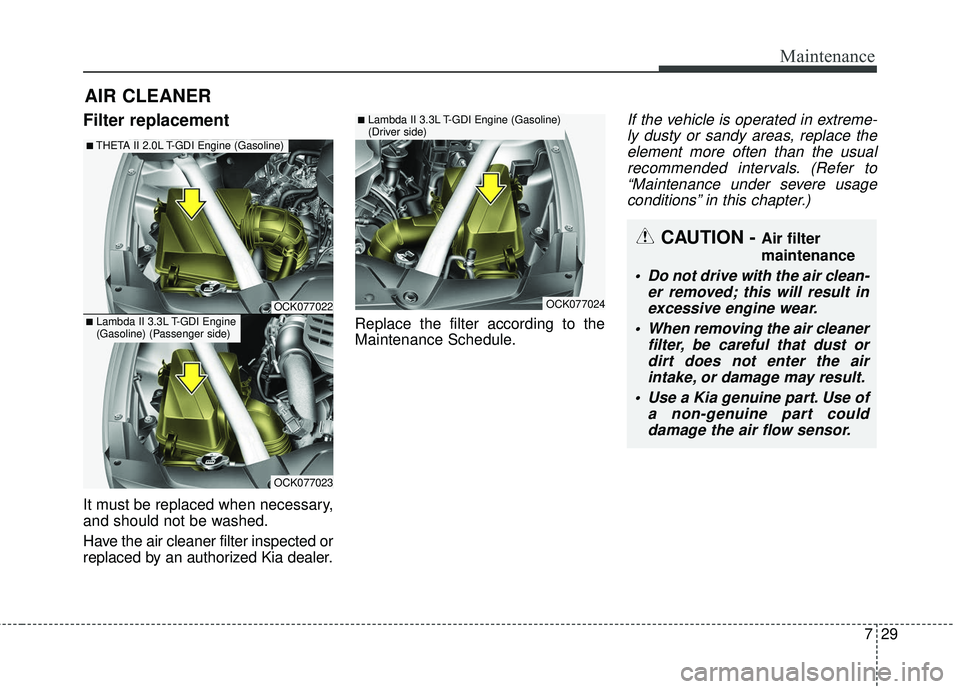
Filter replacement
It must be replaced when necessary,
and should not be washed.
Have the air cleaner filter inspected or
replaced by an authorized Kia dealer.Replace the filter according to the
Maintenance Schedule.
If the vehicle is operated in extreme-
ly dusty or sandy areas, replace theelement more often than the usualrecommended intervals. (Refer to“Maintenance under severe usageconditions” in this chapter.)
OCK077022
OCK077023
■THETA II 2.0L T-GDI Engine (Gasoline)
■Lambda II 3.3L T-GDI Engine
(Gasoline) (Passenger side)
OCK077024
■Lambda II 3.3L T-GDI Engine (Gasoline)
(Driver side)
CAUTION - Air filter
maintenance
Do not drive with the air clean- er removed; this will result inexcessive engine wear.
When removing the air cleaner filter, be careful that dust ordirt does not enter the airintake, or damage may result.
Use a Kia genuine part. Use of a non-genuine part coulddamage the air flow sensor.
Page 492 of 551
Maintenance
64
7
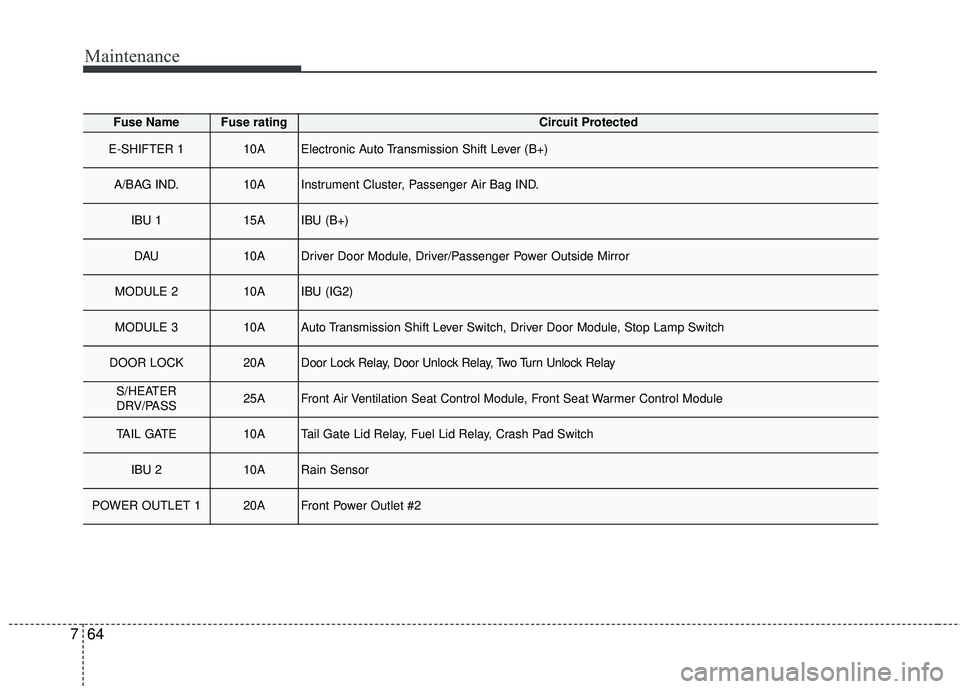
Fuse NameFuse ratingCircuit Protected
E-SHIFTER 110AElectronic Auto Transmission Shift Lever (B+)
A/BAG IND.10AInstrument Cluster, Passenger Air Bag IND.
IBU 115AIBU (B+)
DAU10ADriver Door Module, Driver/Passenger Power Outside Mirror
MODULE 210AIBU (IG2)
MODULE 310AAuto Transmission Shift Lever Switch, Driver Door Module, Stop Lamp Switch
DOOR LOCK20ADoor Lock Relay, Door Unlock Relay, Two Turn Unlock Relay
S/HEATER
DRV/PASS25AFront Air Ventilation Seat Control Module, Front Seat Warmer Control Module
TAIL GATE10ATail Gate Lid Relay, Fuel Lid Relay, Crash Pad Switch
IBU 210ARain Sensor
POWER OUTLET 120AFront Power Outlet #2
Page 493 of 551
765
Maintenance
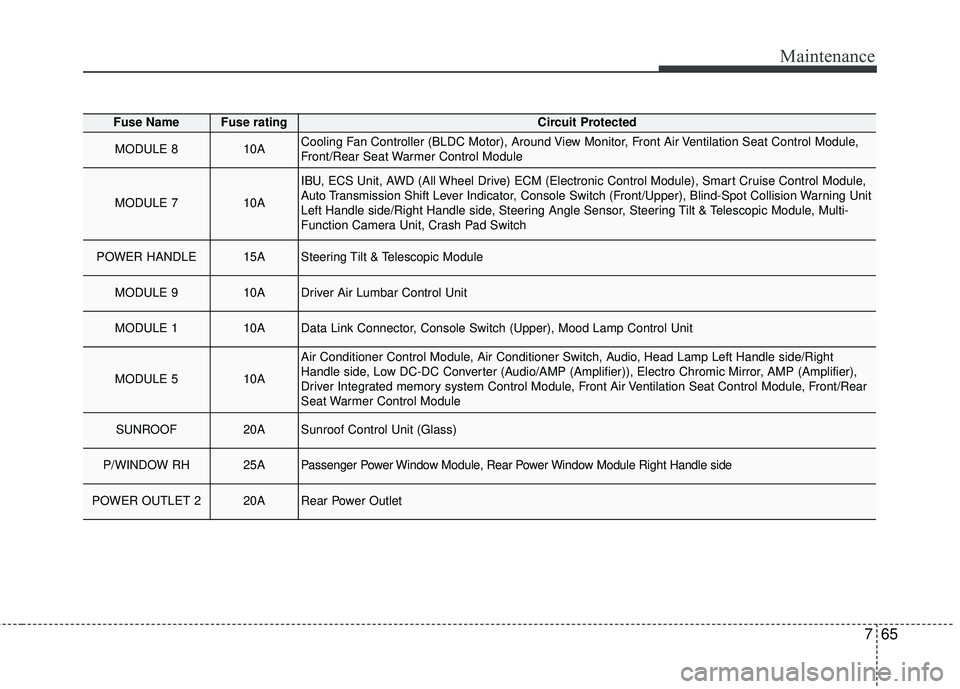
Fuse NameFuse ratingCircuit Protected
MODULE 810ACooling Fan Controller (BLDC Motor), Around View Monitor, Front Air Ventilation Seat Control Module,
Front/Rear Seat Warmer Control Module
MODULE 710A
IBU, ECS Unit, AWD (All Wheel Drive) ECM (Electronic Control Module), Smart Cruise Control Module,
Auto Transmission Shift Lever Indicator, Console Switch (Front/Upper), Blind-Spot Collision Warning Unit
Left Handle side/Right Handle side, Steering Angle Sensor, Steering Tilt & Telescopic Module, Multi-
Function Camera Unit, Crash Pad Switch
POWER HANDLE15ASteering Tilt & Telescopic Module
MODULE 910ADriver Air Lumbar Control Unit
MODULE 110AData Link Connector, Console Switch (Upper), Mood Lamp Control Unit
MODULE 510A
Air Conditioner Control Module, Air Conditioner Switch, Audio, Head Lamp Left Handle side/Right
Handle side, Low DC-DC Converter (Audio/AMP (Amplifier)), Electro Chromic Mirror, AMP (Amplifier),
Driver Integrated memory system Control Module, Front Air Ventilation Seat Control Module, Front/Rear
Seat Warmer Control Module
SUNROOF20ASunroof Control Unit (Glass)
P/WINDOW RH25APassenger Power Window Module, Rear Power Window Module Right Handle side
POWER OUTLET 220ARear Power Outlet
Page 498 of 551
![KIA STINGER 2018 Workshop Manual Maintenance
70
7
Fuse NameFuse ratingCircuit Protected
E-CVVT 220A[THETA II 2.0L T-GDI Engine] ECM (Engine Control Module)
ESC 310AESC (Electronic Stability Control) Control Module, Multipurpose Check KIA STINGER 2018 Workshop Manual Maintenance
70
7
Fuse NameFuse ratingCircuit Protected
E-CVVT 220A[THETA II 2.0L T-GDI Engine] ECM (Engine Control Module)
ESC 310AESC (Electronic Stability Control) Control Module, Multipurpose Check](/img/2/40391/w960_40391-497.png)
Maintenance
70
7
Fuse NameFuse ratingCircuit Protected
E-CVVT 220A[THETA II 2.0L T-GDI Engine] ECM (Engine Control Module)
ESC 310AESC (Electronic Stability Control) Control Module, Multipurpose Check Connector
ECU 310AECM (Engine Control Module)
ECU 215AECM (Engine Control Module)
HORN20AHorn Relay
WIPER 130AWiper Power Relay
TCU 215ATCM (Transmission Control Module)
SENSOR 410ABrake Vacuum Switch, Vacuum Pump Relay, Electric Oil Pump Inverter
TCU 120ATCM (Transmission Control Module)
WIPER 210AIBU (Integrated Body Control Unit), ECM (Electronic Control Module)
SENSOR 115ARear Sub Junction Block (Fuel Pump Relay)
SENSOR520A[THETA II 2.0L T-GDI Engine] Ignition Coil #1/#2/#3/#4
[Lambda II 3.3L T-GDI Engine] Ignition Coil #1/#2/#3/#4/#5/#6
Page 499 of 551
![KIA STINGER 2018 Workshop Manual 771
Maintenance
Fuse NameFuse ratingCircuit Protected
H/LAMP HI10AHead Lamp (High) Relay
ECU 120AECM (Engine Control Module)
SENSOR 315A[THETA II 2.0L T-GDI Engine] Oxygen Sensor (Up)
[Lambda II 3.3L KIA STINGER 2018 Workshop Manual 771
Maintenance
Fuse NameFuse ratingCircuit Protected
H/LAMP HI10AHead Lamp (High) Relay
ECU 120AECM (Engine Control Module)
SENSOR 315A[THETA II 2.0L T-GDI Engine] Oxygen Sensor (Up)
[Lambda II 3.3L](/img/2/40391/w960_40391-498.png)
771
Maintenance
Fuse NameFuse ratingCircuit Protected
H/LAMP HI10AHead Lamp (High) Relay
ECU 120AECM (Engine Control Module)
SENSOR 315A[THETA II 2.0L T-GDI Engine] Oxygen Sensor (Up)
[Lambda II 3.3L T-GDI Engine] Oxygen Sensor #2/#4
SENSOR 210A
[THETA II 2.0L T-GDI Engine] Electronic Thermostat, Oil Control Valve, Purge Control Solenoid Valve,
RCV (Recirculation Valve Control) Control Solenoid Valve, Canister Close Valve
[Lambda II 3.3L T-GDI Engine] Electronic Thermostat, Oil Pressure Solenoid Valve, Oil Control Valve
#1/#2/#3/#4 (Intake/Exhaust), RCV (Recirculation Valve Control) Control Solenoid Valve, Purge Control
Solenoid Valve, Canister Close Valve
B/ALARM HORN10ABurglar Alarm Horn Relay
Page 504 of 551
Maintenance
76
7
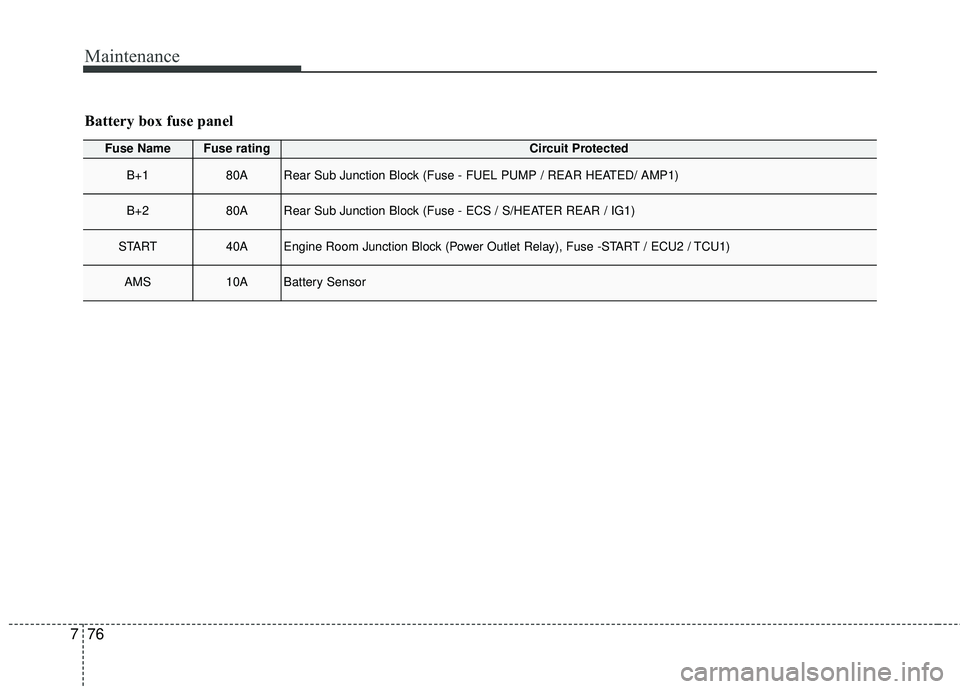
Fuse NameFuse ratingCircuit Protected
B+180ARear Sub Junction Block (Fuse - FUEL PUMP / REAR HEATED/ AMP1)
B+280ARear Sub Junction Block (Fuse - ECS / S/HEATER REAR / IG1)
START40AEngine Room Junction Block (Power Outlet Relay), Fuse -START / ECU2 / TCU1)
AMS10ABattery Sensor
Battery box fuse panel
Page 520 of 551
Maintenance
92
7
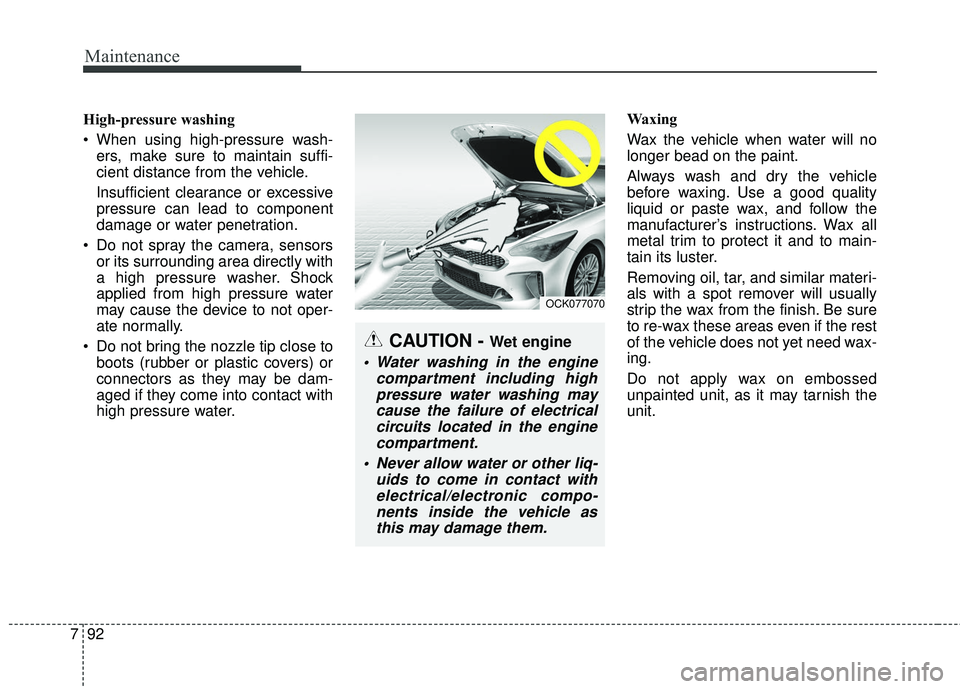
High-pressure washing
When using high-pressure wash-
ers, make sure to maintain suffi-
cient distance from the vehicle.
Insufficient clearance or excessive
pressure can lead to component
damage or water penetration.
Do not spray the camera, sensors or its surrounding area directly with
a high pressure washer. Shock
applied from high pressure water
may cause the device to not oper-
ate normally.
Do not bring the nozzle tip close to boots (rubber or plastic covers) or
connectors as they may be dam-
aged if they come into contact with
high pressure water. Waxing
Wax the vehicle when water will no
longer bead on the paint.
Always wash and dry the vehicle
before waxing. Use a good quality
liquid or paste wax, and follow the
manufacturer’s instructions. Wax all
metal trim to protect it and to main-
tain its luster.
Removing oil, tar, and similar materi-
als with a spot remover will usually
strip the wax from the finish. Be sure
to re-wax these areas even if the rest
of the vehicle does not yet need wax-
ing.
Do not apply wax on embossed
unpainted unit, as it may tarnish the
unit.
CAUTION - Wet engine
Water washing in the engine
compartment including highpressure water washing maycause the failure of electricalcircuits located in the enginecompartment.
Never allow water or other liq- uids to come in contact withelectrical/electronic compo-nents inside the vehicle asthis may damage them.
OCK077070