KIA STINGER 2020 Owners Manual
Manufacturer: KIA, Model Year: 2020, Model line: STINGER, Model: KIA STINGER 2020Pages: 555, PDF Size: 13.49 MB
Page 511 of 555

Maintenance
80
7
(1) Stop and tail lamp (LED type)
(2) Stop lamp (LED type)
(3) Back-up lamp (bulb type)
(4) Rear turn signal lamp (bulb type)
(5) Side marker (LED type)
(6) Rear turn signal lamp (LED type)
(7) High mounted stop lamp (LED
type)
(8) License plate lamp (LED type)
Light bulb position (Side)
(1) Side repeater lamp (LED type)
Headlamp (LED type) replace-
ment (Headlamp Type B)
If the Low/High beam lamp (1, 2),
Front turn signal lamp (3), Day time
running lamp/Position lamp (4),
and/or Side marker (5) do not oper-
ate, have the vehicle checked by an
authorized Kia dealer.
The LED lamps cannot be replaced
as a single component because they
are part of an integrated unit. The
LED lamps have to be replaced with
the unit.
A skilled technician should check or
repair the head lamp (LED), for it
may damage related parts of the
vehicle.
■High mounted stop lamp
OCK077050L ■License plate lamp
OCK077051L
OCK077052
■ Side repeater lamp
OCK077100L
■Head lamp - Type B
Page 512 of 555

781
Maintenance
Side marker bulb replacement
(Headlamp Type A)
If the side marker (1) does not oper-
ate, have the vehicle checked by an
authorized Kia dealer.
A skilled technician should check or
repair the side marker, for it may
damage related parts of the vehicle.
Position lamp + DRL (LED
type) bulb replacement
(Headlamp Type A)
If the position lamp + DRL (LED) (1)
does not operate, have the vehicle
checked by an authorized Kia dealer.
The LED lamps cannot be replaced
as a single component because they
are part of an integrated unit. The
LED lamps have to be replaced with
the unit.
A skilled technician should check or
repair the position lamp + DRL
(LED), for it may damage related
parts of the vehicle.
Headlamp (Low/High beam)
bulb replacement (Headlamp
Type A)
1. Remove the service cover clip onthe wheel housing.
OCK077101L
■Head lamp - Type A
OCK077073
■Head lamp - Type A
OCK077074
■Head lamp - Type A
Page 513 of 555

Maintenance
82
7
2. Remove the headlamp bulb cover
by turning it counterclockwise.
3. Disconnect the headlamp bulb socket-connector. 4. Remove the bulb-socket from the
headlamp assembly by turning the
bulb-socket counterclockwise until
the tabs on the bulb-socket align
with the slots on the headlamp
assembly.
5. Install a new bulb-socket assem- bly in the headlamp assembly by
aligning the tabs on the bulb-sock-
et with the slots in the headlamp
assembly. Push the bulb-socket
into the headlamp assembly and
turn the bulb-socket clockwise.
6. Connect the headlamp bulb sock- et-connector.
7. Install the headlamp bulb cover by turning it clockwise.
8. Install the clip on the service cover.
❈ If it is difficult to replace light bulbs,
have the vehicle checked by an
authorized Kia dealer.
Headlamp bulb
OCK077075
OCK077076
OQL075058
WARNING- Halogen
bulbs
Halogen bulbs contain pres- surized gas that will produce
flying pieces of glass if broken.
Always handle them carefully, and avoid scratches and abra-
sions. If the bulbs are lit, avoid
contact with liquids.
Page 514 of 555

783
Maintenance
Never touch the glass with barehands. Residual oil may cause the
bulb to overheat and burst when lit.
A bulb should be operated only
when installed in a headlight.
If a bulb becomes damaged or cracked, replace it immediately
and carefully dispose of it.
Wear eye protection when chang- ing a bulb. Allow the bulb to cool
down before handling it.Front turn signal lamp bulb
replacement (Headlamp Type A)
1. Open the hood.
2. Remove the strut bar and the air cleaner assembly. 3. Remove the bulb-socket from the
headlamp assembly by turning the
bulb-socket counterclockwise until
the tabs on the bulb-socket align
with the slots on the headlamp
assembly.
4. Remove the bulb from the bulb- socket by pressing it in and rotat-
ing it counterclockwise until the
tabs on the bulb align with the
slots in the bulb-socket. Pull the
bulb out of the bulb-socket.
5. Insert a new bulb by inserting it into the bulb-socket and rotating it
until it locks into place.
OCK077077
OCK077078
OCK077079
Page 515 of 555

Maintenance
84
7
6. Install the socket in the headlamp
assembly by aligning the tabs on
the bulb-socket with the slots in
the assembly. Push the bulb-sock-
et into the headlamp assembly
and turn the socket clockwise.
7. Install the strut bar and the air cleaner assembly.
❈ If it is difficult to replace light bulbs,
have the vehicle checked by an
authorized Kia dealer.Stop and tail lamp (LED type)
bulb replacement
If the stop and tail lamp (LED) (1, 2)
does not operate, have the vehicle
checked by an authorized Kia dealer.
The LED lamps cannot be replaced
as a single component because they
are part of an integrated unit. The
LED lamps have to be replaced with
the unit.
A skilled technician should check or
repair the stop and tail lamp (LED),
for it may damage related parts of
the vehicle.
Rear side marker (LED type)
bulb replacement
If the rear side marker (LED) (1)
does not operate, have the vehicle
checked by an authorized Kia dealer.
The LED lamps cannot be replaced
as a single component because they
are part of an integrated unit. The
LED lamps have to be replaced with
the unit.
A skilled technician should check or
repair the rear side marker (LED), for
it may damage related parts of the
vehicle.
OCK077053OCK077102L
Page 516 of 555

785
Maintenance
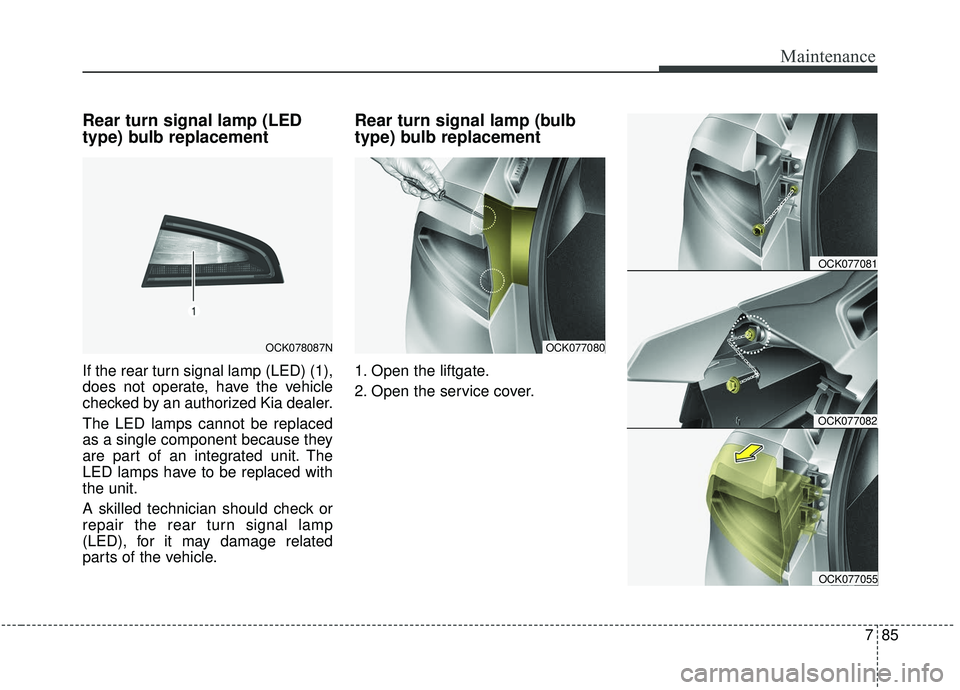
Rear turn signal lamp (LED
type) bulb replacement
If the rear turn signal lamp (LED) (1),
does not operate, have the vehicle
checked by an authorized Kia dealer.
The LED lamps cannot be replaced
as a single component because they
are part of an integrated unit. The
LED lamps have to be replaced with
the unit.
A skilled technician should check or
repair the rear turn signal lamp
(LED), for it may damage related
parts of the vehicle.
Rear turn signal lamp (bulb
type) bulb replacement
1. Open the liftgate.
2. Open the service cover.
OCK078087NOCK077080
OCK077081
OCK077082
OCK077055
Page 517 of 555

Maintenance
86
7
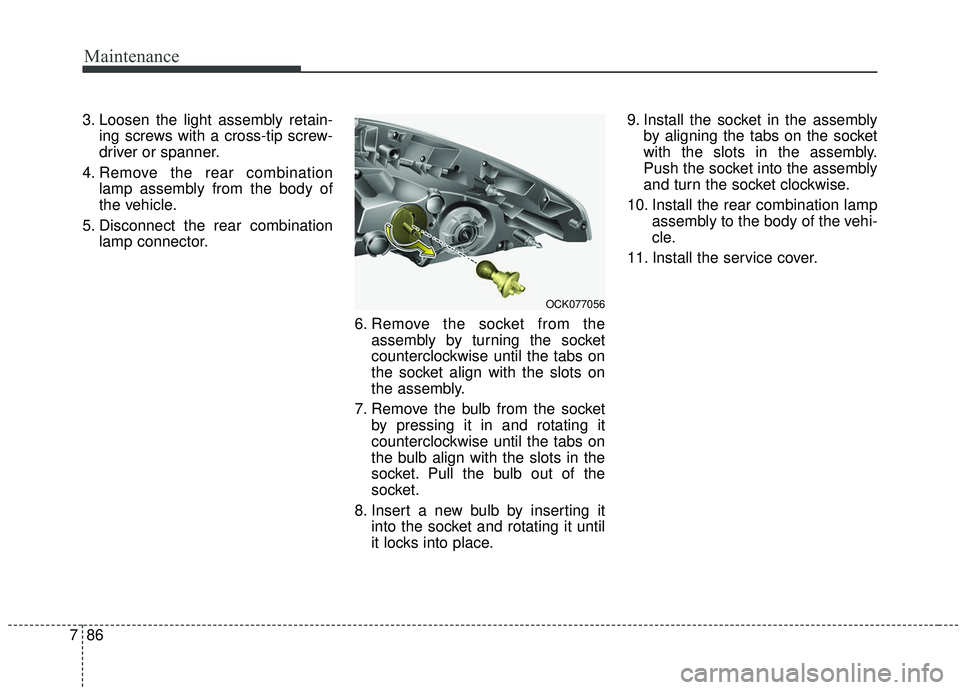
3. Loosen the light assembly retain-
ing screws with a cross-tip screw-
driver or spanner.
4. Remove the rear combination lamp assembly from the body of
the vehicle.
5. Disconnect the rear combination lamp connector.
6. Remove the socket from theassembly by turning the socket
counterclockwise until the tabs on
the socket align with the slots on
the assembly.
7. Remove the bulb from the socket by pressing it in and rotating it
counterclockwise until the tabs on
the bulb align with the slots in the
socket. Pull the bulb out of the
socket.
8. Insert a new bulb by inserting it into the socket and rotating it until
it locks into place. 9. Install the socket in the assembly
by aligning the tabs on the socket
with the slots in the assembly.
Push the socket into the assembly
and turn the socket clockwise.
10. Install the rear combination lamp assembly to the body of the vehi-
cle.
11. Install the service cover.
OCK077056
Page 518 of 555

787
Maintenance
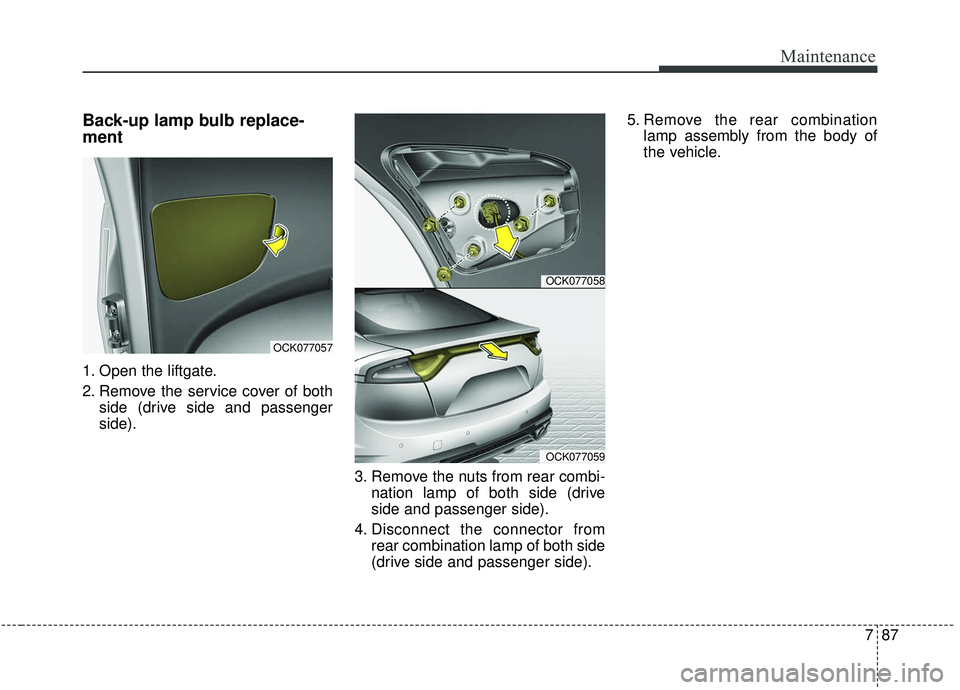
Back-up lamp bulb replace-
ment
1. Open the liftgate.
2. Remove the service cover of bothside (drive side and passenger
side).
3. Remove the nuts from rear combi-nation lamp of both side (drive
side and passenger side).
4. Disconnect the connector from rear combination lamp of both side
(drive side and passenger side). 5. Remove the rear combination
lamp assembly from the body of
the vehicle.
OCK077057
OCK077058
OCK077059
Page 519 of 555

Maintenance
88
7
6. Remove the socket from the
assembly by turning the socket
counterclockwise until the tabs on
the socket align with the slots on
the assembly.
7. Remove the bulb from the socket by pressing it in and rotating it counter-
clockwise until the tabs on the bulb
align with the slots in the socket.
Pull the bulb out of the socket.
8. Insert a new bulb by inserting it into the socket and rotating it until
it locks into place. 9. Install the socket in the assembly
by aligning the tabs on the socket
with the slots in the assembly.
Push the socket into the assembly
and turn the socket clockwise.
10. Install the rear combination lamp assembly to the body of the vehi-
cle.
11. Install the service cover by put- ting it into the service hole.
High mounted stop lamp (LED
type) bulb replacement
If the high mounted stop lamp (LED)
(1) does not operate, have the vehi-
cle checked by an authorized Kia
dealer.
The LED lamps cannot be replaced
as a single component because they
are part of an integrated unit. The
LED lamps have to be replaced with
the unit.
A skilled technician should check or
repair the high mounted stop lamp
(LED), for it may damage related
parts of the vehicle.
OCK077060
OCK077061
Page 520 of 555

789
Maintenance
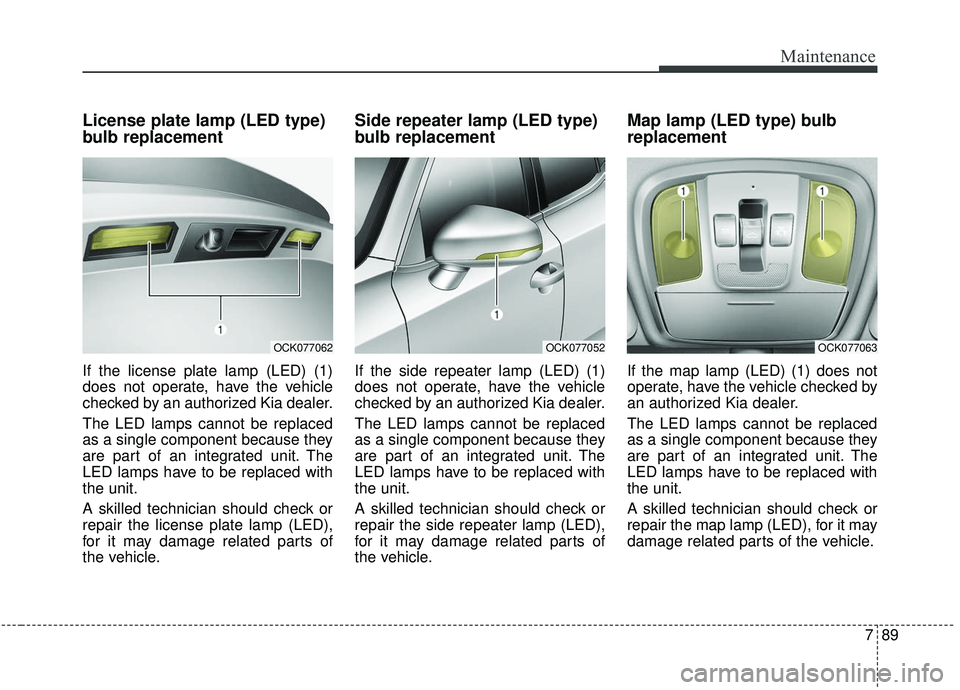
License plate lamp (LED type)
bulb replacement
If the license plate lamp (LED) (1)
does not operate, have the vehicle
checked by an authorized Kia dealer.
The LED lamps cannot be replaced
as a single component because they
are part of an integrated unit. The
LED lamps have to be replaced with
the unit.
A skilled technician should check or
repair the license plate lamp (LED),
for it may damage related parts of
the vehicle.
Side repeater lamp (LED type)
bulb replacement
If the side repeater lamp (LED) (1)
does not operate, have the vehicle
checked by an authorized Kia dealer.
The LED lamps cannot be replaced
as a single component because they
are part of an integrated unit. The
LED lamps have to be replaced with
the unit.
A skilled technician should check or
repair the side repeater lamp (LED),
for it may damage related parts of
the vehicle.
Map lamp (LED type) bulb
replacement
If the map lamp (LED) (1) does not
operate, have the vehicle checked by
an authorized Kia dealer.
The LED lamps cannot be replaced
as a single component because they
are part of an integrated unit. The
LED lamps have to be replaced with
the unit.
A skilled technician should check or
repair the map lamp (LED), for it may
damage related parts of the vehicle.
OCK077062OCK077052OCK077063