headlamp KIA STINGER 2021 Features and Functions Guide
[x] Cancel search | Manufacturer: KIA, Model Year: 2021, Model line: STINGER, Model: KIA STINGER 2021Pages: 62, PDF Size: 7.68 MB
Page 7 of 62

INSTRUMENT CLUSTER
5*IF EQUIPPED ALWAYS CHECK THE OWNER’S MANUAL FOR COMPLE TE OPER ATING INFORMATION AND SAFE T Y WARNINGS.
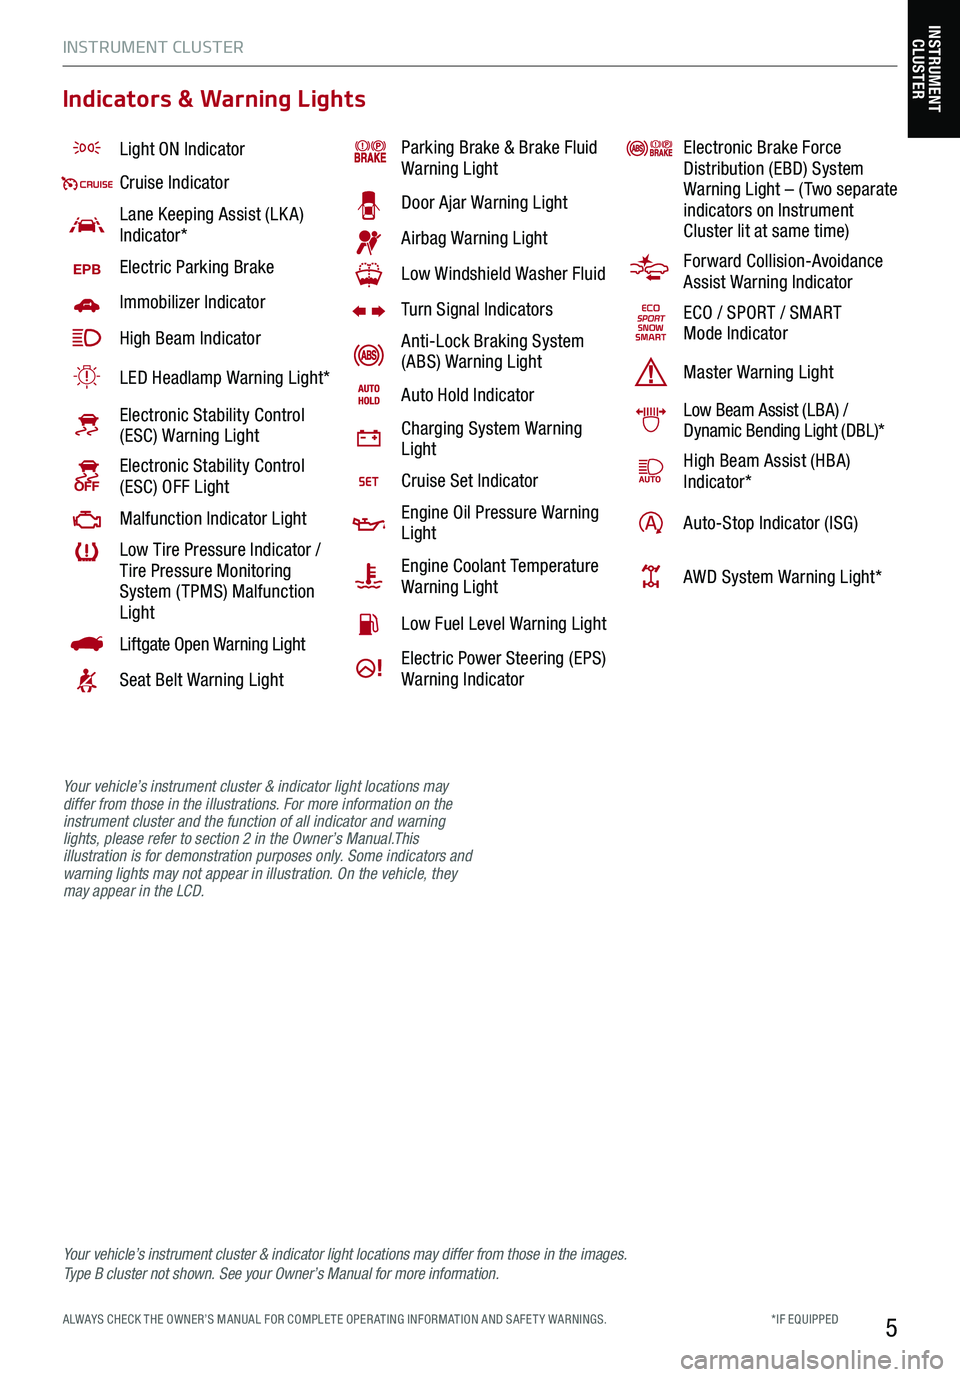
Light ON Indicator
Cruise Indicator
Lane Keeping Assist (LK A) Indicator*
EPBElectric Parking Brake
Immobilizer Indicator
High Beam Indicator
LED Headlamp Warning Light*
Electronic Stability Control (ESC) Warning Light
Electronic Stability Control (ESC) OFF Light
Malfunction Indicator Light
Low Tire Pressure Indicator / Tire Pressure Monitoring System ( TPMS) Malfunction Light
Liftgate Open Warning Light
Seat Belt Warning Light
Parking Brake & Brake Fluid Warning Light
Door Ajar Warning Light
Airbag Warning Light
Low Windshield Washer Fluid
Turn Signal Indicators
Anti-Lock Braking System (ABS) Warning Light
Auto Hold Indicator
Charging System Warning Light
Cruise Set Indicator
Engine Oil Pressure Warning Light
Engine Coolant Temperature Warning Light
Low Fuel Level Warning Light
Electric Power Steering (EPS) Warning Indicator
Electronic Brake Force Distribution (EBD) System Warning Light – ( Two separate indicators on Instrument Cluster lit at same time)
Forward Collision-Avoidance Assist Warning Indicator
ECO / SPORT / SMART Mode Indicator
Master Warning Light
Low Beam Assist (LBA) / Dynamic Bending Light (DBL)*
High Beam Assist (HBA)Indicator*
Auto-Stop Indicator (ISG)
AWD System Warning Light*
Your vehicle’s instrument cluster & indicator light locations may differ from those in the images. Ty p e B cluster not shown. See your Owner’s Manual for more information.
INSTRUMENT CLUSTER
Indicators & Warning Lights
Your vehicle’s instrument cluster & indicator light locations may differ from those in the illustrations. For more information on the instrument cluster and the function of all indicator and warning lights, please refer to section 2 in the Owner’s Manual.This illustration is for demonstration purposes only. Some indicators and warning lights may not appear in illustration. On the vehicle, they may appear in the LCD.
Page 13 of 62

VEHICLE SET TINGS
11
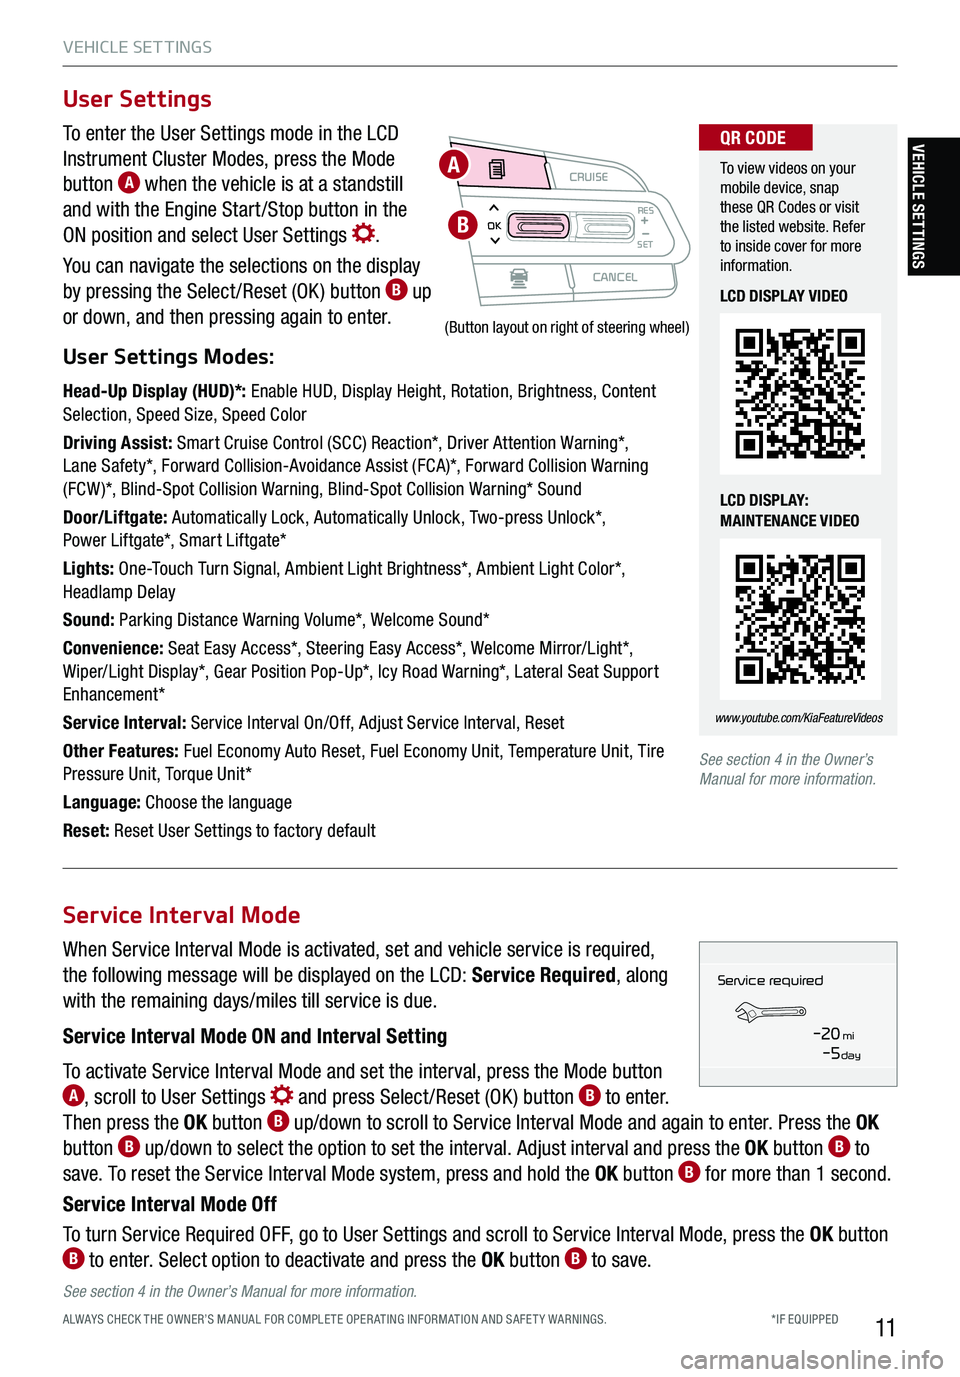
To enter the User Settings mode in the LCD
Instrument Cluster Modes, press the Mode
button A when the vehicle is at a standstill
and with the Engine Start /Stop button in the
ON position and select User Settings .
You can navigate the selections on the display
by pressing the Select /Reset (OK ) button B up
or down, and then pressing again to enter.
User Settings Modes:
Head-Up Display (HUD)*: Enable HUD, Display Height, Rotation, Brightness, Content Selection, Speed Size, Speed Color
Driving Assist: Smart Cruise Control (SCC) Reaction*, Driver Attention Warning*, Lane Safety*, Forward Collision-Avoidance Assist (FCA)*, Forward Collision Warning (FCW )*, Blind-Spot Collision Warning, Blind-Spot Collision Warning* Sound
Door/Liftgate: Automatically Lock, Automatically Unlock, Two-press Unlock*, Power Liftgate*, Smart Liftgate*
Lights: One-Touch Turn Signal, Ambient Light Brightness*, Ambient Light Color*, Headlamp Delay
Sound: Parking Distance Warning Volume*, Welcome Sound*
Convenience: Seat Easy Access*, Steering Easy Access*, Welcome Mirror/Light*, Wiper/Light Display*, Gear Position Pop-Up*, Icy Road Warning*, Lateral Seat Support Enhancement*
Service Interval: Service Interval On/Off, Adjust Service Interval, Reset
Other Features: Fuel Economy Auto Reset, Fuel Economy Unit, Temperature Unit, Tire Pressure Unit, Torque Unit*
Language: Choose the language
Reset: Reset User Settings to factory default
User Settings
CRUISE
CANCEL
RESOKSET
(Button layout on right of steering wheel)
A
B
To view videos on your mobile device, snap these QR Codes or visit the listed website. Refer to inside cover for more information.
www.youtube.com/KiaFeatureVideos
QR CODE
LCD DISPLAY VIDEO
LCD DISPLAY: MAINTENANCE VIDEO
See section 4 in the Owner’s Manual for more information.
When Service Interval Mode is activated, set and vehicle service is required,
the following message will be displayed on the LCD: Service Required, along
with the remaining days/miles till service is due.
Service Interval Mode ON and Interval Setting
To activate Service Interval Mode and set the interval, press the Mode button A, scroll to User Settings and press Select /Reset (OK ) button B to enter.
Then press the OK button B up/down to scroll to Service Interval Mode and again to enter. Press the OK
button B up/down to select the option to set the interval. Adjust interval and press the OK button B to
save. To reset the Service Interval Mode system, press and hold the OK button B for more than 1 second.
Service Interval Mode Off
To turn Service Required OFF, go to User Settings and scroll to Service Interval Mode, press the OK button B to enter. Select option to deactivate and press the OK button B to save.
Service Interval Mode
Service in
-20 mi-5 day
Service required
See section 4 in the Owner’s Manual for more information.
VEHICLE SETTINGS
*IF EQUIPPED ALWAYS CHECK THE OWNER’S MANUAL FOR COMPLE TE OPER ATING INFORMATION AND SAFE T Y WARNINGS.