ignition KIA STINGER 2021 Features and Functions Guide
[x] Cancel search | Manufacturer: KIA, Model Year: 2021, Model line: STINGER, Model: KIA STINGER 2021Pages: 62, PDF Size: 7.68 MB
Page 8 of 62
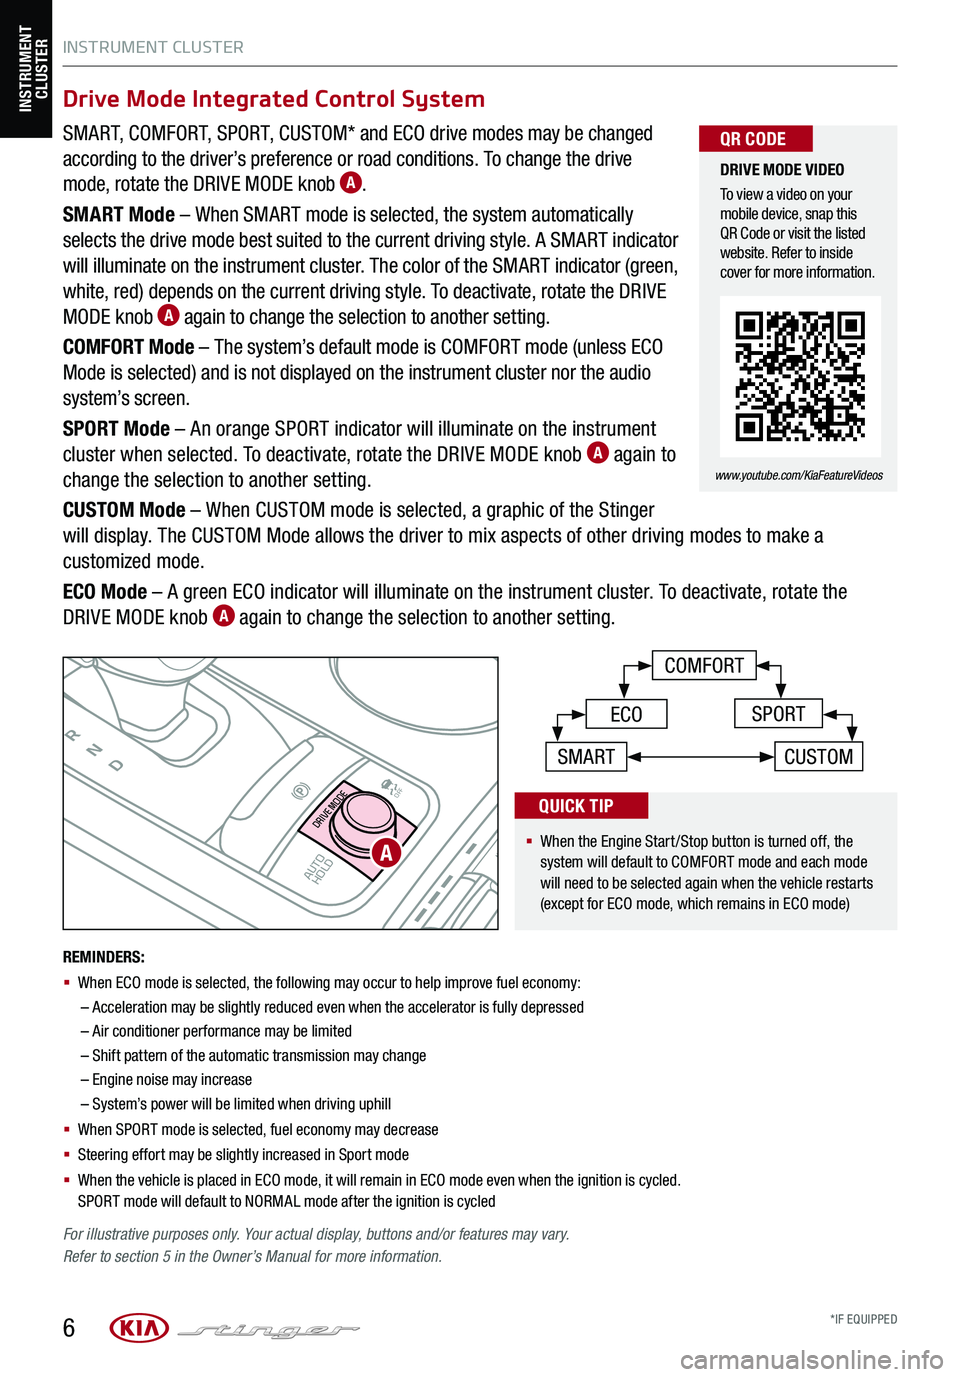
SMART, COMFORT, SPORT, CUSTOM* and ECO drive modes may be changed
according to the driver’s preference or road conditions. To change the drive
mode, rotate the DRIVE MODE knob A.
SMART Mode – When SMART mode is selected, the system automatically
selects the drive mode best suited to the current driving style. A SMART indicator
will illuminate on the instrument cluster. The color of the SMART indicator (green,
white, red) depends on the current driving style. To deactivate, rotate the DRIVE
MODE knob A again to change the selection to another setting.
COMFORT Mode – The system’s default mode is COMFORT mode (unless ECO
Mode is selected) and is not displayed on the instrument cluster nor the audio
system’s screen.
SPORT Mode – An orange SPORT indicator will illuminate on the instrument
cluster when selected. To deactivate, rotate the DRIVE MODE knob A again to
change the selection to another setting.
CUSTOM Mode – When CUSTOM mode is selected, a graphic of the Stinger
will display. The CUSTOM Mode allows the driver to mix aspects of other driving modes to make a
customized mode.
ECO Mode – A green ECO indicator will illuminate on the instrument cluster. To deactivate, rotate the
DRIVE MODE knob A again to change the selection to another setting.
INSTRUMENT CLUSTER
6
P
RN
D
AUTO
HOLD
DRIVE MODE
OFF
OFF
VIEW
P
COMFORT
ECOSPORT
SMARTCUSTOM
For illustrative purposes only. Your actual display, buttons and/or features may vary. Refer to section 5 in the Owner’s Manual for more information.
INSTRUMENT CLUSTER
A
DRIVE MODE VIDEO
To view a video on your mobile device, snap this QR Code or visit the listed website. Refer to inside cover for more information.
www.youtube.com/KiaFeatureVideos
QR CODE
REMINDERS:
§
When ECO mode is selected, the following may occur to help improve fuel economy:
–
Acceleration may be slightly reduced even when the accelerator is fully depressed
– Air conditioner performance may be limited
– Shift pattern of the automatic transmission may change
– Engine noise may increase
– System’s power will be limited when driving uphill
§ When SPORT mode is selected, fuel economy may decrease
§ Steering effort may be slightly increased in Sport mode
§ When the vehicle is placed in ECO mode, it will remain in ECO mode even when the ignition is cycled. SPORT mode will default to NORMAL mode after the ignition is cycled
Drive Mode Integrated Control System
§
When the Engine Start/Stop button is turned off, the system will default to COMFORT mode and each mode will need to be selected again when the vehicle restarts (except for ECO mode, which remains in ECO mode)
QUICK TIP
*IF EQUIPPED
Page 14 of 62
12*IF EQUIPPED†LEG AL DISCL AIMERS ON BACK INSIDE COVER
ADAS(Button located on driver’s panel, left of the steering wheel)
(Blind-spot area monitoring)
( Vehicle approaching at high speed monitoring)
Blind-Spot Collision Warning (BCW)†6
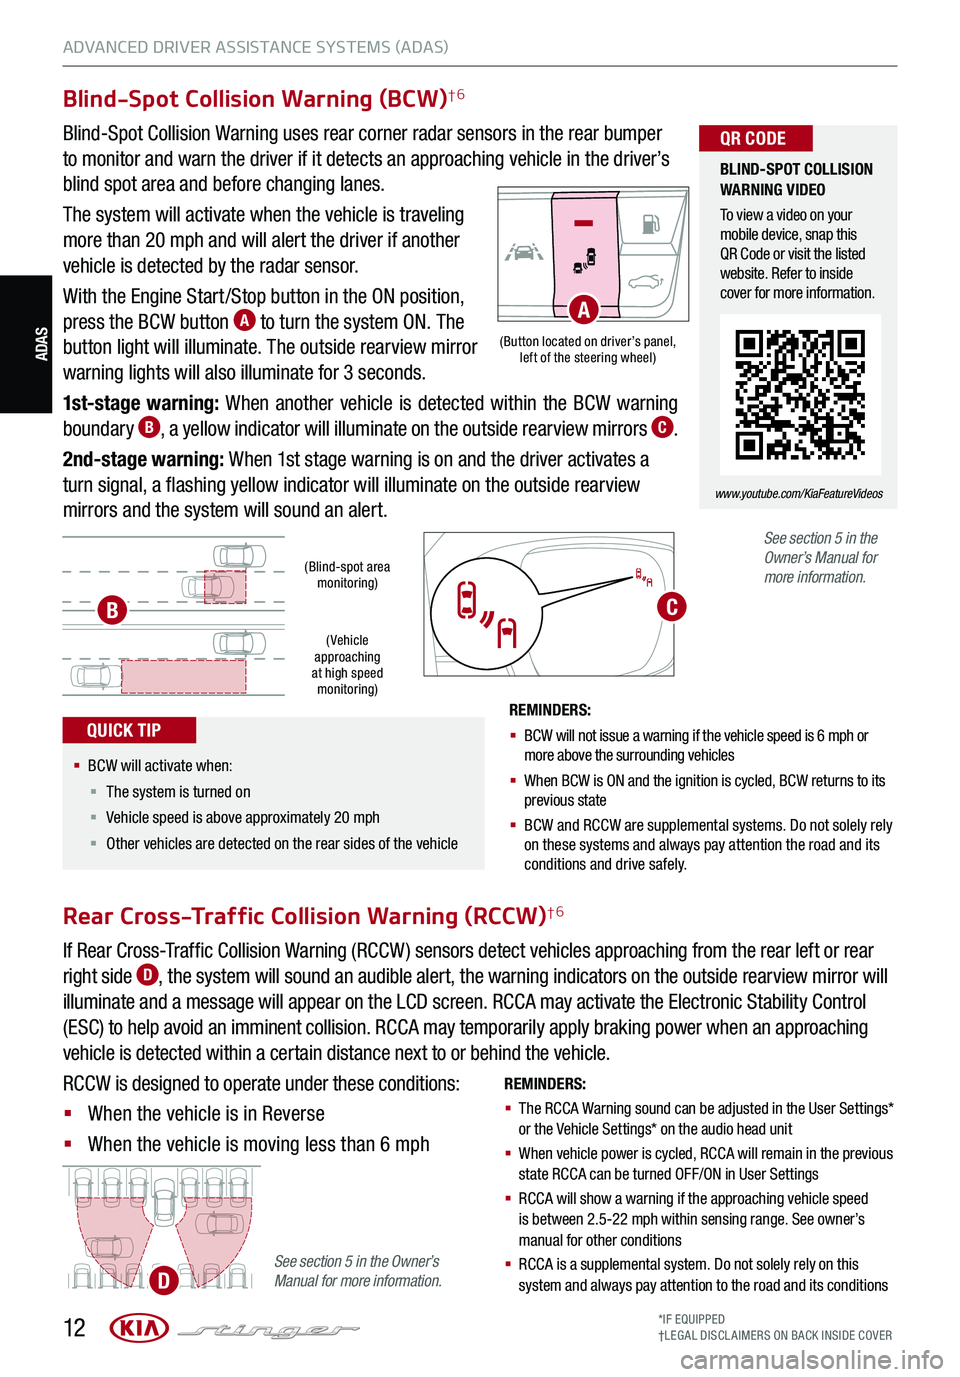
Blind-Spot Collision Warning uses rear corner radar sensors in the rear bumper
to monitor and warn the driver if it detects an approaching vehicle in the driver’s
blind spot area and before changing lanes.
The system will activate when the vehicle is traveling
more than 20 mph and will alert the driver if another
vehicle is detected by the radar sensor.
With the Engine Start /Stop button in the ON position,
press the BCW button A to turn the system ON. The
button light will illuminate. The outside rearview mirror
warning lights will also illuminate for 3 seconds.
1st-stage warning: When another vehicle is detected within the BCW warning
boundary B, a yellow indicator will illuminate on the outside rearview mirrors C.
2nd-stage warning: When 1st stage warning is on and the driver activates a
turn signal, a flashing yellow indicator will illuminate on the outside rearview
mirrors and the system will sound an alert.
REMINDERS:
§ BCW will not issue a warning if the vehicle speed is 6 mph or more above the surrounding vehicles
§ When BCW is ON and the ignition is cycled, BCW returns to its previous state
§
BCW and RCCW are supplemental systems. Do not solely rely on these systems and always pay attention the road and its conditions and drive safely.
See section 5 in the Owner’s Manual for more information.
REMINDERS:
§ The RCCA Warning sound can be adjusted in the User Settings* or the Vehicle Settings* on the audio head unit
§ When vehicle power is cycled, RCCA will remain in the previous state RCCA can be turned OFF/ON in User Settings
§ RCCA will show a warning if the approaching vehicle speed is between 2.5-22 mph within sensing range. See owner’s manual for other conditions
§ RCCA is a supplemental system. Do not solely rely on this system and always pay attention to the road and its conditions
Rear Cross-Traffic Collision Warning (RCCW)†6
If Rear Cross-Traffic Collision Warning (RCCW ) sensors detect vehicles approaching from the rear left or rear
right side D, the system will sound an audible alert, the warning indicators on the outside rearview mirror will
illuminate and a message will appear on the LCD screen. RCCA may activate the Electronic Stability Control
(ESC) to help avoid an imminent collision. RCCA may temporarily apply braking power when an approaching
vehicle is detected within a certain distance next to or behind the vehicle.
RCCW is designed to operate under these conditions:
§ When the vehicle is in Reverse
§ When the vehicle is moving less than 6 mph
A
B
See section 5 in the Owner’s Manual for more information.D
C
BLIND-SPOT COLLISION WARNING VIDEO
To view a video on your mobile device, snap this QR Code or visit the listed website. Refer to inside cover for more information.
www.youtube.com/KiaFeatureVideos
QR CODE
§ BCW will activate when:
§ The system is turned on
§ Vehicle speed is above approximately 20 mph
§ Other vehicles are detected on the rear sides of the vehicle
QUICK TIP
ADVANCED DRIVER ASSISTANCE SYSTEMS (ADAS)
Page 15 of 62
13
ADAS
ADVANCED DRIVER ASSISTANCE SYSTEMS (ADAS)
ALWAYS CHECK THE OWNER’S MANUAL FOR COMPLE TE OPERATING INFORMATION AND SAFETY WARNINGS.*IF EQUIPPED†LEG AL DISCL AIMERS ON BACK INSIDE COVER
Forward Collision-Avoidance Assist (FCA)*† 10
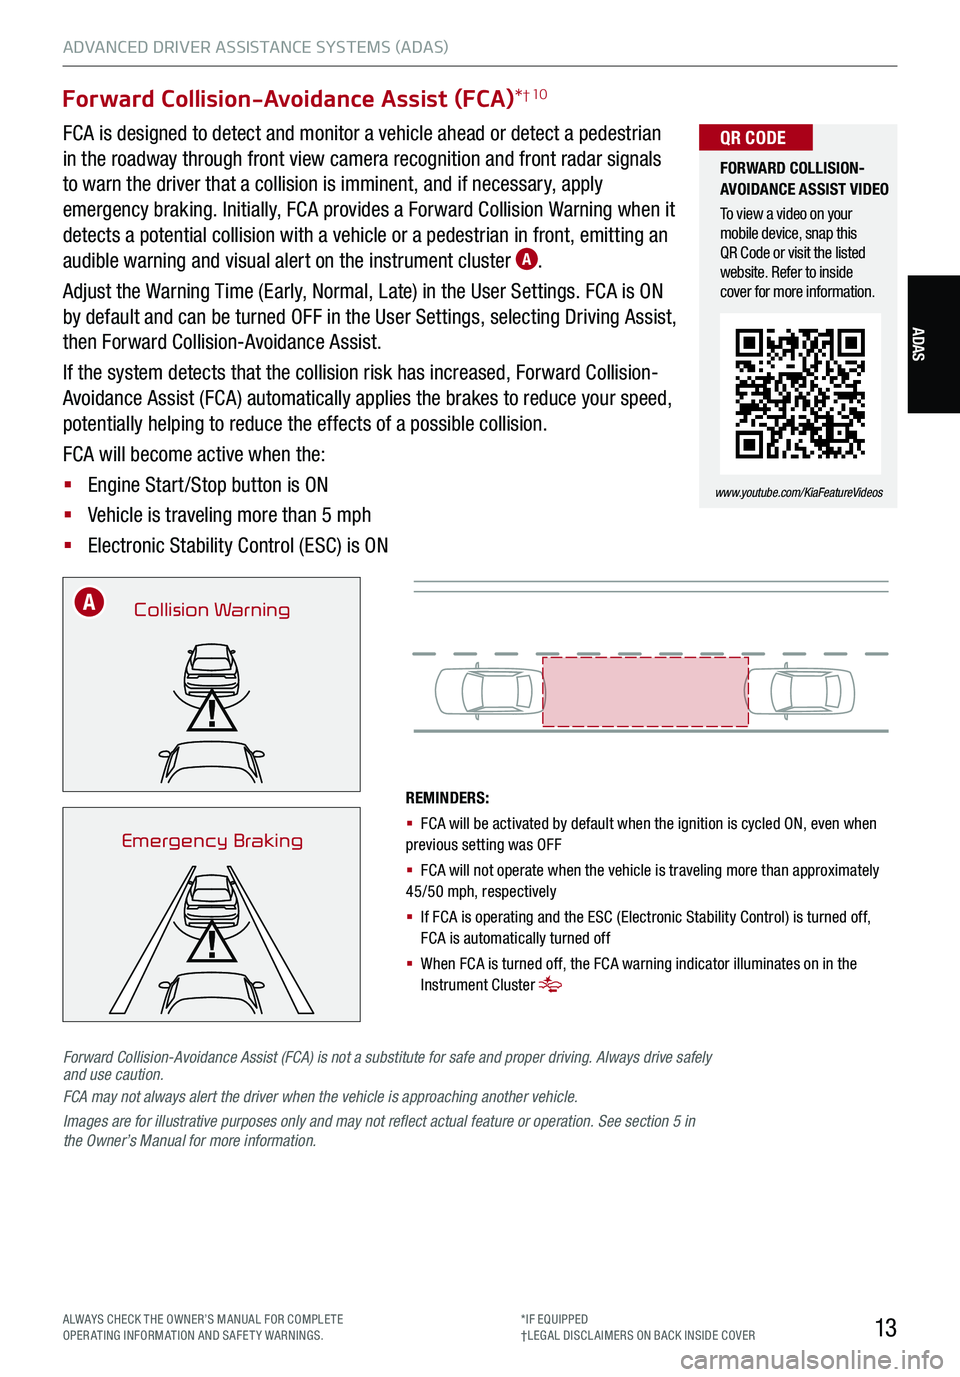
FCA is designed to detect and monitor a vehicle ahead or detect a pedestrian
in the roadway through front view camera recognition and front radar signals
to warn the driver that a collision is imminent, and if necessary, apply
emergency braking. Initially, FCA provides a Forward Collision Warning when it
detects a potential collision with a vehicle or a pedestrian in front, emitting an
audible warning and visual alert on the instrument cluster A.
Adjust the Warning Time (Early, Normal, Late) in the User Settings. FCA is ON
by default and can be turned OFF in the User Settings, selecting Driving Assist,
then Forward Collision-Avoidance Assist.
If the system detects that the collision risk has increased, Forward Collision-
Avoidance Assist (FCA) automatically applies the brakes to reduce your speed,
potentially helping to reduce the effects of a possible collision.
FCA will become active when the:
§ Engine Start /Stop button is ON
§ Vehicle is traveling more than 5 mph
§ Electronic Stability Control (ESC) is ON
REMINDERS:
§ FCA will be activated by default when the ignition is cycled ON, even when previous setting was OFF
§ FCA will not operate when the vehicle is traveling more than approximately 45/50 mph, respectively
§ If FCA is operating and the ESC (Electronic Stability Control) is turned off, FCA is automatically turned off
§ When FCA is turned off, the FCA warning indicator illuminates on in the Instrument Cluster
Collision Warning
Emergency Braking
FORWARD COLLISION-AVOIDANCE ASSIST VIDEO
To view a video on your mobile device, snap this QR Code or visit the listed website. Refer to inside cover for more information.
www.youtube.com/KiaFeatureVideos
QR CODE
Forward Collision-Avoidance Assist (FCA) is not a substitute for safe and proper driving. Always drive safely and use caution. FCA may not always alert the driver when the vehicle is approaching another vehicle.
Images are for illustrative purposes only and may not reflect actual feature or operation. See section 5 in the Owner’s Manual for more information.
A
Page 16 of 62
14*IF EQUIPPED†LEG AL DISCL AIMERS ON BACK INSIDE COVER
ADAS
Lane Keeping Assist (LKA)*†6
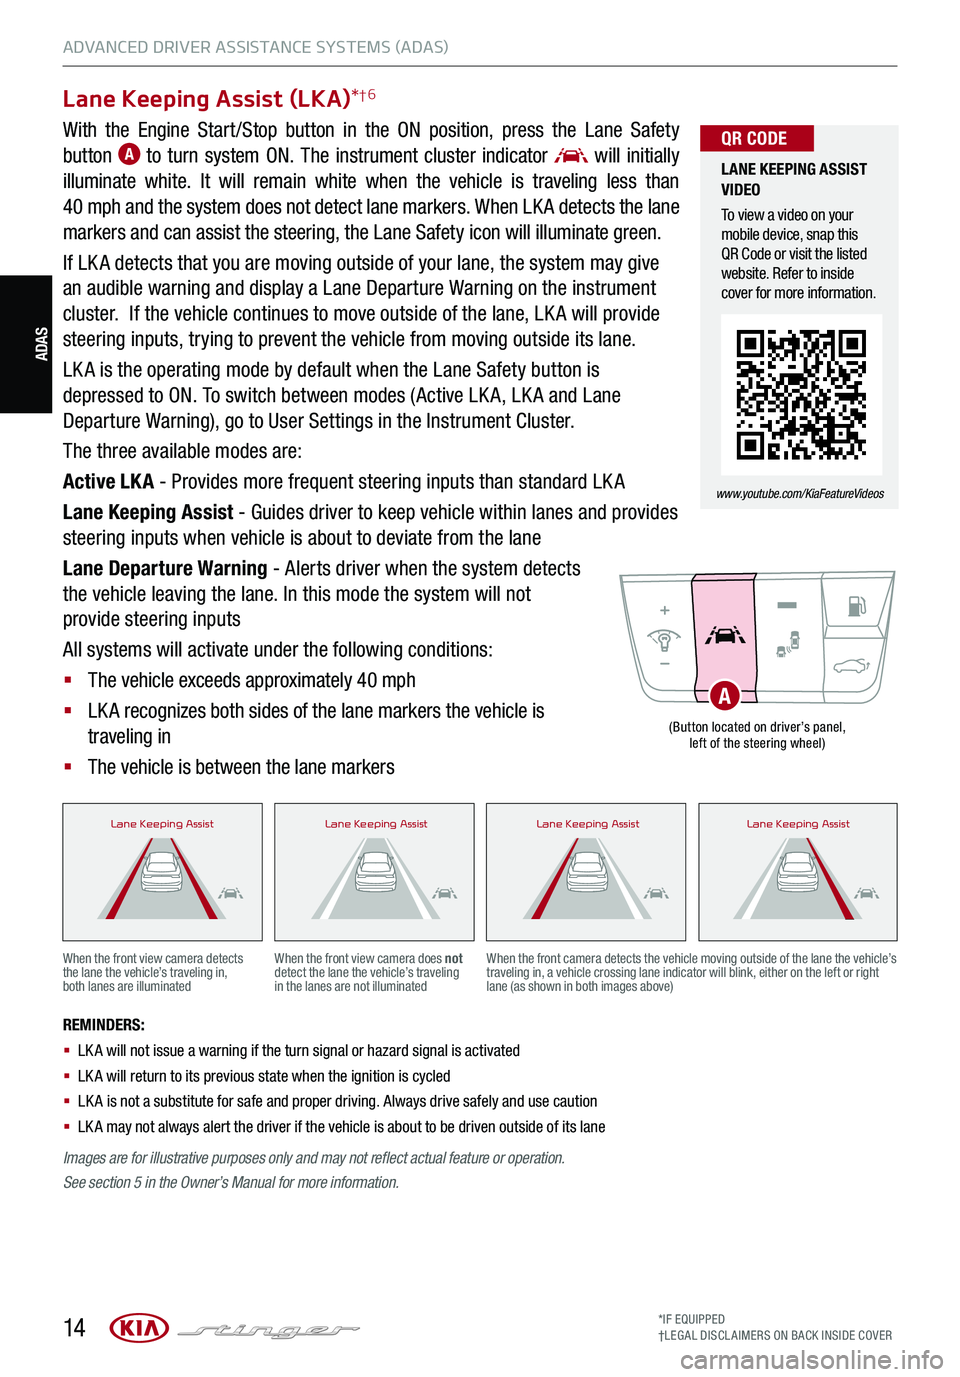
With the Engine Start /Stop button in the ON position, press the Lane Safety
button A to turn system ON. The instrument cluster indicator will initially
illuminate white. It will remain white when the vehicle is traveling less than
40 mph and the system does not detect lane markers. When LK A detects the lane
markers and can assist the steering, the Lane Safety icon will illuminate green.
If LK A detects that you are moving outside of your lane, the system may give
an audible warning and display a Lane Departure Warning on the instrument
cluster. If the vehicle continues to move outside of the lane, LK A will provide
steering inputs, trying to prevent the vehicle from moving outside its lane.
LK A is the operating mode by default when the Lane Safety button is
depressed to ON. To switch between modes (Active LK A, LK A and Lane
Departure Warning), go to User Settings in the Instrument Cluster.
The three available modes are:
Active LK A - Provides more frequent steering inputs than standard LK A
Lane Keeping Assist - Guides driver to keep vehicle within lanes and provides
steering inputs when vehicle is about to deviate from the lane
Lane Departure Warning - Alerts driver when the system detects
the vehicle leaving the lane. In this mode the system will not
provide steering inputs
All systems will activate under the following conditions:
§ The vehicle exceeds approximately 40 mph
§ LK A recognizes both sides of the lane markers the vehicle is
traveling in
§ The vehicle is between the lane markers
REMINDERS:
§
LK A will not issue a warning if the turn signal or hazard signal is activated
§
LK A will return to its previous state when the ignition is cycled
§ LK A is not a substitute for safe and proper driving. Always drive safely and use caution
§ LK A may not always alert the driver if the vehicle is about to be driven outside of its lane
When the front view camera detects the lane the vehicle’s traveling in, both lanes are illuminated
When the front view camera does not detect the lane the vehicle’s traveling in the lanes are not illuminated
When the front camera detects the vehicle moving outside of the lane the vehicle’s traveling in, a vehicle crossing lane indicator will blink, either on the left or right lane (as shown in both images above)
Lane Keeping AssistLane Keeping AssistLane Keeping AssistLane Keeping AssistLane Keeping AssistLane Keeping AssistLane Keeping AssistLane Keeping AssistLane Keeping AssistLane Keeping AssistLane Keeping AssistLane Keeping AssistLane Keeping AssistLane Keeping AssistLane Keeping AssistLane Keeping Assist
(Button located on driver’s panel, left of the steering wheel)
A
LANE KEEPING ASSIST VIDEO
To view a video on your mobile device, snap this QR Code or visit the listed website. Refer to inside cover for more information.
www.youtube.com/KiaFeatureVideos
QR CODE
Images are for illustrative purposes only and may not reflect actual feature or operation.
See section 5 in the Owner’s Manual for more information.
ADVANCED DRIVER ASSISTANCE SYSTEMS (ADAS)
Page 17 of 62
15
ADAS
ADVANCED DRIVER ASSISTANCE SYSTEMS (ADAS)
ALWAYS CHECK THE OWNER’S MANUAL FOR COMPLE TE OPERATING INFORMATION AND SAFETY WARNINGS.*IF EQUIPPED†LEG AL DISCL AIMERS ON BACK INSIDE COVER
Driver Attention Warning (DAW)†7
DAW is designed to alert the driver if it detects certain inattentive
driving and, in certain situations, can give a warning signal to take
a break from driving.
DAW is set to OFF by default. To turn DAW ON, turn the ignition on
and then select User Settings in the LCD Display on the Instrument
Cluster. Then go to Driving Assist and select Driver Attention
Warning. Set the DAW System to Normal or High Sensitivity.
Driver Attention Warning modes:
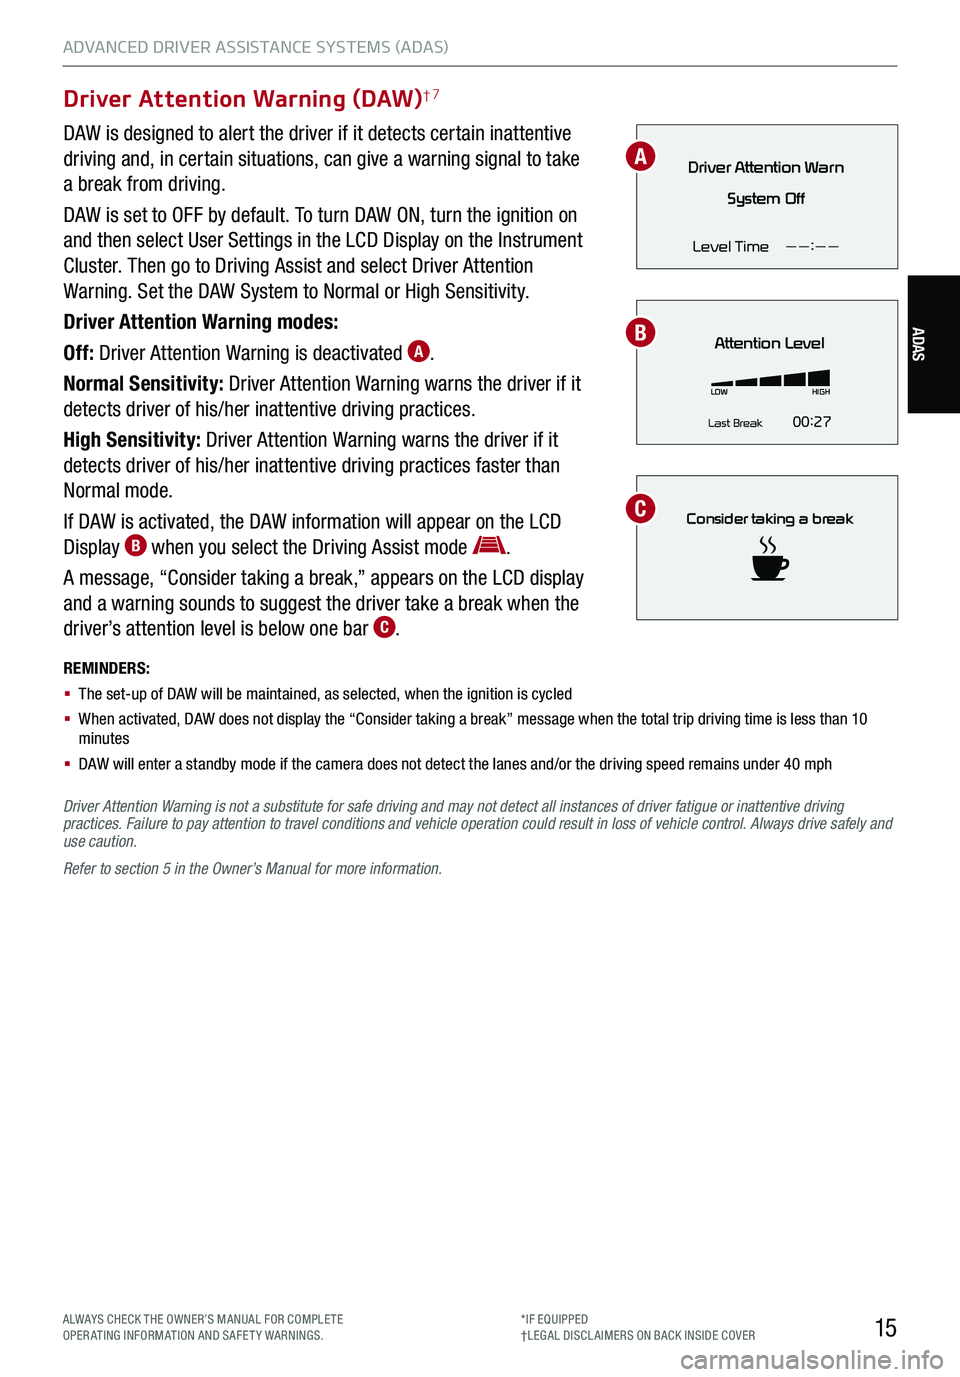
Off: Driver Attention Warning is deactivated A.
Normal Sensitivity: Driver Attention Warning warns the driver if it
detects driver of his/her inattentive driving practices.
High Sensitivity: Driver Attention Warning warns the driver if it
detects driver of his/her inattentive driving practices faster than
Normal mode.
If DAW is activated, the DAW information will appear on the LCD
Display B when you select the Driving Assist mode .
A message, “Consider taking a break,” appears on the LCD display
and a warning sounds to suggest the driver take a break when the
driver’s attention level is below one bar C.
REMINDERS:
§ The set-up of DAW will be maintained, as selected, when the ignition is cycled
§ When activated, DAW does not display the “Consider taking a break” message when the total trip driving time is less than 10 minutes
§ DAW will enter a standby mode if the camera does not detect the lanes and/or the driving speed remains under 40 mph
Driver Attention Warn
System Off
Level Time ——:——
Attention Level
LOW HIGH
Last Break 00:27
Consider taking a break
Driver Attention Warning is not a substitute for safe driving and may not detect all instances of driver fatigue or inattentive driving practices. Failure to pay attention to travel conditions and vehicle operation could result in loss of vehicle control. Always drive safely and use caution.
Refer to section 5 in the Owner’s Manual for more information.
B
C
A
Page 18 of 62
DRIVER’S PANEL
16*IF EQUIPPED†LEG AL DISCL AIMERS ON BACK INSIDE COVER
P
R
N
D
AUTO
HOLD
DRIVE MODE
OFF
OFF
VIEW
P
For more information on Electronic Stability Control (ESC) and its specific features and operations, please refer to section 5 in the Owner’s Manual.
Refer to section 4 in the Owner’s Manual for more information.
Refer to section 5 in the Owner’s Manual for more information.
Instrument Cluster Control (Instrument Panel Dimmer)
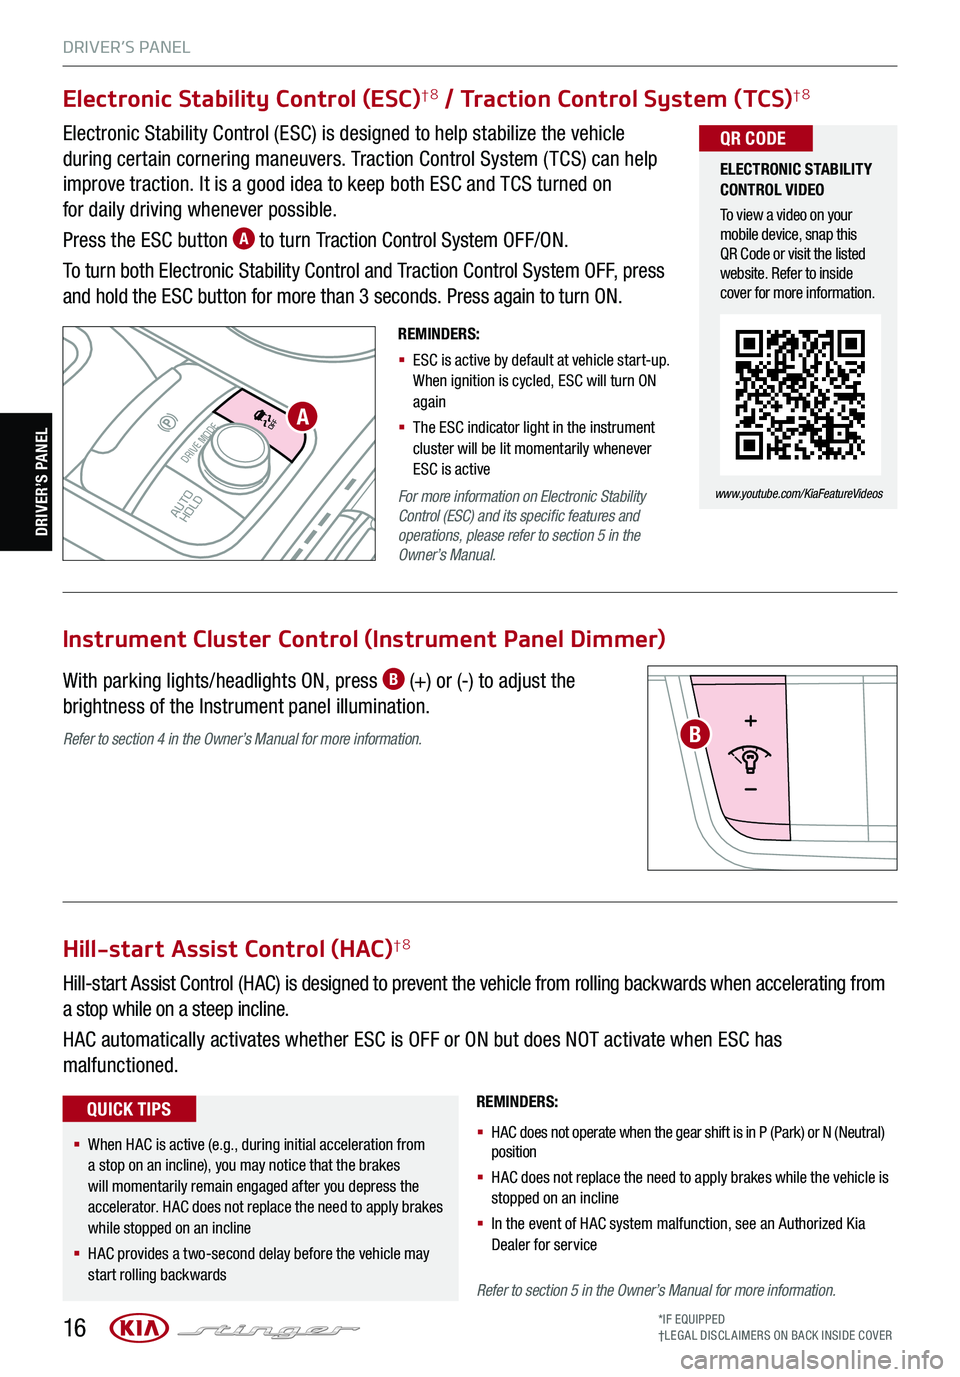
With parking lights/headlights ON, press B (+) or (-) to adjust the
brightness of the Instrument panel illumination.
Electronic Stability Control (ESC)†8 / Traction Control System (TCS)†8
Electronic Stability Control (ESC) is designed to help stabilize the vehicle
during certain cornering maneuvers. Traction Control System ( TCS) can help
improve traction. It is a good idea to keep both ESC and TCS turned on
for daily driving whenever possible.
Press the ESC button A to turn Traction Control System OFF/ON.
To turn both Electronic Stability Control and Traction Control System OFF, press
and hold the ESC button for more than 3 seconds. Press again to turn ON.
Hill-start Assist Control (HAC)†8
Hill-start Assist Control (HAC) is designed to prevent the vehicle from rolling backwards when accelerating from
a stop while on a steep incline.
HAC automatically activates whether ESC is OFF or ON but does NOT activate when ESC has
malfunctioned.
REMINDERS:
§ HAC does not operate when the gear shift is in P (Park) or N (Neutral) position
§
HAC does not replace the need to apply brakes while the vehicle is stopped on an incline
§ In the event of HAC system malfunction, see an Authorized Kia Dealer for service
A
B
ELECTRONIC STABILITY CONTROL VIDEO
To view a video on your mobile device, snap this QR Code or visit the listed website. Refer to inside cover for more information.
www.youtube.com/KiaFeatureVideos
QR CODE
REMINDERS:
§ ESC is active by default at vehicle start-up. When ignition is cycled, ESC will turn ON again
§ The ESC indicator light in the instrument cluster will be lit momentarily whenever ESC is active
§
When HAC is active (e.g., during initial acceleration from a stop on an incline), you may notice that the brakes will momentarily remain engaged after you depress the accelerator. HAC does not replace the need to apply brakes while stopped on an incline
§ HAC provides a two-second delay before the vehicle may start rolling backwards
QUICK TIPS
DRIVER’S PANEL
Page 24 of 62
22
STEERING WHEEL CONTROLS
STEERING WHEEL CONTROLS
MISTOFF
AUTO LOHIAUTO
Lifting Wipers (Wiper Service Mode)
To lift the windshield wipers to clean windshield, inspect or replace
wiper blades or raise wipers in snow/ice conditions without damaging
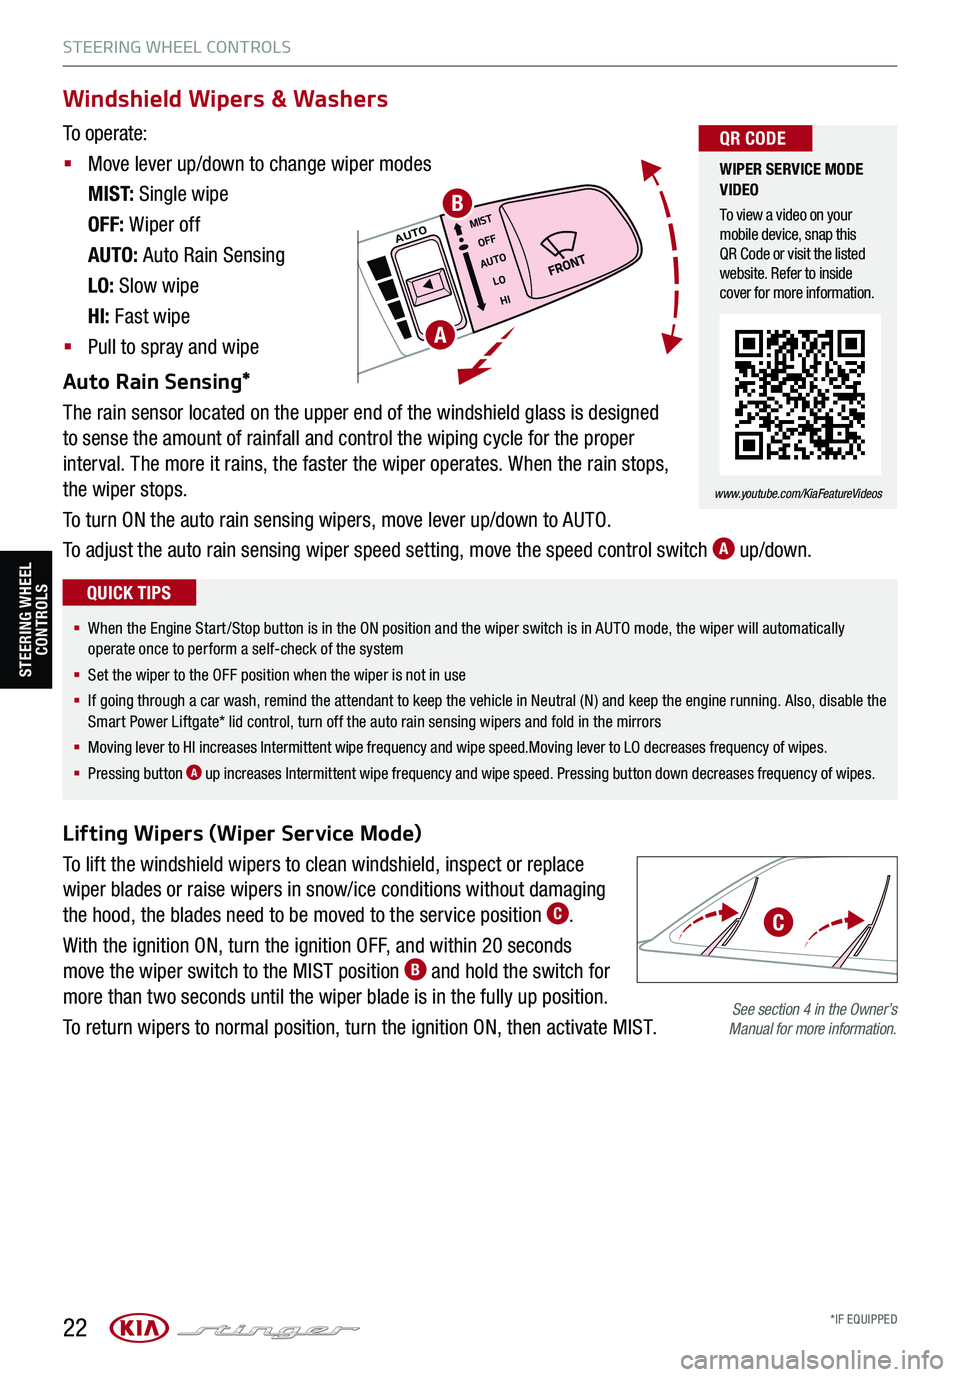
the hood, the blades need to be moved to the service position C.
With the ignition ON, turn the ignition OFF, and within 20 seconds
move the wiper switch to the MIST position B and hold the switch for
more than two seconds until the wiper blade is in the fully up position.
To return wipers to normal position, turn the ignition ON, then activate MIST.
A
B
See section 4 in the Owner’s Manual for more information.
Windshield Wipers & Washers
To operate:
§ Move lever up/down to change wiper modes
M I S T: Single wipe
OFF: Wiper off
AUTO: Auto Rain Sensing
LO: Slow wipe
HI: Fast wipe
§ Pull to spray and wipe
Auto Rain Sensing*
The rain sensor located on the upper end of the windshield glass is designed
to sense the amount of rainfall and control the wiping cycle for the proper
interval. The more it rains, the faster the wiper operates. When the rain stops,
the wiper stops.
To turn ON the auto rain sensing wipers, move lever up/down to AUTO.
To adjust the auto rain sensing wiper speed setting, move the speed control switch A up/down.
WIPER SERVICE MODE VIDEO
To view a video on your mobile device, snap this QR Code or visit the listed website. Refer to inside cover for more information.
www.youtube.com/KiaFeatureVideos
QR CODE
§ When the Engine Start/Stop button is in the ON position and the wiper switch is in AUTO mode, the wiper will automatically operate once to perform a self-check of the system
§ Set the wiper to the OFF position when the wiper is not in use
§ If going through a car wash, remind the attendant to keep the vehicle in Neutral (N) and keep the engine running. Also, disable the Smart Power Liftgate* lid control, turn off the auto rain sensing wipers and fold in the mirrors
§
Moving lever to HI increases Intermittent wipe frequency and wipe speed.Moving lever to LO decreases frequency of wipes.
§ Pressing button A up increases Intermittent wipe frequency and wipe speed. Pressing button down decreases frequency of wipes.
QUICK TIPS
C
*IF EQUIPPED
Page 27 of 62

25
STEERING WHEEL CONTROLS
STEERING WHEEL CONTROLS
CRUISE
RESOKSET
CANCEL
OK
CRUISE
RESOKSET
CANCEL
OK
I
K
J
REMINDER: Cruise Control will not activate until the brake pedal has been depressed at least once after the ignition is ON or engine starting
§ Cruise Control is designed to function above approximately 20 mph only
§ Cruise Control will not activate until the brake pedal has been depressed at least once after ignition ON or engine start
QUICK TIPS
I
Driving Assist button: Press the CRUISE button up to turn the cruise control ON/OFF
J RES+ button: Press up to resume or increase cruising speed
J SE T- button: Press down to set or decrease cruising speed
K CANCEL button: To cancel cruise control setting, do one of the following:
§ Press the brake pedal
§ Press the CANCEL button
Cruise Control (CC)
§ The speed setting for SCC can be adjusted under the following conditions:
§ With no vehicle in front, you must be travelling at a minimum speed of 20 mph
§ When following a vehicle, there is no minimum speed requirement
§ When following a vehicle, the system can automatically adjust your cruise speed based on the vehicle detected in front. It will even bring the vehicle to a complete stop if necessary. If the vehicle remains at a standstill for more than 3 seconds, you must depress the accelerator pedal or press the RES+/SET- button up/down to start the vehicle
§ To change the cruise control mode from SCC to standard cruise control, press and hold button C. Repeat to switch back to SCC mode. (SCC must not be activated to change modes)
QUICK TIPS
Smart Cruise Control (SCC)†6 (Continued)
REMINDERS:
§ CRUISE indicator must be ON in order to operate SCC
§
SCC remains ON when ignition is cycled. The speed setting will need to be reset when ignition is cycled
§
The distance settings are approximations and may vary depending on vehicle speed. See the owner’s manual for more information
§
SCC is also canceled when the driver’s door is opened, gear shift is changed out of D (Drive), Electronic Parking Brake (EPB) is activated and various other conditions. See owner’s manual for other conditions
§ If SCC is left on, it can be activated inadvertently. Keep the system off when not in use to avoid setting a speed which the driver is not aware of
§ SCC is a supplemental system and is not a substitute for safe driving. It is the responsibility of the driver to always check the speed and distance to the vehicle ahead
ALWAYS CHECK THE OWNER’S MANUAL FOR COMPLE TE OPERATING INFORMATION AND SAFETY WARNINGS.*IF EQUIPPED†LEG AL DISCL AIMERS ON BACK INSIDE COVER
Page 34 of 62
32
CENTER PANEL
CENTER PANEL
*IF EQUIPPED
See section 4 in the Owner’s Manual for more information.
REMINDERS:
§ Using the power outlets (accessory plugs) for prolonged periods of time with the Engine Start /Stop button in the ACC position (Engine OFF ) may cause the battery to discharge
§ Only use manufacturer cables that came with your device as third party cables may cause damage to the device. It is recommended to always update your phone to the latest operating system release
12V180WAUX USB
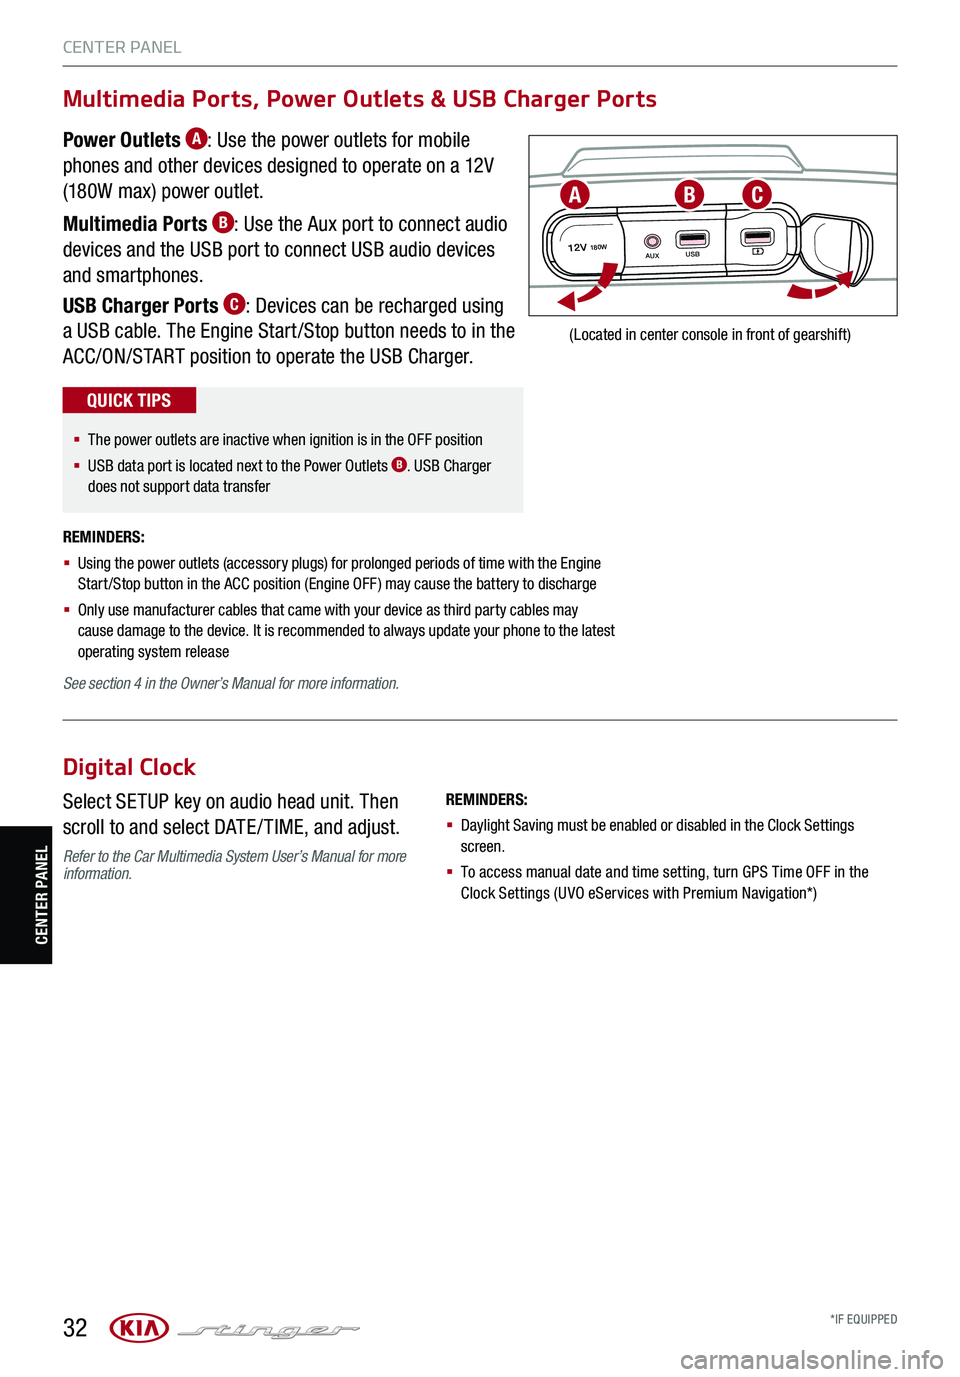
(Located in center console in front of gearshift)
ABC
Multimedia Ports, Power Outlets & USB Charger Ports
Power Outlets A: Use the power outlets for mobile
phones and other devices designed to operate on a 12V
(180W max) power outlet.
Multimedia Ports B: Use the Aux port to connect audio
devices and the USB port to connect USB audio devices
and smartphones.
USB Charger Ports C: Devices can be recharged using
a USB cable. The Engine Start /Stop button needs to in the
ACC/ON/START position to operate the USB Charger.
§ The power outlets are inactive when ignition is in the OFF position
§ USB data port is located next to the Power Outlets B. USB Charger does not support data transfer
QUICK TIPS
Digital Clock
Select SETUP key on audio head unit. Then
scroll to and select DATE / TIME, and adjust.
Refer to the Car Multimedia System User’s Manual for more information.
REMINDERS:
§ Daylight Saving must be enabled or disabled in the Clock Settings screen.
§ To access manual date and time setting, turn GPS Time OFF in the Clock Settings (UVO eServices with Premium Navigation*)
Page 36 of 62

34
CENTER PANEL
*IF EQUIPPED
CENTER PANEL
Idle, Stop and Go (ISG) System
The ISG system is designed to reduce fuel consumption by automatically
shutting down the engine when the vehicle is at a standstill.
When the ISG system is ON and the vehicle is at a standstill the engine will
stop, and the green AUTO STOP indicator A on the instrument cluster will
illuminate.
The engine will restart when the brake pedal is released or the shift lever is
moved from D (Drive) to the R (Reverse) position or to Manual Shift mode*.
When the engine restarts, the green AUTO STOP indicator on the instrument
cluster will turn off.
To deactivate the ISG System, press the ISG OFF button B. If you press again,
the system will be activated.
For more information on Idle, Stop and Go System, refer to section 5 in the Owner’s Manual or contact your local dealership.
REMINDERS:
§ ISG is active by default at vehicle start- up. When ignition is cycled, ISG will turn ON again
§ Under certain conditions, the engine will restart automatically even if the brake pedal is still depressed
§ If the AUTO STOP indicator is continuously blinking yellow and the ISG button LED is on, please contact an authorized Kia dealer
Images are for illustrative purposes only and may not reflect actual feature or operation
(Type B instrument cluster shown)
0
1 2
3
4
x1000 rpm5
6
7
8
C HE F
km/h
MPH
2030
40
10 0
10 0
80 130
160
200
230
260
290
60
40
20
10 012 0
1 4 0
1 6 0
1 8 0
50
80
60
1 0
0
EPB
AUTO
A
REMINDERS:
§ When launching, stop vehicle and keep steering wheel straight
§ Brake pedal, EPB and Auto Hold must be released for smooth launching
§ Always drive safely and use caution
Refer to section 5 in the Owner’s Manual for more information.
Launch control aids in controlling acceleration to help the vehicle
accelerate smoothly and quickly, while avoiding slipping of the
drive wheels and other engine, clutch and gearbox issues.
To turn on, press and hold the ESC OFF button C for more than
three seconds while DRIVE MODE D is in SPORT Mode.
To activate, with the left foot press brake firmly while gear shift is
in D (Drive) and then press the accelerator pedal fully to the floor.
The LCD will display a ready status.
Launch Control*
P
R
N
D
AUTO
HOLD
DRIVE MODE
OFF
OFF
P
BC
D
To view videos on your mobile device, snap these QR Codes or visit the listed website. Refer to inside cover for more information.
www.youtube.com/KiaFeatureVideos
QR CODE
IDLE, STOP AND GO VIDEO
LAUNCH CONTROL VIDEO
§ The ISG system is disabled when:
§ A seat belt is unfastened
§ The hood or a door is opened
§ Battery condition is poor
§ The front or rear defroster is turned on
§ Engine coolant temperature is low
§ The outside ambient temperature is too low/high
§ Emission control devices activate
§ The vehicle is on a steep slope
QUICK TIPS