instrument cluster KIA STINGER 2021 Owners Manual
[x] Cancel search | Manufacturer: KIA, Model Year: 2021, Model line: STINGER, Model: KIA STINGER 2021Pages: 585, PDF Size: 10.87 MB
Page 17 of 585

25
Your vehicle at a glance
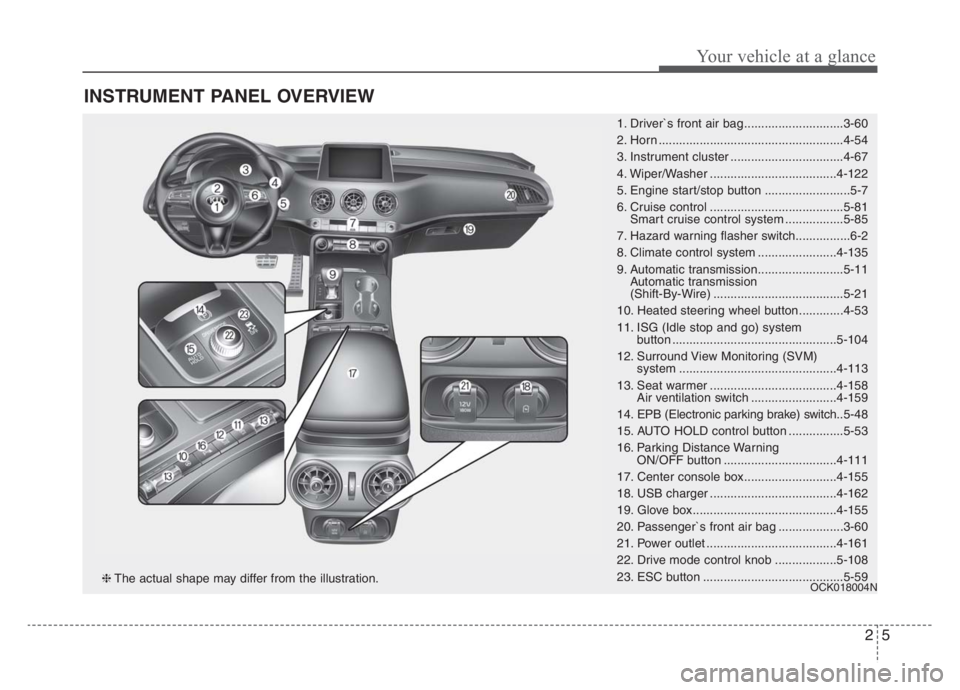
INSTRUMENT PANEL OVERVIEW
1. Driver`s front air bag .............................3-60
2. Horn ......................................................4-54
3. Instrument cluster .................................4-67
4. Wiper/Washer .....................................4-122
5. Engine start/stop button .........................5-7
6. Cruise control .......................................5-81
Smart cruise control system .................5-85
7. Hazard warning flasher switch................6-2
8. Climate control system .......................4-135
9. Automatic transmission.........................5-11
Automatic transmission
(Shift-By-Wire) ......................................5-21
10. Heated steering wheel button.............4-53
11. ISG (Idle stop and go) system
button ................................................5-104
12. Surround View Monitoring (SVM)
system ..............................................4-113
13. Seat warmer .....................................4-158
Air ventilation switch .........................4-159
14. EPB (Electronic parking brake) switch..5-48
15. AUTO HOLD control button ................5-53
16. Parking Distance Warning
ON/OFF button .................................4-111
17. Center console box...........................4-155
18. USB charger .....................................4-162
19. Glove box ..........................................4-155
20. Passenger`s front air bag ...................3-60
21. Power outlet ......................................4-161
22. Drive mode control knob ..................5-108
23. ESC button .........................................5-59
OCK018004N❈The actual shape may differ from the illustration.
Page 91 of 585

Mirrors . . . . . . . . . . . . . . . . . . . . . . . . . . . . . . . . . . 4-55
• Inside rearview mirror . . . . . . . . . . . . . . . . . . . . . . . . 4-55
• Outside rearview mirror. . . . . . . . . . . . . . . . . . . . . . . 4-64
Instrument cluster . . . . . . . . . . . . . . . . . . . . . . . . . 4-67
• Instrument cluster control . . . . . . . . . . . . . . . . . . . . . 4-68
• LCD display control . . . . . . . . . . . . . . . . . . . . . . . . . . 4-68
• Gauges . . . . . . . . . . . . . . . . . . . . . . . . . . . . . . . . . . . . . 4-69
• Transmission shift indicator . . . . . . . . . . . . . . . . . . . . 4-72
LCD windows . . . . . . . . . . . . . . . . . . . . . . . . . . . . . 4-73
• Over view . . . . . . . . . . . . . . . . . . . . . . . . . . . . . . . . . . . 4-73
• Trip information (Trip computer) . . . . . . . . . . . . . . . 4-73
• LCD modes. . . . . . . . . . . . . . . . . . . . . . . . . . . . . . . . . . 4-77
• Distance to empty . . . . . . . . . . . . . . . . . . . . . . . . . . . . 4-81
• User settings mode. . . . . . . . . . . . . . . . . . . . . . . . . . . . 4-82
• Warning messages . . . . . . . . . . . . . . . . . . . . . . . . . . . . 4-87
Warning and indicator lights . . . . . . . . . . . . . . . . 4-92
• Warning lights . . . . . . . . . . . . . . . . . . . . . . . . . . . . . . . 4-92
• Indicator lights. . . . . . . . . . . . . . . . . . . . . . . . . . . . . . 4-100
Head Up Display (HUD) . . . . . . . . . . . . . . . . . . . 4-105
• Description . . . . . . . . . . . . . . . . . . . . . . . . . . . . . . . . . 4-105
• Head Up Display on/off. . . . . . . . . . . . . . . . . . . . . . . 4-106
• Head Up Display information . . . . . . . . . . . . . . . . . 4-106
• Head Up Display setting . . . . . . . . . . . . . . . . . . . . . . 4-106
Reverse Parking Distance Warning . . . . . . . . . . 4-107
• Operation of Reverse Parking Distance Warning . 4-107
• Non-operational conditions of Reverse Parking
Distance Warning . . . . . . . . . . . . . . . . . . . . . . . . . . 4-108
• Reverse Parking Distance Warning precautions . . 4-109
• Self-diagnosis . . . . . . . . . . . . . . . . . . . . . . . . . . . . . . . 4-110
Parking Distance Warning (PDW) system . . . . . 4-111
• Operation of Parking Distance Warning. . . . . . . . . 4-111
• Non-operational conditions of Parking Distance
Warning . . . . . . . . . . . . . . . . . . . . . . . . . . . . . . . . . . 4-113
• Self-diagnosis . . . . . . . . . . . . . . . . . . . . . . . . . . . . . . . 4-115
Rear View Monitor (RVM) system . . . . . . . . . . . 4-116
Surround View Monitoring (SVM) system . . . . 4-117
Lighting . . . . . . . . . . . . . . . . . . . . . . . . . . . . . . . . . 4-118
• Battery saver function . . . . . . . . . . . . . . . . . . . . . . . . 4-118
• Daytime running light . . . . . . . . . . . . . . . . . . . . . . . . 4-118
• Lighting control . . . . . . . . . . . . . . . . . . . . . . . . . . . . . 4-118
• High beam operation. . . . . . . . . . . . . . . . . . . . . . . . . 4-120
• High Beam Assist (HBA) system . . . . . . . . . . . . . . . 4-121
• Turn signals and lane change signals . . . . . . . . . . . 4-123
• Check headlight . . . . . . . . . . . . . . . . . . . . . . . . . . . . . 4-124
• Headlight leveling device . . . . . . . . . . . . . . . . . . . . . 4-124
• Dynamic Bending Light (DBL) . . . . . . . . . . . . . . . . 4-125
4
Page 140 of 585

451
Features of your vehicle
Electric power steering (EPS)
The power steering uses a motor to
assist you in steering the vehicle. If
the engine is off or if the power steer-
ing system becomes inoperative, the
vehicle may still be steered, but it will
require increased steering effort.
The EPS is controlled by a power
steering control unit which senses
the steering wheel torque and vehi-
cle speed to command the motor.
The steering becomes heavier as the
vehicle’s speed increases and
becomes lighter as the vehicle’s
speed decreases for optimum steer-
ing control.
Should you notice any change in the
effort required to steer during normal
vehicle operation, have the power
steering checked by an authorized
Kia dealer. When you operate the steering
wheel in low temperature, noise
may occur. If temperature rises, the
noise will likely disappear. This is a
normal condition.
When the vehicle is stationary, and
the steering wheel is turned all the
way to the left or right continuous-
ly, the steering wheel becomes
harder to turn. The power assist is
limited to protect the motor from
overheating.
As time passes, the steering wheel
will return to its normal condition.
✽ ✽
NOTICE
The following symptoms may occur
during normal vehicle operation:
• The EPS warning light does not
illuminate.
• The steering gets heavy immedi-
ately after turning the ignition
switch on. This happens as the sys-
tem performs the EPS system
diagnostics. When the diagnostics
are completed, the steering wheel
will return to its normal condition.
• A click noise may be heard from
the EPS relay after the Engine
Start/Stop button is turned to the
ON or OFF position.
• A motor noise may be heard when
the vehicle is at a stop or at a low
driving speed.
• If the Electric Power Steering
System does not operate normally,
the warning light will illuminate on
the instrument cluster. The power
steering system will not operate
and steering effort can increase.
Take your vehicle to an authorized
Kia dealer and have the vehicle
checked as soon as possible.
(Continued)
STEERING WHEEL
Page 156 of 585

467
Features of your vehicle
INSTRUMENT CLUSTER
1. Tachometer
2. Speedometer
3. Engine coolant temperature gauge
4. Fuel gauge
5. LCD display
6. Warning and indicator lights
OCK047100N/OCK047101N
■ ■
Type A
❈The actual cluster in the vehicle may differ
from the illustration.
For more details, refer to the “Gauges” in
this chapter.
■ ■
Type B
Page 157 of 585

Features of your vehicle
68 4
Instrument Cluster Control
Adjusting Instrument Cluster
Illumination
The brightness of the instrument
panel illumination is changed by
pressing the illumination control button
(“+” or “-”) when the Engine Start/Stop
button is ON, or the taillights are
turned on. If you hold the illumination control
button (“+” or “-”), the brightness
will be changed continuously.
If the brightness reaches to the
maximum or minimum level, an
alarm will sound.
LCD Display Control
The LCD display modes can be
changed by using the control buttons
on the steering wheel.
OCK047047L
OCK047138LOCK047048L
OCK047049L
■Type A
■Type B
Page 194 of 585

4105
Features of your vehicle
Description
The Head Up Display is a transpar-
ent display which projects some
information of the instrument cluster
and navigation on the windshield
glass. The Head Up Display image on the
windshield glass may not be visible
when:
- Sitting posture prevents visibility.
- Wearing polarized sunglasses.
- There is an object on the cover of
the head up display.
- Driving on a wet road.
- Lighting is turned on inside the
vehicle.
- Any light comes from the outside.
- Wearing inadequate glasses for
your eyesight.
If the Head Up Display image is not
shown well, adjust the height, rota-
tion or illumination of the Head Up
Display in the LCD window.
❈For more details, refer to “LCD
window” in this chapter.
When the Head Up Display needs
inspection or repair, consult an
authorized Kia dealer.
Do not place any accessories on
the dashboard or attach any
objects on the windshield glass.
✽ ✽
NOTICE
Installing window tint or any other
type of metallic coating on the wind-
shield can prevent the driver from
seeing the Head Up Display images.
✽ ✽
NOTICE
When replacing the front wind-
shield glass of vehicles equipped
with the head up display, replace it
with a windshield glass designed for
the Head Up Display operation.
Otherwise, duplicated images may
be displayed on the windshield glass.
HEAD UP DISPLAY (HUD) (IF EQUIPPED)
OCK048467N
WARNING - Head Up
Display
The Head Up Display is a sup-
plemental system. Do not solely
rely on the system, always drive
safely, and pay attention to the
driving conditions on the road.
Page 252 of 585

4163
Features of your vehicle
The wireless charging system is
designed for one smart phone
equipped with QI. Please refer to the
smart phone accessory cover or the
smart phone manufacturer home-
page to check whether your smart
phone supports QI function.Wireless smart phone charging
1. Remove any object on the smart
phone charging pad including the
smart key. If there is any foreign
object on the pad other than a
smart phone, the wireless charging
function may not operate properly.
2. Place the smart phone on the cen-
ter of the wireless charging pad.
3. The indicator light will change to
orange once the wireless charging
begins. After the charging is com-
plete, the orange light will change
to green.
4. You can choose to turn the wireless
charging function to either ON or
OFF by selecting the USM on the
instrument cluster. (Please refer to
“Instrument Cluster” for details).
If the wireless charging does not
work, gently move your smart phone
around the pad until the charging indi-
cator light turns yellow. Depending on
the smart phone, the charging indica-
tor light may not turn green even after
the charging is complete.If the wireless charging is not func-
tioning properly, the orange light will
blink and flash for ten seconds then
turn off. In such cases, remove the
smart phone from the pad and
replace it on the pad again, or double
check the charging status.
If you leave the smart phone on the
charging pad when the vehicle igni-
tion is in OFF, the vehicle will alert
you through warning messages and
sound (applicable for vehicles with
voice guidance function) after the
‘Good bye’ function on the instru-
ment cluster ends.
Page 283 of 585

Driving your vehicle
22 5
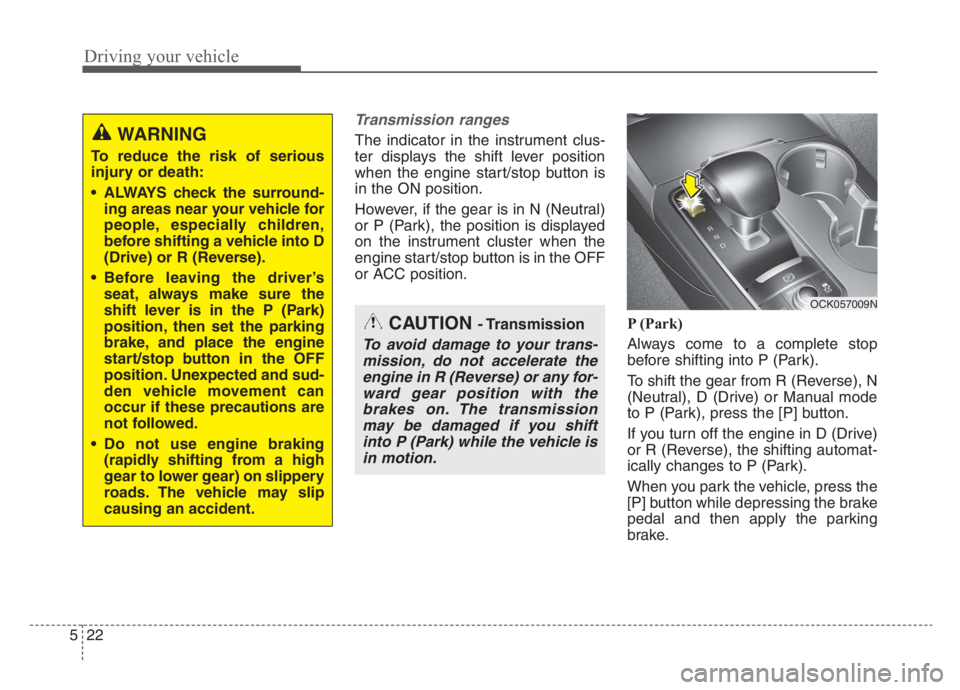
Transmission ranges
The indicator in the instrument clus-
ter displays the shift lever position
when the engine start/stop button is
in the ON position.
However, if the gear is in N (Neutral)
or P (Park), the position is displayed
on the instrument cluster when the
engine start/stop button is in the OFF
or ACC position.
P (Park)
Always come to a complete stop
before shifting into P (Park).
To shift the gear from R (Reverse), N
(Neutral), D (Drive) or Manual mode
to P (Park), press the [P] button.
If you turn off the engine in D (Drive)
or R (Reverse), the shifting automat-
ically changes to P (Park).
When you park the vehicle, press the
[P] button while depressing the brake
pedal and then apply the parking
brake.WARNING
To reduce the risk of serious
injury or death:
ALWAYS check the surround-
ing areas near your vehicle for
people, especially children,
before shifting a vehicle into D
(Drive) or R (Reverse).
Before leaving the driver’s
seat, always make sure the
shift lever is in the P (Park)
position, then set the parking
brake, and place the engine
start/stop button in the OFF
position. Unexpected and sud-
den vehicle movement can
occur if these precautions are
not followed.
Do not use engine braking
(rapidly shifting from a high
gear to lower gear) on slippery
roads. The vehicle may slip
causing an accident.
OCK057009N
CAUTION - Transmission
To avoid damage to your trans-
mission, do not accelerate the
engine in R (Reverse) or any for-
ward gear position with the
brakes on. The transmission
may be damaged if you shift
into P (Park) while the vehicle is
in motion.
Page 299 of 585

Driving your vehicle
38 5
Using All Wheel Drive (AWD)
The All Wheel Drive (AWD) System
delivers engine power to front and
rear wheels for maximum traction.
AWD is useful when extra traction is
required, such as when driving slip-
pery, muddy, wet, or snow-covered
roads.
If the system determines there is a
need for four wheel drive, the
engine's driving power is distributed
to all four wheels automatically.
ALL WHEEL DRIVE (AWD) (IF EQUIPPED)
WARNING
If the AWD warning light ( )
stays on the instrument cluster,
your vehicle may have a mal-
function with the AWD system.
When the AWD warning light
( ) illuminates, we recom-
mend that the vehicle be
checked by an authorized Kia
dealer as soon as possible.
WARNING
To reduce the risk of SERIOUS
INJURY or DEATH:
Do not drive in conditions that
exceed the vehicle's intended
design such as challenging
off-road conditions.
(Continued)
(Continued)
Avoid high speeds when cor-
nering or turning.
Do not make quick steering
wheel movements, such as
sharp lane changes or fast,
sharp turns.
The risk of a rollover is great-
ly increased if you lose con-
trol of your vehicle at highway
speeds.
Loss of control often occurs if
two or more wheels drop off
the roadway and the driver
over steers to reenter the
roadway.
In the event your vehicle
leaves the roadway, do not
steer sharply. Instead, slow
down before pulling back into
the travel lanes.
Page 324 of 585

563
Driving your vehicle
Vehicle stability management
(VSM)
This system provides further
enhancements to vehicle stability
and steering responses when a vehi-
cle is driving on a slippery road or a
vehicle detects changes in coeffi-
cient of friction between right wheels
and left wheels when braking.
VSM operation
When the VSM is in operation, ESC
indicator light ( ) blinks.
When the vehicle stability manage-
ment is operating properly, you can
feel a slight pulsation in the vehicle
and/or abnormal steering responses
EPS (Electric Power Steering). This
is only the effect of brake and EPS
control and indicates nothing unusu-
al.
The VSM does not operate when:
Driving on a sloping road such as a
gradient or incline
Driving in reverse
ESC OFF indicator light ( )
remains on the instrument cluster
EPS (Electric Power Steering) indi-
cator light remains on the instru-
ment cluster
VSM operation off
If you press the ESC OFF button to
turn off the ESC, the VSM will also
cancel and the ESC OFF indicator
light ( ) illuminates.
To turn on the VSM, press the button
again. The ESC OFF indicator light
goes out.
WARNING- Tire/
Wheel size
When replacing tires and wheels,
make sure they are the same size
as the original tires and wheels
installed. Driving with varying
tire or wheel sizes may diminish
any supplemental safety benefits
of the VSM system.WARNING- Vehicle stabili-
ty management
Drive carefully even though your
vehicle has Vehicle stability man-
agement. It can only assist you in
maintaining control under cer-
tain circumstances.