remove seats KIA STONIC 2018 Owners Manual
[x] Cancel search | Manufacturer: KIA, Model Year: 2018, Model line: STONIC, Model: KIA STONIC 2018Pages: 523, PDF Size: 24.99 MB
Page 24 of 523
(Continued)
•Luggage and other cargo should belaid flat in the cargo area. If ob‐jects are large, heavy, or must bepiled, they must be secured. Underno circumstances should cargo bepiled higher than the seatbacks.Failure to follow these warningscould result in serious injury ordeath in the event of a suddenstop, collision or rollover.
•No passenger should ride in thecargo area or sit or lie on foldedseatbacks while the vehicle ismoving. All passengers must beproperly seated in seats and re‐strained properly while riding.
•When resetting the seatback tothe upright position, make sure itis securely latched by pushing itforward and backwards.
•To avoid the possibility of burns,do not remove the carpet in thecargo area. Emission control devi‐ces beneath this floor generatehigh temperatures.
WARNING
After adjusting the seat, alwayscheck that it is securely locked intoplace by attempting to move theseat forward or backward withoutusing the lock release lever. Suddenor unexpected movement of thedriver's seat could cause you to losecontrol of the vehicle resulting in anaccident.
WARNING
•Use extreme caution so that handsor other objects are not caught inthe seat mechanisms while theseat is moving.
•Do not put a cigarette lighter onthe floor or seat. When you oper‐ate the seat, gas may gush out ofthe lighter and cause fire.
•If there are occupants in the rearseats, be careful while adjustingthe front seat position.
(Continued)
(Continued)
•Use extreme caution when pickingsmall objects trapped under theseats or between the seat and thecenter console. Your hands mightbe cut or injured by the sharpedges of the seat mechanism.
Feature of Seat Leather
• Leather is made from the outer skin of an animal, which goes through a
special process to be available for use. Since it is a natural substance,
each part differs in thickness or den‐
sity.
Wrinkles may appear as a natural re‐
sult of stretching and shrinking de‐
pending on the temperature and hu‐ midity.
• The seat is made of stretchable fab‐ ric to improve comfort.
• The parts contacting the body are curved and the side supporting area
is high which provides driving comfort
and stability.
• Wrinkles may appear naturally from usage. It is not a fault of the product.
Safety features of your vehicle
3-04
Page 26 of 523
Seat cushion height (if equipped,
for driver’s seat)
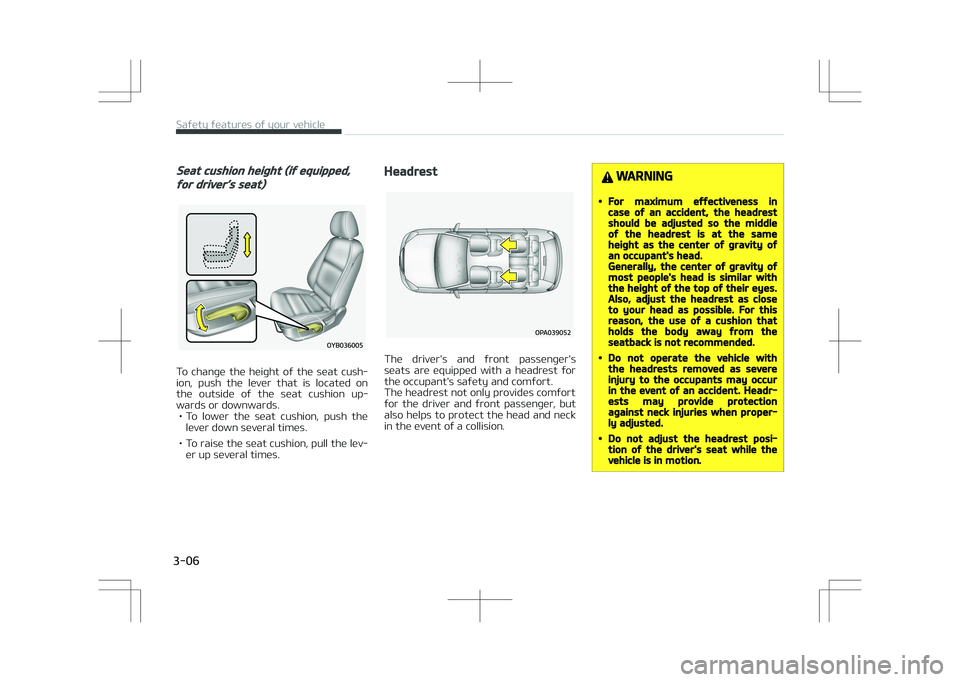
To change the height of the seat cush‐
ion, push the lever that is located on the outside of the seat cushion up‐
wards or downwards. • To lower the seat cushion, push the lever down several times.
• To raise the seat cushion, pull the lev‐ er up several times.
Headrest
The driver's and front passenger's
seats are equipped with a headrest for the occupant's safety and comfort.
The headrest not only provides comfort
for the driver and front passenger, but
also helps to protect the head and neck
in the event of a collision.
WARNING
•For maximum effectiveness incase of an accident, the headrestshould be adjusted so the middleof the headrest is at the sameheight as the center of gravity ofan occupant's head.Generally, the center of gravity ofmost people's head is similar withthe height of the top of their eyes.Also, adjust the headrest as closeto your head as possible. For thisreason, the use of a cushion thatholds the body away from theseatback is not recommended.
•Do not operate the vehicle withthe headrests removed as severeinjury to the occupants may occurin the event of an accident. Headr‐ests may provide protectionagainst neck injuries when proper‐ly adjusted.
•Do not adjust the headrest posi‐tion of the driver's seat while thevehicle is in motion.
Safety features of your vehicle
3-06
Page 27 of 523
CAUTION
When there is no occupant in therear seats, adjust the height of theheadrest to the lowest position. Therear seat headrest can reduce thevisibility of the rear area.
Adjusting the height up and down
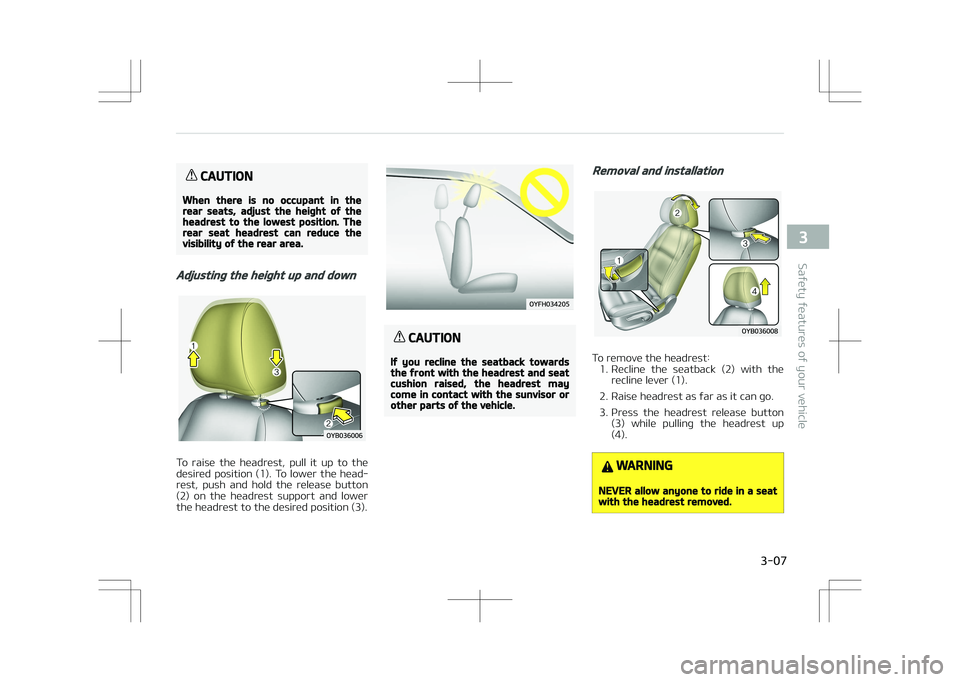
To raise the headrest, pull it up to the
desired position (1). To lower the head‐ rest, push and hold the release button
(2) on the headrest support and lower
the headrest to the desired position (3).
CAUTION
If you recline the seatback towardsthe front with the headrest and seatcushion raised, the headrest maycome in contact with the sunvisor orother parts of the vehicle.
Removal and installation
To remove the headrest: 1. Recline the seatback (2) with the recline lever (1).
2. Raise headrest as far as it can go.
3. Press the headrest release button (3) while pulling the headrest up
(4).
WARNING
NEVER allow anyone to ride in a seatwith the headrest removed.
3-07
3
Safety features of your vehicle
Page 30 of 523
Removal and installation (if equipped)
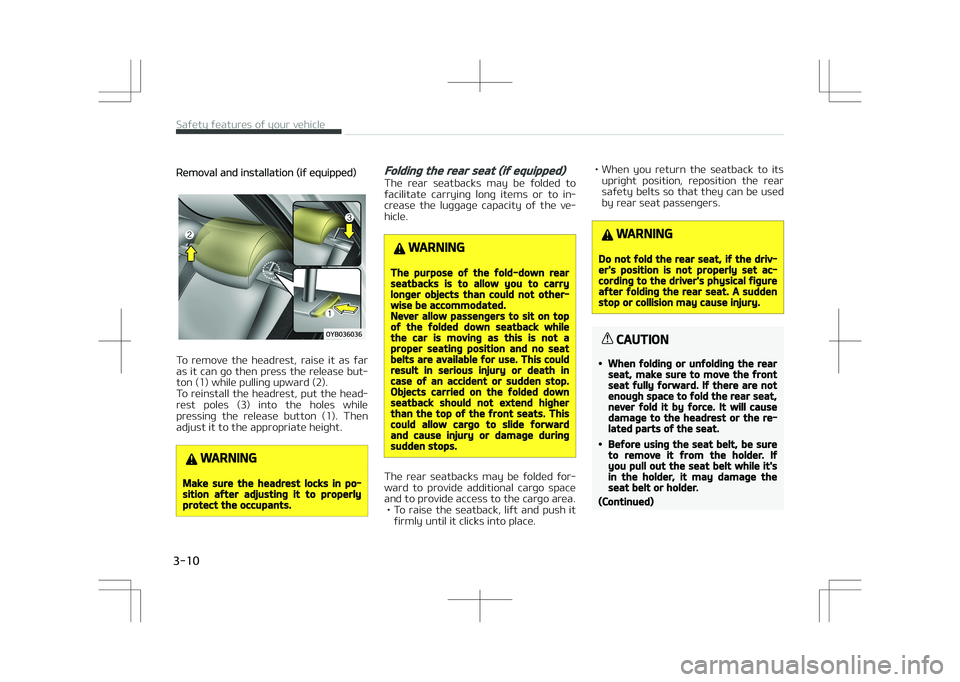
To remove the headrest, raise it as far
as it can go then press the release but‐ ton (1) while pulling upward (2).
To reinstall the headrest, put the head‐
rest poles (3) into the holes while
pressing the release button (1). Then adjust it to the appropriate height.
WARNING
Make sure the headrest locks in po‐sition after adjusting it to properlyprotect the occupants.
Folding the rear seat (if equipped)
The rear seatbacks may be folded to
facilitate carrying long items or to in‐
crease the luggage capacity of the ve‐ hicle.
WARNING
The purpose of the fold-down rearseatbacks is to allow you to carrylonger objects than could not other‐wise be accommodated.Never allow passengers to sit on topof the folded down seatback whilethe car is moving as this is not aproper seating position and no seatbelts are available for use. This couldresult in serious injury or death incase of an accident or sudden stop.Objects carried on the folded downseatback should not extend higherthan the top of the front seats. Thiscould allow cargo to slide forwardand cause injury or damage duringsudden stops.
The rear seatbacks may be folded for‐
ward to provide additional cargo space and to provide access to the cargo area. • To raise the seatback, lift and push it firmly until it clicks into place. • When you return the seatback to its
upright position, reposition the rear
safety belts so that they can be used
by rear seat passengers.
WARNING
Do not fold the rear seat, if the driv‐er's position is not properly set ac‐cording to the driver's physical figureafter folding the rear seat. A suddenstop or collision may cause injury.
CAUTION
•When folding or unfolding the rearseat, make sure to move the frontseat fully forward. If there are notenough space to fold the rear seat,never fold it by force. It will causedamage to the headrest or the re‐lated parts of the seat.
•Before using the seat belt, be sureto remove it from the holder. Ifyou pull out the seat belt while it'sin the holder, it may damage theseat belt or holder.
(Continued)
Safety features of your vehicle
3-10
Page 48 of 523
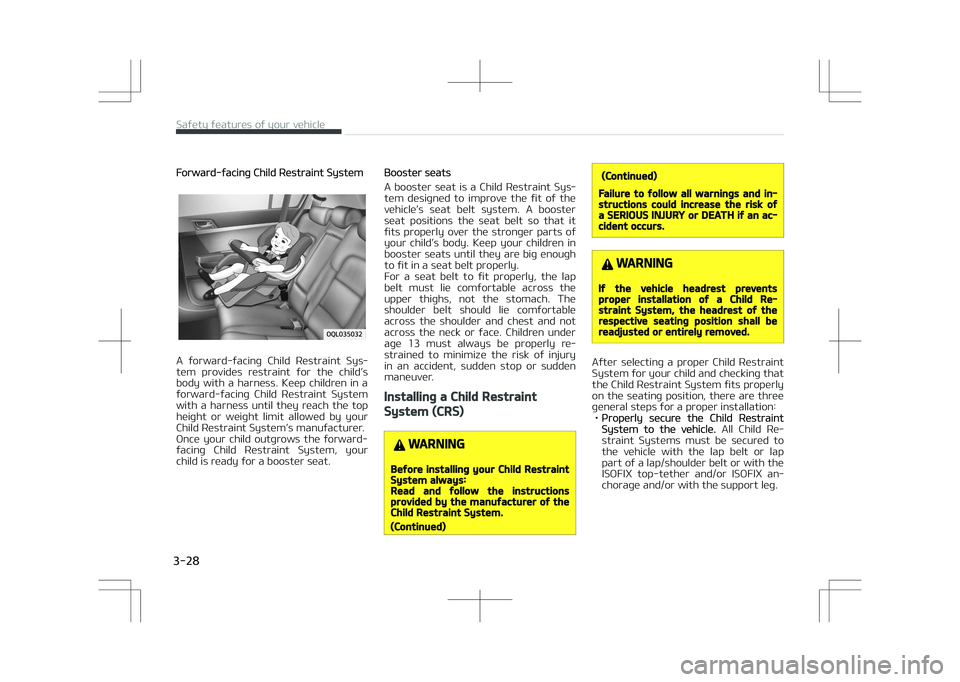
Forward-facing Child Restraint System
A forward-facing Child Restraint Sys‐
tem provides restraint for the child’s body with a harness. Keep children in a
forward-facing Child Restraint System
with a harness until they reach the top height or weight limit allowed by your
Child Restraint System’s manufacturer.
Once your child outgrows the forward-
facing Child Restraint System, your child is ready for a booster seat.
Booster seats
A booster seat is a Child Restraint Sys‐
tem designed to improve the fit of the
vehicle’s seat belt system. A booster seat positions the seat belt so that it
fits properly over the stronger parts of
your child’s body. Keep your children in booster seats until they are big enough
to fit in a seat belt properly.
For a seat belt to fit properly, the lap
belt must lie comfortable across the upper thighs, not the stomach. The
shoulder belt should lie comfortable
across the shoulder and chest and not across the neck or face. Children under
age 13 must always be properly re‐
strained to minimize the risk of injury in an accident, sudden stop or sudden
maneuver.
Installing a Child Restraint
System (CRS)
WARNING
Before installing your Child RestraintSystem always:Read and follow the instructionsprovided by the manufacturer of theChild Restraint System.
(Continued)
(Continued)
Failure to follow all warnings and in‐structions could increase the risk ofa SERIOUS INJURY or DEATH if an ac‐cident occurs.
WARNING
If the vehicle headrest preventsproper installation of a Child Re‐straint System, the headrest of therespective seating position shall bereadjusted or entirely removed.
After selecting a proper Child Restraint
System for your child and checking that the Child Restraint System fits properly
on the seating position, there are three
general steps for a proper installation: •
Properly secure the Child RestraintSystem to the vehicle. All Child Re‐
straint Systems must be secured to
the vehicle with the lap belt or lap
part of a lap/shoulder belt or with the
ISOFIX top-tether and/or ISOFIX an‐
chorage and/or with the support leg.
Safety features of your vehicle
3-28
Page 68 of 523
(Continued)
•Air bags can only be used once -have the system replaced by aprofessional workshop.Kia recommends to visit an au‐thorized Kia dealer/service part‐ner.
•The SRS is designed to deploy thefront air bags only when an impactis sufficiently severe and when theimpact angle is less than 30° fromthe forward longitudinal axis ofthe vehicle. Additionally, the airbags will only deploy once. Seatbelts must be worn at all times.
•Front air bags are not intended todeploy in side-impact, rear-impactor rollover crashes. In addition,front air bags will not deploy infrontal crashes below the deploy‐ment threshold.
•A child restraint system must nev‐er be placed in the front seat. Theinfant or child could be severely in‐jured or killed by an air bag deploy‐ment in case of an accident.
(Continued)
(Continued)
•Children age 12 and under must al‐ways be properly restrained in therear seat. Never allow children toride in the front passenger seat. Ifa child over 12 must be seated inthe front seat, he or she must beproperly belted and the seatshould be moved as far back aspossible.
•For maximum safety protection inall types of crashes, all occupantsincluding the driver should alwayswear their seat belts whether ornot an air bag is also provided attheir seating position to minimizethe risk of severe injury or death inthe event of a crash. Do not sit orlean unnecessarily close to the airbag while the vehicle is in motion.
(Continued)
(Continued)
•Sitting improperly or out of posi‐tion can result in serious or fatalinjury in a crash. All occupantsshould sit upright with the seatback in an upright position, cen‐tered on the seat cushion withtheir seat belt on, legs comforta‐bly extended and their feet on thefloor until the vehicle is parked andthe ignition key is removed.
•The SRS air bag system must de‐ploy very rapidly to provide pro‐tection in a crash. If an occupant isout of position because of notwearing a seat belt, the air bagmay forcefully contact the occu‐pant causing serious or fatal inju‐ries.
Safety features of your vehicle
3-48
Page 478 of 523
Don't neglect the interior
Moisture can collect under the floor
mats and carpeting and cause corro‐
sion. Check under the mats periodically to be sure the carpeting is dry. Use
particular care if you carry fertilizers,
cleaning materials or chemicals in the vehicle.
These should be carried only in proper
containers and any spills or leaks
should be cleaned up, flushed with clean water and thoroughly dried.
Interior care
Interior general precautions
Prevent chemicals such as perfume,
cosmetic oil, sun cream, hand cleaner, and air freshener from contacting the
interior parts because they may cause
damage or discoloration. If they do con‐ tact the interior parts, wipe them off
immediately. If necessary, use a vinyle
cleaner, see instructions for correct us‐ age.
CAUTION
Never allow water or other liquids tocome in contact with electrical/elec‐
(Continued)
(Continued)
tronic components inside the vehicleas this may damage them.
CAUTION
When cleaning leather products(steering wheel, seats etc.), useneutral detergents or low alcoholcontent solutions. If you use high al‐cohol content solutions or acid/alka‐line detergents, the color of theleather may fade or the surface mayget stripped off.
Taking care of leather seats
• Vacuum the seat periodically to re‐ move dust and sand on the seat. It
will prevent abrasion or damage of the leather and maintain its quality.
• Wipe the natural leather seat cover often with dry or soft cloth.
• Sufficient use of a leather protective may prevent abrasion of the cover
and helps maintain the color.
Be sure to read the instructions and
consult a specialist when using leath‐ er coating or protective agents. • Leather with bright colors(beige,
cream beige) is easily contaminated
and clear in appearance. Clean the
seats frequently.
• Avoid wiping with wet cloth. It may cause the surface to crack.
Cleaning the leather seats
• Remove all contaminations instantly.Refer to instructions below for re‐
moval of each contaminant.
• Cosmetic products(sunscreen, foun‐ dation, etc.)- Apply cleansing cream on a cloth and wipe the contaminated point.
Wipe off the cream with a wet
cloth and remove water with a dry
cloth.
• Beverages(coffee, soft drink, etc.) - Apply a small amount of neutraldetergent and wipe until contami‐
nations do not smear.
• Oil - Remove oil instantly with absorba‐ble cloth and wipe with stain re‐
mover for natural leather only.
• Chewing gum - Harden the gum with ice and re‐move gradually.
Maintenance
8-132
Page 479 of 523
Fabric seat cover using precautions
(If equipped)
Please clean the fabric seats regularly
with a vacuum cleaner in consideration of fabric material characteristics. If
they are heavily soiled with beverage
stains, etc., use a suitable interior cleaner. To prevent damage to seat
covers, wipe off the seat covers down
to the seams with a large wiping mo‐ tion and moderate pressure using a
soft sponge or microfiber cloth. Velcro
closures on clothing or sharp objects may cause snagging or scratches on
the surface of the seats. Make sure not
to rub such objects against the surface.
Cleaning the upholstery and
interior trim
Vinyl
Remove dust and loose dirt from vinyl
with a whisk broom or vacuum cleaner. Clean vinyl surfaces with a vinyl clean‐
er.
Fabric
Remove dust and loose dirt from fabric
with a whisk broom or vacuum cleaner. Clean with a mild soap solution recom‐
mended for upholstery or carpets. Re‐
move fresh spots immediately with a fabric spot cleaner. If fresh spots do
not receive immediate attention, the
fabric can be stained and its color can be affected. Also, its fire-resistant
properties can be reduced if the mate‐
rial is not properly maintained.
CAUTION
Using anything but recommendedcleaners and procedures may affectthe fabric’s appearance and fire-re‐sistant properties.
Cleaning the lap/shoulder belt
webbing
Clean the belt webbing with any mild
soap solution recommended for clean‐ ing upholstery or carpet. Follow the in‐
structions provided with the soap. Do
not bleach or re-dye the webbing be‐ cause this may weaken it.
Cleaning the interior window glass
If the interior glass surfaces of the ve‐
hicle become fogged (that is, covered
with an oily, greasy or waxy film), they should be cleaned with glass cleaner.
Follow the directions on the glass
cleaner container.
CAUTION
Do not scrape or scratch the insideof the rear window. This may resultin damage to the rear window de‐froster grid.
8-133
8
Maintenance