climate control KIA TELLURIDE 2021 Features and Functions Guide
[x] Cancel search | Manufacturer: KIA, Model Year: 2021, Model line: TELLURIDE, Model: KIA TELLURIDE 2021Pages: 70, PDF Size: 8.41 MB
Page 4 of 70
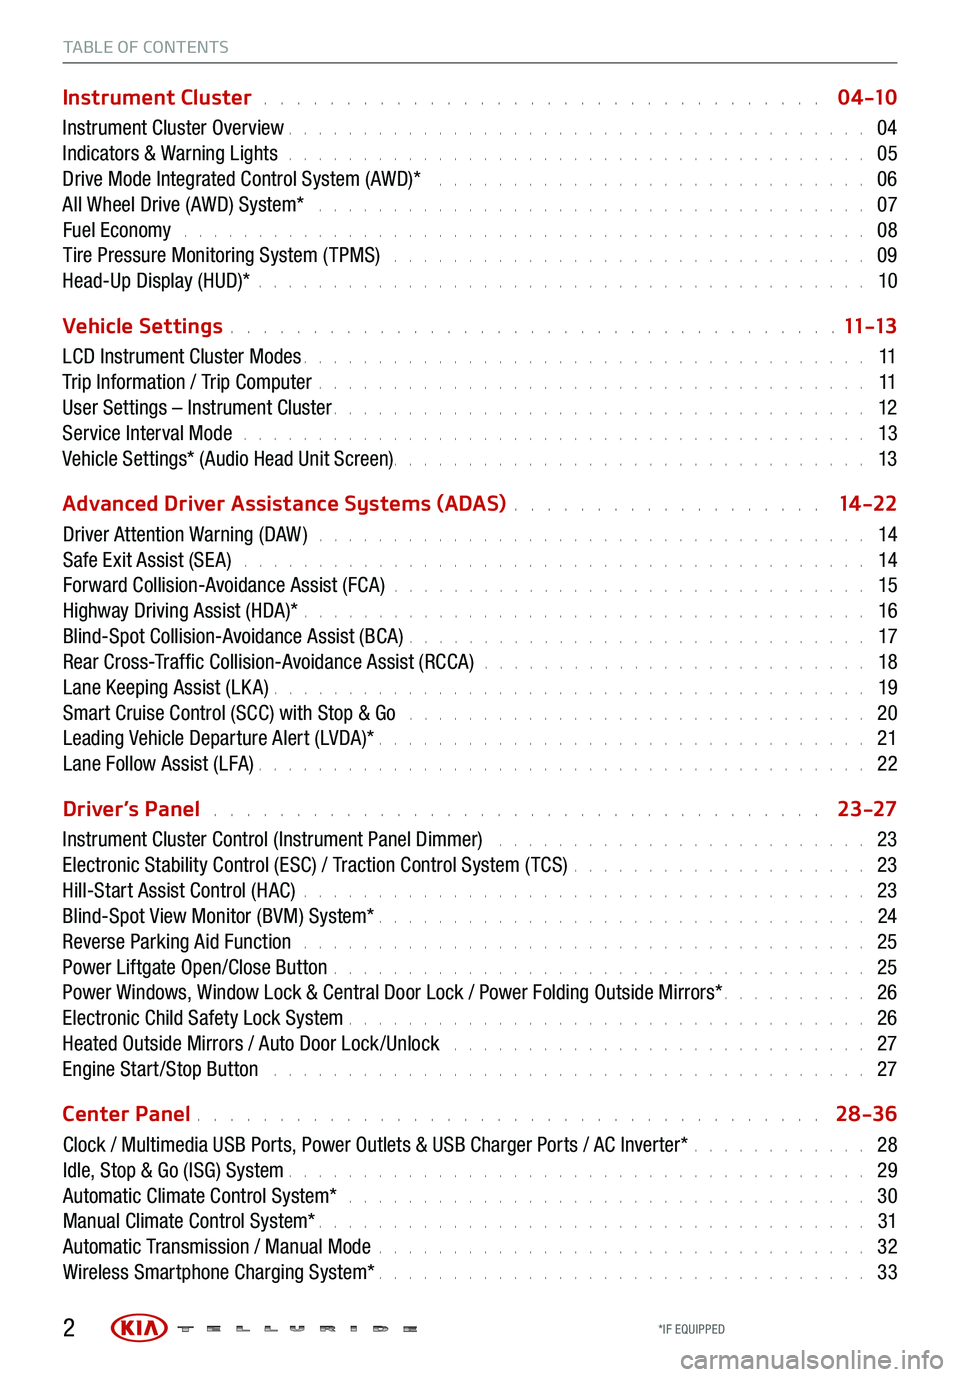
TABLE OF CONTENTS
Instrument Cluster . . . . . . . . . . . . . . . . . . . . . . . . . . . . . . . . . . 0 4 -10
Instrument Cluster Overview . . . . . . . . . . . . . . . . . . . . . . . . . . . . . . . . . . . . \
. . . 04
Indicators & Warning Lights . . . . . . . . . . . . . . . . . . . . . . . . . . . . . . . . . . . . \
. . . 05
Drive Mode Integrated Control System (AWD)* . . . . . . . . . . . . . . . . . . . . . . . . . . . . . 06
All Wheel Drive (AWD) System* . . . . . . . . . . . . . . . . . . . . . . . . . . . . . . . . . . . . . 07
Fuel Economy . . . . . . . . . . . . . . . . . . . . . . . . . . . . . . . . . . . . \
. . . . . . . . . . 08
Tire Pressure Monitoring System ( TPMS) . . . . . . . . . . . . . . . . . . . . . . . . . . . . . . . . 09
Head-Up Display (HUD)* . . . . . . . . . . . . . . . . . . . . . . . . . . . . . . . . . . . . \
. . . . . 10
Vehicle Settings
. . . . . . . . . . . . . . . . . . . . . . . . . . . . . . . . . . . . \
. 11 -13
LCD Instrument Cluster Modes . . . . . . . . . . . . . . . . . . . . . . . . . . . . . . . . . . . . \
. . 11
Trip Information / Trip Computer . . . . . . . . . . . . . . . . . . . . . . . . . . . . . . . . . . . . \
. 11
User Settings – Instrument Cluster . . . . . . . . . . . . . . . . . . . . . . . . . . . . . . . . . . . . \
12
Service Interval Mode . . . . . . . . . . . . . . . . . . . . . . . . . . . . . . . . . . . . . . . . . . 13
Vehicle Settings* (Audio Head Unit Screen) . . . . . . . . . . . . . . . . . . . . . . . . \
. . . . . . . . 13
Advanced Driver Assistance Systems (ADAS)
. . . . . . . . . . . . . . . . . . . 14 -22
Driver Attention Warning (DAW ) . . . . . . . . . . . . . . . . . . . . . . . . . . . . . . . . . . . . . 14
Safe Exit Assist (SE A) . . . . . . . . . . . . . . . . . . . . . . . . . . . . . . . . . . . . . . . . . . 14
Forward Collision-Avoidance Assist (FCA) . . . . . . . . . . . . . . . . . . . . . . . . . . . . . . . . 15
Highway Driving Assist (HDA)* . . . . . . . . . . . . . . . . . . . . . . . . . . . . . . . . . . . . \
. . 16
Blind-Spot Collision-Avoidance Assist (BCA) . . . . . . . . . . . . . . . . . . . . . . . . . . . . . . . 17
Rear Cross-Traffic Collision-Avoidance Assist (RCCA) . . . . . . . . . . . . . . . . . . . . . . . . . . 18
Lane Keeping Assist (LK A) . . . . . . . . . . . . . . . . . . . . . . . . . . . . . . . . . . . . \
. . . . 19
Smart Cruise Control (SCC) with Stop & Go . . . . . . . . . . . . . . . . . . . . . . . . . . . . . . . 20
Leading Vehicle Departure Alert (LVDA)* . . . . . . . . . . . . . . . . . . . . . . . . . . . . . . . . . 21
Lane Follow Assist (LFA) . . . . . . . . . . . . . . . . . . . . . . . . . . . . . . . . . . . . \
. . . . . 22
Driver’s Panel
. . . . . . . . . . . . . . . . . . . . . . . . . . . . . . . . . . . . . 23-27
Instrument Cluster Control (Instrument Panel Dimmer) . . . . . . . . . . . . . . . . . . . . . . . . . 23
Electronic Stability Control (ESC) / Traction Control System ( TCS) . . . . . . . . . . . . . . . . . . . . 23
Hill-Start Assist Control (HAC) . . . . . . . . . . . . . . . . . . . . . . . . . . . . . . . . . . . . \
. . 23
Blind-Spot View Monitor (BVM) System* . . . . . . . . . . . . . . . . . . . . . . . . . . . . . . . . . 24
Reverse Parking Aid Function . . . . . . . . . . . . . . . . . . . . . . . . . . . . . . . . . . . . \
. . 25
Power Liftgate Open/Close Button . . . . . . . . . . . . . . . . . . . . . . . . . . . . . . . . . . . . 25
Power Windows, Window Lock & Central Door Lock / Power Folding Outside Mirrors* . . . . . . . . . . 26
Electronic Child Safety Lock System . . . . . . . . . . . . . . . . . . . . . . . . . . . . . . . . . . . 26
Heated Outside Mirrors / Auto Door Lock /Unlock . . . . . . . . . . . . . . . . . . . . . . . . . . . . 27
Engine Start /Stop Button . . . . . . . . . . . . . . . . . . . . . . . . . . . . . . . . . . . . \
. . . . 27
Center Panel
. . . . . . . . . . . . . . . . . . . . . . . . . . . . . . . . . . . . \
. . 28-36
Clock / Multimedia USB Ports, Power Outlets & USB Charger Ports / AC Inverter* . . . . . . . . . . . . 28
Idle, Stop & Go (ISG) System . . . . . . . . . . . . . . . . . . . . . . . . . . . . . . . . . . . . \
. . . 29
Automatic Climate Control System* . . . . . . . . . . . . . . . . . . . . . . . . . . . . . . . . . . . 30
Manual Climate Control System* . . . . . . . . . . . . . . . . . . . . . . . . . . . . . . . . . . . . \
. 31
Automatic Transmission / Manual Mode . . . . . . . . . . . . . . . . . . . . . . . . . . . . . . . . . 32
Wireless Smartphone Charging System* . . . . . . . . . . . . . . . . . . . . . . . . . . . . . . . . . 33
2*IF EQUIPPED
Page 15 of 70
13
VEHICLE SET TINGS
VEHICLE SETTINGS
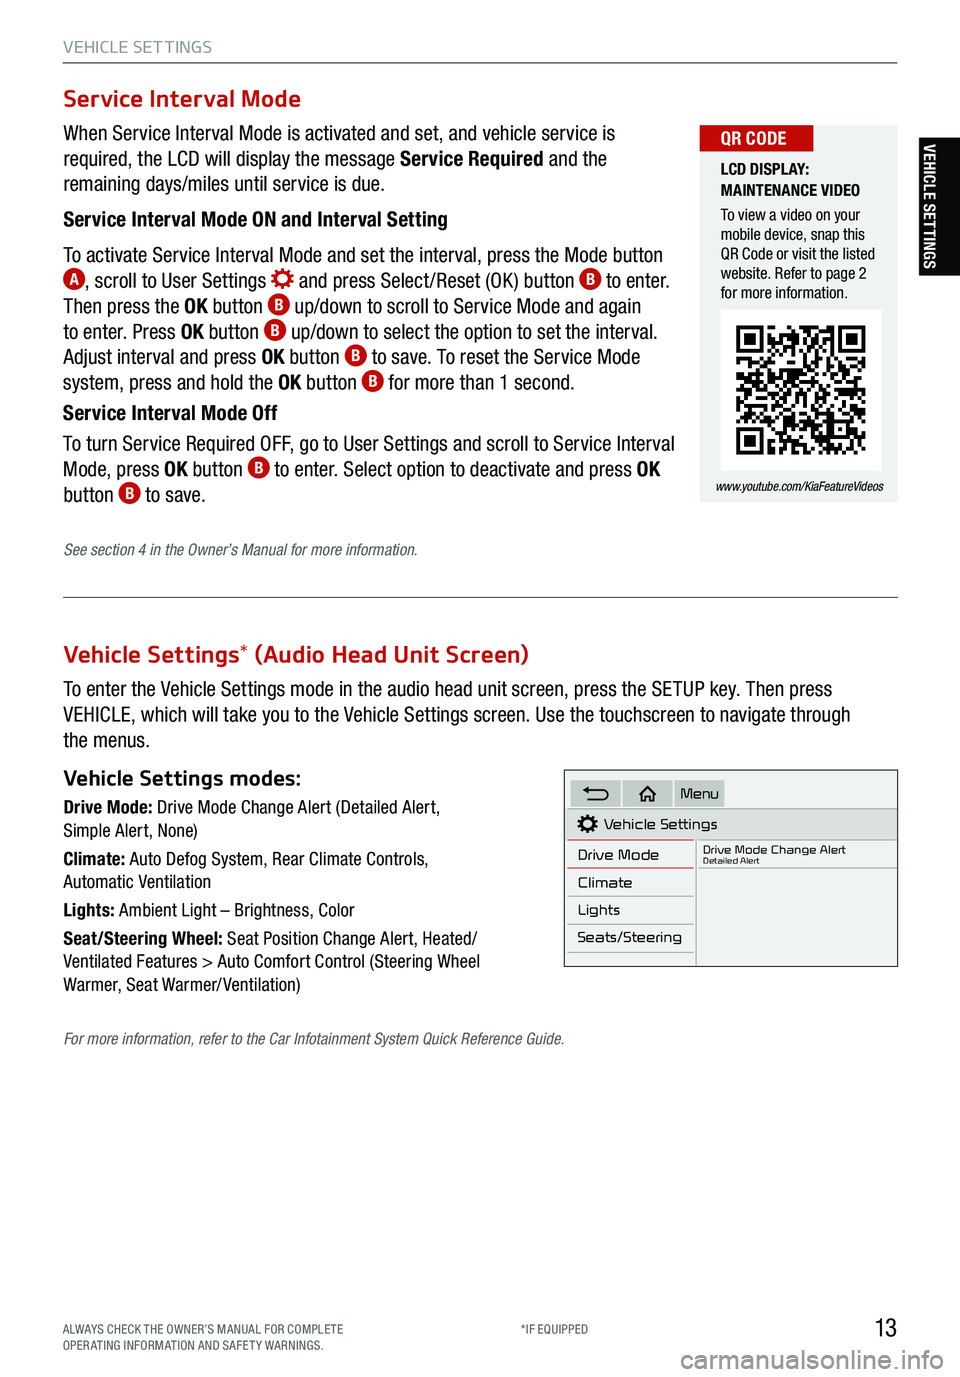
Vehicle Settings* (Audio Head Unit Screen)
To enter the Vehicle Settings mode in the audio head unit screen, press the SETUP key. Then press
VEHICLE, which will take you to the Vehicle Settings screen. Use the touchscreen to navigate through
the menus.
Vehicle Settings modes:
Drive Mode: Drive Mode Change Alert (Detailed Alert,
Simple Alert, None)
Climate: Auto Defog System, Rear Climate Controls,
Automatic Ventilation
Lights: Ambient Light – Brightness, Color
Seat/Steering Wheel: Seat Position Change Alert, Heated/
Ventilated Features > Auto Comfort Control (Steering Wheel
Warmer, Seat Warmer/ Ventilation)Vehicle Settings
Drive Mode
Drive Mode Change AlertDetailed Alert
Climate
Lights
Seats/Steering
Menu
When Service Interval Mode is activated and set, and vehicle service is
required, the LCD will display the message Service Required and the
remaining days/miles until service is due.
Service Interval Mode ON and Interval Setting
To activate Service Interval Mode and set the interval, press the Mode button
A, scroll to User Settings and press Select /Reset (OK ) button B to enter.
Then press the OK button B up/down to scroll to Service Mode and again
to enter. Press OK button B up/down to select the option to set the interval.
Adjust interval and press OK button B to save. To reset the Service Mode
system, press and hold the OK button B for more than 1 second.
Service Interval Mode Off
To turn Service Required OFF, go to User Settings and scroll to Service Interval
Mode, press OK button
B to enter. Select option to deactivate and press OK
button B to save.
Service Interval Mode
LCD DISPLAY:
MAINTENANCE VIDEO
To view a video on your
mobile device, snap this
QR Code or visit the listed
website. Refer to page 2
for more information.
www.youtube.com/KiaFeatureVideos
QR CODE
See section 4 in the Owner’s Manual for more information.
For more information, refer to the Car Infotainment System Quick Reference Guide.
ALWAYS CHECK THE OWNER’S MANUAL FOR COMPLE TE
OPERATING INFORMATION AND SAFETY WARNINGS. *IF EQUIPPED
Page 29 of 70
27
DRIVER’S PANEL
DRIVER’S PANEL
Heated Outside Mirrors
Mirror heaters automatically turn ON/OFF at the same time the Rear Window Defroster is turned ON/OFF.
Rear Window Defroster button is located on the climate control system panel.
See section 4 in the Owner’s Manual for more information.
Auto Door Lock/Unlock
Auto Door Lock /Unlock will engage when the gear shift is moved into or out of the P (Park) position. Refer
to the User Settings on how to turn Auto Door Lock /Unlock ON/OFF.
See section 4 in the Owner’s Manual for more information.
REMINDERS:
§ If the Smart Key fob battery is dead, you can still start the engine by pressing the ENGINE START/STOP button with the Lock-button
end of the Smart Key. The Smart Key must contact the ENGINE START/STOP button directly, at a right angle
§ In an emergency situation while the vehicle is in motion, you are able to turn the engine off and to the ACC position by pressing the
ENGINE START/STOP button for more than 2 seconds or 3 times successively within 3 seconds
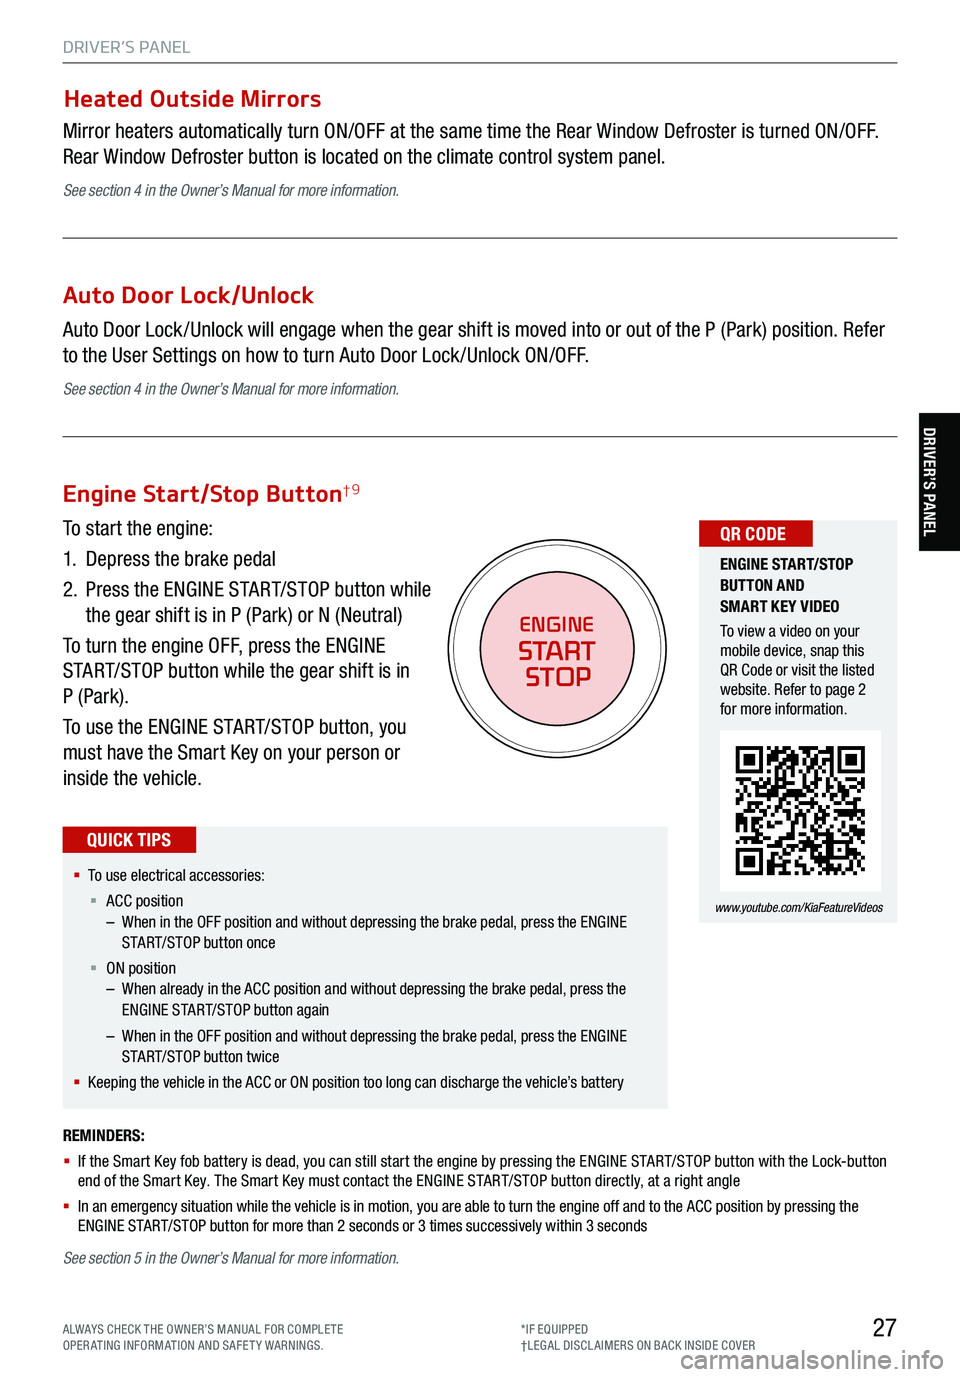
Engine Start/Stop Button†9
To start the engine:
1. Depress the brake pedal
2.
Press the ENGINE START/STOP button while
the gear shift is in P (Park) or N (Neutral)
To turn the engine OFF, press the ENGINE
START/STOP button while the gear shift is in
P (Park).
To use the ENGINE START/STOP button, you
must have the Smart Key on your person or
inside the vehicle.
§ To use electrical accessories:
§ ACC position
– When in the OFF position and without depressing the brake pedal, press the ENGINE
START/STOP button once
§ ON position
– When already in the ACC position and without depressing the brake pedal, press the
ENGINE START/STOP button again
– When in the OFF position and without depressing the brake pedal, press the ENGINE
START/STOP button twice
§ Keeping the vehicle in the ACC or ON position too long can discharge the vehicle’s battery
QUICK TIPS
ENGINE
START
STOP
ENGINE STA RT/STOP
BUTTON AND
SMART KEY VIDEO
To view a video on your
mobile device, snap this
QR Code or visit the listed
website. Refer to page 2
for more information.
www.youtube.com/KiaFeatureVideos
QR CODE
See section 5 in the Owner’s Manual for more information.
ALWAYS CHECK THE OWNER’S MANUAL FOR COMPLE TE
OPERATING INFORMATION AND SAFETY WARNINGS. *IF EQUIPPED
†LEG AL DISCL AIMERS ON BACK INSIDE COVER
Page 32 of 70

30
CENTER PANEL
CENTER PANEL
AUTO
OFFA/C
SYNC888ADS OFFAUTO888AUTO888
Face-Level F lo o r- L evel
Bi-Level Floor/Defrost-Level
Tri-Zone Climate Control
Pressing the SYNC button
J synchronizes all climate
control zones (driver, passenger, and rear) to the driver’s
temperature control. Auto Defogging System (ADS)
Auto defogging is designed to reduce
the fogging up of the inside of the
windshield by automatically sensing the
moisture of the inside of the windshield.
The system will automatically change to
defrost mode when needed.
The ADS is set ON by default. To cancel
ADS, press the Front Defrost button
C for three seconds, when the ignition
is in on (ADS OFF icon will illuminate).
To turn ADS on again, press the Front
Defrost button
for three seconds.
REMINDERS:
§ Continuous use of the climate control system in
the recirculated air position may allow humidity to
increase inside the vehicle which may fog the glass
and obscure visibility
§ When in AUTO m ode, Air Flow Mode and Fan Speed
do not display on the Climate Control Display
§ Cold or warm ambient air may flow in through vents
if Recirculated Air button is not pressed ON (LED lit)
Defrost Outside Windshield
1. Set fan speed to the highest position
D
2. Set temperature to hot A
3. Press the front defrost button C
Defog Inside Windshield
1. Set fan speed to highest position
D
2. Set temperature to highest position A
3. Press the front defrost button C
Climate Control Auto Function
Press AUTO
A to select full auto operation. In AUTO mode
the driver and front passenger have full control of their own
temperature zones. The mode, fan speed, air intake and air
conditioning will activate and adjust accordingly to achieve
the temperature settings for each zone.
To set temperatures:
§ Tu r n
A to set the driver’s zone temperature
§ Tu r n
J to set the front passenger’s zone temperature
A AUTO (Automatic) Climate
Control button
B System OFF button
C Front Windshield Defrost button
D Fan Speed Control buttons
E Rear Control Mode button
F Mode Select button
G Air Conditioning button
H Rear Window Defrost button
I Recirculated Air button
J SYNC (Synchronize All Zones)
Temperature Control button
Front Climate Control
Air Flow Modes
To select air flow modes, press the Mode Select
button
F:
See section 4 in the Owner’s Manual for more information.
Automatic Climate Control System *
AUTO DEFOGGING
SYSTEM (ADS) VIDEO
To view a video on your
mobile device, snap this
QR Code or visit the listed
website. Refer to page 2
for more information.
www.youtube.com/KiaFeatureVideos
QR CODE
When the Climate Control System’s temperature
is turned up to high heat or low cool, the Seat
Warmers / Ventilated Seats turn on automatically.
QUICK TIPS
A
BCDEFGHI
J
*IF EQUIPPED
Page 33 of 70

31
CENTER PANEL
CENTER PANEL
REMINDERS:
§ Continuous use of the climate control system in the recirculated air position may allow humidity to increase inside the vehicle which may
fog the glass and obscure visibility
§ Warm air may flow in through vents if Recirculated Air button is not pressed ON (LED lit)
Face-Level
F lo o r- L evel Bi-Level
Floor/Defrost-Level
A Fan speed control knob
B Rear Window Defrost button
C Air Conditioning button
D Mode Select knob
E Fresh Air button
F Recirculated Air button
G Rear Climate Control Mode button
H Temperature Control Knob
Air Flow Modes
To select air flow modes, turn the Mode Select
knob
D:
A/C TEMP
MAXA/C
Defrost Outside Windshield
1. Set fan speed to the highest position
A
2. Set temperature to hot H
3. Set to front defrost D
Defog Inside Windshield
1. Set fan speed
A to the desired position
2. Set desired temperature
H
3. Set to front defrost D
See section 4 in the Owner’s Manual for more information. Your Manual Climate Control system may differ from those in the illustrations.
Manual Climate Control System*
§ Defrost mode activates A /C and opens Fresh Air Vent to help dehumidify the air and improve Defroster performance
§ Keep inside glass as clean as possible to reduce window fogging
§ MA X A /C mode automatically engages Recirculated Air
QUICK TIPS
ABCDEFGH
ALWAYS CHECK THE OWNER’S MANUAL FOR COMPLE TE
OPERATING INFORMATION AND SAFETY WARNINGS. *IF EQUIPPED
Page 50 of 70

48
Seat Warmers† 20 / Ventilated Seats
Front Seats
Seat Warmers :
§ Press button
A up once for high setting (3 LEDs lit)
§ Press button twice for medium setting (2 LEDs lit)
§ Press a third time for low setting (1 LED lit) and again to turn OFF
§ Press and hold to turn off
Ventilated Seats :
§ Press button
A down once for high setting (3 LEDs lit)
§ Press twice for medium setting (2 LEDs lit)
§ Press a third time for low setting (1 LED lit) and again to turn OFF
§ Press and hold to turn off
(Buttons are located on center console in front of gear shift)
(Passenger controls shown)
REMINDERS:
§ Use extreme caution when using the seat warmers
to avoid burns. Refer to the Owner’s Manual for more
information
§ If the Auto Climate Control is on, the seat warmers or
ventilated seats may turn on automatically based on the
set temperature and ambient temperature
SEAT WARMERS AND
V ENTIL ATED SE AT S
VIDEO
To view a video on your
mobile device, snap this
QR Code or visit the listed
website. Refer to page 2
for more information.
www.youtube.com/KiaFeatureVideos
QR CODE
§ With the seat warmer switch in the ON position, the heating system
in the seat turns OFF or ON automatically depending on the seat
temperature
§ When the Climate Control System’s temperature is turned up to high
heat, the Seat Warmers turn on automatically
QUICK TIPS
S E AT I N G
A
See section 4 in the Owner’s Manual for more information.
SE ATING
*IF EQUIPPED
†LEG AL DISCL AIMERS ON BACK INSIDE COVER
Page 65 of 70

63
A
Occupant Detection System (ODS) / Passenger Airbag Off Indicator† 2 ,1 6
ODS is designed to detect the presence and position of the front passenger and is designed to adjust or turn off
airbag deployment accordingly.
Depending on the situation and type of
accident, the system may:
§ Deploy airbag (Adult)
§ Not deploy the airbag (Unoccupied)
If the system determines that the airbag
should not be deployed, the “PASSENGER AIRBAG OFF” light will illuminate
D.
REMINDER: Do not allow an adult passenger to ride in the front seat when the Passenger Airbag Indicator is illuminated OFF because the
airbag will not deploy in the event of a crash. The driver must instruct the passenger to reposition her/himself in the seat.
See section 3 in the Owner’s Manual for more information.
Seat Belts† 2 ,19
To properly fasten your safety belts:
1.
Insert the belt tongue plate
A into the buckle until it clicks
2.
Position the lap portion of the belt across your lap as LOW ON THE HIPS as possible
C. Adjust the belt
to a SNUG FIT by pulling up on the shoulder portion B
Seat Belt Retractor Locks
Retractor locks allow lap/shoulder safety belts to remain unlocked during normal vehicle operation for
freedom of movement and increased comfort.
During a STRONG STOP, SUDDEN TURN OR CERTAIN COLLISIONS, seat belt retractors will automatically
lock the belts to help reduce the risk of injury.
For more detailed information regarding your vehicle’s s afety belts, please refer to section 3 in the Owner’s Manual and the separate brochure
titled “Understanding Your S afety Belt & Supplemental Restraint System.”
REMINDER:
For maximum protection, always wear your seatbelt.
2PASSENGER
AIR BAG OFF
(Located to the right of Climate Controls, Center Panel)
2PASSENGERAIR BAG OFF
§ The seat belt warning chime operates for the driver’s seat only
QUICK TIP
SAFETY
AB
C
D
SAFETY
ALWAYS CHECK THE OWNER’S MANUAL FOR COMPLE TE
OPERATING INFORMATION AND SAFETY WARNINGS. *IF EQUIPPED
†LEG AL DISCL AIMERS ON BACK INSIDE COVER
Page 66 of 70
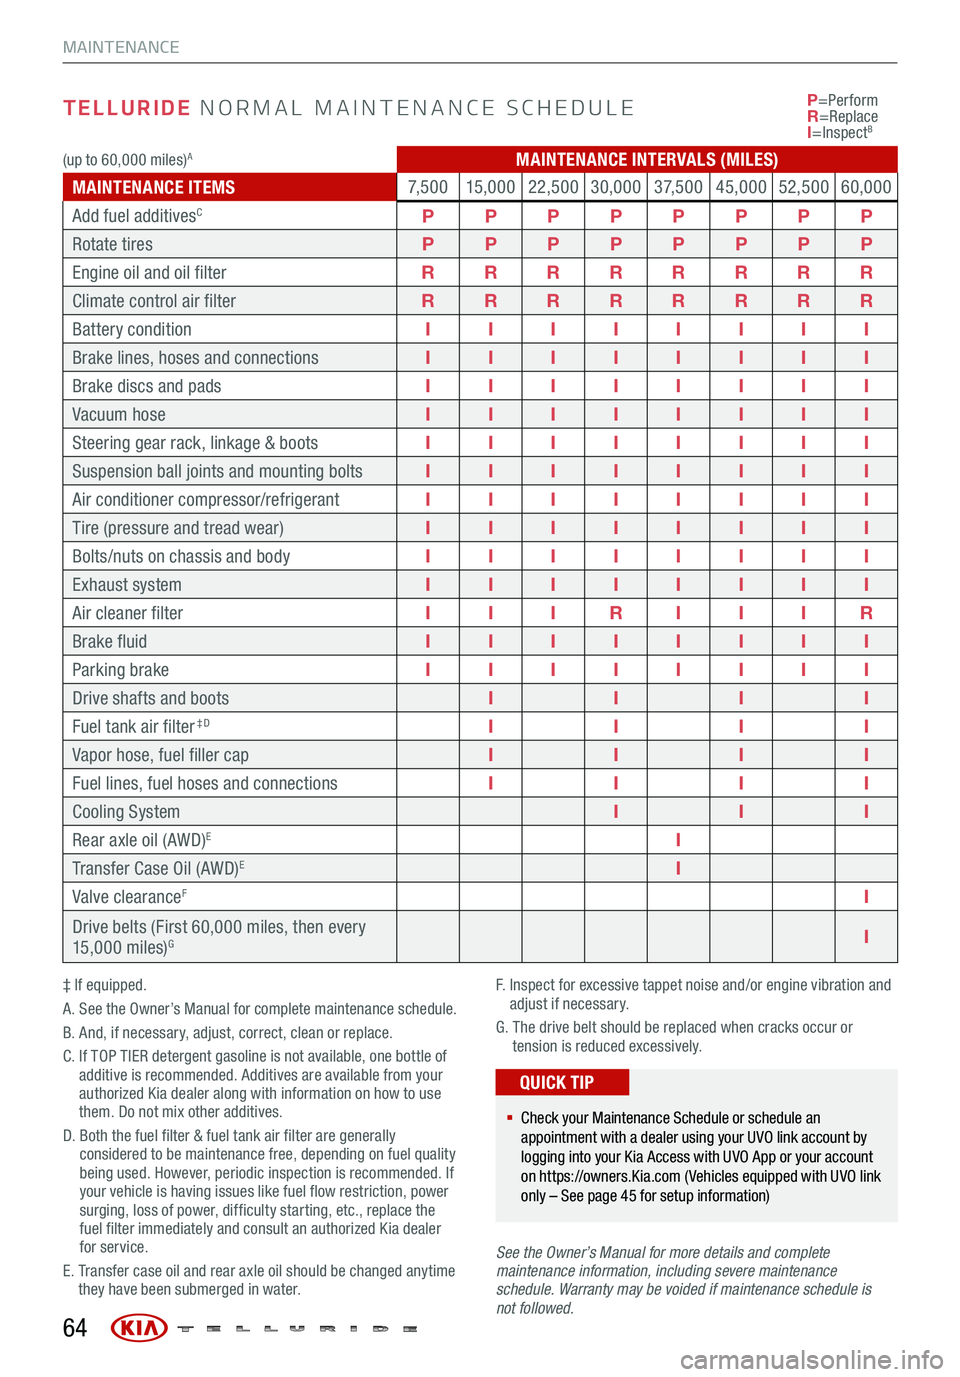
TELLURIDE NORMAL MAINTENANCE SCHEDULE
‡ If equipped.
A. See the Owner’s Manual for complete maintenance schedule.
B. And, if necessary, adjust, correct, clean or replace.
C. If TOP TIER detergent gasoline is not available, one bottle of
additive is recommended. Additives are available from your
authorized Kia dealer along with information on how to use
them. Do not mix other additives.
D. Both the fuel filter & fuel tank air filter are generally
considered to be maintenance free, depending on fuel quality
being used. However, periodic inspection is recommended. If
your vehicle is having issues like fuel flow restriction, power
surging, loss of power, difficulty starting, etc., replace the
fuel filter immediately and consult an authorized Kia dealer
for service.
E. Transfer case oil and rear axle oil should be changed anytime
they have been submerged in water. F.
Inspect for excessive tappet noise and/or engine vibration and
adjust if necessary.
G. The drive belt should be replaced when cracks occur or
tension is reduced excessively.
See the Owner’s Manu al for more details and complete
maintenance information, including severe maintenance
schedule. Warranty may be voided if maintenance schedule is
not followed. P
=Perform
R =Replace
I =Inspect
B
§ Check your Maintenance Schedule or schedule an
appointment with a dealer using your UVO link account by
logging into your Kia Access with UVO App or your account
on https://owners.Kia.com ( Vehicles equipped with UVO link
only – See page 45 for setup information)
QUICK TIP
64
MAINTENANCE
(up to 60,000 miles)AMAINTENANCE INTERVALS (MILES)
MAINTENANCE ITEMS 7, 5 0 0
15,000 22,500 30,000 3 7, 5 0 045,000 52,50060,000
Add fuel additives
CP PPPPPPP
Rotate tires PPPPPPPP
Engine oil and oil filter RRRRRRRR
Climate control air filter RRRRRRRR
Battery condition IIIIIIII
Brake lines, hoses and connections IIIIIIII
Brake discs and pads IIIIIIII
Vacuum hose IIIIIIII
Steering gear rack, linkage & boots IIIIIIII
Suspension ball joints and mounting bolts IIIIIIII
Air conditioner compressor/refrigerant IIIIIIII
Tire (pressure and tread wear) IIIIIIII
Bolts/nuts on chassis and body IIIIIIII
Exhaust system IIIIIIII
Air cleaner filter IIIR IIIR
Brake fluid IIIIIIII
Parking brake IIIIIIII
Drive shafts and boots IIII
Fuel tank air filte r
Page 69 of 70
SHIFT
LOCK
RELEASEP•R•N•D•
+
•-
AUTOOFFA/CSYNC888ADS OFFAUTO888AUTO888
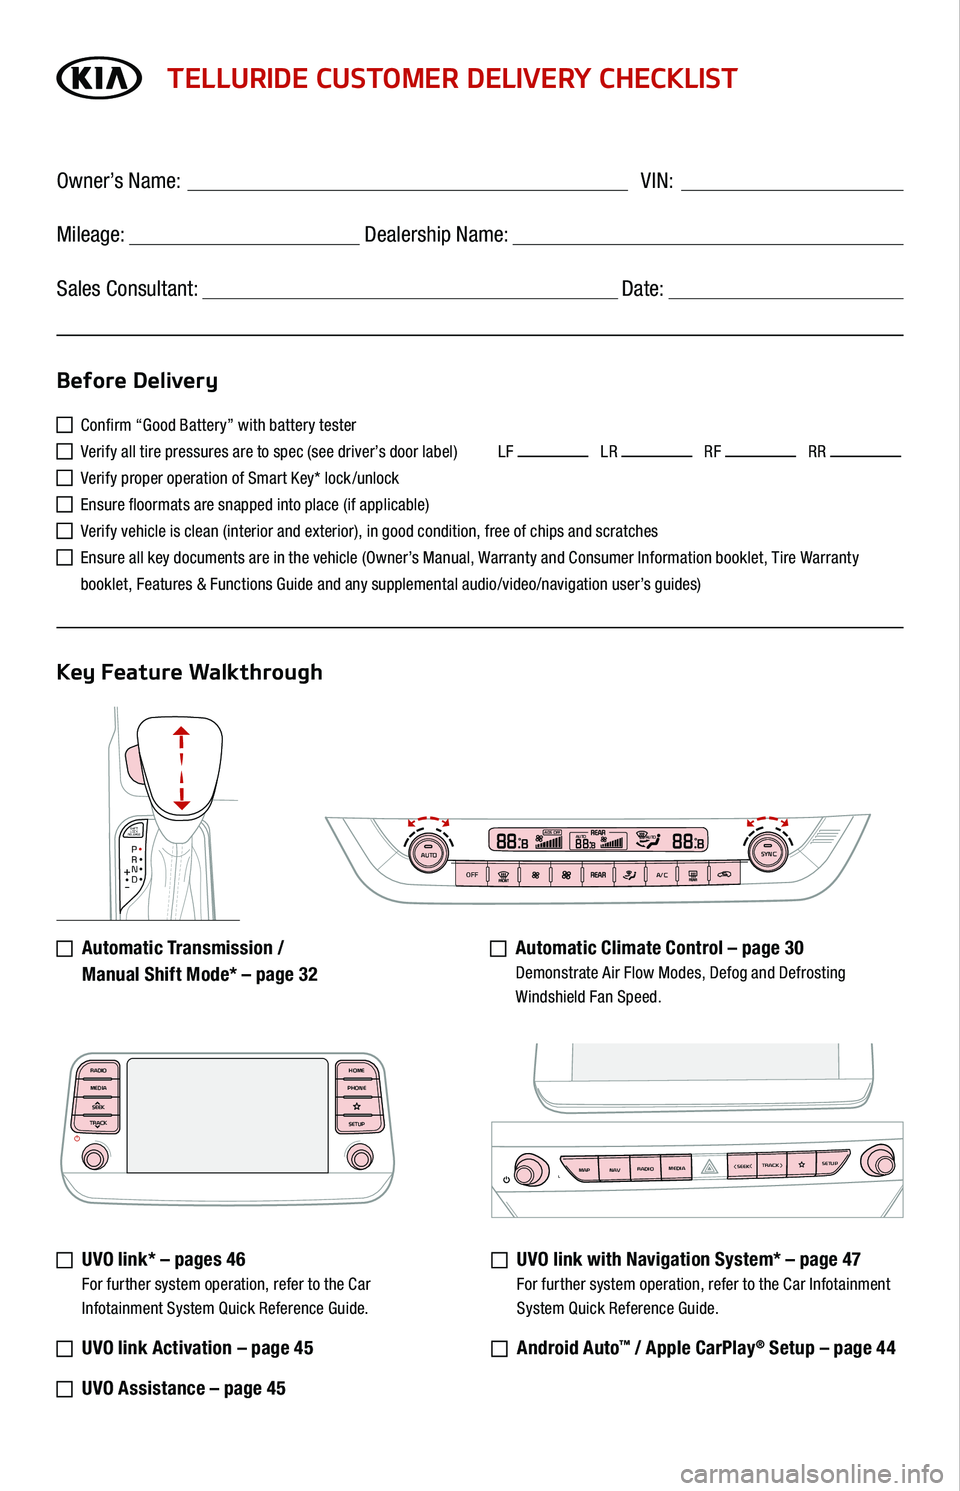
TELLURIDE CUSTOMER DELIVERY CHECKLIST
Confirm “Good Battery” with battery tester
Verify all tire pressures are to spec (see driver’s door label) LF LR RF RR
Verify proper operation of Smart Key* lock /unlock
Ensure floormats are snapped into place (if applicable)
Verify vehicle is clean (interior and exterior), in good condition, free of chips and scratches
Ensure all key documents are in the vehicle (Owner’s Manual, Warranty and Consumer Information booklet, Tire Warranty
booklet, Features & Functions Guide and any supplemental audio/video/navigation user’s guides)
Automatic Transmission /
Manual Shift Mode* – page 32
Automatic Climate Control – page 30 Demonstrate Air Flow Modes, Defog and Defrosting Windshield Fan Speed.
UVO link* – pages 46 For further system operation, refer to the Car Infotainment System Quick Reference Guide.
UVO link Activation – page 45
UVO Assistance – page 45
UVO link with Navigation System* – page 47 For further system operation, refer to the Car Infotainment
System Quick Reference Guide.
Android Auto™ / Apple CarPlay® Setup – page 44
Before Delivery
Key Feature Walkthrough
Owner’s Name: ____________________________________ VIN:
Mileage: __________________ Dealership Name: ______________________
Sales Consultant: _________________________________ Date: __________
MAP RADIO
N AV MEDIASEEK<