fluid KIA VENGA 2010 Owners Manual
[x] Cancel search | Manufacturer: KIA, Model Year: 2010, Model line: VENGA, Model: KIA VENGA 2010Pages: 379, PDF Size: 6.58 MB
Page 9 of 379
Introduction
6
1
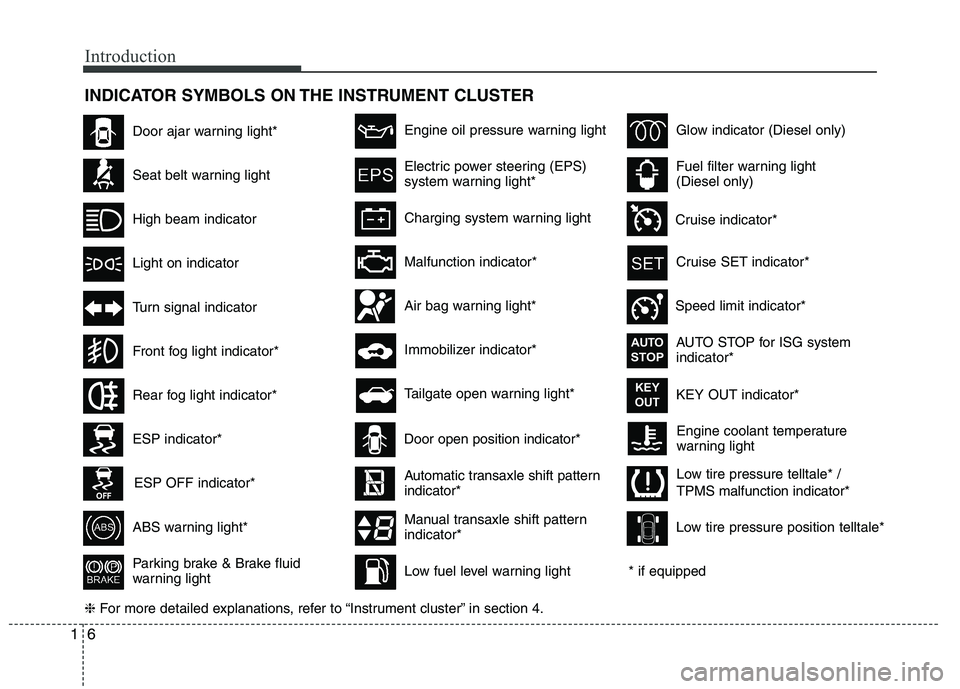
INDICATOR SYMBOLS ON THE INSTRUMENT CLUSTER
Engine coolant temperature
warning light
Seat belt warning light
High beam indicator
Turn signal indicator
ABS warning light*
Parking brake & Brake fluid
warning light
Malfunction indicator*
Immobilizer indicator*
Glow indicator (Diesel only)
Fuel filter warning light (Diesel only)
Tailgate open warning light*
❈ For more detailed explanations, refer to “Instrument cluster” in section 4.
Charging system warning light
Door ajar warning light*
ESP indicator*
ESP OFF indicator*
Front fog light indicator*
Engine oil pressure warning light
Electric power steering (EPS)
system warning light*
Air bag warning light*
Low tire pressure telltale* / TPMS malfunction indicator*
Rear fog light indicator*
Cruise SET indicator*
Speed limit indicator* AUTO STOP for ISG system indicator*
Cruise indicator*
AUTOSTOP
KEY OUT indicator*KEY
OUT
Light on indicator
Automatic transaxle shift pattern indicator*
Manual transaxle shift pattern indicator*
* if equipped
Door open position indicator*
Low fuel level warning light Low tire pressure position telltale*
Page 13 of 379
Your vehicle at a glance
4
2
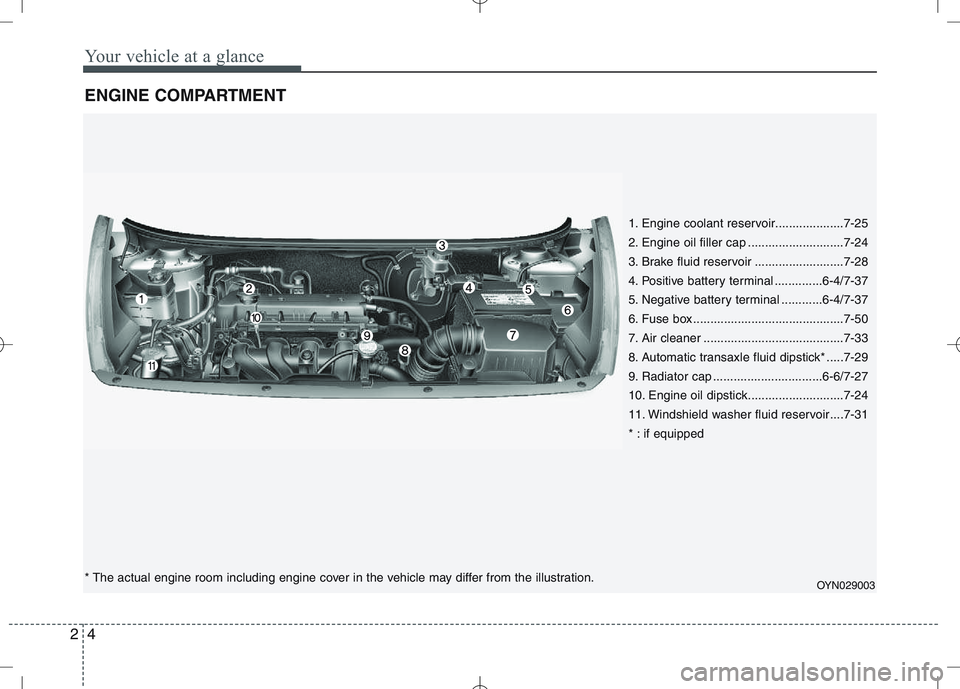
ENGINE COMPARTMENT
1. Engine coolant reservoir....................7-25
2. Engine oil filler cap ............................7-24
3. Brake fluid reservoir ..........................7-28
4. Positive battery terminal ..............6-4/7-37
5. Negative battery terminal ............6-4/7-37
6. Fuse box ............................................7-50
7. Air cleaner .........................................7-33
8. Automatic transaxle fluid dipstick* .....7-29
9. Radiator cap ................................6-6/7-27
10. Engine oil dipstick............................7-24
11. Windshield washer fluid reservoir ....7-31
* : if equipped
* The actual engine room including engine cover in the vehicle may differ from the illustration.
OYN029003
Page 98 of 379
Features of your vehicle
26
4
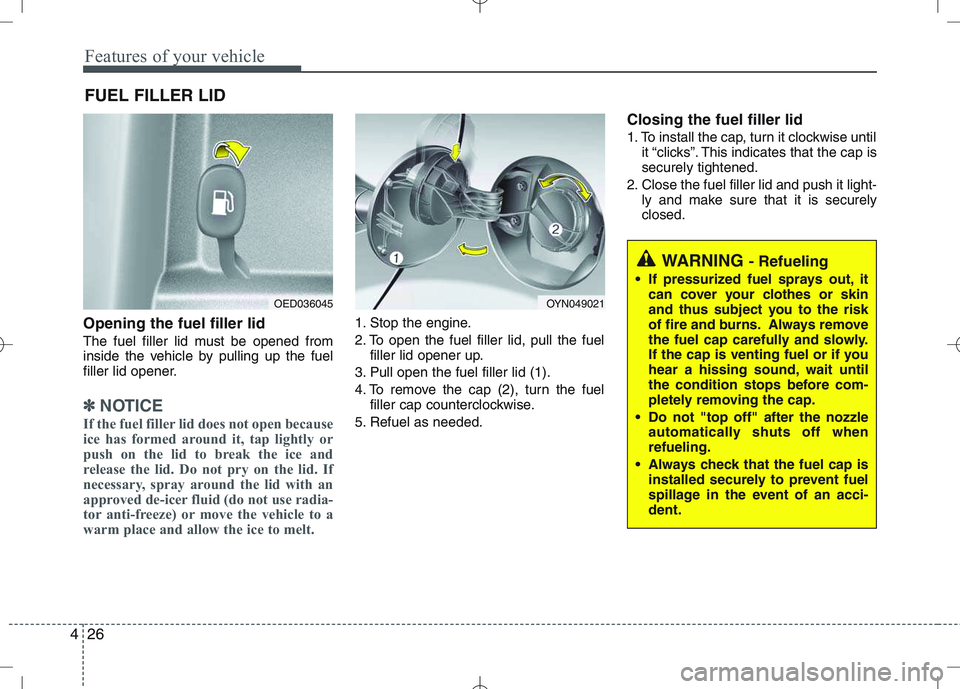
Opening the fuel filler lid
The fuel filler lid must be opened from
inside the vehicle by pulling up the fuel
filler lid opener.
✽✽
NOTICE
If the fuel filler lid does not open because
ice has formed around it, tap lightly or
push on the lid to break the ice and
release the lid. Do not pry on the lid. If
necessary, spray around the lid with an
approved de-icer fluid (do not use radia-
tor anti-freeze) or move the vehicle to a
warm place and allow the ice to melt.
1. Stop the engine.
2. To open the fuel filler lid, pull the fuel filler lid opener up.
3. Pull open the fuel filler lid (1).
4. To remove the cap (2), turn the fuel filler cap counterclockwise.
5. Refuel as needed. Closing the fuel filler lid
1. To install the cap, turn it clockwise until
it “clicks”. This indicates that the cap is securely tightened.
2. Close the fuel filler lid and push it light- ly and make sure that it is securelyclosed.
FUEL FILLER LID
WARNING
- Refueling
If pressurized fuel sprays out, it can cover your clothes or skin
and thus subject you to the risk
of fire and burns. Always remove
the fuel cap carefully and slowly.
If the cap is venting fuel or if you
hear a hissing sound, wait until
the condition stops before com-
pletely removing the cap.
Do not "top off" after the nozzle automatically shuts off whenrefueling.
Always check that the fuel cap is installed securely to prevent fuel
spillage in the event of an acci-dent.
OED036045OYN049021
Page 122 of 379

Features of your vehicle
50
4
Front fog light indicator
(if equipped)
This indicator comes on when the front
fog lights are ON.
Rear fog light indicator
(if equipped)
This indicator illuminates when the rear
fog lights are ON.
Light on indicator (if equipped)
The indicator illuminates when the tail lights or headlights are ON.
Parking brake & brake fluidwarning
Parking brake warning
This warning light is illuminated when the
parking brake is applied with the ignition
switch in the START or ON position. The
warning light should go off when the
parking brake is released.
The parking brake warning chime (if
equipped) will sound to remind you that the
parking brake is applied when you are driv-
ing above approximately 10 km/h (6 mph).
Always release the parking brake before
you drive.
Low brake fluid level warning
If the warning light remains on, it may
indicate that the brake fluid level in the
reservoir is low.
If the warning light remains on:
1. Drive carefully to the nearest safe location and stop your vehicle.
2. With the engine stopped, check the brake fluid level immediately and add
fluid as required. Then check all brake
components for fluid leaks. 3. Do not drive the vehicle if leaks are
found, the warning light remains on or
the brakes do not operate properly.
Have the vehicle towed to any author-
ized KIA dealer for a brake system
inspection and necessary repairs.
Your vehicle is equipped with dual-diago-
nal braking systems. This means you still
have braking on two wheels even if one
of the dual systems should fail. With only
one of the dual systems working, more
than normal pedal travel and greaterpedal pressure are required to stop the
vehicle. Also, the vehicle will not stop in
as short a distance with only a portion of
the brake system working. If the brakes
fail while you are driving, shift to a lower
gear for additional engine braking and
stop the vehicle as soon as it is safe to do
so.
To check bulb operation, check whether
the parking brake and brake fluid warning
light illuminates when the ignition switchis in the ON position.
WARNING
Driving the vehicle with a warning
light on is dangerous. If the brake
warning light remains on, have the
brakes checked and repaired imme-
diately by an authorized KIA dealer.
Page 140 of 379

Features of your vehicle
68
4
Windshield washers (front)
In the O (OFF) position, pull the lever
gently toward you to spray washer fluid
on the windshield and to run the wipers
1-3 cycles. Use this function when the windshield is
dirty.
The spray and wiper operation will con-
tinue until you release the lever.
If the washer does not work, check the
washer fluid level. If the fluid level, you
will need to add appropriate non-abra-
sive windshield washer fluid to the wash-
er reservoir.
The reservoir filler neck is located in the
front of the engine compartment on the
passenger side.
OXM049048E
WARNING
Do not use the washer in freezing
temperatures without first warming
the windshield with the defrosters;
the washer solution could freeze on
the windshield and obscure yourvision.
CAUTION
To prevent possible damage to the wipers or windshield, do notoperate the wipers when the
windshield is dry.
To prevent damage to the wiper blades, do not use gasoline,
kerosene, paint thinner, or othersolvents on or near them.
To prevent damage to the wiper arms and other components, do
not attempt to move the wipersmanually.
CAUTION
To prevent possible damage to the
washer pump, do not operate the
washer when the fluid reservoir isempty.
Page 141 of 379

469
Features of your vehicle
Rear window wiper and washer
switch
The rear window wiper and washer
switch is located at the end of the wiper
and washer switch lever. Turn the switch
to desired position to operate the rear
wiper and washer.- Normal wiper operation
--- - Intermittent wipe
O - Wiper is not in operation Push the lever away from you to spray
rear washer fluid and to run the rear
wipers 1~3 cycles. The spray and wiper
operation will continue until you release
the lever.
OXM049103EOXM049125L
Page 177 of 379

4105
Features of your vehicle
Notes on CD formats
The following CD formats are sup-
ported by the CD player:
CD Audio (CD-DA in accordance withthe Red Book Standard);
CD-R/RW (in accordance with
Orange Book, part 2/3)
Multi-session CD (in accordance with
multi-session CD specification 1.0).
Red Book
Red Book is the standard for audio CDs
(Compact Disc Digital Audio system, or
CDDA). It is named after one of a set ofcolor-bound books that contain the tech-
nical specifications for all CD and
CDROM formats.
Orange Book
Orange Book is the standard for CD-R
duplicating (write-once) media. Compact
Disc ReWritable (CD-RW) is a rewritable
optical disc format. Known as CD-
Erasable (CD-E) during its development,
CD-RW was introduced in 1997, and was
preceded by the never officially releasedCD-MO in 1988. Multi Session Disc
A multi session disc is a compact disc to which data is added incrementally in
more than one recording, allowing you to
add, update, or “delete” files and directo-
ries. You could, theoretically, record audio
tracks in multiple sessions. However, an
audio CD player will only play the tracks
in the first session. However, the disc
cannot be played in a normal CD-ROM
drive or home or car stereo until the ses-sion is closed.
Handling CDs
Avoid leaving fingerprints on the CD
when removing it.
Always store any CDs in their protec-
tive covers.
Always ensure that CDs are clean
and dry before inserting.
Protect CDs from heat and direct sun-light.
Cleaning the unit
Do not clean using cleaning fluid, alcohol
or other solvents. Use only a damp cloth.
Page 206 of 379
53
Driving your vehicle
Before entering vehicle
• Be sure that all windows, outside mir-ror(s), and outside lights are clean.
Check the condition of the tires.
Check under the vehicle for any sign of leaks.
Be sure there are no obstacles behind you if you intend to back up.
Necessary inspections
Fluid levels, such as engine oil, engine
coolant, brake fluid, and washer fluid
should be checked on a regular basis,
with the exact interval depending on the
fluid. Further details are provided in sec-
tion 7, “Maintenance”.
Before starting
Close and lock all doors.
Position the seat so that all controls are easily reached.
Adjust the inside and outside rearview mirrors. Be sure that all lights work.
Check all gauges.
Check the operation of warning lights
when the ignition switch is turned to the ON position.
Release the parking brake and make sure the brake warning light goes out.
For safe operation, be sure you are famil-
iar with your vehicle and its equipment.
BEFORE DRIVING
WARNING
All passengers must be properly
belted whenever the vehicle is mov-
ing. Refer to “Seat belts” in section
3 for more information on their
proper use.
WARNING
Always check the surrounding
areas near your vehicle for people,
especially children, before putting a
car into D (Drive) or R (Reverse).
WARNING - Driving under
the influence of alcohol or drugs
Drinking and driving is dangerous.
Drunk driving is the number one
contributor to the highway death
toll each year. Even a small amount
of alcohol will affect your reflexes,
perceptions and judgment. Drivingwhile under the influence of drugs
is as dangerous or more dangerousthan driving drunk.
You are much more likely to have a
serious accident if you drink or
take drugs and drive.
If you are drinking or taking drugs,
don’t drive. Do not ride with a driv-er who has been drinking or taking
drugs. Choose a designated driveror call a cab.
WARNING
When you intend to park or stop the
vehicle with the engine on, be care-ful not to depress the accelerator
pedal for a long period of time. It
may overheat the engine or exhaust
system and cause fire.
Page 253 of 379

Driving your vehicle
50
5
To keep locks from freezing
To keep the locks from freezing, squirt an
approved de-icer fluid or glycerine into
the key opening. If a lock is covered with
ice, squirt it with an approved de-icing
fluid to remove the ice. If the lock is
frozen internally, you may be able to thaw
it out by using a heated key. Handle the
heated key with care to avoid injury.
Use approved window washer
anti-freeze in system
To keep the water in the window washer
system from freezing, add an approved
window washer anti-freeze solution in
accordance with instructions on the con-
tainer. Window washer anti-freeze is
available from an authorized KIA dealer
and most auto parts outlets. Do not useengine coolant or other types of anti-
freeze as these may damage the paintfinish. Don't let your parking brake
freeze
Under some conditions your parking
brake can freeze in the engaged position.
This is most likely to happen when there
is an accumulation of snow or ice around
or near the rear brakes or if the brakes
are wet. If there is a risk the parking
brake may freeze, apply it only temporar-
ily while you put the shift lever in P (auto-
matic transaxle) or in first or reverse gear
(manual transaxle) and block the rear
wheels so the vehicle cannot roll. Then
release the parking brake.
Don't let ice and snow accumu- late underneath
Under some conditions, snow and ice
can build up under the fenders and inter-
fere with the steering. When driving in
severe winter conditions where this may
happen, you should periodically check
underneath the car to be sure the move-
ment of the front wheels and the steering
components is not obstructed.Carry emergency equipment
Depending on the severity of the weath-
er, you should carry appropriate emer-
gency equipment. Some of the items you
may want to carry include tire chains, tow
straps or chains, flashlight, emergency
flares, sand, shovel, jumper cables, win-
dow scraper, gloves, ground cloth, cover-
alls, blanket, etc.
Page 259 of 379
Driving your vehicle
56
5
When you are ready to leave after park-
ing on a hill
1. With the manual transaxle in Neutral
or automatic transaxle in P (Park),
apply your brakes and hold the brake
pedal down while you:
and
2. Slowly remove your foot from the brake pedal.
3. Drive slowly until the trailer is clear of the chocks.
4. Stop and have someone pick up and store the chocks. Maintenance when trailer towing
Your vehicle will need service more often
when you regularly pull a trailer.
Important items to pay particular atten-tion to include engine oil, automatic
transaxle fluid, axle lubricant and cooling
system fluid. Brake condition is another
important item to frequently check. Each
item is covered in this manual, and the
Index will help you find them quickly. If
you’re trailering, it’s a good idea to review
these sections before you start your trip.
Don’t forget to also maintain your trailer
and hitch. Follow the maintenance
schedule that accompanied your trailer
and check it periodically. Preferably, con-
duct the check at the start of each day’s
driving. Most importantly, all hitch nutsand bolts should be tight.CAUTION
Due to higher load during trailer
usage, overheating might occur
in hot days or during uphill driv- ing. If the coolant gauge indicatesover-heating, switch off the A/Cand stop the vehicle in a safe area
to cool down the engine.
When towing, check the transaxle fluid more frequently.
If your vehicle is not equipped with an air conditioner, you
should install a condenser fan toimprove engine performancewhen towing a trailer.