KIA VENGA 2011 Owners Manual
Manufacturer: KIA, Model Year: 2011, Model line: VENGA, Model: KIA VENGA 2011Pages: 761, PDF Size: 34.65 MB
Page 391 of 761
329
Safety features of your vehicle
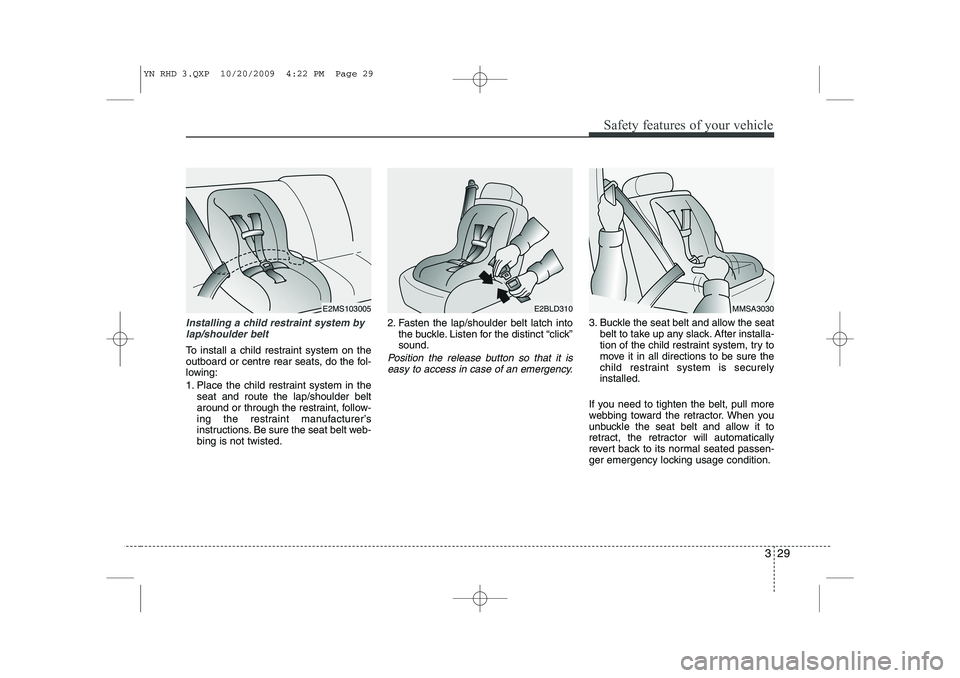
Installing a child restraint system bylap/shoulder belt
To install a child restraint system on the
outboard or centre rear seats, do the fol-
lowing:
1. Place the child restraint system in the seat and route the lap/shoulder belt
around or through the restraint, follow-
ing the restraint manufacturer’s
instructions. Be sure the seat belt web-bing is not twisted. 2. Fasten the lap/shoulder belt latch into
the buckle. Listen for the distinct “click”sound.Position the release button so that it is
easy to access in case of an emergency.
3. Buckle the seat belt and allow the seat belt to take up any slack. After installa-
tion of the child restraint system, try to
move it in all directions to be sure the
child restraint system is securelyinstalled.
If you need to tighten the belt, pull more
webbing toward the retractor. When you
unbuckle the seat belt and allow it to
retract, the retractor will automatically
revert back to its normal seated passen-
ger emergency locking usage condition.
E2MS103005MMSA3030E2BLD310
YN RHD 3.QXP 10/20/2009 4:22 PM Page 29
Page 392 of 761
Safety features of your vehicle
30
3
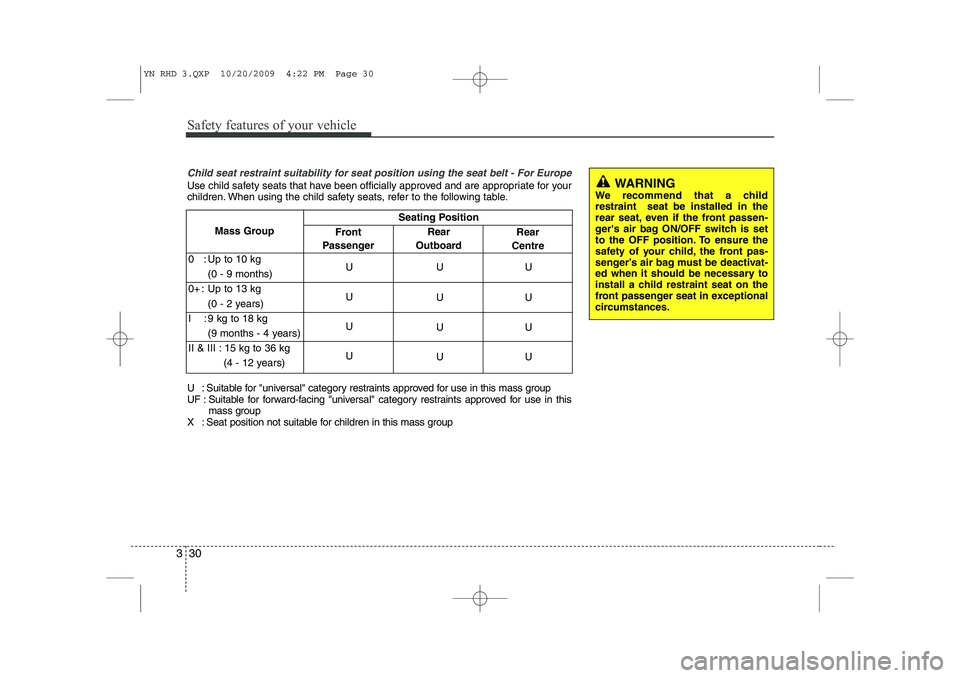
Child seat restraint suitability for seat position using the seat belt - For Europe
Use child safety seats that have been officially approved and are appropriate for your
children. When using the child safety seats, refer to the following table.WARNING
We recommend that a child restraint seat be installed in the
rear seat, even if the front passen-
ger's air bag ON/OFF switch is set
to the OFF position. To ensure the
safety of your child, the front pas-
senger’s air bag must be deactivat-
ed when it should be necessary to
install a child restraint seat on the
front passenger seat in exceptional
circumstances.
Front
Passenger Rear
Outboard Rear
Centre
Seating Position
U : Suitable for "universal" category restraints approved for use in this mass group
UF : Suitable for forward-facing "universal" category restraints approved for use in this mass group
X : Seat position not suitable for children in this mass group Mass Group
0 : Up to 10 kg UUU
(0 - 9 months)
0+ : Up to 13 kg UUU
(0 - 2 years)
I : 9 kg to 18 kg UUU
(9 months - 4 years)
II & III : 15 kg to 36 kg UUU
(4 - 12 years)
YN RHD 3.QXP 10/20/2009 4:22 PM Page 30
Page 393 of 761
331
Safety features of your vehicle
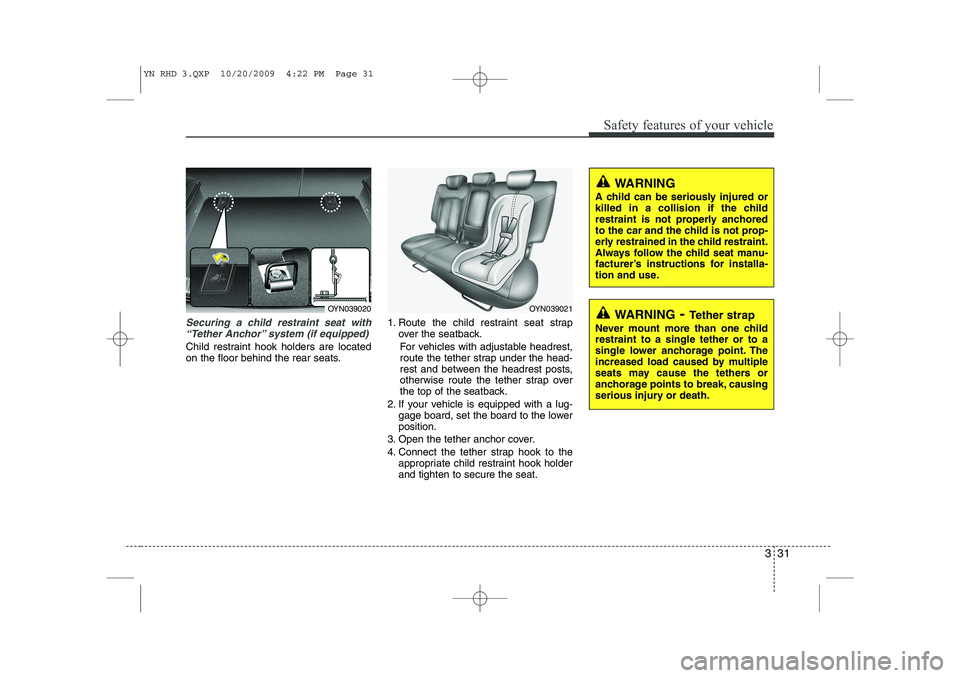
Securing a child restraint seat with“Tether Anchor” system (if equipped)
Child restraint hook holders are located
on the floor behind the rear seats. 1. Route the child restraint seat strap
over the seatback.
For vehicles with adjustable headrest,
route the tether strap under the head-
rest and between the headrest posts,
otherwise route the tether strap over
the top of the seatback.
2. If your vehicle is equipped with a lug- gage board, set the board to the lowerposition.
3. Open the tether anchor cover.
4. Connect the tether strap hook to the appropriate child restraint hook holder and tighten to secure the seat.
WARNING - Tether strap
Never mount more than one child restraint to a single tether or to a
single lower anchorage point. The
increased load caused by multiple
seats may cause the tethers or
anchorage points to break, causing
serious injury or death.
WARNING
A child can be seriously injured or
killed in a collision if the child
restraint is not properly anchored
to the car and the child is not prop-
erly restrained in the child restraint.
Always follow the child seat manu-
facturer’s instructions for installa-
tion and use.
OYN039021OYN039020
YN RHD 3.QXP 10/20/2009 4:22 PM Page 31
Page 394 of 761
Safety features of your vehicle
32
3
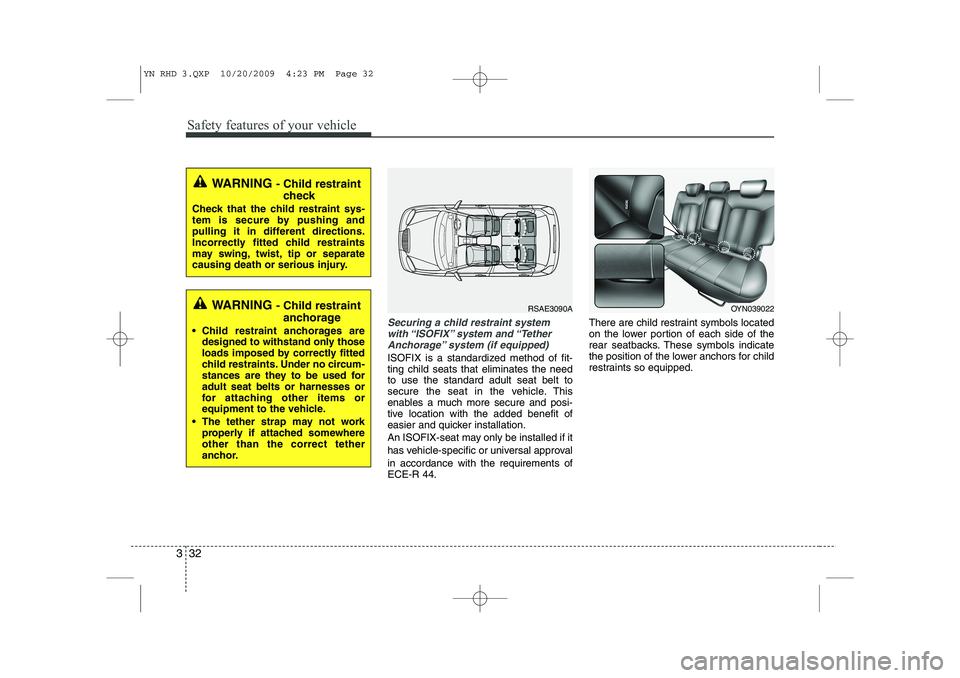
Securing a child restraint system
with “ISOFIX” system and “TetherAnchorage” system (if equipped)
ISOFIX is a standardized method of fit- ting child seats that eliminates the needto use the standard adult seat belt to
secure the seat in the vehicle. This
enables a much more secure and posi-
tive location with the added benefit of
easier and quicker installation.
An ISOFIX-seat may only be installed if it
has vehicle-specific or universal approval in accordance with the requirements of ECE-R 44. There are child restraint symbols located
on the lower portion of each side of the
rear seatbacks. These symbols indicate
the position of the lower anchors for child
restraints so equipped.
WARNING
- Child restraint
check
Check that the child restraint sys-
tem is secure by pushing and
pulling it in different directions.
Incorrectly fitted child restraints
may swing, twist, tip or separate
causing death or serious injury.
WARNING - Child restraint
anchorage
Child restraint anchorages are designed to withstand only those
loads imposed by correctly fitted
child restraints. Under no circum-
stances are they to be used foradult seat belts or harnesses or
for attaching other items or
equipment to the vehicle.
The tether strap may not work properly if attached somewhereother than the correct tether
anchor.RSAE3090AOYN039022
YN RHD 3.QXP 10/20/2009 4:23 PM Page 32
Page 395 of 761
333
Safety features of your vehicle
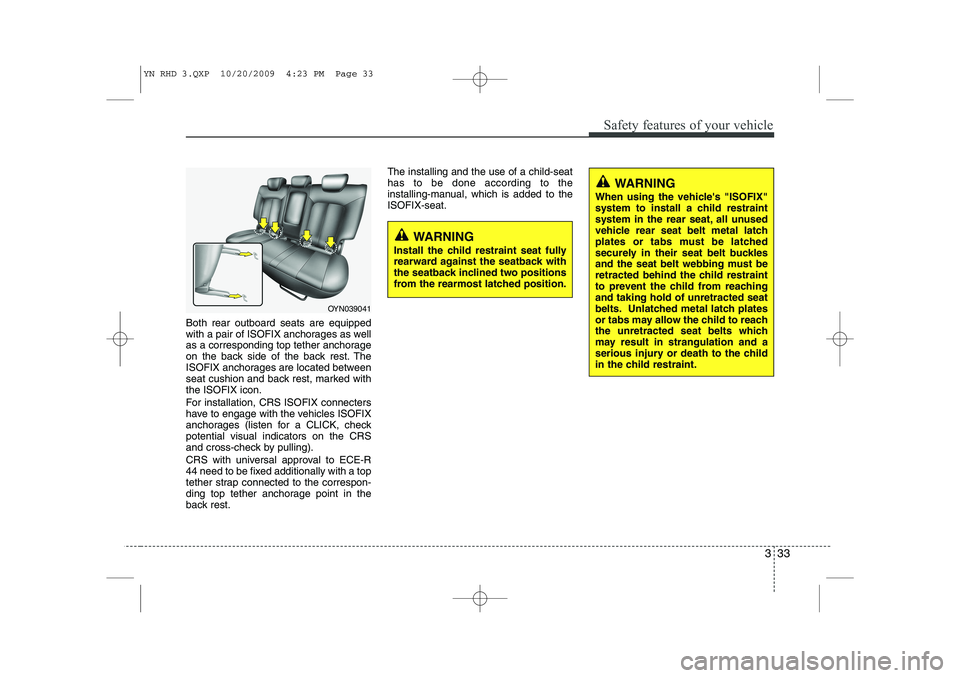
Both rear outboard seats are equipped
with a pair of ISOFIX anchorages as well
as a corresponding top tether anchorage
on the back side of the back rest. The
ISOFIX anchorages are located between
seat cushion and back rest, marked withthe ISOFIX icon.
For installation, CRS ISOFIX connecters
have to engage with the vehicles ISOFIX
anchorages (listen for a CLICK, checkpotential visual indicators on the CRS
and cross-check by pulling).
CRS with universal approval to ECE-R
44 need to be fixed additionally with a top
tether strap connected to the correspon-
ding top tether anchorage point in the
back rest.The installing and the use of a child-seathas to be done according to the
installing-manual, which is added to theISOFIX-seat.
OYN039041
WARNING
Install the child restraint seat fully
rearward against the seatback with
the seatback inclined two positions
from the rearmost latched position.
WARNING
When using the vehicle's "ISOFIX"
system to install a child restraint
system in the rear seat, all unused
vehicle rear seat belt metal latch
plates or tabs must be latched
securely in their seat belt buckles
and the seat belt webbing must be
retracted behind the child restraint
to prevent the child from reachingand taking hold of unretracted seat
belts. Unlatched metal latch plates
or tabs may allow the child to reach
the unretracted seat belts which
may result in strangulation and a
serious injury or death to the child
in the child restraint.
YN RHD 3.QXP 10/20/2009 4:23 PM Page 33
Page 396 of 761
Safety features of your vehicle
34
3
To secure the child restraint seat:
1. To engage the child restraint seat to
the ISOFIX lower anchor, insert the
child restraint seat latch into the
ISOFIX anchor. Listen for the audible
“click” sound.
2. Connect the tether strap hook to the child restraint hook holder and tighten
to secure the seat. (Refer to the previ-
ous page.)
WARNING
Do not install a child restraint seat at the centre of the rear seat
using the vehicle's ISOFIX
anchors. The ISOFIX anchors are
only provided for the left and right
outboard rear seating positions.
Do not misuse the ISOFIX anchors
by attempting to attach a child
restraint seat in the middle of the
rear seat to the ISOFIX anchors.
In a crash, the child restraint seat
ISOFIX attachments may not be
strong enough to secure the child
restraint seat properly in the cen-
tre of the rear seat and may
break, causing serious injury ordeath.
Do not mount more than one child restraint to a child restraint
lower anchorage point. The
improper increased load may
cause the anchorage points or
tether anchor to break, causing
serious injury or death.
(Continued)(Continued)
Attach the ISOFIX or ISOFIX-com-patible child restraint seat only to
the appropriate locations shownin the illustration.
Always follow the installation and use instructions provided by the
manufacturer of the child restraint.
CAUTION
Do not allow the rear seat belt web-
bing to get scratched or pinched by
the ISOFIX-seat latch and ISOFIXanchor during the installation.
YN RHD 3.QXP 10/20/2009 4:23 PM Page 34
Page 397 of 761
335
Safety features of your vehicle
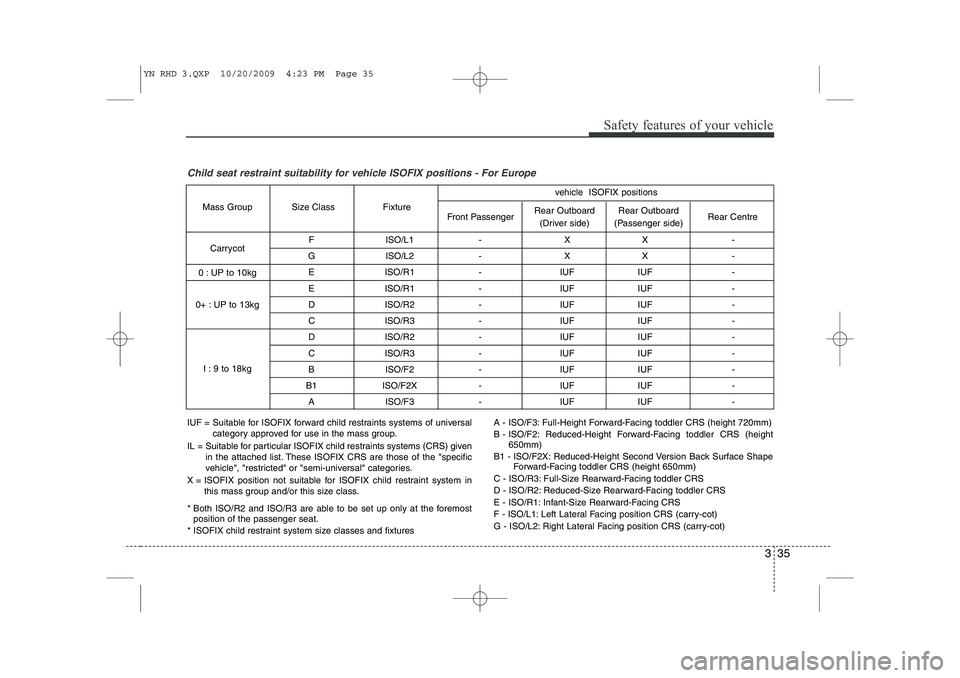
Child seat restraint suitability for vehicle ISOFIX positions - For Europe
F ISO/L1 - X X -
G ISO/L2 - X X - E ISO/R1 - IUF IUF -
E ISO/R1 - IUF IUF -
D ISO/R2 - IUF IUF -
C ISO/R3 - IUF IUF -
D ISO/R2 - IUF IUF -
C ISO/R3 - IUF IUF - B ISO/F2 - IUF IUF -
B1 ISO/F2X - IUF IUF - A ISO/F3 - IUF IUF -
Rear Outboard
(Passenger side)
Rear Outboard
(Driver side)
Front Passenger
Fixture
Size Class
Mass Group
Carrycot
0 : UP to 10kg
0+ : UP to 13kg
I : 9 to 18kg Rear Centre
vehicle ISOFIX positions
IUF = Suitable for ISOFIX forward child restraints systems of universal
category approved for use in the mass group.
IL = Suitable for particular ISOFIX child restraints systems (CRS) given in the attached list. These ISOFIX CRS are those of the "specific
vehicle", "restricted" or "semi-universal" categories.
X = ISOFIX position not suitable for ISOFIX child restraint system in this mass group and/or this size class.
* Both ISO/R2 and ISO/R3 are able to be set up only at the foremost position of the passenger seat.
* ISOFIX child restraint system size classes and fixtures A - ISO/F3: Full-Height Forward-Facing toddler CRS (height 720mm)
B - ISO/F2: Reduced-Height Forward-Facing toddler CRS (height
650mm)
B1 - ISO/F2X: Reduced-Height Second Version Back Surface Shape Forward-Facing toddler CRS (height 650mm)
C - ISO/R3: Full-Size Rearward-Facing toddler CRS
D - ISO/R2: Reduced-Size Rearward-Facing toddler CRS
E - ISO/R1: Infant-Size Rearward-Facing CRS
F - ISO/L1: Left Lateral Facing position CRS (carry-cot)
G - ISO/L2: Right Lateral Facing position CRS (carry-cot)
YN RHD 3.QXP 10/20/2009 4:23 PM Page 35
Page 398 of 761
Safety features of your vehicle
36
3
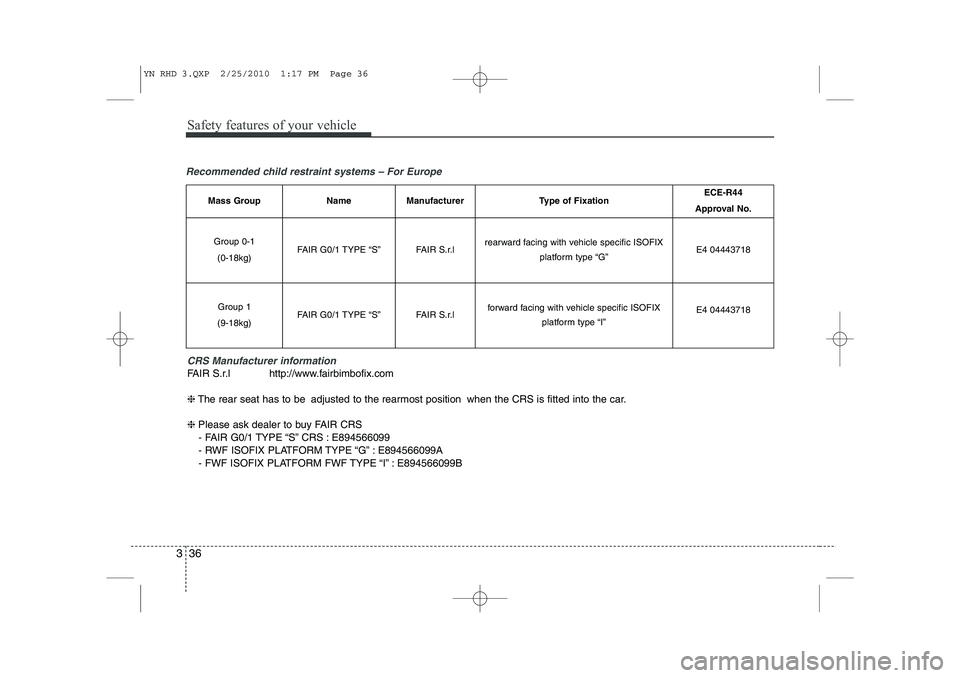
Recommended child restraint systems – For Europe
CRS Manufacturer information
FAIR S.r.l http://www.fairbimbofix.com ❈The rear seat has to be adjusted to the rearmost position when the CRS is fitted into the car.
❈ Please ask dealer to buy FAIR CRS
- FAIR G0/1 TYPE “S” CRS : E894566099
- RWF ISOFIX PLATFORM TYPE “G” : E894566099A
- FWF ISOFIX PLATFORM FWF TYPE “I” : E894566099B
Mass GroupNameManufacturerType of FixationECE-R44
Approval No.
Group 0-1 (0-18kg)FAIR G0/1 TYPE “S”FAIR S.r.lrearward facing with vehicle specific ISOFIX platform type “G”E4 04443718
Group 1
(9-18kg)FAIR G0/1 TYPE “S”FAIR S.r.lforward facing with vehicle specific ISOFIX platform type “I”E4 04443718
YN RHD 3.QXP 2/25/2010 1:17 PM Page 36
Page 399 of 761
337
Safety features of your vehicle
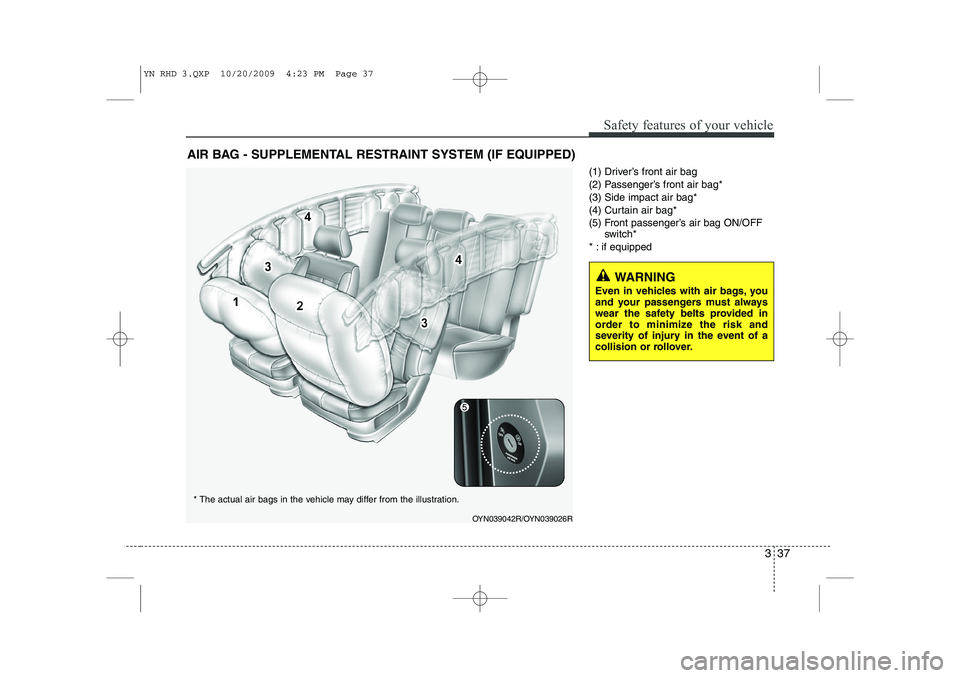
(1) Driver’s front air bag
(2) Passenger’s front air bag*(3) Side impact air bag*
(4) Curtain air bag*
(5) Front passenger’s air bag ON/OFFswitch*
* : if equipped
AIR BAG - SUPPLEMENTAL RESTRAINT SYSTEM (IF EQUIPPED)
OYN039042R/OYN039026R
* The actual air bags in the vehicle may differ from the illustration.
WARNING
Even in vehicles with air bags, you
and your passengers must always
wear the safety belts provided in
order to minimize the risk and
severity of injury in the event of a
collision or rollover.
YN RHD 3.QXP 10/20/2009 4:23 PM Page 37
Page 400 of 761
Safety features of your vehicle
38
3
How does the air bag system operate
Air bags are activated (able to inflate if
necessary) only when the ignition
switch is turned to the ON or STARTposition.
Air bags inflate instantly in the event of serious frontal or side collision (ifequipped with side impact air bag or
curtain air bag) in order to help protect
the occupants from serious physical
injury.
There is no single speed at which the air bags will inflate.
Generally, air bags are designed to
inflate based upon the severity of a col-
lision and its direction. These two fac-
tors determine whether the sensors
produce an electronic deployment/inflation signal.
Air bag deployment depends on a number of factors including vehiclespeed, angles of impact and the densi-
ty and stiffness of the vehicles or
objects which your vehicle hits in the
collision. The determining, factors are
not limited to those mentioned above.
The front air bags will completely inflate and deflate in an instant. It is virtually impossible for you to see
the air bags inflate during an accident.
It is much more likely that you will sim-ply see the deflated air bags hanging
out of their storage compartments afterthe collision.
In order to help provide protection in a severe collision, the air bags must
inflate rapidly. The speed of air bag
inflation is a consequence of extremely
short time in which a collision occursand the need to get the air bag
between the occupant and the vehicle
structures before the occupant impacts
those structures. This speed of inflation
reduces the risk of serious or life-
threatening injuries in a severe collision
and is thus a necessary part of air bagdesign.
However, air bag inflation can also
cause injuries which can include facial
abrasions, bruises and broken bonesbecause the inflation speed also caus-
es the air bags to expand with a great
deal of force.
There are even circumstances under which contact with the steer-
ing wheel air bag can cause fatal
injuries, especially if the occupant
is positioned excessively close tothe steering wheel.
WARNING
To avoid severe personal injury or death caused by deploying air
bags in a collision, the driver
should sit as far back from the
steering wheel air bag as possible
(at least 250 mm (10 inches)
away). The front passenger should
always move their seat as far
back as possible and sit back intheir seat.
Air bag inflates instantly in an event of a collision, passengers
may be injured by the air bag
expansion force if they are not in
a proper position.
Air bag inflation may cause injuries including facial or bodily
abrasions, injuries from broken
glasses or burns.
YN RHD 3.QXP 10/20/2009 4:23 PM Page 38