KIA VENGA 2011 Owners Manual
Manufacturer: KIA, Model Year: 2011, Model line: VENGA, Model: KIA VENGA 2011Pages: 761, PDF Size: 34.65 MB
Page 691 of 761
751
Maintenance
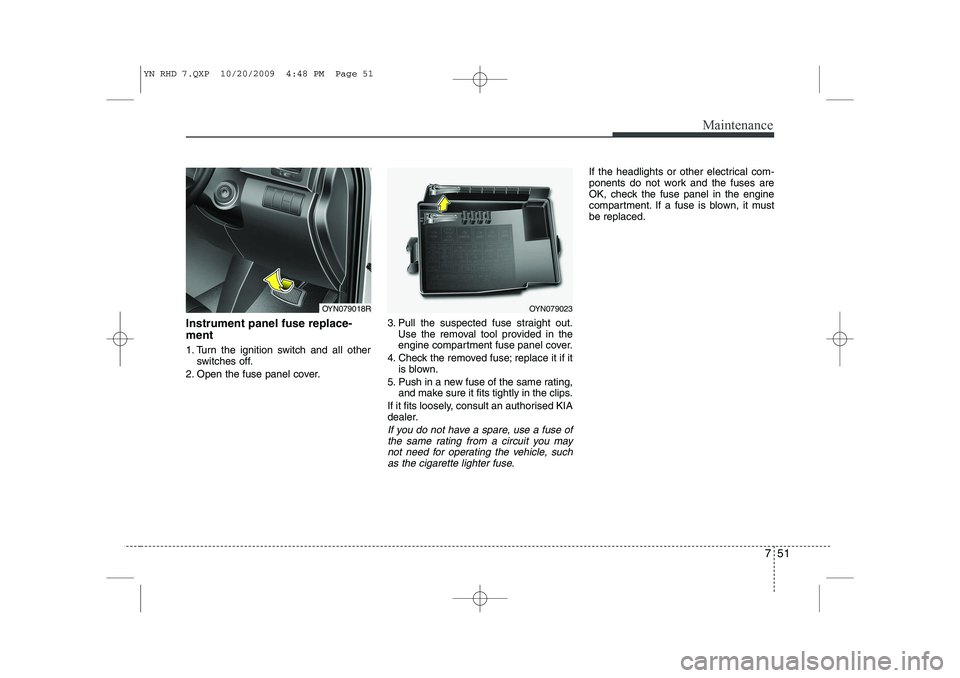
Instrument panel fuse replace- ment
1. Turn the ignition switch and all otherswitches off.
2. Open the fuse panel cover. 3. Pull the suspected fuse straight out.
Use the removal tool provided in the
engine compartment fuse panel cover.
4. Check the removed fuse; replace it if it is blown.
5. Push in a new fuse of the same rating, and make sure it fits tightly in the clips.
If it fits loosely, consult an authorised KIA
dealer.
If you do not have a spare, use a fuse of the same rating from a circuit you may
not need for operating the vehicle, such as the cigarette lighter fuse.
If the headlights or other electrical com-
ponents do not work and the fuses are
OK, check the fuse panel in the engine
compartment. If a fuse is blown, it mustbe replaced.
OYN079023OYN079018R
YN RHD 7.QXP 10/20/2009 4:48 PM Page 51
Page 692 of 761
Maintenance
52
7
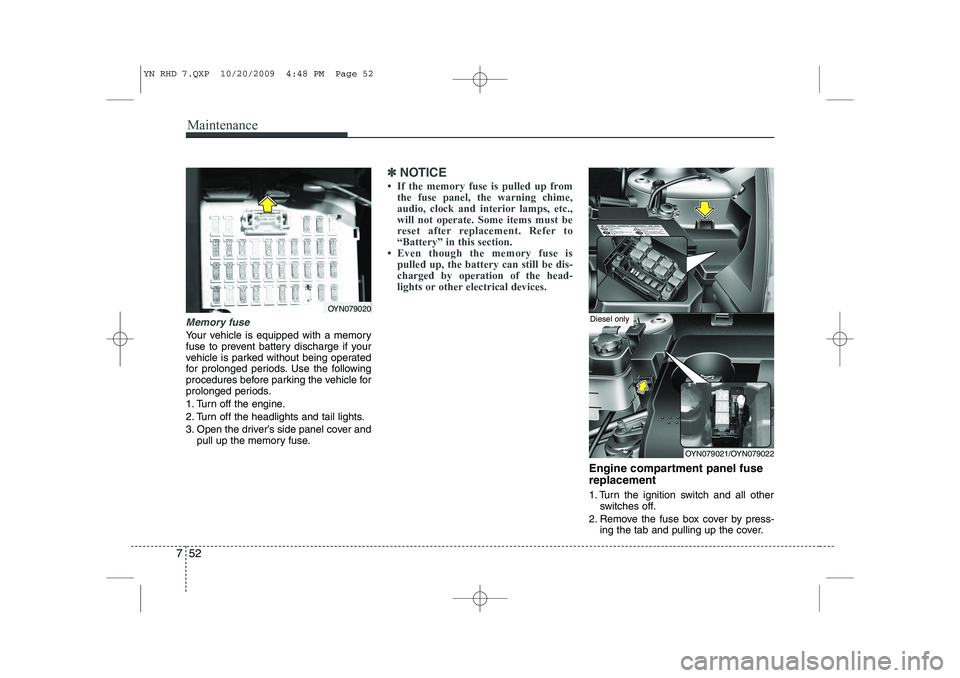
Memory fuse
Your vehicle is equipped with a memory
fuse to prevent battery discharge if your
vehicle is parked without being operated
for prolonged periods. Use the following
procedures before parking the vehicle for
prolonged periods.
1. Turn off the engine.
2. Turn off the headlights and tail lights.
3. Open the driver’s side panel cover and
pull up the memory fuse.
✽✽ NOTICE
Page 693 of 761
753
Maintenance
3. Check the removed fuse; replace it if itis blown. To remove or insert the fuse, use the fuse puller in the engine com-
partment fuse panel.
4. Push in a new fuse of the same rating, and make sure it fits tightly in the clips.
If it fits loosely, consult an authorised
KIA dealer.
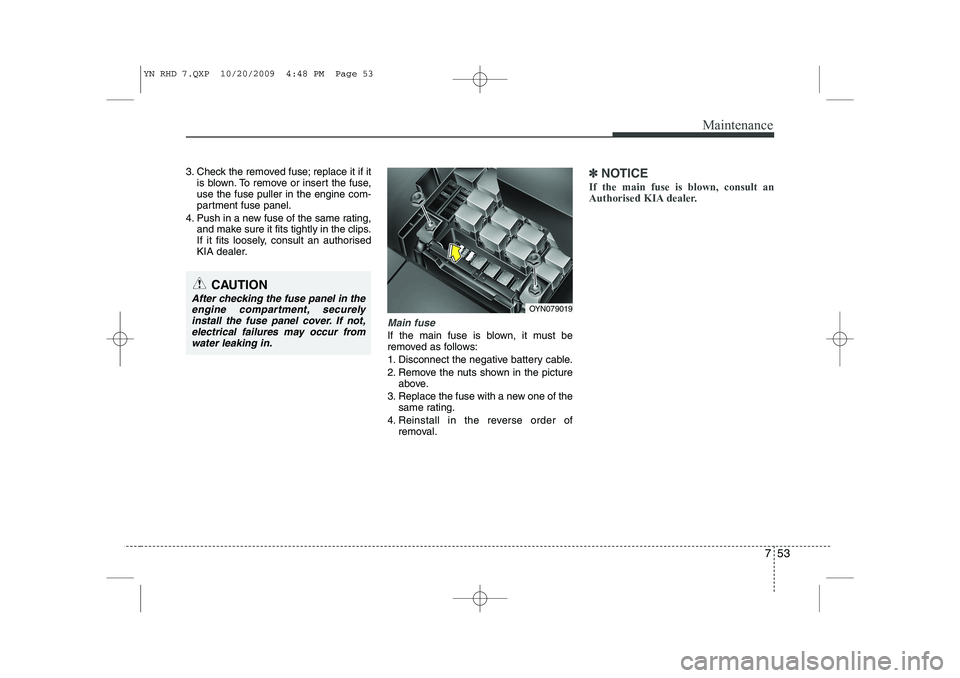
Main fuse
If the main fuse is blown, it must be
removed as follows:
1. Disconnect the negative battery cable.
2. Remove the nuts shown in the pictureabove.
3. Replace the fuse with a new one of the same rating.
4. Reinstall in the reverse order of removal.
✽✽ NOTICE
If the main fuse is blown, consult an
Authorised KIA dealer.
CAUTION
After checking the fuse panel in the engine compartment, securely
install the fuse panel cover. If not,electrical failures may occur from water leaking in.OYN079019
YN RHD 7.QXP 10/20/2009 4:48 PM Page 53
Page 694 of 761
Maintenance
54
7
✽✽
NOTICE
Not all fuse panel descriptions in this
manual may be applicable to your vehi-cle. It is accurate at the time of printing.When you inspect the fuse panel in your
vehicle, refer to the fuse panel label.Inner fuse panel Engine compartment fuse panel
OYN079024R/OYN079025/OYN079026
Diesel only
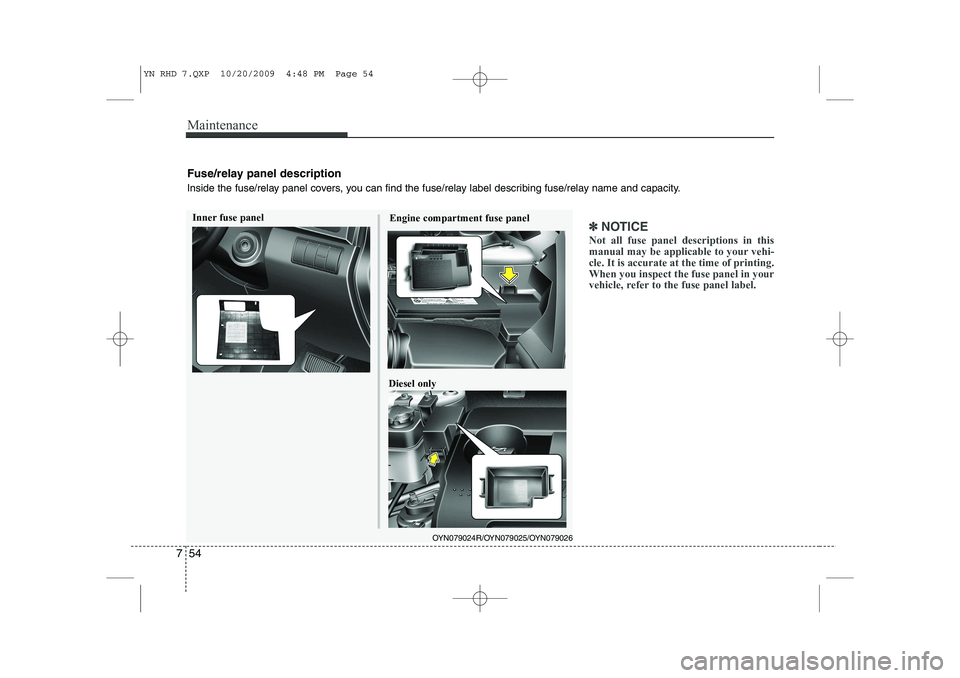
Fuse/relay panel description
Inside the fuse/relay panel covers, you can find the fuse/relay label describing fuse/relay name and capacity.
YN RHD 7.QXP 10/20/2009 4:48 PM Page 54
Page 695 of 761
755
Maintenance
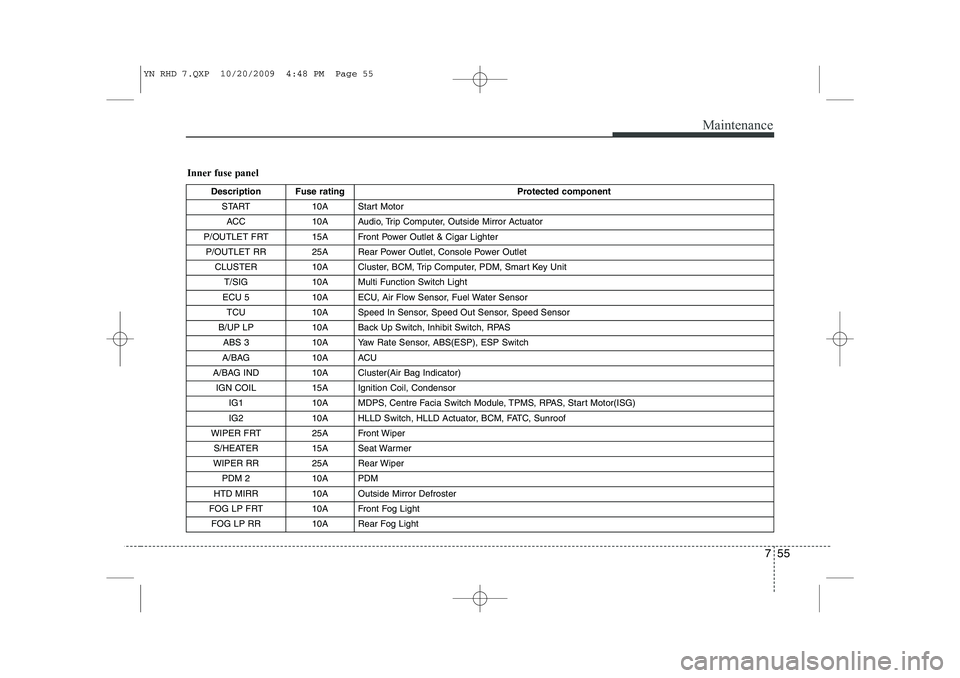
Inner fuse panelDescription Fuse rating Protected component
START 10A Start Motor
ACC 10A Audio, Trip Computer, Outside Mirror Actuator
P/OUTLET FRT 15A Front Power Outlet & Cigar Lighter
P/OUTLET RR 25A Rear Power Outlet, Console Power Outlet CLUSTER 10A Cluster, BCM, Trip Computer, PDM, Smart Key Unit T/SIG 10A Multi Function Switch Light
ECU 5 10A ECU, Air Flow Sensor, Fuel Water Sensor TCU 10A Speed In Sensor, Speed Out Sensor, Speed Sensor
B/UP LP 10A Back Up Switch, Inhibit Switch, RPAS
ABS 3 10A Yaw Rate Sensor, ABS(ESP), ESP Switch
A/BAG 10A ACU
A/BAG IND 10A Cluster(Air Bag Indicator) IGN COIL 15A Ignition Coil, Condensor IG1 10A MDPS, Centre Facia Switch Module, TPMS, RPAS, Start Motor(ISG)
IG2 10A HLLD Switch, HLLD Actuator, BCM, FATC, Sunroof
WIPER FRT 25A Front Wiper S/HEATER 15A Seat Warmer
WIPER RR 25A Rear Wiper PDM 2 10A PDM
HTD MIRR 10A Outside Mirror Defroster
FOG LP FRT10AFront Fog Light
FOG LP RR10ARear Fog Light
YN RHD 7.QXP 10/20/2009 4:48 PM Page 55
Page 696 of 761
Maintenance
56
7
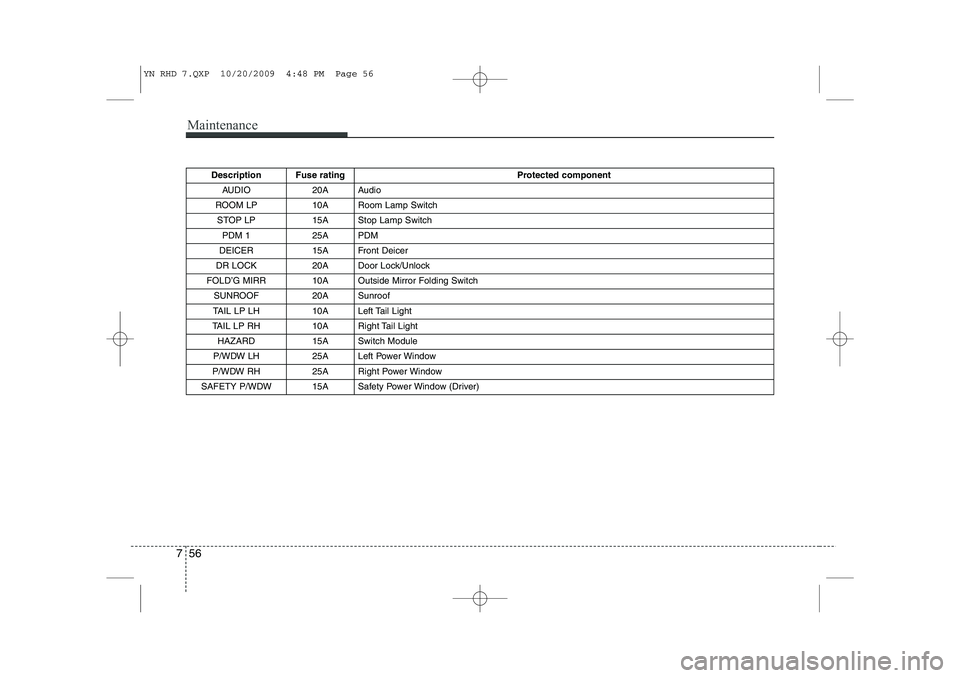
Description Fuse rating Protected component
AUDIO 20A Audio
ROOM LP 10A Room Lamp Switch STOP LP 15A Stop Lamp Switch
PDM 1 25A PDM
DEICER 15A Front Deicer
DR LOCK 20A Door Lock/Unlock
FOLD’G MIRR 10A Outside Mirror Folding Switch SUNROOF 20A Sunroof
TAIL LP LH 10A Left Tail Light
TAIL LP RH 10A Right Tail Light HAZARD 15A Switch Module
P/WDW LH 25A Left Power Window
P/WDW RH 25A Right Power Window
SAFETY P/WDW 15A Safety Power Window (Driver)
YN RHD 7.QXP 10/20/2009 4:48 PM Page 56
Page 697 of 761
757
Maintenance
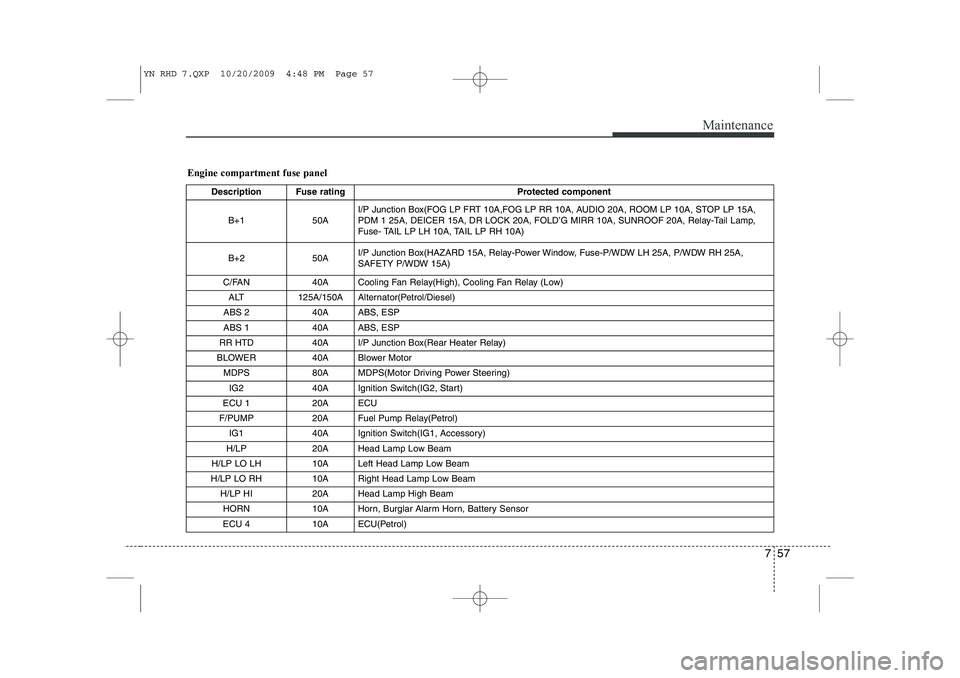
Engine compartment fuse panelDescription Fuse rating Protected component
B+1 50A I/P Junction Box(FOG LP FRT 10A,FOG LP RR 10A, AUDIO 20A, ROOM LP 10A, STOP LP 15A,
PDM 1 25A, DEICER 15A, DR LOCK 20A, FOLD’G MIRR 10A, SUNROOF 20A, Relay-Tail Lamp,
Fuse- TAIL LP LH 10A, TAIL LP RH 10A)
B+2 50A I/P Junction Box(HAZARD 15A, Relay-Power Window, Fuse-P/WDW LH 25A, P/WDW RH 25A,
SAFETY P/WDW 15A)
C/FAN 40A Cooling Fan Relay(High), Cooling Fan Relay (Low) ALT 125A/150A Alternator(Petrol/Diesel)
ABS 2 40A ABS, ESP
ABS 1 40A ABS, ESP
RR HTD 40A I/P Junction Box(Rear Heater Relay)
BLOWER 40A Blower Motor
MDPS 80A MDPS(Motor Driving Power Steering)IG2 40A Ignition Switch(IG2, Start)
ECU 1 20A ECU
F/PUMP 20A Fuel Pump Relay(Petrol) IG1 40A Ignition Switch(IG1, Accessory)
H/LP 20A Head Lamp Low Beam
H/LP LO LH 10A Left Head Lamp Low Beam
H/LP LO RH 10A Right Head Lamp Low Beam
H/LP HI 20A Head Lamp High BeamHORN 10A Horn, Burglar Alarm Horn, Battery Sensor
ECU 4 10A ECU(Petrol)
YN RHD 7.QXP 10/20/2009 4:48 PM Page 57
Page 698 of 761
Maintenance
58
7
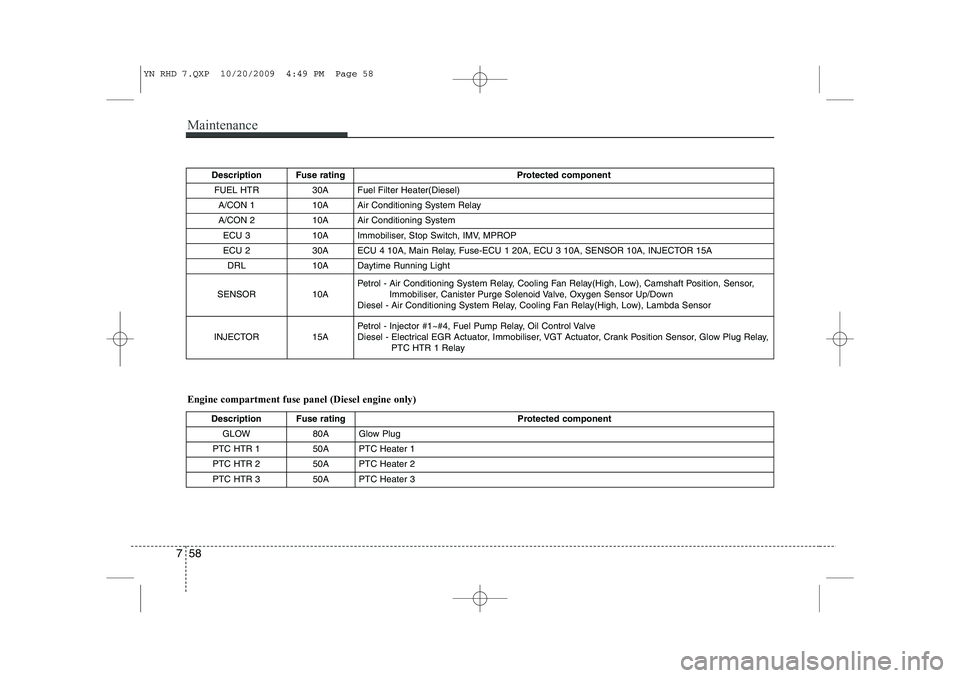
Engine compartment fuse panel (Diesel engine only) Description Fuse rating
Protected component
FUEL HTR30AFuel Filter Heater(Diesel)
A/CON 110AAir Conditioning System Relay
A/CON 210AAir Conditioning System
ECU 3 10A Immobiliser, Stop Switch, IMV, MPROP
ECU 2 30A ECU 4 10A, Main Relay, Fuse-ECU 1 20A, ECU 3 10A, SENSOR 10A, INJECTOR 15A
DRL 10A Daytime Running Light
SENSOR 10A Petrol - Air Conditioning System Relay, Cooling Fan Relay(High, Low), Camshaft Position, Sensor,
Immobiliser, Canister Purge Solenoid Valve, Oxygen Sensor Up/Down
Diesel - Air Conditioning System Relay, Cooling Fan Relay(High, Low), Lambda Sensor
INJECTOR 15A Petrol - Injector #1~#4, Fuel Pump Relay, Oil Control Valve
Diesel - Electrical EGR Actuator, Immobiliser, VGT Actuator, Crank Position Sensor, Glow Plug Relay,
PTC HTR 1 Relay
Description Fuse rating Protected component
GLOW 80A Glow Plug
PTC HTR 1 50A PTC Heater 1
PTC HTR 2 50A PTC Heater 2
PTC HTR 3 50A PTC Heater 3
YN RHD 7.QXP 10/20/2009 4:49 PM Page 58
Page 699 of 761
759
Maintenance
LIGHT BULBS
Use only the bulbs of the specifiedwattage.
✽✽ NOTICE
After heavy, driving rain or washing, headlight and taillight lenses could
appear frosty. This condition is caused by
the temperature difference between the
lamp inside and outside. This is similar
to the condensation on your windows
inside your vehicle during the rain and
doesn’t indicate a problem with your
vehicle. If the water leaks into the lamp
bulb circuitry, have the vehicle checked
by an authorised KIA dealer.
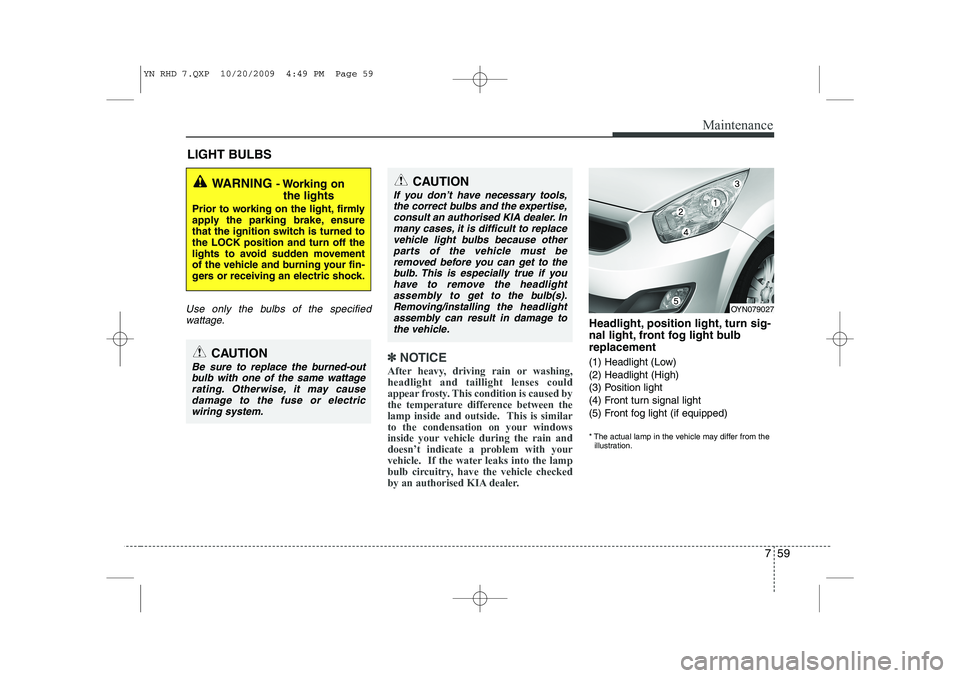
Headlight, position light, turn sig-
nal light, front fog light bulbreplacement
(1) Headlight (Low) (2) Headlight (High)
(3) Position light
(4) Front turn signal light
(5) Front fog light (if equipped)
* The actual lamp in the vehicle may differ from the illustration.
WARNING - Working on
the lights
Prior to working on the light, firmly
apply the parking brake, ensure
that the ignition switch is turned tothe LOCK position and turn off the
lights to avoid sudden movement
of the vehicle and burning your fin-
gers or receiving an electric shock.
CAUTION
Be sure to replace the burned-out bulb with one of the same wattagerating. Otherwise, it may cause
damage to the fuse or electricwiring system.
CAUTION
If you don’t have necessary tools,the correct bulbs and the expertise,
consult an authorised KIA dealer. Inmany cases, it is difficult to replace vehicle light bulbs because otherparts of the vehicle must be
removed before you can get to thebulb. This is especially true if you have to remove the headlight
assembly to
get to the bulb(s).
Removing/installingthe headlight
assembly can result in damage to the vehicle.OYN079027
YN RHD 7.QXP 10/20/2009 4:49 PM Page 59
Page 700 of 761
Maintenance
60
7
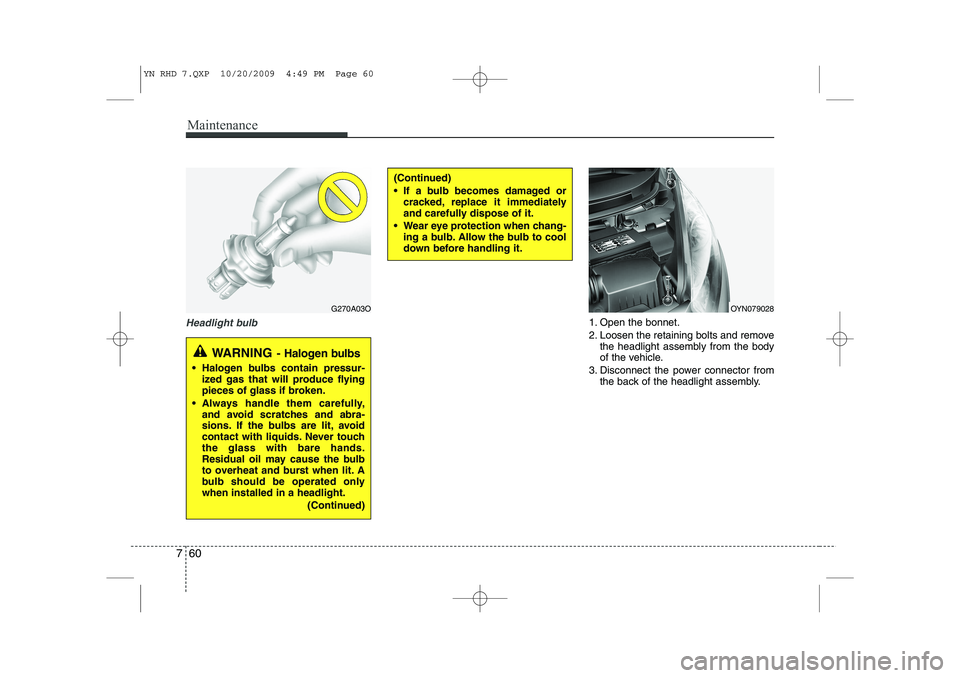
Headlight bulb1. Open the bonnet.
2. Loosen the retaining bolts and remove
the headlight assembly from the body
of the vehicle.
3. Disconnect the power connector from the back of the headlight assembly.
(Continued)
If a bulb becomes damaged orcracked, replace it immediately
and carefully dispose of it.
Wear eye protection when chang- ing a bulb. Allow the bulb to cool
down before handling it.
G270A03O
WARNING - Halogen bulbs
Halogen bulbs contain pressur-
ized gas that will produce flying
pieces of glass if broken.
Always handle them carefully, and avoid scratches and abra-
sions. If the bulbs are lit, avoid
contact with liquids. Never touchthe glass with bare hands.
Residual oil may cause the bulb
to overheat and burst when lit. A
bulb should be operated onlywhen installed in a headlight.
(Continued)
OYN079028
YN RHD 7.QXP 10/20/2009 4:49 PM Page 60