oil KIA VENGA 2013 Repair Manual
[x] Cancel search | Manufacturer: KIA, Model Year: 2013, Model line: VENGA, Model: KIA VENGA 2013Pages: 751, PDF Size: 27.49 MB
Page 677 of 751
725
Maintenance
Changing the engine oil and filter
We recommend that the engine oil and
filter be replaced by an authorised Kia
dealer.The high-pressure cooling system has a
reservoir filled with year-round antifreeze
coolant. The reservoir is filled at the fac-
tory.
Check the antifreeze protection and
coolant level at least once a year, at thebeginning of the winter season, and
before travelling to a colder climate.
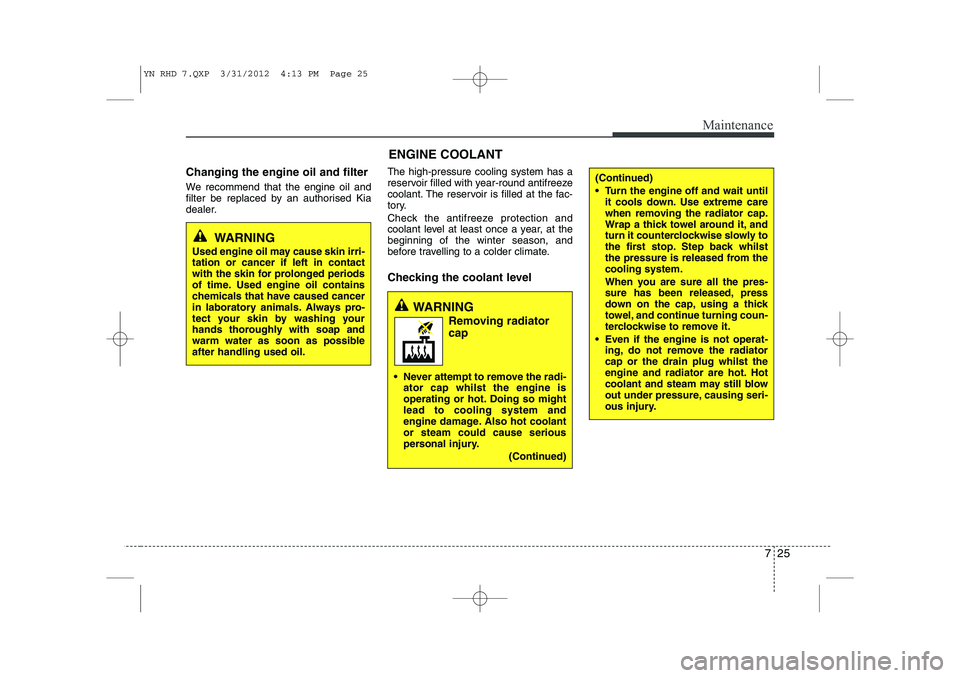
Checking the coolant level
WARNING
Used engine oil may cause skin irri- tation or cancer if left in contact
with the skin for prolonged periods
of time. Used engine oil contains
chemicals that have caused cancer
in laboratory animals. Always pro-
tect your skin by washing your
hands thoroughly with soap and
warm water as soon as possibleafter handling used oil.
ENGINE COOLANT
WARNING
Removing radiator cap
Never attempt to remove the radi- ator cap whilst the engine is
operating or hot. Doing so mightlead to cooling system and
engine damage. Also hot coolantor steam could cause serious
personal injury.
(Continued)
(Continued)
Turn the engine off and wait untilit cools down. Use extreme care
when removing the radiator cap.
Wrap a thick towel around it, and
turn it counterclockwise slowly to
the first stop. Step back whilst
the pressure is released from thecooling system.
When you are sure all the pres-
sure has been released, press
down on the cap, using a thick
towel, and continue turning coun-
terclockwise to remove it.
Even if the engine is not operat- ing, do not remove the radiatorcap or the drain plug whilst the
engine and radiator are hot. Hot
coolant and steam may still blow
out under pressure, causing seri-
ous injury.
YN RHD 7.QXP 3/31/2012 4:13 PM Page 25
Page 680 of 751
Maintenance
28
7
BRAKE/CLUTCH FLUID (IF EQUIPPED)
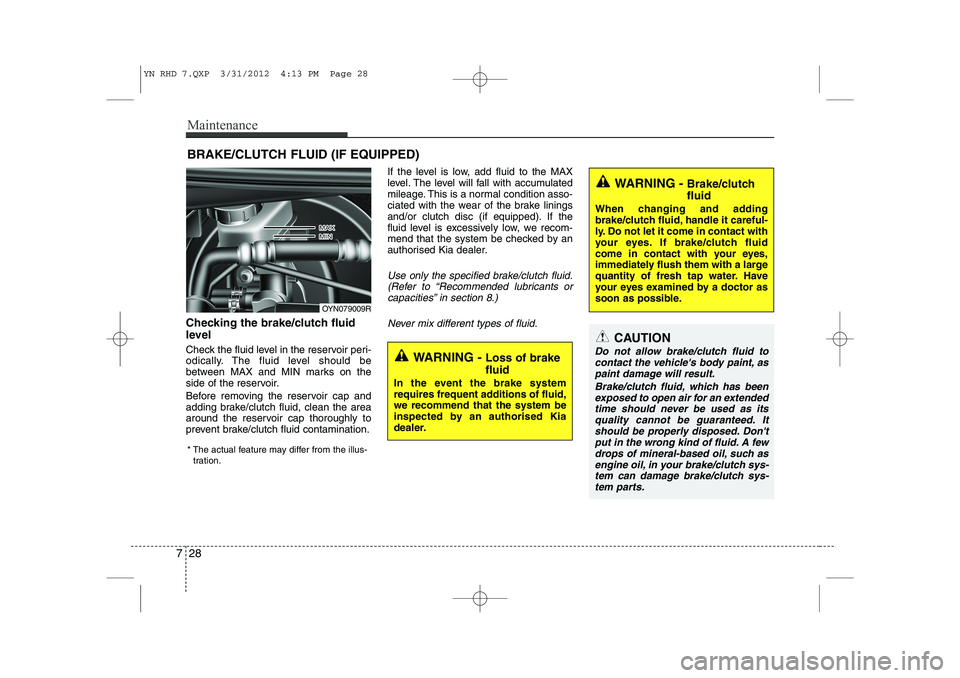
Checking the brake/clutch fluid
level
Check the fluid level in the reservoir peri-
odically. The fluid level should be
between MAX and MIN marks on the
side of the reservoir.
Before removing the reservoir cap and
adding brake/clutch fluid, clean the area
around the reservoir cap thoroughly to
prevent brake/clutch fluid contamination. If the level is low, add fluid to the MAX
level. The level will fall with accumulated
mileage. This is a normal condition asso-
ciated with the wear of the brake linings
and/or clutch disc (if equipped). If the
fluid level is excessively low, we recom-
mend that the system be checked by an
authorised Kia dealer.
Use only the specified brake/clutch fluid.
(Refer to “Recommended lubricants or
capacities” in section 8.)
Never mix different types of fluid.
WARNING - Loss of brake fluid
In the event the brake system
requires frequent additions of fluid,we recommend that the system be
inspected by an authorised Kia
dealer.
WARNING - Brake/clutch fluid
When changing and adding
brake/clutch fluid, handle it careful-
ly. Do not let it come in contact with
your eyes. If brake/clutch fluid
come in contact with your eyes,
immediately flush them with a large
quantity of fresh tap water. Have
your eyes examined by a doctor as
soon as possible.
CAUTION
Do not allow brake/clutch fluid to contact the vehicle's body paint, as
paint damage will result.
Brake/clutch fluid, which has beenexposed to open air for an extendedtime should never be used as itsquality cannot be guaranteed. It
should be properly disposed. Don'tput in the wrong kind of fluid. A few drops of mineral-based oil, such asengine oil, in your brake/clutch sys-
tem can damage brake/clutch sys- tem parts.
OYN079009R
* The actual feature may differ from the illus- tration.
YN RHD 7.QXP 3/31/2012 4:13 PM Page 28
Page 682 of 751
Maintenance
30
7
✽✽
NOTICE
New automatic transaxle fluid should be
red. The red dye is added so the assem-bly plant can identify it as automatic
transaxle fluid and distinguish it from
engine oil or antifreeze. The red dye,
which is not an indicator of fluid quali-
ty, is not permanent. As the vehicle isdriven, the automatic transaxle fluid
will begin to look darker. The colour
may eventually appear light brown.
Therefore, we recommend that the sys-
tem be replaced by an authorised Kia
dealer according to the ScheduledMaintenance at the beginning of thissection.
Use only specified automatic transaxle
fluid. (Refer to "Recommended lubricantsor capacities" in section 8.) Changing the automatic transaxle fluid
We recommend that the system be
replaced by an authorised Kia dealer.According to the Maintenance Scheduleat the beginning of this section.
YN RHD 7.QXP 3/31/2012 4:13 PM Page 30
Page 693 of 751
741
Maintenance
Reset items
Items should be reset after the battery
has been discharged or the battery hasbeen disconnected.
Auto up/down window (See section 4)
Sunroof (See section 4)
Trip computer (See section 4)
Climate control system (See section 4)
Clock (See section 4)
Audio (See section 4)(Continued)
If the AGM battery is reconnected or replaced, ISG function will notoperate immediately.
If you want to use the ISG func-tion, the battery sensor needs to be calibrated for approximately 4hours with the ignition off.
WARNING
Before performing maintenance or recharging the battery, turn off all accessories and stop the
engine.
The negative battery cable must be removed first and installed
last when the battery is discon-nected.
WARNING - Recharging
battery
When recharging the battery,
observe the following precautions:
The battery must be removed from the vehicle and placed in an area with good ventilation.
Do not allow cigarettes, sparks, or flame near the battery.
Watch the battery during charg- ing, and stop or reduce the charg-
ing rate if the battery cells begin
gassing (boiling) violently or if
the temperature of the electrolyte
of any cell exceeds 49°C (120°F).
Wear eye protection when check- ing the battery during charging.
(Continued)
(Continued)
Disconnect the battery charger inthe following order.
1. Turn off the battery charger main switch.
2. Unhook the negative clamp from the negative battery terminal.
3. Unhook the positive clamp from the positive battery terminal.
YN RHD 7.QXP 3/31/2012 4:14 PM Page 41
Page 704 of 751
Maintenance
52
7
FUSES
A vehicle’s electrical system is protected
from electrical overload damage by
fuses. This vehicle has 2 (or 3) fuse panels, one
located in the driver’s side panel bolster,
the other in the engine compartment
near the battery.
If any of your vehicle’s lights, acces-
sories, or controls do not work, check the
appropriate circuit fuse. If a fuse has
blown, the element inside the fuse will bemelted.
If the electrical system does not work,
first check the driver’s side fuse panel.
Always replace a blown fuse with one of
the same rating.
Before replacing a blown fuse, disconnect
the negative battery cable.
If the replacement fuse blows, this indi-
cates an electrical problem. Avoid using
the system involved and we recommend
that you consult an authorised Kia deal-
er.
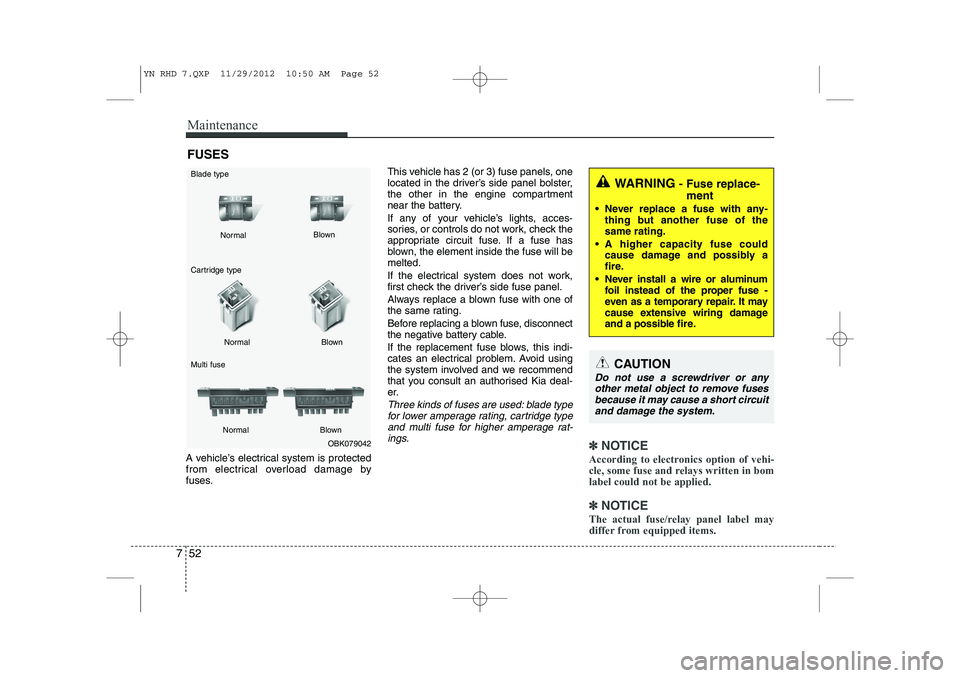
Three kinds of fuses are used: blade type
for lower amperage rating, cartridge type
and multi fuse for higher amperage rat- ings.
✽✽ NOTICE
According to electronics option of vehi-
cle, some fuse and relays written in bomlabel could not be applied.
✽
✽ NOTICE
The actual fuse/relay panel label may
differ from equipped items.
OBK079042
Normal
Normal
Cartridge type Multi fuse Blown
Blown
Normal Blown
WARNING - Fuse replace-
ment
• Never replace a fuse with any- thing but another fuse of the same rating.
A higher capacity fuse could cause damage and possibly a
fire.
Never install a wire or aluminum foil instead of the proper fuse -
even as a temporary repair. It may
cause extensive wiring damage
and a possible fire.
CAUTION
Do not use a screwdriver or any
other metal object to remove fuses because it may cause a short circuitand damage the system.
Blade type
YN RHD 7.QXP 11/29/2012 10:50 AM Page 52
Page 710 of 751
Maintenance
58
7
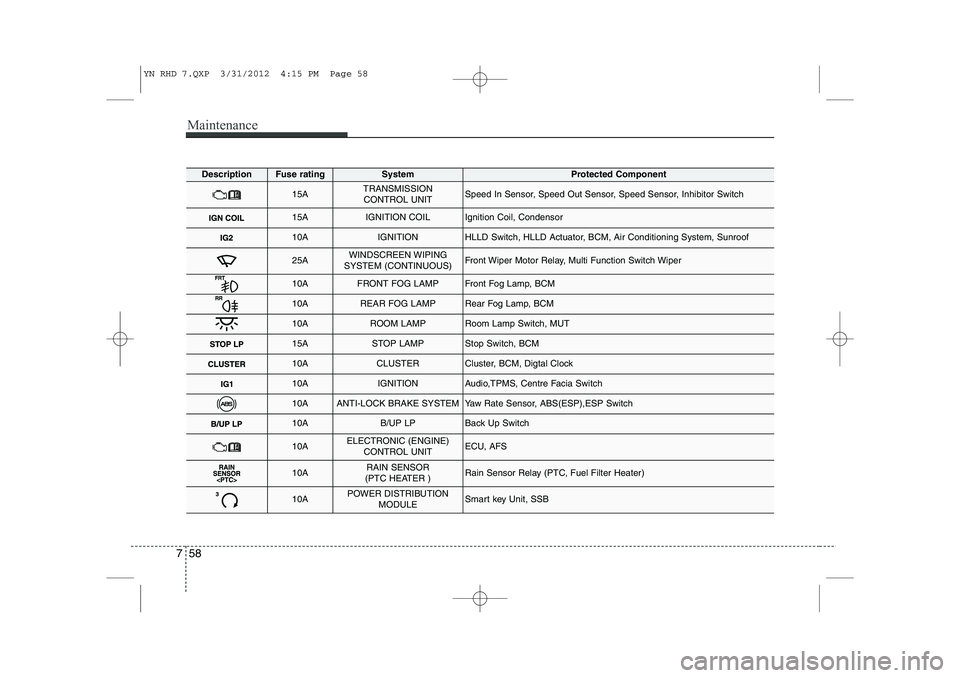
DescriptionFuse ratingSystemProtected Component
15ATRANSMISSION
CONTROL UNITSpeed In Sensor, Speed Out Sensor, Speed Sensor, Inhibitor Switch
15AIGNITION COILIgnition Coil, Condensor
10AIGNITIONHLLD Switch, HLLD Actuator, BCM, Air Conditioning System, Sunroof
25AWINDSCREEN WIPING
SYSTEM (CONTINUOUS)Front Wiper Motor Relay, Multi Function Switch Wiper
10AFRONT FOG LAMPFront Fog Lamp, BCM
10AREAR FOG LAMPRear Fog Lamp, BCM
10AROOM LAMPRoom Lamp Switch, MUT
15ASTOP LAMPStop Switch, BCM
10ACLUSTERCluster, BCM, Digtal Clock
10AIGNITIONAudio,TPMS, Centre Facia Switch
10AANTI-LOCK BRAKE SYSTEMYaw Rate Sensor, ABS(ESP),ESP Switch
10AB/UP LPBack Up Switch
10AELECTRONIC (ENGINE) CONTROL UNITECU, AFS
10ARAIN SENSOR
(PTC HEATER )Rain Sensor Relay (PTC, Fuel Filter Heater)
10APOWER DISTRIBUTION MODULESmart key Unit, SSB
YN RHD 7.QXP 3/31/2012 4:15 PM Page 58
Page 716 of 751
Maintenance
64
7
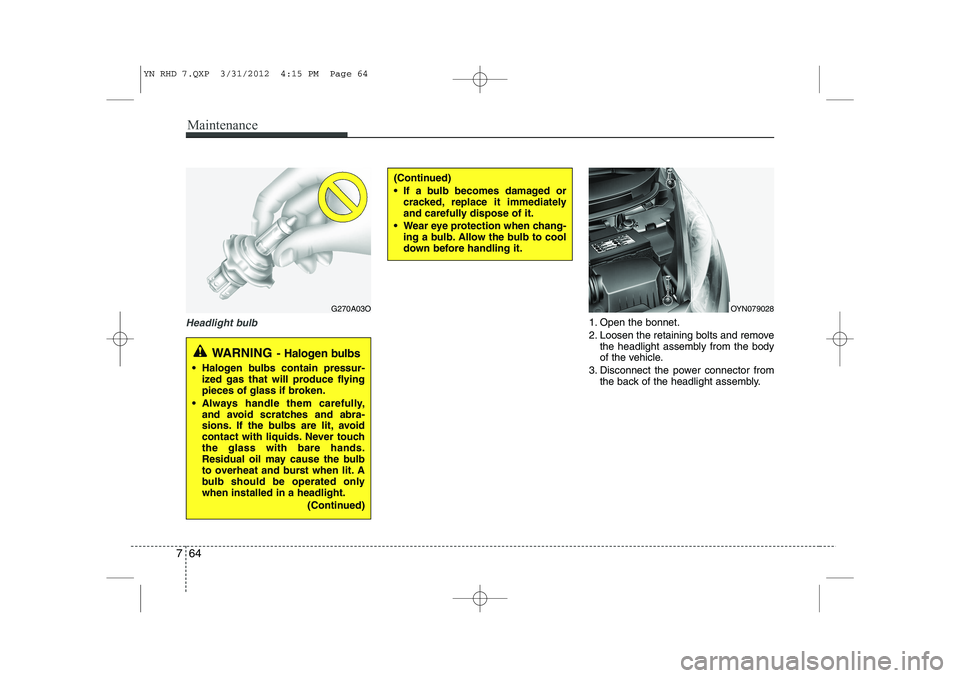
Headlight bulb1. Open the bonnet.
2. Loosen the retaining bolts and remove
the headlight assembly from the body
of the vehicle.
3. Disconnect the power connector from the back of the headlight assembly.
(Continued)
If a bulb becomes damaged orcracked, replace it immediately
and carefully dispose of it.
Wear eye protection when chang- ing a bulb. Allow the bulb to cool
down before handling it.
G270A03O
WARNING - Halogen bulbs
Halogen bulbs contain pressur-
ized gas that will produce flying
pieces of glass if broken.
Always handle them carefully, and avoid scratches and abra-
sions. If the bulbs are lit, avoid
contact with liquids. Never touchthe glass with bare hands.
Residual oil may cause the bulb
to overheat and burst when lit. A
bulb should be operated onlywhen installed in a headlight.
(Continued)
OYN079028
YN RHD 7.QXP 3/31/2012 4:15 PM Page 64
Page 725 of 751

773
Maintenance
Waxing
Wax the vehicle when water will no longer bead on the paint.
Always wash and dry the vehicle before
waxing. Use a good quality liquid or
paste wax, and follow the manufacturer’s
instructions. Wax all metal trim to protect
it and to maintain its luster.
Removing oil, tar, and similar materials
with a spot remover will usually strip the
wax from the finish. Be sure to re-wax
these areas even if the rest of the vehicle
does not yet need waxing.Finish damage repair
Deep scratches or stone chips in the
painted surface must be repaired
promptly. Exposed metal will quickly rust
and may develop into a major repair
expense.
✽✽NOTICE
If your vehicle is damaged and requires
any metal repair or replacement, be sure
the body shop applies anti-corrosion
materials to the parts repaired or
replaced.
Bright-metal maintenance
To remove road tar and insects, use a tar remover, not a scraper or other
sharp object.
To protect the surfaces of bright-metal parts from corrosion, apply a coating of
wax or chrome preservative and rub to
a high luster.
During winter weather or in coastal areas, cover the bright metal parts with
a heavier coating of wax or preserva-
tive. If necessary, coat the parts with
non-corrosive petroleum jelly or other
protective compound.
CAUTION
Wiping dust or dirt off the body
with a dry cloth will scratch thefinish.
Do not use steel wool, abrasive cleaners, or strong detergentscontaining highly alkaline or
caustic agents on chrome-platedor anodized aluminum parts. This may result in damage to the pro-tective coating and cause discol-
oration or paint deterioration.
YN RHD 7.QXP 3/31/2012 4:16 PM Page 73
Page 729 of 751
777
Maintenance
Interior care
Interior general precautions
Prevent chemicals such as perfume, cos-
metic oil, sun cream, hand cleaner, and
air freshener from contacting the interior
parts because they may cause damage
or discoloration. If they do contact the
interior parts, wipe them off immediately.
See the instructions that follow for the
proper way to clean vinyl.
Cleaning the upholstery and interiortrim
Vinyl
Remove dust and loose dirt from vinyl
with a whisk broom or vacuum cleaner.
Clean vinyl surfaces with a vinyl cleaner. Fabric
Remove dust and loose dirt from fabric
with a whisk broom or vacuum cleaner.Clean with a mild soap solution recom-
mended for upholstery or carpets.
Remove fresh spots immediately with a
fabric spot cleaner. If fresh spots do not
receive immediate attention, the fabriccan be stained and its colour can be
affected. Also, its fire-resistant properties
can be reduced if the material is not
properly maintained.
Cleaning the lap/shoulder belt web- bing
Clean the belt webbing with any mild
soap solution recommended for cleaning
upholstery or carpet. Follow the instruc-
tions provided with the soap. Do not
bleach or re-dye the webbing because
this may weaken it.
Cleaning the interior window glass
If the interior glass surfaces of the vehi-
cle become fogged (that is, covered with
an oily, greasy or waxy film), they should
be cleaned with glass cleaner. Follow the
directions on the glass cleaner container.
CAUTION
Never allow water or other liquids
to come in contact with electrical/electronic components inside the vehicle as this may damage them.
CAUTION
Using anything but recommended
cleaners and procedures may affectthe fabric’s appearance and fire-resistant properties.
CAUTION
Do not scrape or scratch the inside of the rear window. This may result in damage to the rear windowdefroster grid.
CAUTION
When cleaning leather products (steering wheel, seats etc.), use
neutral detergents or low alcohol content solutions. If you use highalcohol content solutions or acid/alkaline detergents, the colour
of the leather may fade or the sur-face may get stripped off.
YN RHD 7.QXP 3/31/2012 4:16 PM Page 77
Page 737 of 751
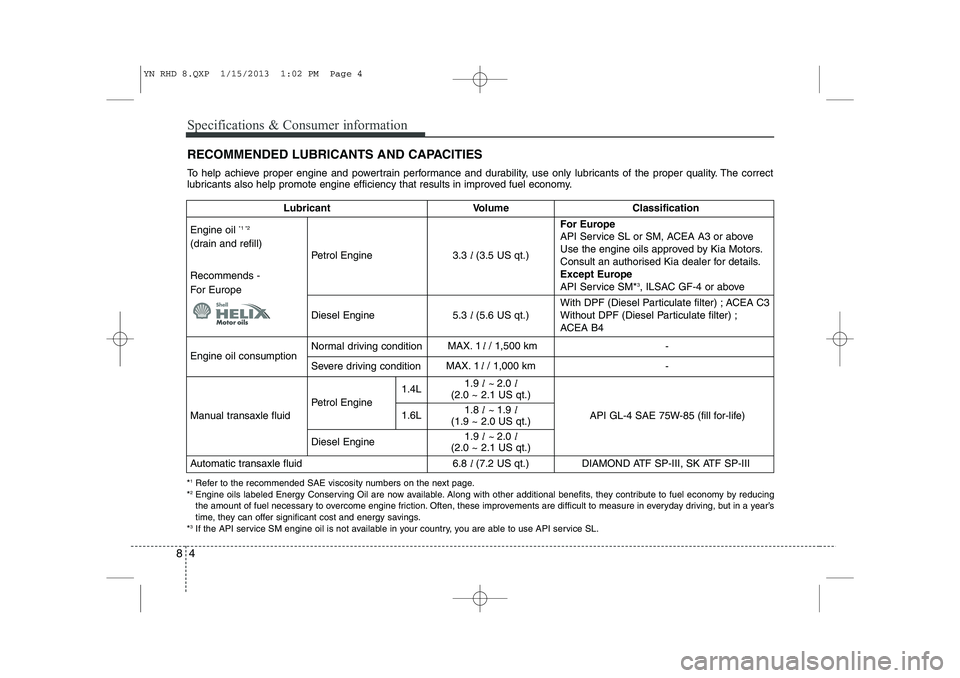
Specifications & Consumer information
4
8
RECOMMENDED LUBRICANTS AND CAPACITIES
To help achieve proper engine and powertrain performance and durability, use only lubricants of the proper quality. The correct
lubricants also help promote engine efficiency that results in improved fuel economy.
* 1
Refer to the recommended SAE viscosity numbers on the next page.
* 2
Engine oils labeled Energy Conserving Oil are now available. Along with other additional benefits, they contribute to fuel economy by reducing
the amount of fuel necessary to overcome engine friction. Often, these improvements are difficult to measure in everyday driving, but in a year’s
time, they can offer significant cost and energy savings.
* 3
If the API service SM engine oil is not available in your country, you are able to use API service SL.
LubricantVolumeClassification
Engine oil *1 *2
(drain and refill) Recommends -
For Europe
Petrol Engine3.3 l(3.5 US qt.)
For Europe
API Service SL or SM, ACEA A3 or above
Use the engine oils approved by Kia Motors.
Consult an authorised Kia dealer for details.
Except Europe
API Service SM* 3
, ILSAC GF-4 or above
Diesel Engine5.3 l(5.6 US qt.)
With DPF (Diesel Particulate filter) ; ACEA C3
Without DPF (Diesel Particulate filter) ;
ACEA B4
Engine oil consumptionNormal driving conditionMAX. 1 l/ 1,500 km-
Severe driving conditionMAX. 1 l/ 1,000 km-
Manual transaxle fluid
Petrol Engine
1.9 l~ 2.0 l
(2.0 ~ 2.1 US qt.)
API GL-4 SAE 75W-85 (fill for-life)1.8 l~ 1.9 l
(1.9 ~ 2.0 US qt.)
Diesel Engine1.9 l~ 2.0 l
(2.0 ~ 2.1 US qt.)
Automatic transaxle fluid6.8 l(7.2 US qt.)DIAMOND ATF SP-III, SK ATF SP-III
1.4L 1.6L
YN RHD 8.QXP 1/15/2013 1:02 PM Page 4