tow bar Lancia Flavia 2012 Owner handbook (in English)
[x] Cancel search | Manufacturer: LANCIA, Model Year: 2012, Model line: Flavia, Model: Lancia Flavia 2012Pages: 233, PDF Size: 2.61 MB
Page 49 of 233

The rear seat lower anchor-
ages are round bars, located
at the rear of the seat cush-
ion where it meets the seat-
back, and are just visible when you
lean into the rear seat to install the
child restraint. You will easily feel
them if you run your finger along the
intersection of the seatback and seat
cushion surfaces.
In addition, there are tether
strap anchorages behind
each rear seating position.
Access ports to the tether
anchors are located in the panel be-
tween the rear seat and the rear win-
dow. The tether anchors are under-
neath access covers in the carpet
covering the back of the seat where
you see this symbol.
Many, but not all, restraint systems
will be equipped with separate straps
on each side, with each having a hook
or connector for attachment to the
lower anchorage and a means of ad-
justing the tension in the strap.
Forward-facing toddler restraints and
some rear-facing infant restraints will
also be equipped with a tether strap, a hook for attachment to the tether
strap anchorage and a means of ad-
justing the tension of the strap.
You will first loosen the child seat
adjusters on the lower straps and on
the tether strap so that you can more
easily attach the hooks or connectors
to the vehicle anchorages. Next, at-
tach the lower hooks or connectors
over the top of the seat cover material.
Then, rotate the tether anchorage
cover directly behind the seat where
you are placing the child restraint,
push the tether strap and hook
through the access port and down into
the trunk. Open the access cover on
the carpet covering the back of the
seat and attach the tether strap hook
to the anchor. Be careful to route the
tether strap to provide the most direct
path between the anchor and the child
restraint. Finally, tighten all three
straps as you push the child restraint
rearward and downward into the seat,
removing slack in the straps accord-
ing to the child restraint manufactur-
er's instructions.
NOTE:
When using the ISOFIX attaching
system to install a child restraint,
please ensure that all seat belts not
being used for occupant restraints
are stowed and out of reach of chil-
dren. It is recommended that be-
fore installing the child restraint,
buckle the seat belt so the seat belt
is tucked behind the child re-
straint and out of reach. If the
buckled seat belt interferes with
the child restraint installation, in-
stead of tucking the seat belt be-
hind the child restraint, route the
seat belt through the child re-
straint belt path and then buckle
it. This should stow the seat belt
out of the reach of an inquisitive
child. Remind all children in the
vehicle that the seat belts are not
toys and should not be played
with, and never leave your child
unattended in the vehicle.
42
Page 169 of 233

Gross Vehicle Weight Rating(GVWR)
Gross Axle Weight Rating (GAWR) front
Gross Axle Weight Rating (GAWR) rear
Vehicle Identification Number (VIN)
Type of Vehicle
Month Day and Hour of Manufac- ture (MDH)
The bar code allows a computer scan-
ner to read the Vehicle Identification
Number (VIN).
GROSS VEHICLE WEIGHT
RATING (GVWR)
The GVWR is the total allowable
weight of your vehicle. This includes
driver, passengers, and cargo. The to-
tal load must be limited so that you do
not exceed the GVWR.
GROSS AXLE WEIGHT
RATING (GAWR)
The GAWR is the maximum capacity
of the front and rear axles. Distribute
the load over the front and rear axles evenly. Make sure that you do not
exceed either front or rear GAWR.
WARNING!
Because the front wheels steer the
vehicle, it is important that you do
not exceed the maximum front or
rear GAWR. A dangerous driving
condition can result if either rating is
exceeded. You could lose control of
the vehicle and have a collision.
OVERLOADING
The load carrying components (axle,
springs, tires, wheels, etc.) of your
vehicle will provide satisfactory ser-
vice as long as you do not exceed the
GVWR and front and rear GAWR.
The best way to figure out the total
weight of your vehicle is to weigh it
when it is fully loaded and ready for
operation. Weigh it on a commercial
scale to ensure that it is not over the
GVWR.
Figure out the weight on the front and
rear of the vehicle separately. It is
important that you distribute the load
evenly over the front and rear axles. Overloading can cause potential
safety hazards and shorten useful ser-
vice life. Heavier axles or suspension
components do not necessarily in-
crease the
vehicle's GVWR.
LOADING
To load your vehicle properly, first
figure out its empty weight, axle by
axle and side by side. Store heavier
items down low and be sure you dis-
tribute their weight as evenly as pos-
sible. Stow all loose items securely
before driving. If weighing the loaded
vehicle shows that you have exceeded
either GAWR, but the total load is
within the specified GVWR, you must
redistribute the weight. Improper
weight distribution can have an ad-
verse effect on the way your vehicle
steers and handles and the way the
brakes operate.
TRAILER TOWING
Trailer towing with this vehicle is not
recommended.
162
Page 183 of 233

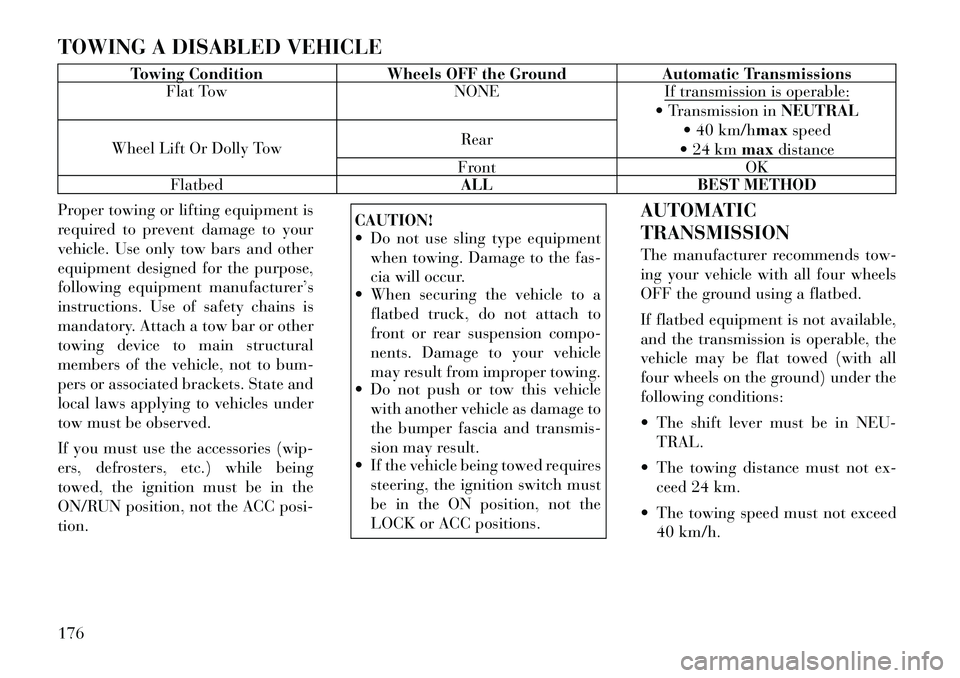
TOWING A DISABLED VEHICLE
Towing ConditionWheels OFF the Ground Automatic Transmissions
Flat Tow NONEIf transmission is operable:
Transmission inNEUTRAL
40 km/hmax speed
24 km maxdistance
Wheel Lift Or Dolly Tow Rear
Front OK
Flatbed ALLBEST METHOD
Proper towing or lifting equipment is
required to prevent damage to your
vehicle. Use only tow bars and other
equipment designed for the purpose,
following equipment manufacturer’s
instructions. Use of safety chains is
mandatory. Attach a tow bar or other
towing device to main structural
members of the vehicle, not to bum-
pers or associated brackets. State and
local laws applying to vehicles under
tow must be observed.
If you must use the accessories (wip-
ers, defrosters, etc.) while being
towed, the ignition must be in the
ON/RUN position, not the ACC posi-
tion.
CAUTION!
Do not use sling type equipment when towing. Damage to the fas-
cia will occur.
When securing the vehicle to a
flatbed truck, do not attach to
front or rear suspension compo-
nents. Damage to your vehicle
may result from improper towing.
Do not push or tow this vehicle
with another vehicle as damage to
the bumper fascia and transmis-
sion may result.
If the vehicle being towed requires
steering, the ignition switch must
be in the ON position, not the
LOCK or ACC positions. AUTOMATIC
TRANSMISSION
The manufacturer recommends tow-
ing your vehicle with all four wheels
OFF the ground using a flatbed.
If flatbed equipment is not available,
and the transmission is operable, the
vehicle may be flat towed (with all
four wheels on the ground) under the
following conditions:
The shift lever must be in NEU-
TRAL.
The towing distance must not ex- ceed 24 km.
The towing speed must not exceed 40 km/h.
176