mirror Lancia Thema 2012 Owner handbook (in English)
[x] Cancel search | Manufacturer: LANCIA, Model Year: 2012, Model line: Thema, Model: Lancia Thema 2012Pages: 316, PDF Size: 3.85 MB
Page 88 of 316
Dialing Using The Mobile Phone
Keypad
You can dial a phone number with
your mobile phone keypad and still
use the Uconnect™ Phone (while di-
aling via the mobile phone keypad,
the user must exercise caution and
take precautionary safety measures).
By dialing a number with your paired
Bluetooth® mobile phone, the audio
will be played through your vehicle's
audio system. The Uconnect™ Phone
will work the same as if you dial the
number using voice command.
NOTE:
Certain brands of mobile phones
do not send the dial ring to the
Uconnect™ Phone to play it on the
vehicle audio system, so you will
not hear it. Under this situation,
after successfully dialing a num-
ber the user may feel that the call
did not go through even though the
call is in progress. Once your call is
answered, you will hear the audio.Mute/Un-Mute (Mute OFF)
When you mute the Uconnect™
Phone, you will still be able to hear
the conversation coming from the
other party, but the other party will
not be able to hear you. In order to
mute the Uconnect™ Phone simply
touch the Mute button on the Phone
main screen.
ADVANCED PHONE
CONNECTIVITY
Transfer Call To And From
Mobile Phone
The Uconnect™ Phone allows ongo-
ing calls to be transferred from your
mobile phone to the Uconnect™
Phone without terminating the call.
To transfer an ongoing call from your
Uconnect™ Phone paired mobile
phone to the Uconnect™ Phone or
vice versa, press the Transfer button
on the Phone main screen.
Connect Or Disconnect Link
Between The Uconnect™ Phone
And Mobile Phone
If you would like to connect or discon-
nect the Bluetooth® connection be-
tween a Uconnect™ Phone paired
mobile phone and the Uconnect™
Phone, follow the instructions de-
scribed in your mobile phone User's
Manual.
THINGS YOU SHOULD
KNOW ABOUT YOUR
UCONNECT™ PHONE
Voice Command
For best performance, adjust the
rearview mirror to provide at least
1 cm gap between the overhead
console (for versions/markets,
where provided) and the mirror.
Always wait for the beep before speaking.
82
Page 107 of 316

FOLDING REAR SEATThe rear seatbacks can be folded for-
ward to provide an additional storage
area. To fold the rear seatback, pull on
the loops located on the upper seatback.NOTE:
These loops can be tucked away
when not in use.
After releasing the seatback, it can be
folded forward.When the seatback is folded to the
upright position, make sure it is
latched by strongly pulling on the top
of the seatback above the seat strap.
WARNING!
Be certain that the seatback is se-
curely locked into position. If the
seatback is not securely locked
into position, the seat will not pro-
vide the proper stability for child
seats and/or passengers. An im-
properly latched seat could cause
serious injury.
The cargo area in the rear of the
vehicle (with the rear seatbacks in
the locked-up or folded down po-
sition) should not be used as a
play area by children when the
vehicle is in motion. They could
be seriously injured in a collision.
Children should be seated and us-
ing the proper restraint system.
DRIVER MEMORY SEAT
(for versions/markets,
where provided)
This feature allows the driver to store
up to two different memory profiles for easy recall through a memory
switch. Each memory profile contains
desired position settings for the driver
seat, side mirrors, adjustable pedals
(for versions/markets, where pro-
vided), and power tilt and telescopic
steering column (for versions/
markets, where provided) and a set of
desired radio station presets. Your Re-
mote Keyless Entry (RKE) transmit-
ter can also be programmed to recall
the same positions when the UN-
LOCK button is pressed.
NOTE:
Only one RKE transmitter can
be linked to each of the memory
positions.
Passive Entry door handles can- not be linked to the memory
function. Use either the memory
recall switch or the RKE trans-
mitter (if linked to the memory
feature) to recall memory posi-
tions 1 or 2.
The memory seat switch is located on
the driver's door trim panel. The
switch consists of three buttons: The
(S) button, which is used to activate
Rear Seatback LoopFolded Rear Seatback
101
Page 108 of 316

the memory save function and the (1)
and (2) buttons which are used to
recall either of two pre-programmed
memory profiles.
PROGRAMMING THE
MEMORY FEATURE
NOTE:
Saving a new memory profile will
erase an existing profile from
memory.
To create a new memory profile, per-
form the following:
1. Cycle the ignition to the RUN po-
sition.
2. Adjust all memory profile settings
to desired preferences (i.e., seat, side
mirror, adjustable pedals [for
versions/markets, where provided],power tilt and telescopic steering col-
umn [for versions/markets, where
provided], and radio station presets).
3. Press and release the SET (S) but-
ton on the memory switch.
4. Within five seconds, press and re-
lease the MEMORY button 1 or 2. The
Electronic Vehicle Information Center
(EVIC) (for versions/markets, where
provided) will display which memory
position has been set.
NOTE:
Memory profiles can be set with-
out the vehicle in PARK, but the
vehicle must be in PARK to re-
call a memory profile.
The Recall Memory with Remote Key Unlock feature can be
turned on and off using the
Uconnect Touch™ System, refer
to “Uconnect Touch™ Settings”
in “Understanding Your Instru-
ment Panel” for further infor-
mation. LINKING AND UNLINKING
THE REMOTE KEYLESS
ENTRY TRANSMITTER TO
MEMORY
Your RKE transmitters can be pro-
grammed to recall one of two pre-
programmed memory profiles by
pressing the UNLOCK button on the
RKE transmitter.
To program your RKE transmitters,
perform the following:
1. Cycle the ignition to the OFF posi-
tion.
2. Select desired memory profile (1)
or (2).
3. Once the profile has been recalled,
press and release the SET (S) button
on the memory switch, then press and
release button (1) or (2) accordingly.
“Memory Profile Set” (1 or 2) will
display in the instrument cluster on
vehicles equipped with the EVIC.
4. Press and release the LOCK button
on the RKE transmitter within 10 sec-
onds.
Memory Seat Switch
102
Page 109 of 316

NOTE:
Your RKE transmitters can be un-
linked to your memory settings by
pressing the SET (S) button fol-
lowed by the UNLOCK button on
the RKE transmitter in Step 4
above.
MEMORY POSITION
RECALL
NOTE:
The vehicle must be in PARK to
recall memory positions. If a recall
is attempted when the vehicle is
not in PARK, a message will dis-
play in the EVIC (for versions/
markets, where provided).
To recall the memory settings for
driver, press MEMORY button num-
ber (1) on the driver's door or the
UNLOCK button on the RKE trans-
mitter linked to memory position 1.
To recall the memory setting for
driver, press MEMORY button num-
ber (2) on the driver's door or the
UNLOCK button on the RKE trans-
mitter linked to memory position 2.A recall can be cancelled by pressing
any of the MEMORY buttons (S, 1, or
2) on the driver's door during a recall.
When a recall is cancelled, the driver
seat, side mirror, adjustable pedals
(for versions/markets, where pro-
vided), and power tilt and telescopic
steering column (for versions/
markets, where provided) stop mov-
ing. A delay of one second will occur
before another recall can be selected.
EASY ENTRY/EXIT SEAT
(Available With Memory
Seat Only)
This feature provides automatic
driver seat positioning to enhance
driver mobility when entering and ex-
iting the vehicle.
The distance the driver seat moves
depends on where you have the driver
seat positioned when you place the
ignition to the OFF position.
When you cycle the ignition to the
OFF position, the driver seat will
move about 60 mm rearward if the
driver seat position is greater than
or equal to 67.7 mm forward of the
rear stop. The seat will return to its previously set position when you
place the ignition into the ACC or
RUN position.
When you cycle the ignition to the OFF position, the driver seat will
move to a position 7.7 mm forward
of the rear stop if the driver seat
position is between 22.7 mm and
67.7 mm forward of the rear stop.
The seat will return to its previously
set position when you place the ig-
nition to the ACC or RUN position.
The Easy Entry/Easy Exit feature is disabled when the driver seat po-
sition is less than 22.7 mm forward
of the rear stop. At this position,
there is no benefit to the driver by
moving the seat for Easy Exit or
Easy Entry.
Each stored memory setting will have
an associated Easy Entry and Easy
Exit position.
NOTE:
The Easy Entry/Easy Exit feature
can be enabled or disabled using
the Uconnect Touch™ System, re-
fer to “Uconnect Touch™ Settings”
103
Page 151 of 316

WARNING!(Continued)
To help protect against personal
injury, passengers should not be
seated in the rear cargo area. The
rear cargo space is intended for
load carrying purposes only, not
for passengers, who should sit in
seats and use seat belts.WARNING!
The weight and position of cargo
and passengers can change the ve-
hicle center of gravity and vehicle
handling. To avoid loss of control
resulting in personal injury, follow
these guidelines for loading your ve-
hicle:
Always place cargo evenly on the
cargo floor. Put heavier objects as
low and as far forward as possible.
Place as much cargo as possible in
front of the rear axle. Too much
weight or improperly placed
weight over or behind the rear
axle can cause the rear of the ve-
hicle to sway.
(Continued)
WARNING!(Continued)
Do not pile luggage or cargo
higher than the top of the seat-
back. This could impair visibility
or become a dangerous projectile
in a sudden stop or collision.
CARGO AREA FEATURES
TRUNK MAT (for
versions/markets, where
provided)
A trunk mat covers the bottom of the
cargo area. The trunk mat is used to
protect the interior of the trunk from
mud, snow, and debris.
GROCERY BAG HOOKS
The rear cargo area is equipped with
grocery bag hooks, located on either
side of the rear cargo area. REAR WINDOW
FEATURES
REAR WINDOW
DEFROSTER
The rear window defroster
button is located on the climate
control. Press this button to
turn on the rear window defroster and
the heated outside mirrors (for
versions/markets, where provided).
An indicator in the button will illumi-
nate when the rear window defroster
is on. The rear window defroster au-
tomatically turns off after approxi-
mately 10 minutes. For an additional
five minutes of operation, press the
button a second time.
Grocery Bag Hooks
145
Page 177 of 316
warns you of a possible collision when
you are much closer to the vehicle in
front of you. This allows for a more
dynamic driving experience. To
change the FCW status, touch and
release the OFF, Near or Far button.
Then touch the arrow back soft-key.
For further information, refer to
“Adaptive Cruise Control (ACC)” in
“Understanding The Features Of
Your Vehicle”.
Park Assist (for versions/markets, where provided)
The Rear Park Assist system will scan
for objects behind the vehicle when
the transmission shift lever is in RE-
VERSE and the vehicle speed is less
than 11 mph (18 km/h). The system
can be enabled with Sound Only,
Sound and Display, or turned OFF. To
change the Park Assist status, touch
and release the OFF, Sound Only or
Sounds and Display button. Then
touch the arrow back soft-key. Refer
to “ParkSense® Rear Park Assist” in
“Understanding The Features Of
Your Vehicle” for system function and
operating information. Tilt Mirrors In Reverse (for
versions/markets, where
provided)
When this feature is selected, the out-
side sideview mirrors will tilt down-
ward when the ignition is in the RUN
position and the transmission shift le-
ver is in the REVERSE position. The
mirrors will move back to their previ-
ous position when the transmission is
shifted out of REVERSE. To make
your selection, touch the Tilt Mirrors
In Reverse soft-key, until a check-
mark appears next to setting, showing
that setting has been selected. Touch
the back arrow soft-key to return to
the previous menu.
Blind Spot Alert (for versions/markets, where
provided)
When this feature is selected, the
Blind Spot Alert feature can be set to
Off, Lights or Lights and Chime. The
Blind Spot Alert feature can be acti-
vated in “Lights” mode. When this
mode is selected, the Blind Spot Moni-
tor (BSM) system is activated and will
only show a visual alert in the outside
mirrors. When “Lights & Chime” mode is activated, the Blind Spot
Monitor (BSM) will show a visual
alert in the outside mirrors as well as
an audible alert when the turn signal
is on. When “Off” is selected, the
Blind Spot Monitor (BSM) system is
deactivated. To change the Blind Spot
Alert status, touch the Off, Lights or
Lights & Chime soft-key. Then touch
the arrow back soft-key.
NOTE:
If your vehicle has experienced
any damage in the area where the
sensor is located, even if the fascia
is not damaged, the sensor may
have become misaligned. Take
your vehicle to an authorized
dealer to verify sensor alignment.
Having a sensor that is misaligned
will result in the BSM not operat-
ing to specification.
171
Page 187 of 316
Button Descriptions (Applies To
Both Hard-keys And Soft-keys)
1. A/C Button
Press and release to change the cur-
rent Air Conditioning (A/C) setting,
the indicator illuminates when A/C is
ON. Performing this function will
cause the automatic operation to
switch into manual mode and the
AUTO indicator will turn off.
2. Recirculation Button
Press and release to change the cur-
rent setting, the indicator illuminates
when ON.
3. Blower Control
Blower control is used to regulate the
amount of air forced through the cli-
mate system. There are seven blower
speeds available. Adjusting the
blower will cause automatic mode to
switch to manual operation. The
speeds can be selected using either
hard-keys or soft-keys as follows:Hard-key
The blower speed increases as you
turn the control clockwise from the
lowest blower setting. The blower
speed decreases as you turn the knob
counter-clockwise.
Soft-key — Uconnect Touch™
System 8.4
Use the small blower icon to reduce
the blower setting and the large
blower icon to increase the blower
setting. Blower can also be selected by
pressing the blower bar area between
the icons.
4. Front Defrost Button
Press and release to change the cur-
rent airflow setting to Defrost mode.
The indicator illuminates when this
feature is ON. Performing this func-
tion will cause the ATC to switch into
manual mode. The blower speed may
increase when Defrost mode is se-
lected. If the front defrost mode is
turned off the climate system will re-
turn the previous setting.5. Rear Defrost Button
Press and release this button to turn
on the rear window defroster and the
heated outside mirrors (for versions/
markets, where provided). An indica-
tor will illuminate when the rear win-
dow defroster is on. The rear window
defroster automatically turns off after
10 minutes.
CAUTION!
Failure to follow these cautions can
cause damage to the heating ele-
ments:
Use care when washing the inside
of the rear window. Do not use
abrasive window cleaners on the
interior surface of the window.
Use a soft cloth and a mild wash-
ing solution, wiping parallel to the
heating elements. Labels can be
peeled off after soaking with
warm water.
Do not use scrapers, sharp instru-
ments, or abrasive window clean-
ers on the interior surface of the
window.
Keep all objects a safe distance
from the window.
181
Page 197 of 316

STARTING
PROCEDURES
Before starting your vehicle, adjust
your seat, adjust the inside and out-
side mirrors, fasten your seat belt, and
if present, instruct all other occupants
to buckle their seat belts.WARNING!
When leaving the vehicle, alwaysremove the key fob and lock your
vehicle.
Never leave children alone in a
vehicle, or with access to an un-
locked vehicle. Allowing children
to be in a vehicle unattended is
dangerous for a number of rea-
sons. A child or others could be
seriously or fatally injured. Chil-
dren should be warned not to
touch the parking brake, brake
pedal or the shift lever.
Do not leave the key fob in or near
the vehicle, and do not leave Key-
less Enter-N-Go in the ACC or
ON/RUN mode. A child could op-
erate power windows, other con-
trols, or move the vehicle. AUTOMATIC
TRANSMISSION
The shift lever must be in the NEU-
TRAL or PARK position before you
can start the engine. Apply the brakes
before shifting into any driving gear.
CAUTION!
Damage to the transmission may oc-
cur if the following precautions are
not observed:
Shift into PARK only after the ve-
hicle has come to a complete stop.
Shift into or out of REVERSE
only after the vehicle has come to
a complete stop and the engine is
at idle speed.
Do not shift between PARK, RE-
VERSE, NEUTRAL, or DRIVE
when the engine is above idle
speed.
Before shifting into any gear,
make sure your foot is firmly
pressing the brake pedal. KEYLESS ENTER-N-GO
This feature allows
the driver to oper-
ate the ignition
switch with the
push of a button,
as long as the Re-
mote Keyless En-
try (RKE) transmitter is in the pas-
senger compartment.
NORMAL STARTING —
GASOLINE ENGINE
Using The ENGINE START/STOP
Button
NOTE:
Normal starting of either a cold or
a warm engine is obtained without
pumping or pressing the accelera-
tor pedal.
To start the engine, the transmission
must be in PARK or NEUTRAL. Press
and hold the brake pedal while press-
ing the ENGINE START/STOP but-
ton once. The system takes over and
attempts to start the vehicle. If the
vehicle fails to start, the starter will
disengage automatically after 10 sec-
191
Page 242 of 316
Electronic Speed Control (for
versions/markets, where
provided)
Do not use in hilly terrain or withheavy loads.
When using the speed control, if you experience speed drops greater
than 16 km/h, disengage until you
can get back to cruising speed.
Use speed control in flat terrain and with light loads to maximize
fuel efficiency.
AutoStick® (for versions/markets,
where provided)
By using the AutoStick® mode and selecting a specific gear range, fr e-
quent shifting can be avoided. The
highest gear range should be se-
lected that allows for adequate per-
formance. For example, choose “4”
if the desired speed can be main-
tained. Choose “3” or “2” if needed
to maintain the desired speed.
Extended driving at high RPM should be avoided to prevent excess heat generation. A reduction in
ve-
hicle speed may be required to
avoid extended driving at high
RPM. Return to a higher gear range
or vehicle speed when road condi-
tions and RPM level allows.
Cooling System
To reduce potential for engine and
transmission overheating, take the
following actions:
City Driving
When stopped for short periods of
time, shift the transmission into NEU-
TRAL and increase engine idle speed.
Highway Driving
Reduce speed.
Air Conditioning
Turn off temporarily.
TRAILER HITCH
ATTACHING POINTS
Your vehicle will require extra equip-
ment to tow a trailer safely and effi-
ciently. The trailer tow hitch must be
attached to your vehicle using the
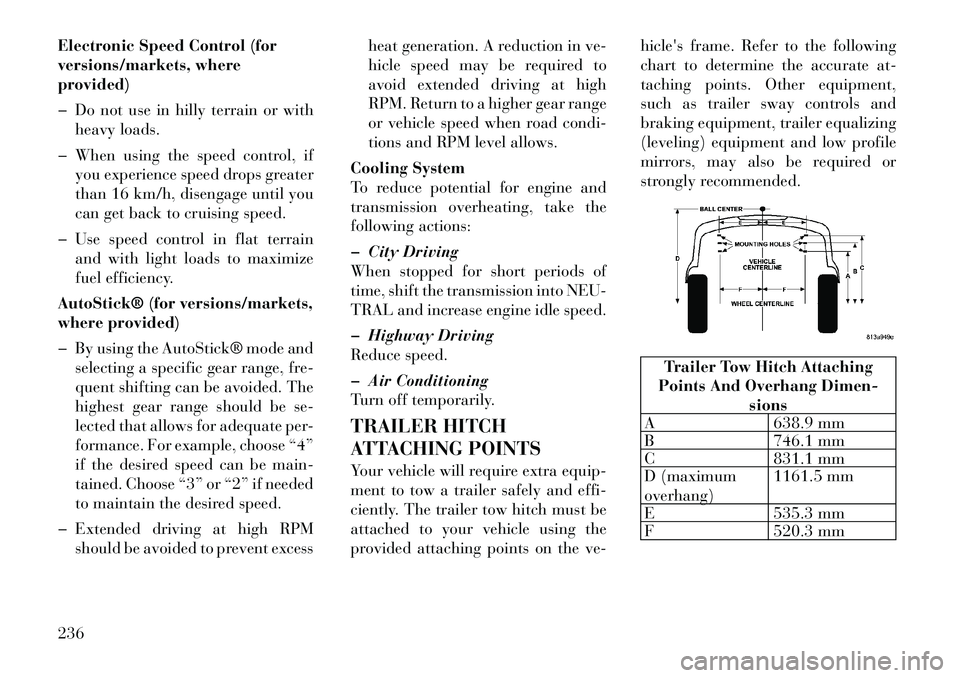
provided attaching points on the ve- hicle's frame. Refer to the following
chart to determine the accurate
at-
taching points. Other equipment,
such as trailer sway controls and
braking equipment, trailer equalizing
(leveling) equipment and low profile
mirrors, may also be required or
strongly recommended.
Trailer Tow Hitch Attaching
Points And Overhang Dimen- sions
A 638.9 mm
B 746.1 mm
C 831.1 mm
D (maximum
overhang) 1161.5 mm
E 535.3 mm
F 520.3 mm
236
Page 279 of 316

Your leather upholstery can be best
preserved by regular cleaning with a
damp soft cloth. Small particles of
dirt can act as an abrasive and dam-
age the leather upholstery and should
be removed promptly with a damp
cloth. Stubborn soils can be removed
easily with a soft cloth and appropri-
ate products. Care should be taken to
avoid soaking your leather upholstery
with any liquid. Please do not use
polishes, oils, cleaning fluids, sol-
vents, detergents, or ammonia-based
cleaners to clean your leather uphol-
stery. Application of a leather condi-
tioner is not required to maintain the
original condition.WARNING!
Do not use volatile solvents for
cleaning purposes. Many are poten-
tially flammable, and if used in
closed areas they may cause respira-
tory harm.Cleaning Headlights
Your vehicle has plastic headlights
that are lighter and less susceptible to
stone breakage than glass headlights.
Plastic is not as scratch resistant as
glass and therefore different lens
cleaning procedures must be fol-
lowed.
To minimize the possibility of scratch-
ing the lenses and reducing light out-
put, avoid wiping with a dry cloth. To
remove road dirt, wash with a mild
soap solution followed by rinsing.
Do not use abrasive cleaning compo-
nents, solvents, steel wool or other
aggressive material to clean the
lenses.
Glass Surfaces
All glass surfaces should be cleaned
on a regular basis with any commer-
cial household-type glass cleaner.
Never use an abrasive type cleaner.
Use caution when cleaning the inside
rear window equipped with electric
defrosters or the right rear quarter
window equipped with the radio an- tenna. Do not use scrapers or other
sharp instrument that may scratch
the elements.
When cleaning the rear view mirror,
spray cleaner on the towel or rag that
you are using. Do not spray cleaner
directly on the mirror.
Cleaning Plastic Instrument
Cluster Lenses
The lenses in front of the instruments
in this vehicle are molded in clear
plastic. When cleaning the lenses,
care must be taken to avoid scratch-
ing the plastic.
1. Clean with a wet soft rag or micro-
fiber towel. A mild soap solution may
be used, but do not use high alcohol
content or abrasive cleaners. If soap is
used, wipe clean with a clean damp
rag.
2. Dry with a soft cloth.
273