lock Lancia Thema 2012 Owner handbook (in English)
[x] Cancel search | Manufacturer: LANCIA, Model Year: 2012, Model line: Thema, Model: Lancia Thema 2012Pages: 316, PDF Size: 3.85 MB
Page 47 of 316

WARNING!(Continued)
It is dangerous to try to repair any
part of the air bag system your-
self. Be sure to tell anyone who
works on your vehicle that it has
an air bag system.
Do not attempt to modify any part
of your air bag system. The air
bag may inflate accidentally or
may not function properly if
modifications are made. Take
your vehicle to an authorized
dealer for any air bag system ser-
vice. If your seat including your
trim cover and cushion needs to
be serviced in any way (including
removal or loosening/tightening
of seat attachment bolts), take the
vehicle to your authorized dealer.
Only manufacturer approved seat
accessories may be used. If it is
necessary to modify the air bag
system for persons with disabili-
ties, contact your authorized
dealer. Air Bag Warning Light
You will want to have the
air bags ready to inflate for
your protection in a colli-
sion. The Air Bag Warning
Light monitors the internal circuits
and interconnecting wiring associated
with air bag system electrical compo-
nents. While the air bag system is
designed to be maintenance free, if
any of the following occurs, have an
authorized dealer service the air bag
system immediately.
The Air Bag Warning Light does not come on for approximately four
to eight seconds when the ignition
switch is first turned to the ON/
RUN position.
The Air Bag Warning Light remains on after the approximate four to
eight-second interval.
The Air Bag Warning Light comes on intermittently or remains on
while driving.
NOTE:
If the speedometer, tachometer, or
any engine related gauges are not
working, the Occupant Restraint Controller (ORC) may also be dis-
abled. The air bags may not be
ready to inflate for your protec-
tion. Promptly check the fuse
block for blown fuses. Refer to the
label located on the inside of the
fuse block cover for the proper air
bag fuses. See your authorized
dealer if the fuse is good.
EVENT DATA RECORDER
(EDR)
This vehicle is equipped with an event
data recorder (EDR). The main pur-
pose of an EDR is to record, in certain
crash or near crash-like situations,
such as an air bag deployment or hit-
ting a road obstacle, data that will
assist in understanding how a vehi-
cle’s systems performed. The EDR is
designed to record data related to ve-
hicle dynamics and safety systems for
a short period of time, typically
30 seconds or less. The EDR in this
vehicle is designed to record such data
as:
How various systems in your ve-
hicle were operating;
41
Page 55 of 316

Installing Child Restraints Using
The Vehicle Seat Belt
The seat belts in the rear passenger
seating positions are equipped with
an Automatic Locking Retractor
(ALR) to secure a Child Restraint
System (CRS). These types of seat
belts are designed to keep the lap por-
tion of the seat belt tight around the
child restraint so that it is not neces-
sary to use a locking clip. The ALR
will make a ratcheting noise if you
extract the entire belt from the retrac-
tor and then allow the belt to retract
into the retractor. For additional in-
formation on ALR, refer to “Auto-
matic Locking Mode”. The chart be-
low defines the seating positions with
an Automatic Locking Retractor
(ALR) or a cinching latch plate.
Driver Center Passen-ger
First
Row N/A N/A N/A
Second Row ALR ALR ALR
N/A — Not Applicable
ALR — Automatic Locking Retrac- tor Installing a Child Restraint with an
ALR:
1. To install a child restraint with
ALR, first, pull enough of the seat belt
webbing from the retractor to route it
through the belt path of the child re-
straint. Slide the latch plate into the
buckle until you hear a “click.” Next,
extract all the seat belt webbing out of
the retractor and then allow the belt to
retract into the retractor. As the belt
retracts, you will hear a ratcheting
sound. This indicates the safety belt is
now in the Automatic Locking mode.
2.
Finally, pull on any excess webbing
to tighten the lap portion around the
child restraint. Any seat belt system will
loosen with time, so check the belt oc-
casionally, and pull it tight if necessary.
In the rear center seat, you may have trouble tightening the lap/
shoulder belt on the child restraint
because the buckle or latch plate is
too close to the belt path opening on
the restraint. Disconnect the latch
plate from the buckle and twist the
short buckle-end belt several times
to shorten it. Insert the latch plate
into the buckle with the release but-
ton facing out. If the belt still can’t be tightened, or
if pulling and pushing on the re-
straint loosens the belt, disconnect
the latch plate from the buckle,
turn the buckle around, and insert
the latch plate into the buckle
again. If you still can’t make the
child restraint secure, try a differ-
ent seating position.
To attach a child restraint tether
strap:
1. Rotate the cover over the anchor
directly behind the seat where you are
placing the child restraint.
Tether Strap Mounting
1 — Cover A — Tether
Strap Hook
3 — Attaching
Strap B — Tether An-
chor
49
Page 59 of 316

Periodic Safety Checks You
Should Make Outside The
Vehicle
Tires
Examine tires for excessive tread wear
and uneven wear patterns. Check for
stones, nails, glass, or other objects
lodged in the tread or sidewall. In-
spect the tread for cuts and cracks.
Inspect sidewalls for cuts, cracks and
bulges. Check the wheel nuts fortightness. Check the tires (including
spare) for proper cold inflation pres-
sure.
Lights
Have someone observe the operation
of exterior lights while you work the
controls. Check turn signal and high
beam indicator lights on the instru-
ment panel.
Door Latches
Check for positive closing, latching,
and locking.Fluid Leaks
Check area under vehicle after over-
night parking for fuel, engine coolant,
oil, or other fluid leaks. Also, if gaso-
line fumes are detected or if fuel,
power steering fluid, or brake fluid
leaks are suspected, the cause should
be located and corrected immediately.
53
Page 72 of 316

BLIND SPOT
MONITORING (for
versions/markets, where
provided)
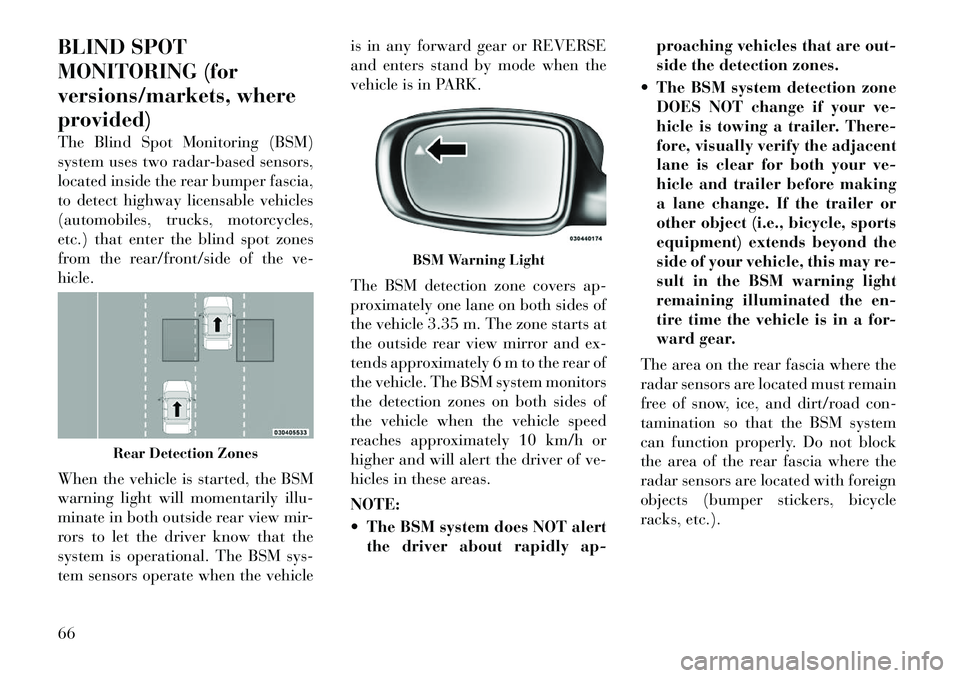
The Blind Spot Monitoring (BSM)
system uses two radar-based sensors,
located inside the rear bumper fascia,
to detect highway licensable vehicles
(automobiles, trucks, motorcycles,
etc.) that enter the blind spot zones
from the rear/front/side of the ve-
hicle.
When the vehicle is started, the BSM
warning light will momentarily illu-
minate in both outside rear view mir-
rors to let the driver know that the
system is operational. The BSM sys-
tem sensors operate when the vehicleis in any forward gear or REVERSE
and enters stand by mode when the
vehicle is in PARK.
The BSM detection zone covers ap-
proximately one lane on both sides of
the vehicle 3.35 m. The zone starts at
the outside rear view mirror and ex-
tends approximately 6 m to the rear of
the vehicle. The BSM system monitors
the detection zones on both sides of
the vehicle when the vehicle speed
reaches approximately 10 km/h or
higher and will alert the driver of ve-
hicles in these areas.
NOTE:
The BSM system does NOT alert
the driver about rapidly ap- proaching vehicles that are out-
side the detection zones.
The BSM system detection zone DOES NOT change if your ve-
hicle is towing a trailer. There-
fore, visually verify the adjacent
lane is clear for both your ve-
hicle and trailer before making
a lane change. If the trailer or
other object (i.e., bicycle, sports
equipment) extends beyond the
side of your vehicle, this may re-
sult in the BSM warning light
remaining illuminated the en-
tire time the vehicle is in a for-
ward gear.
The area on the rear fascia where the
radar sensors are located must remain
free of snow, ice, and dirt/road con-
tamination so that the BSM system
can function properly. Do not block
the area of the rear fascia where the
radar sensors are located with foreign
objects (bumper stickers, bicycle
racks, etc.).
Rear Detection Zones
BSM Warning Light
66
Page 74 of 316

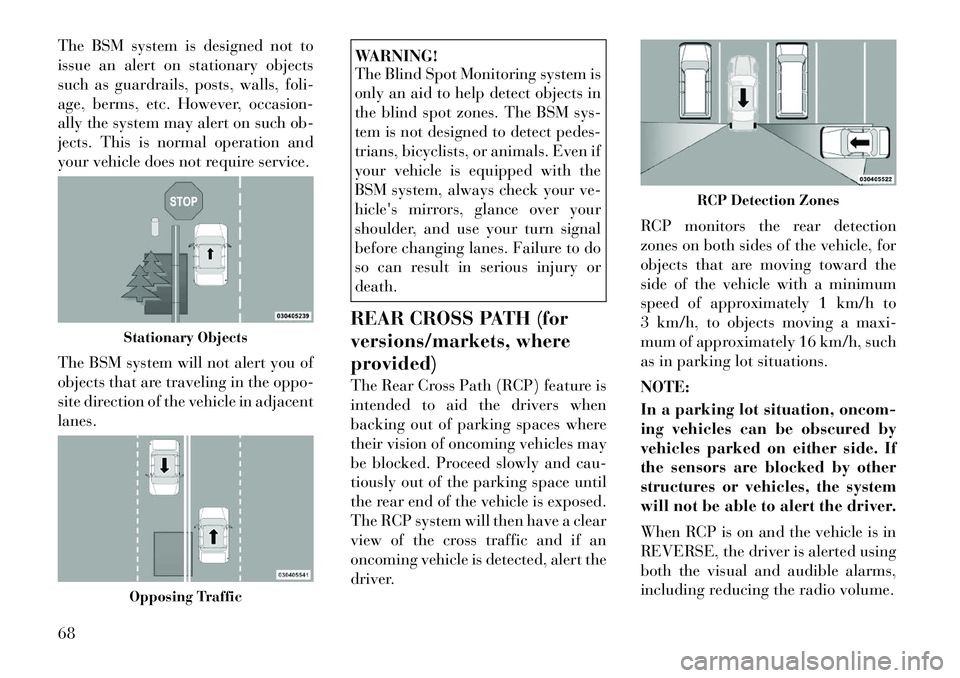
The BSM system is designed not to
issue an alert on stationary objects
such as guardrails, posts, walls, foli-
age, berms, etc. However, occasion-
ally the system may alert on such ob-
jects. This is normal operation and
your vehicle does not require service.
The BSM system will not alert you of
objects that are traveling in the oppo-
site direction of the vehicle in adjacent
lanes.
WARNING!
The Blind Spot Monitoring system is
only an aid to help detect objects in
the blind spot zones. The BSM sys-
tem is not designed to detect pedes-
trians, bicyclists, or animals. Even if
your vehicle is equipped with the
BSM system, always check your ve-
hicle's mirrors, glance over your
shoulder, and use your turn signal
before changing lanes. Failure to do
so can result in serious injury or
death.
REAR CROSS PATH (for
versions/markets, where
provided)
The Rear Cross Path (RCP) feature is
intended to aid the drivers when
backing out of parking spaces where
their vision of oncoming vehicles may
be blocked. Proceed slowly and cau-
tiously out of the parking space until
the rear end of the vehicle is exposed.
The RCP system will then have a clear
view of the cross traffic and if an
oncoming vehicle is detected, alert the
driver. RCP monitors the rear detection
zones on both sides of the vehicle, for
objects that are moving toward the
side of the vehicle with a minimum
speed of approximately 1 km/h to
3 km/h, to objects moving a maxi-
mum of approximately 16 km/h, such
as in parking lot situations.
NOTE:
In a parking lot situation, oncom-
ing vehicles can be obscured by
vehicles parked on either side. If
the sensors are blocked by other
structures or vehicles, the system
will not be able to alert the driver.
When RCP is on and the vehicle is in
REVERSE, the driver is alerted using
both the visual and audible alarms,
including reducing the radio volume.
Stationary ObjectsOpposing Traffic
RCP Detection Zones
68
Page 107 of 316

FOLDING REAR SEATThe rear seatbacks can be folded for-
ward to provide an additional storage
area. To fold the rear seatback, pull on
the loops located on the upper seatback.NOTE:
These loops can be tucked away
when not in use.
After releasing the seatback, it can be
folded forward.When the seatback is folded to the
upright position, make sure it is
latched by strongly pulling on the top
of the seatback above the seat strap.
WARNING!
Be certain that the seatback is se-
curely locked into position. If the
seatback is not securely locked
into position, the seat will not pro-
vide the proper stability for child
seats and/or passengers. An im-
properly latched seat could cause
serious injury.
The cargo area in the rear of the
vehicle (with the rear seatbacks in
the locked-up or folded down po-
sition) should not be used as a
play area by children when the
vehicle is in motion. They could
be seriously injured in a collision.
Children should be seated and us-
ing the proper restraint system.
DRIVER MEMORY SEAT
(for versions/markets,
where provided)
This feature allows the driver to store
up to two different memory profiles for easy recall through a memory
switch. Each memory profile contains
desired position settings for the driver
seat, side mirrors, adjustable pedals
(for versions/markets, where pro-
vided), and power tilt and telescopic
steering column (for versions/
markets, where provided) and a set of
desired radio station presets. Your Re-
mote Keyless Entry (RKE) transmit-
ter can also be programmed to recall
the same positions when the UN-
LOCK button is pressed.
NOTE:
Only one RKE transmitter can
be linked to each of the memory
positions.
Passive Entry door handles can- not be linked to the memory
function. Use either the memory
recall switch or the RKE trans-
mitter (if linked to the memory
feature) to recall memory posi-
tions 1 or 2.
The memory seat switch is located on
the driver's door trim panel. The
switch consists of three buttons: The
(S) button, which is used to activate
Rear Seatback LoopFolded Rear Seatback
101
Page 108 of 316

the memory save function and the (1)
and (2) buttons which are used to
recall either of two pre-programmed
memory profiles.
PROGRAMMING THE
MEMORY FEATURE
NOTE:
Saving a new memory profile will
erase an existing profile from
memory.
To create a new memory profile, per-
form the following:
1. Cycle the ignition to the RUN po-
sition.
2. Adjust all memory profile settings
to desired preferences (i.e., seat, side
mirror, adjustable pedals [for
versions/markets, where provided],power tilt and telescopic steering col-
umn [for versions/markets, where
provided], and radio station presets).
3. Press and release the SET (S) but-
ton on the memory switch.
4. Within five seconds, press and re-
lease the MEMORY button 1 or 2. The
Electronic Vehicle Information Center
(EVIC) (for versions/markets, where
provided) will display which memory
position has been set.
NOTE:
Memory profiles can be set with-
out the vehicle in PARK, but the
vehicle must be in PARK to re-
call a memory profile.
The Recall Memory with Remote Key Unlock feature can be
turned on and off using the
Uconnect Touch™ System, refer
to “Uconnect Touch™ Settings”
in “Understanding Your Instru-
ment Panel” for further infor-
mation. LINKING AND UNLINKING
THE REMOTE KEYLESS
ENTRY TRANSMITTER TO
MEMORY
Your RKE transmitters can be pro-
grammed to recall one of two pre-
programmed memory profiles by
pressing the UNLOCK button on the
RKE transmitter.
To program your RKE transmitters,
perform the following:
1. Cycle the ignition to the OFF posi-
tion.
2. Select desired memory profile (1)
or (2).
3. Once the profile has been recalled,
press and release the SET (S) button
on the memory switch, then press and
release button (1) or (2) accordingly.
“Memory Profile Set” (1 or 2) will
display in the instrument cluster on
vehicles equipped with the EVIC.
4. Press and release the LOCK button
on the RKE transmitter within 10 sec-
onds.
Memory Seat Switch
102
Page 109 of 316

NOTE:
Your RKE transmitters can be un-
linked to your memory settings by
pressing the SET (S) button fol-
lowed by the UNLOCK button on
the RKE transmitter in Step 4
above.
MEMORY POSITION
RECALL
NOTE:
The vehicle must be in PARK to
recall memory positions. If a recall
is attempted when the vehicle is
not in PARK, a message will dis-
play in the EVIC (for versions/
markets, where provided).
To recall the memory settings for
driver, press MEMORY button num-
ber (1) on the driver's door or the
UNLOCK button on the RKE trans-
mitter linked to memory position 1.
To recall the memory setting for
driver, press MEMORY button num-
ber (2) on the driver's door or the
UNLOCK button on the RKE trans-
mitter linked to memory position 2.A recall can be cancelled by pressing
any of the MEMORY buttons (S, 1, or
2) on the driver's door during a recall.
When a recall is cancelled, the driver
seat, side mirror, adjustable pedals
(for versions/markets, where pro-
vided), and power tilt and telescopic
steering column (for versions/
markets, where provided) stop mov-
ing. A delay of one second will occur
before another recall can be selected.
EASY ENTRY/EXIT SEAT
(Available With Memory
Seat Only)
This feature provides automatic
driver seat positioning to enhance
driver mobility when entering and ex-
iting the vehicle.
The distance the driver seat moves
depends on where you have the driver
seat positioned when you place the
ignition to the OFF position.
When you cycle the ignition to the
OFF position, the driver seat will
move about 60 mm rearward if the
driver seat position is greater than
or equal to 67.7 mm forward of the
rear stop. The seat will return to its previously set position when you
place the ignition into the ACC or
RUN position.
When you cycle the ignition to the OFF position, the driver seat will
move to a position 7.7 mm forward
of the rear stop if the driver seat
position is between 22.7 mm and
67.7 mm forward of the rear stop.
The seat will return to its previously
set position when you place the ig-
nition to the ACC or RUN position.
The Easy Entry/Easy Exit feature is disabled when the driver seat po-
sition is less than 22.7 mm forward
of the rear stop. At this position,
there is no benefit to the driver by
moving the seat for Easy Exit or
Easy Entry.
Each stored memory setting will have
an associated Easy Entry and Easy
Exit position.
NOTE:
The Easy Entry/Easy Exit feature
can be enabled or disabled using
the Uconnect Touch™ System, re-
fer to “Uconnect Touch™ Settings”
103
Page 110 of 316

in “Understanding Your Instru-
ment Panel” for further informa-
tion.
TO OPEN AND CLOSE
THE HOOD
Two latches must be released to open
the hood.
1. Pull the hood release lever located
under the left side of the instrument
panel.
2. Move to the outside of the vehicle
and push the safety catch to the left.
The safety catch is located under the
center front edge of the hood.NOTE:
Your vehicle may be equipped with
an Active Hood System. Refer to
“Occupant Restraints” in “Things
To Know Before Starting Your Ve-
hicle” for further information.
CAUTION!
To prevent possible damage, do not
slam the hood to close it. Lower the
hood, until it is open approximately
15 cm, and then drop it. This should
secure both latches. Never drive
your vehicle unless the hood is fully
closed, with both latches engaged.
WARNING!
Be sure the hood is fully latched
before driving your vehicle. If the
hood is not fully latched, it could
open when the vehicle is in motion
and block your vision. Failure to
follow this warning could result in
serious injury or death.
LIGHTS
HEADLIGHT SWITCH The headlight switch is located
on the left side of the instru-
ment panel. This switch con-
trols the operation of the headlights,
parking lights, instrument panel
lights, instrument panel light dim-
ming, interior lights and fog lights.
NOTE:
In certain European countries, the
parking light feature will only op-
erate with the ignition OFF, or with
either the fog lamps or headlights
also ON. Regardless of ignition
switch position, the parking lights
will remain ON as long as the
switch is in this first detent.
Hood Release Lever
Hood Safety Latch
104
Page 111 of 316

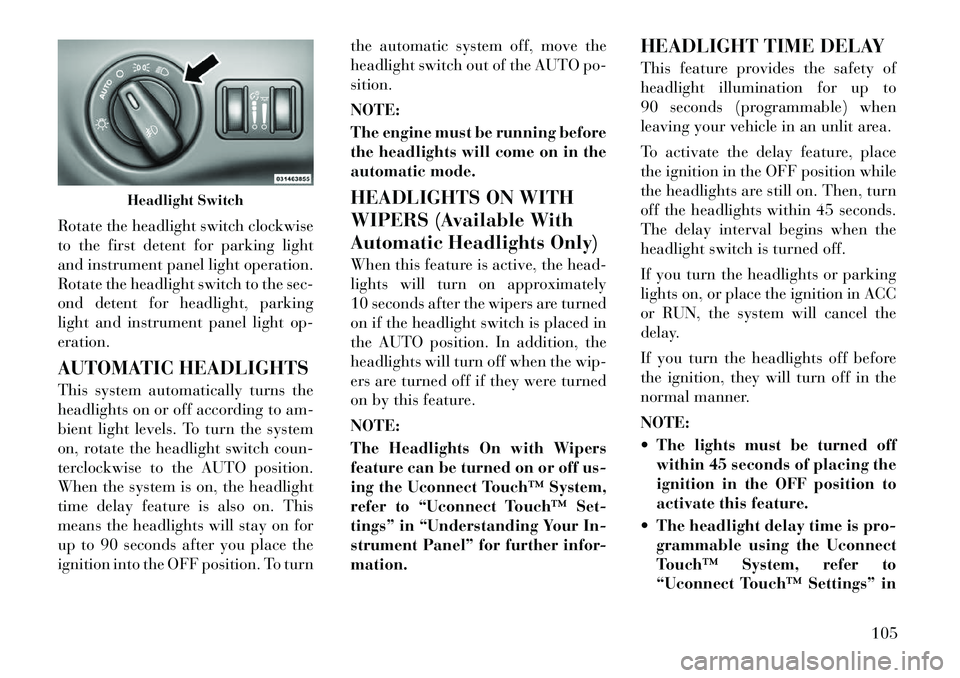
Rotate the headlight switch clockwise
to the first detent for parking light
and instrument panel light operation.
Rotate the headlight switch to the sec-
ond detent for headlight, parking
light and instrument panel light op-
eration.
AUTOMATIC HEADLIGHTS
This system automatically turns the
headlights on or off according to am-
bient light levels. To turn the system
on, rotate the headlight switch coun-
terclockwise to the AUTO position.
When the system is on, the headlight
time delay feature is also on. This
means the headlights will stay on for
up to 90 seconds after you place the
ignition into the OFF position. To turnthe automatic system off, move the
headlight switch out of the AUTO po-
sition.
NOTE:
The engine must be running before
the headlights will come on in the
automatic mode.
HEADLIGHTS ON WITH
WIPERS (Available With
Automatic Headlights Only)
When this feature is active, the head-
lights will turn on approximately
10 seconds after the wipers are turned
on if the headlight switch is placed in
the AUTO position. In addition, the
headlights will turn off when the wip-
ers are turned off if they were turned
on by this feature.
NOTE:
The Headlights On with Wipers
feature can be turned on or off us-
ing the Uconnect Touch™ System,
refer to “Uconnect Touch™ Set-
tings” in “Understanding Your In-
strument Panel” for further infor-
mation.
HEADLIGHT TIME DELAY
This feature provides the safety of
headlight illumination for up to
90 seconds (programmable) when
leaving your vehicle in an unlit area.
To activate the delay feature, place
the ignition in the OFF position while
the headlights are still on. Then, turn
off the headlights within 45 seconds.
The delay interval begins when the
headlight switch is turned off.
If you turn the headlights or parking
lights on, or place the ignition in ACC
or RUN, the system will cancel the
delay.
If you turn the headlights off before
the ignition, they will turn off in the
normal manner.
NOTE:
The lights must be turned off
within 45 seconds of placing the
ignition in the OFF position to
activate this feature.
The headlight delay time is pro- grammable using the Uconnect
Touch™ System, refer to
“Uconnect Touch™ Settings” in
Headlight Switch
105