light Lancia Thema 2012 Owner handbook (in English)
[x] Cancel search | Manufacturer: LANCIA, Model Year: 2012, Model line: Thema, Model: Lancia Thema 2012Pages: 316, PDF Size: 3.85 MB
Page 173 of 316
the SELECT button and one of the
following will be displayed:
If tire pressure is OK for all tires avehicle ICON is displayed with tire
pressure values in each corner of
the ICON.
If one or more tires have low pres- sure, "Tire Pressure LOW" is dis-
played with the vehicle ICON and
the tire pressure values in each cor-
ner of the ICON.
If the Tire Pressure system requires service, "Service Tire Pressure Sys-
tem" is displayed.
Tire pressure is an information only
function and cannot be reset. Press
and release the BACK button to re-
turn to the main menu.
VEHICLE INFO
(CUSTOMER
INFORMATION FEATURES)
Press and release the UP or DOWN
button until "Vehicle Info" is high-
lighted in the EVIC. Press and release
the SELECT button and Coolant
Temp will be displayed. Press the UP or DOWN button to scroll through the
following information displays.
Coolant Temp
Displays the actual coolant tempera-
ture.
Oil Pressure (for versions/
markets, where provided)
Displays the actual oil pressure.
Trans Temperature
Displays the actual transmission tem-
perature.
Engine Hours
Displays the number of hours of en-
gine operation.
MESSAGES #
Select from Main Menu using the UP
or DOWN buttons. This feature shows
the number of stored warning mes-
sages (in the # place holder). Pressing
the SELECT button will allow you to
see what the stored messages are.
Pressing the BACK button takes you
back to the Main Menu.
TURN MENU OFF
Select from Main Menu using the
DOWN button. Pressing the SELECT
button blanks the menu display. Pressing any one of the four steering
wheel buttons brings the menu back.
Uconnect Touch™
SETTINGS
The Uconnect Touch™ system uses a
combination of soft and hard keys
located on the center of the instru-
ment panel that allows you to access
and change the customer program-
mable features.
HARD-KEYS
Hard-Keys are located below the
Uconnect Touch™ system in the cen-
ter of the instrument panel. In addi-
tion, there is a Scroll/Enter control
knob located on the right side of the
Climate Controls in the center of the
instrument panel. Turn the control
knob to scroll through menus and
change settings (i.e., 30, 60, 90),
press the center of the control knob
one or more times to select or change a
setting (i.e., ON, OFF).
SOFT-KEYS
Soft-Keys are accessible on the
Uconnect Touch™ display.
167
Page 174 of 316
CUSTOMER
PROGRAMMABLE
FEATURES — Uconnect
Touch™ SYSTEM 8.4
SETTINGS
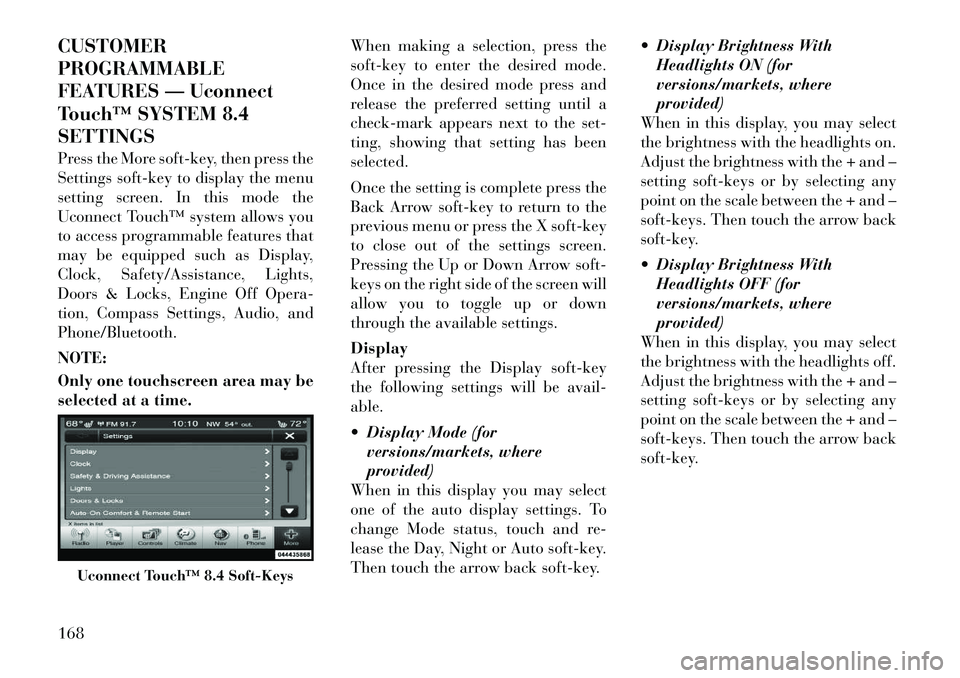
Press the More soft-key, then press the
Settings soft-key to display the menu
setting screen. In this mode the
Uconnect Touch™ system allows you
to access programmable features that
may be equipped such as Display,
Clock, Safety/Assistance, Lights,
Doors & Locks, Engine Off Opera-
tion, Compass Settings, Audio, and
Phone/Bluetooth.
NOTE:
Only one touchscreen area may be
selected at a time.When making a selection, press the
soft-key to enter the desired mode.
Once in the desired mode press and
release the preferred setting until a
check-mark appears next to the set-
ting, showing that setting has been
selected.
Once the setting is complete press the
Back Arrow soft-key to return to the
previous menu or press the X soft-key
to close out of the settings screen.
Pressing the Up or Down Arrow soft-
keys on the right side of the screen will
allow you to toggle up or down
through the available settings.
Display
After pressing the Display soft-key
the following settings will be avail-
able.
Display Mode (for
versions/markets, where
provided)
When in this display you may select
one of the auto display settings. To
change Mode status, touch and re-
lease the Day, Night or Auto soft-key.
Then touch the arrow back soft-key. Display Brightness With
Headlights ON (for
versions/markets, where
provided)
When in this display, you may select
the brightness with the headlights on.
Adjust the brightness with the + and –
setting soft-keys or by selecting any
point on the scale between the + and –
soft-keys. Then touch the arrow back
soft-key.
Display Brightness With Headlights OFF (for
versions/markets, where
provided)
When in this display, you may select
the brightness with the headlights off.
Adjust the brightness with the + and –
setting soft-keys or by selecting any
point on the scale between the + and –
soft-keys. Then touch the arrow back
soft-key.
Uconnect Touch™ 8.4 Soft-Keys
168
Page 177 of 316
warns you of a possible collision when
you are much closer to the vehicle in
front of you. This allows for a more
dynamic driving experience. To
change the FCW status, touch and
release the OFF, Near or Far button.
Then touch the arrow back soft-key.
For further information, refer to
“Adaptive Cruise Control (ACC)” in
“Understanding The Features Of
Your Vehicle”.
Park Assist (for versions/markets, where provided)
The Rear Park Assist system will scan
for objects behind the vehicle when
the transmission shift lever is in RE-
VERSE and the vehicle speed is less
than 11 mph (18 km/h). The system
can be enabled with Sound Only,
Sound and Display, or turned OFF. To
change the Park Assist status, touch
and release the OFF, Sound Only or
Sounds and Display button. Then
touch the arrow back soft-key. Refer
to “ParkSense® Rear Park Assist” in
“Understanding The Features Of
Your Vehicle” for system function and
operating information. Tilt Mirrors In Reverse (for
versions/markets, where
provided)
When this feature is selected, the out-
side sideview mirrors will tilt down-
ward when the ignition is in the RUN
position and the transmission shift le-
ver is in the REVERSE position. The
mirrors will move back to their previ-
ous position when the transmission is
shifted out of REVERSE. To make
your selection, touch the Tilt Mirrors
In Reverse soft-key, until a check-
mark appears next to setting, showing
that setting has been selected. Touch
the back arrow soft-key to return to
the previous menu.
Blind Spot Alert (for versions/markets, where
provided)
When this feature is selected, the
Blind Spot Alert feature can be set to
Off, Lights or Lights and Chime. The
Blind Spot Alert feature can be acti-
vated in “Lights” mode. When this
mode is selected, the Blind Spot Moni-
tor (BSM) system is activated and will
only show a visual alert in the outside
mirrors. When “Lights & Chime” mode is activated, the Blind Spot
Monitor (BSM) will show a visual
alert in the outside mirrors as well as
an audible alert when the turn signal
is on. When “Off” is selected, the
Blind Spot Monitor (BSM) system is
deactivated. To change the Blind Spot
Alert status, touch the Off, Lights or
Lights & Chime soft-key. Then touch
the arrow back soft-key.
NOTE:
If your vehicle has experienced
any damage in the area where the
sensor is located, even if the fascia
is not damaged, the sensor may
have become misaligned. Take
your vehicle to an authorized
dealer to verify sensor alignment.
Having a sensor that is misaligned
will result in the BSM not operat-
ing to specification.
171
Page 178 of 316
ParkView® Backup Camera (forversions/markets, where
provided)
Your vehicle may be equipped with
the ParkView® Rear Back Up Cam-
era that allows you to see an on-screen
image of the rear surroundings of
your vehicle whenever the shift lever
is put into REVERSE. The image will
be displayed on the radio touchscreen
display along with a caution note to
“check entire surroundings” across
the top of the screen. After five sec-
onds, this note will disappear. The
ParkView® camera is located on the
rear of the vehicle above the rear Li-
cense plate. To make your selection,
touch the ParkView® Backup Cam-
era soft-key, until a check-mark ap-
pears next to setting, showing that
setting has been selected. Touch the
back arrow soft-key to return to the
previous menu. Rain Sensing Auto Wipers (for
versions/markets, where
provided)
When this feature is selected, the sys-
tem will automatically activate the
windshield wipers if it senses moisture
on the windshield. To make your se-
lection, touch the Rain Sensing soft-
key, until a check-mark appears next
to setting, showing that setting has
been selected. Touch the back arrow
soft-key to return to the previous
menu.
Hill Start Assist (for
versions/markets, where
provided)
When this feature is selected, the Hill
Start Assist (HSA) system is active.
Refer to “Electronic Brake Control
System” in “Starting And Operating”
for system function and operating in-
formation. To make your selection,
touch the Hill Start Assist soft-key,
until a check-mark appears next to
setting, showing that setting has been
selected. Touch the back arrow soft-
key to return to the previous menu. Lights
After pressing the Lights soft-key the
following settings will be available.
Headlight Off Delay (for
versions/markets, where
provided)
When this feature is selected, the
driver can choose to have the head-
lights remain on for 0, 30, 60, or
90 seconds when exiting the vehicle.
To change the Headlight Off Delay
status touch the 0, 30, 60 or 90 soft-
key. Then touch the arrow back soft-
key.
Headlight Illumination On Approach (for versions/markets,
where provided)
When this feature is selected, the
headlights will activate and remain on
for 0, 30, 60, or 90 seconds when the
doors are unlocked with the Remote
Keyless Entry (RKE) transmitter. To
change the Illuminated Approach sta-
tus, touch the + or - soft-key to select
your desired time interval. Touch the
back arrow soft-key to return to the
previous menu.
172
Page 179 of 316
Headlights With Wipers (forversions/markets, where
provided)
When this feature is selected, and the
headlight switch is in the AUTO posi-
tion, the headlights will turn on ap-
proximately 10 seconds after the wip-
ers are turned on. The headlights will
also turn off when the wipers are
turned off if they were turned on by
this feature. To make your selection,
touch the Headlights With Wipers
soft-key, until a check-mark appears
next to setting, showing that setting
has been selected. Touch the back ar-
row soft-key to return to the previous
menu.
Auto Dim High Beams “SmartBeam™” (for
versions/markets, where
provided)
When this feature is selected, the high
beam headlights will deactivate auto-
matically under certain conditions. To
make your selection, touch the Auto
High Beams soft-key, until a check-
mark appears next to setting, showing
that setting has been selected. Touch
the back arrow soft-key to return to the previous menu. Refer to “Lights/
SmartBeam™ (for versions/markets,
where provided)” in “Understanding
The Features Of Your Vehicle” for
further information.
Daytime Running Lights (for
versions/markets, where
provided)
When this feature is selected, the
headlights will turn on whenever the
engine is running. To make your se-
lection, touch the Daytime Running
Lights soft-key, until a check-mark
appears next to setting, showing that
setting has been selected. Touch the
back arrow soft-key to return to the
previous menu.
Steering Directed Lights (for versions/markets, where
provided)
When this feature is selected, the
headlights turn relative to a change in
direction of the steering wheel. To
make your selection, touch the Steer-
ing Directed Lights soft-key, until a
check-mark appears next to setting,
showing that setting has been se-
lected. Touch the back arrow soft-key
to return to the previous menu. Doors & Locks
After pressing the Doors & Locks soft-
key the following settings will be
available.
Auto Unlock On Exit (for
versions/markets, where
provided)
When this feature is selected, all doors
will unlock when the vehicle is
stopped and the transmission is in the
PARK or NEUTRAL position and the
driver's door is opened. To make your
selection, touch the Auto Unlock On
Exit soft-key, until a check-mark ap-
pears next to setting, showing that
setting has been selected. Touch the
back arrow soft-key to return to the
previous menu.
1st Press Of Key Fob Unlocks (for versions/markets, where
provided)
When 1st Press Of Key Fob Unlocks is
selected, only the driver's door will
unlock on the first press of the Remote
Keyless Entry (RKE) transmitter UN-
LOCK button. When 1st Press Of Key
Fob Unlocks is selected, you must
press the RKE transmitter UNLOCK
button twice to unlock the passenger's
173
Page 181 of 316
Engine Off Power Delay (forversions/markets, where
provided)
When this feature is selected, the
power window switches, radio,
Uconnect™ phone system (for
versions/markets, where provided),
DVD video system (for versions/
markets, where provided), power
sunroof (for versions/markets, where
provided), and power outlets will re-
main active for up to 10 minutes after
the ignition is cycled to OFF. Opening
either front door will cancel this fea-
ture. To change the Engine Off Power
Delay status touch the 0 seconds,
45 seconds, 5 minutes or 10 minutes
soft-key. Then touch the arrow back
soft-key. Headlight Off Delay (for
versions/markets, where
provided)
When this feature is selected, the
driver can choose to have the head-
lights remain on for 0, 30, 60, or
90 seconds when exiting the vehicle.
To change the Headlight Off Delay
status touch the + or - soft-key to
select your desired time interval.
Touch the back arrow soft-key to re-
turn to the previous menu.
Compass Settings
After pressing the Compass Settings
soft-key the following settings will be
available.
Variance (for versions/markets, where provided)
Compass Variance is the difference
between Magnetic North and Geo-
graphic North. To compensate for the
differences the variance should be set
for the zone where the vehicle is
driven, per the zone map. Once prop-
erly set, the compass will automati-
cally compensate for the differences,
and provide the most accurate com-
pass heading. NOTE:
Keep magnetic materials away
from the top of the instrument
panel, such as iPod's, Mobile
Phones, Laptops and Radar Detec-
tors. This is where the compass
module is located, and it can cause
interference with the compass sen-
sor, and it may give false readings.
175
Page 186 of 316
2. If the disc is stained, clean the sur-
face with a soft cloth, wiping from
center to edge.
3. Do not apply paper or tape to the
disc; avoid scratching the disc.
4. Do not use solvents such as ben-
zene, thinner, cleaners, or anti-static
sprays.
5. Store the disc in its case after play-
ing.
6. Do not expose the disc to direct
sunlight.
7. Do not store the disc where tem-
peratures may become too high.
NOTE:
If you experience difficulty in
playing a particular disc, it may be
damaged (i.e., scratched, reflective
coating removed, a hair, moisture
or dew on the disc) oversized, or
have protection encoding. Try a
known good disc before consider-
ing disc player service.RADIO OPERATION AND
MOBILE PHONES
Under certain conditions, the mobile
phone being on in your vehicle can
cause erratic or noisy performance
from your radio. This condition may
be lessened or eliminated by relocat-
ing the mobile phone antenna. This
condition is not harmful to the radio.
If your radio performance does not
satisfactorily “clear” by the reposi-
tioning of the antenna, it is recom-
mended that the radio volume be
turned down or off during mobile
phone operation.
CLIMATE CONTROLS
The air conditioning and heating sys-
tem is designed to make you comfort-
able in all types of weather. This sys-
tem can be operated through either
the Automatic Climate Controls on
the instrument panel or through the
Uconnect Touch™ system display.
When the Uconnect Touch™ system
is in different modes (Radio, Player,
Settings, More, etc.) the driver and
passenger temperature settings will be
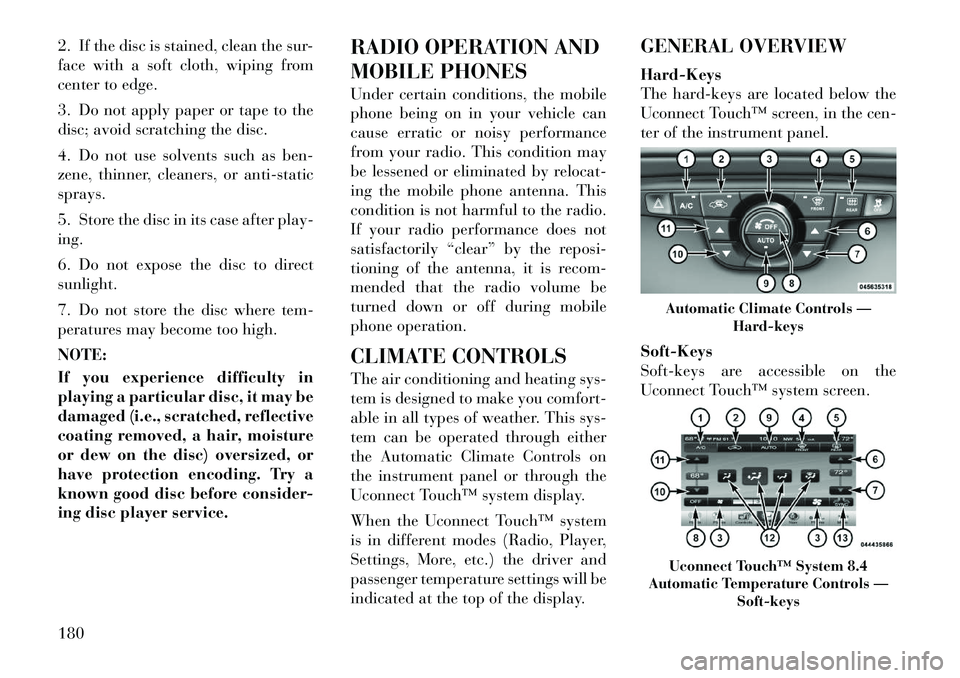
indicated at the top of the display.GENERAL OVERVIEW
Hard-Keys
The hard-keys are located below the
Uconnect Touch™ screen, in the cen-
ter of the instrument panel.
Soft-Keys
Soft-keys are accessible on the
Uconnect Touch™ system screen.
Automatic Climate Controls —
Hard-keysUconnect Touch™ System 8.4
Automatic Temperature Controls — Soft-keys
180
Page 189 of 316
Bi-Level Mode
Air comes from the instrument
panel outlets and floor outlets. A
slight amount of air is directed
through the defrost and side window
demister outlets.
NOTE:
BI-LEVEL mode is designed under
comfort conditions to provide
cooler air out of the panel outlets
and warmer air from the floor out-
lets.
Floor Mode
Air comes from the floor outlets.
A slight amount of air is directed
through the defrost and side
window demister outlets.
Mix Mode
Air comes from the floor, defrost
and side window demist outlets.
This mode works best in cold or
snowy conditions.
Defrost Mode
Air comes from the windshield
and side window demist out-
lets. Use Defrost mode with
maximum temperature settings for
best windshield and side window de-
frosting and defogging. When the de-
frost mode is selected, the blower level
may increase.
13. SYNC
Press the Sync soft-key to toggle the
Sync feature On/Off. The Sync indi-
cator is illuminated when this feature
is enabled. Sync is used to synchro-
nize the passenger temperature set-
ting with the driver temperature set-
ting. Changing the passenger
temperature setting while in Sync will
automatically exit this feature.
CLIMATE CONTROL
FUNCTIONS
A/C (Air Conditioning)
The Air Conditioning (A/C) button
allows the operator to manually acti-
vate or deactivate the air conditioning
system. When the air conditioning
system is turned on, cool dehumidi-
fied air will flow through the outlets into the cabin. For improved fuel
economy, press the A/C button to turn
off the air conditioning and manually
adjust the blower and airflow mode
settings.
NOTE:
If fog or mist appears on the
windshield or side glass, select
Defrost mode and increase
blower speed.
If your air conditioning perfor- mance seems lower than ex-
pected, check the front of the
A/C condenser (located in front
of the radiator), for an accumu-
lation of dirt or insects. Clean
with a gentle water spray from
behind the radiator and through
the condenser. Fabric front fas-
cia protectors may reduce air-
flow to the condenser, reducing
air conditioning performance.
Recirculation When outside air contains
smoke, odors, or high hu-
midity, or if rapid cooling is
desired, you may wish to
recirculate interior air by pressing the
183
Page 194 of 316

DRIVING ON SLIPPERY SURFACES . . . . . . . . . 204 ACCELERATION . . . . . . . . . . . . . . . . . . . . . . 204
TRACTION . . . . . . . . . . . . . . . . . . . . . . . . . . . 204
DRIVING THROUGH WATER . . . . . . . . . . . . . . 204 FLOWING/RISING WATER . . . . . . . . . . . . . . 204
SHALLOW STANDING WATER . . . . . . . . . . . 205
POWER STEERING . . . . . . . . . . . . . . . . . . . . . . 206
PARKING BRAKE . . . . . . . . . . . . . . . . . . . . . . . 206
ANTI-LOCK BRAKE SYSTEM . . . . . . . . . . . . . . 208
ELECTRONIC BRAKE CONTROL SYSTEM . . . . 209 ANTI-LOCK BRAKE SYSTEM (ABS) . . . . . . . 209
TRACTION CONTROL SYSTEM (TCS) . . . . . . 209
BRAKE ASSIST SYSTEM (BAS) . . . . . . . . . . . 209
ELECTRONIC STABILITY CONTROL (ESC) . . 210
HILL START ASSIST (HSA) . . . . . . . . . . . . . . 211
READY ALERT BRAKING . . . . . . . . . . . . . . . 212
RAIN BRAKE SUPPORT . . . . . . . . . . . . . . . . 213
ESC ACTIVATION/MALFUNCTIONINDICATOR LIGHT AND ESC OFF
INDICATOR LIGHT . . . . . . . . . . . . . . . . . . . . 213
SYNCHRONIZING ESC . . . . . . . . . . . . . . . . . 213
TIRES — GENERAL INFORMATION . . . . . . . . . 214 TIRE PRESSURE . . . . . . . . . . . . . . . . . . . . . . 214
TIRE INFLATION PRESSURES . . . . . . . . . . . 214
TIRE PRESSURES FOR HIGH SPEEDOPERATION . . . . . . . . . . . . . . . . . . . . . . . . . 215
188
Page 199 of 316

WARNING!(Continued)
Do not attempt to push or tow
your vehicle to get it started. Ve-
hicles equipped with an automatic
transmission cannot be started
this way. Unburned fuel could en-
ter the catalytic converter and
once the engine has started, ignite
and damage the converter and ve-
hicle. If the vehicle has a dis-
charged battery, booster cables
may be used to obtain a start from
a booster battery or the battery in
another vehicle. This type of start
can be dangerous if done improp-
erly. Refer to “Jump Starting” in
“What To Do In Emergencies” for
further information.
Clearing A Flooded Engine (Using
ENGINE START/STOP Button)
If the engine fails to start after you
have followed the “Normal Starting”
or “Extreme Cold Weather" proce-
dures, it may be flooded. To clear any
excess fuel, press and hold the brake
pedal, push the accelerator pedal all
the way to the floor and hold it, then
press and release the ENGINE START/STOP button once. The
starter motor will engage automati-
cally, run for 10 seconds, and then
disengage. Once this occurs, release
the accelerator pedal and the brake
pedal, wait 10 to 15 seconds, then
repeat the “Normal Starting” proce-
dure.
After Starting
The idle speed is controlled automati-
cally and it will decrease as the engine
warms up.
NORMAL STARTING –
DIESEL ENGINE
Observe the following when the en-
gine is operating.
All message center lights are off.
Malfunction Indicator Light (MIL)
is off.
Low Oil Pressure Light is off.
Cold Weather Precautions
If the outside temperature is very low,
the diesel fuel thickens due to the
formation of parrafin clots and could
clog the diesel filter. In order to avoid
these problems, different types of die-
sel fuel are distributed according to the season: summer type, winter type
and arctic type (cold, mountainous
areas).
If refuelling with diesel fuel whose
specifications are not suitable for the
outside temperature, it is advisable to
mix TUTELA DIESEL ART additive
in the proportions shown on the con-
tainer with the fuel. Pour the additive
into the tank before the fuel.
When using or parking the vehicle for
a long time in the mountains or cold
areas, it is advisable to refuel using
locally available diesel. In this case, it
is also advisable to keep the tank over
50% full.
Battery Blanket Usage
A battery loses 60% of its cranking
power as the battery temperature de-
creases to 18°C. For the same de-
crease in temperature, the engine re-
quires twice as much power to crank
at the same RPM. The use of battery
blankets will greatly increase starting
capability at low temperatures.
193