change time Lancia Thema 2014 Owner handbook (in English)
[x] Cancel search | Manufacturer: LANCIA, Model Year: 2014, Model line: Thema, Model: Lancia Thema 2014Pages: 332, PDF Size: 3.46 MB
Page 112 of 332
When the HI-level setting is selected,
the heater will provide a boosted heat
level during the first four minutes of
operation. Then, the heat output will
drop to the normal HI-level. If the
HI-level setting is selected, the system
will automatically switch to LO-level
after a maximum of 60 minutes of
continuous operation. At that time,
the display will change from HI to LO,
indicating the change. The LO-level
setting will turn OFF automatically
after a maximum of 45 minutes.
Rear Heated Seats
On some models, the two outboard
seats are equipped with heated seats.
The heated seat switches for these
seats are located on the rear of the
center console. There are two heated
seat switches that allow the rear pas-
sengers to operate the seats indepen-
dently.You can choose from HI, LO or OFF
heat settings. Amber indicator lights
in each switch indicate the level of
heat in use. Two indicator lights will
illuminate for HI, one for LO and
none for OFF.
Press the switch once to se-
lect HI-level heating. Press
the switch a second time to
select LO-level heating.
Press the switch a third time to shut
the heating elements OFF.
NOTE:
Once a heat setting is selected, heat will be felt within two to
five minutes.
The engine must be running for the heated seats to operate.
When the HI-level setting is selected,
the heater will provide a boosted heat
level during the first four minutes of
operation. Then, the heat output will
drop to the normal HI-level. If the
HI-level setting is selected, the system
will automatically switch to LO-level
after a maximum of 60 minutes of
continuous operation. At that time, the number of illuminated LEDs
changes from two to one, indicating
the change. The LO-level setting will
turn OFF automatically after a maxi-
mum of 45 minutes.
VENTILATED SEATS (for
versions/markets, where
provided)
On some models, both the driver and
passenger seats are ventilated. Lo-
cated in the seat cushion and seatback
are small fans that draw air from the
seat surface through fine perforations
in the seat cover to help keep the
driver and front passenger cooler in
higher ambient temperatures.
The ventilated seats can be operated
using the Uconnect® System.
NOTE: The engine must be run-
ning for the ventilated seats to op-
erate.
Front Ventilated Seat Operation
— Uconnect® 8.4/8.4N:
Press the “Controls” soft-key located
on the bottom of the Uconnect® dis-
play.
106
Page 121 of 332

FOG LIGHTS
The fog light switch is built
into the headlight switch.
To activate the fog lights,
turn the headlamp switch to
the park lamp or headlamp position.
Press the headlight switch once for
front fog lights, press the switch a
second time for front and rear fog
lights. Pressing the switch a third time
will deactivate the rear fog lights, and
a fourth time will deactivate the front
fog lights. Turning the headlight
switch off will also deactivate the fog
lights.
An indicator light in the instrument
cluster illuminates when the fog lights
are turned on.
NOTE: The front fog lights will
activate automatically when turn-
ing on the position lights or the low
beam headlights if previously de-
activated by turning the headlight
switch off. The rear fog lights will
only turn on by operating the
switch as previously described.
MULTIFUNCTION LEVER
The multifunction lever controls the
operation of the turn signals, head-
light beam selection and passing
lights. The multifunction lever is lo-
cated on the left side of the steering
column.
TURN SIGNALS
Move the multifunction lever up or
down and the arrows on each side of
the instrument cluster flash to show
proper operation of the front and rear
turn signal lights. NOTE:
If either light remains on and
does not flash, or there is a very
fast flash rate, check for a defec-
tive outside light bulb. If an in-
dicator fails to light when the
lever is moved, it would suggest
that the indicator bulb is defec-
tive.
A “Turn Signal On” message will appear in the EVIC (for
versions/markets, where pro-
vided) and a continuous chime
will sound if the vehicle is driven
more than 1.6 km with either
turn signal on.
LANE CHANGE ASSIST
Tap the lever up or down once, with-
out moving beyond the detent, and
the turn signal (right or left) will flash
three times then automatically turn
off.
Multifunction Lever
115
Page 136 of 332

To change the distance setting, press
the Distance button and release. Each
time the button is pressed, the dis-
tance setting adjusts between 3
(long), 2 (medium), and 1 (short).
If there is no vehicle ahead, the vehicle
will maintain the set speed. If a slower
moving vehicle is detected in the same
lane, the EVIC displays the “Sensed
Vehicle Indicator” icon, and the sys-
tem adjusts vehicle speed automati-
cally to maintain the distance setting,
regardless of the set speed.
The vehicle will then maintain the set
distance until:
The vehicle ahead accelerates to aspeed above the set speed. The vehicle ahead moves out of
your lane or view of the sensor.
The vehicle ahead slows to a speed below 25 km/h and the system au-
tomatically disengages itself.
The distance setting is changed.
The system disengages. (Refer to the information on ACC Activa-
tion).
The maximum braking applied by
ACC is limited; however, the driver
can always apply the brakes manu-
ally, if necessary.
NOTE: The brake lights will illu-
minate whenever the ACC system
applies the brakes.
A Proximity Warning will alert the
driver if ACC predicts that its maxi-
mum braking level is not sufficient to
maintain the set distance. If this oc-
curs, a visual alert “BRAKE” will flash
in the EVIC and a chime will sound
while ACC continues to apply its maxi-
mum braking capacity. When this oc-
curs, you should immediately apply
the brakes as needed to maintain a safe
distance from the vehicle ahead.
Distance Set 1 (short)Brake Alert 3
Brake Alert 2
Brake Alert 1
130
Page 141 of 332

accelerator. Cruise Control can only
be operated if the vehicle speed is
above 30 km/h.
To change modes, press the MODE
button when the system is in either the
OFF, READY, or SET position.
“Cruise Ready” will be displayed if
the system was in ACC READY or
ACC SET position. “Cruise Off” will
be displayed if the system was in the
ACC OFF position. To switch back to
Adaptive Cruise Control mode, press
the MODE button a second time.
WARNING!
In the normal Cruise Control mode,
the system will not react to vehicles
ahead. In addition, the proximity
warning does not activate and no
alarm will sound even if you are too
close to the vehicle ahead since nei-
ther the presence of the vehicle
ahead nor the vehicle-to vehicle
distance is detected. Be sure to
maintain a safe distance between
your vehicle and the vehicle ahead.
Always be aware which mode is
selected.To Set A Desired Speed
When the vehicle reaches the speed
desired, press the SET
-button and
release. The EVIC will display the set
speed.
NOTE: You must observe the dis-
play when setting or changing
speed, not the speedometer.
To Vary The Speed Setting
There are two ways to change the set
speed:
Use the accelerator pedal to adjust the vehicle to the desired speed and
press the SET -button.
Tap the RES +or SET -button to
increase or decrease the set speed in
1.6 km/h increments respectively.
Hold the RES +or SET -button for
10 km/h increments.
To Cancel
The system will disable normal Cruise
Control without erasing the memory
if:
You softly tap or depress the brake pedal. You press the CANCEL button.
The Electronic Stability Control/
Traction Control System (ESC/
TCS) activates.
To Resume
Press the RES +button and then re-
move your foot from the accelerator
pedal. The EVIC will display the last
set speed.
To Turn Off
The system will turn off and erase the
set speed in memory if:
You push and release the ON/OFF button.
You turn off the ignition.
You switch off ESC.
If the Cruise Control system is turned
off and reactivated, the system will
return to the last driver setting (ACC
or Normal Cruise Control).
135
Page 177 of 332

When the shift down indicator (-) is
shown on the display, the GSI is ad-
vising the driver to engage a lower
gear.
The GSI indicator in the EVIC re-
mains illuminated until the driver
changes gear, or the driving condi-
tions return to a situation where
changing gear is not required to im-
prove fuel consumption.
OIL CHANGE DUE
Your vehicle is equipped with an en-
gine oil change indicator system. The
“Oil Change Due” message will flash
in the EVIC display for approxi-
mately 10 seconds after a single chime
has sounded to indicate the next
scheduled oil change interval. The en-
gine oil change indicator system is
duty cycle based, which means the
engine oil change interval may fluctu-
ate dependent upon your personal
driving style.
Unless reset, this message will con-
tinue to display each time you cycle
the ignition to the ON/RUN position.
To turn off the message temporarily,
press and release the BACK button.
To reset the oil change indicator sys-
tem please refer to a Lancia Dealer-
ship.
DIESEL PARTICULATE
FILTER (DPF) MESSAGES
Exhaust System — RegenerationRequired Now. Under conditions of
exclusive short duration and low
speed driving and low speed driv-
ing cycles, the engine and exhaust
after-treatment system may never
reach the conditions required to re-
move the trapped PM. If this occurs
the “Exhaust System Regeneration
Required Now” message will be
displayed on the EVIC. By driving
your vehicle at highway speeds for
as little as 30 minutes, you can rem-
edy the condition in the particulate
filter system by allowing the
trapped PM to be removed to re-
store the system to normal operat-
ing condition.
Exhaust Service Require — See Dealer Now. The engine will be de-
rated to prevent permanent dam-
age to the after-treatment system. If
this condition occurs, it is necessary
to have your vehicle serviced by
your local authorized dealer.
GSI Shift Up (+) Indicator
GSI Shift Down (-) Indicator
171
Page 179 of 332

CRUISE CONTROL
Press and release the UP or DOWN
button until "ACC" (for versions/
markets, where provided with Adap-
tive Cruise Control) or "Cruise" is
highlighted in the EVIC. Status of the
ACC or Cruise is displayed in the
menu line also. Press and release the
SELECT (right arrow) button to dis-
play the following information:
For versions/markets, where pro-vided with ACC, one of several
messages will be displayed giving a
dynamic update of the status of the
feature as the driver changes fea-
ture status or following conditions
change. If ACC is active and a
warning or other feature is in the
EVIC main display, the ACC status
will be displayed in place of the
EVIC odometer line.
For vehicles with Cruise, one of sev- eral messages will be displayed giv-
ing a dynamic update of the status
of the feature as the driver changes
feature status or conditions change.
If Cruise is active and a warning or
other feature is in the EVIC main display, the Cruise status will be
displayed in place of the EVIC
odometer line.
Press and release the BACK button to
return to the main menu.
VEHICLE SPEED
Press and release the UP or DOWN
button until "Vehicle Speed" is high-
lighted in the EVIC. Press the SE-
LECT button to view a digital display
of the current speed in km/h or mph.
Pressing the SELECT button a sec-
ond time will toggle the unit of mea-
sure between km/h or mph. Press the
BACK button to return to the main
menu.
NOTE: Changing the unit of mea-
sure in the Vehicle Speed menu
will not change the unit of measure
in the EVIC.
TRIP INFO
Press and release the UP or DOWN
button until "Trip Info" is highlighted
in the EVIC. Press and release the SELECT button to display the follow-
ing three trip features in the next
screen:
Trip A
Trip B
Elapsed Time
Press the UP/DOWN buttons to cycle
through all the Trip Computer func-
tions or press the BACK button to
return to the main menu.
The Trip Functions mode displays the
following information:
Trip A
Shows the total distance traveled for
Trip A since the last reset.
Trip B
Shows the total distance traveled for
Trip B since the last reset.
Elapsed Time
Shows the total elapsed time of travel
since the last reset. Elapsed time will
increment when the ignition is in the
ON/RUN position.
173
Page 181 of 332
HARD-KEYS
Hard-Keys are located below the
Uconnect® system in the center of the
instrument panel. In addition, there is
a Scroll/Enter control knob located on
the right side of the Climate Controls
in the center of the instrument panel.
Turn the control knob to scroll
through menus and change settings
(i.e., 30, 60, 90), press the center of
the control knob one or more times to
select or change a setting (i.e., ON,
OFF).
SOFT-KEYS
Soft-Keys are accessible on the
Uconnect® touchscreen.
CUSTOMER
PROGRAMMABLE
FEATURES — Uconnect®
8.4 SETTINGS
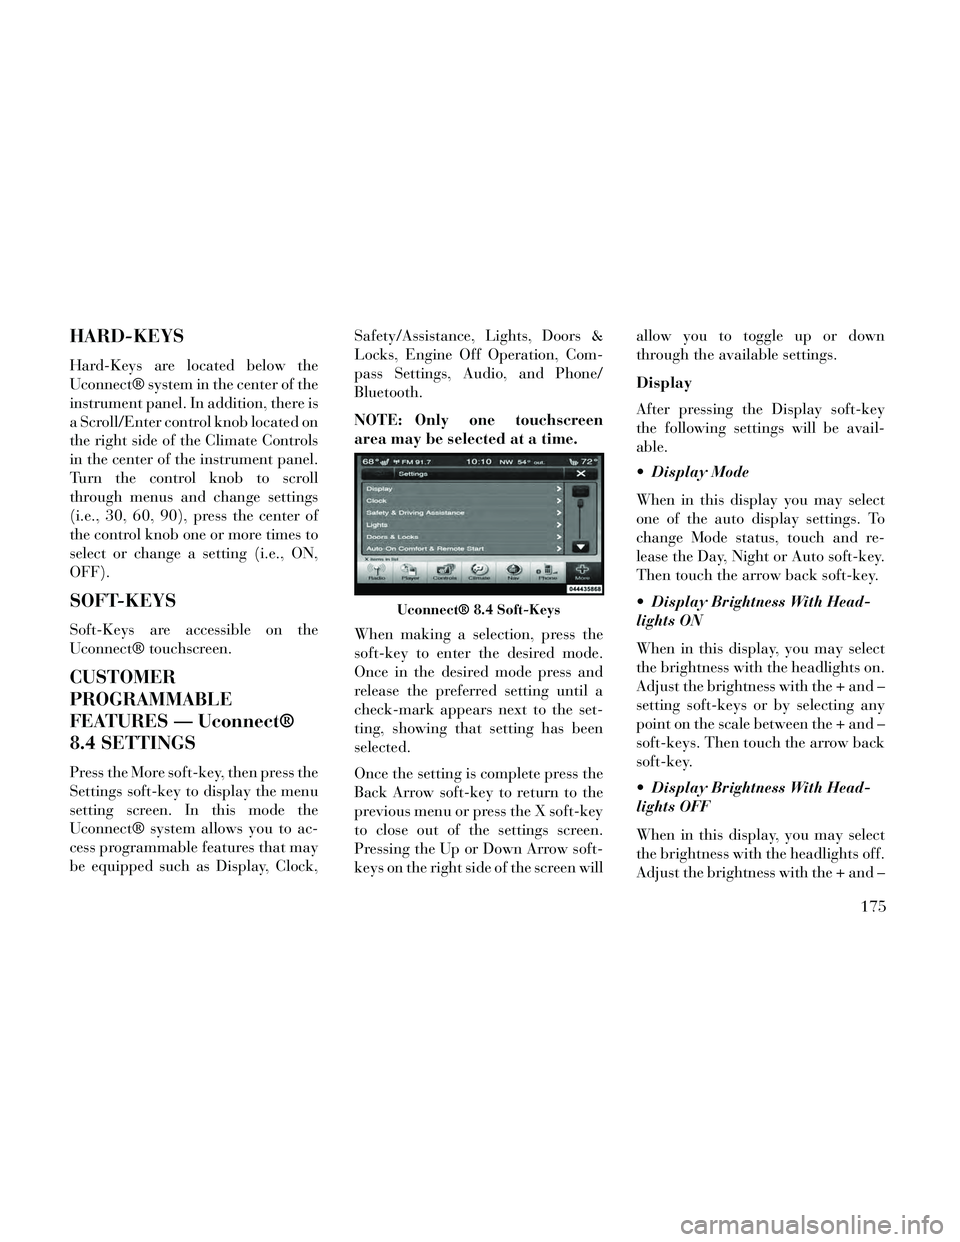
Press the More soft-key, then press the
Settings soft-key to display the menu
setting screen. In this mode the
Uconnect® system allows you to ac-
cess programmable features that may
be equipped such as Display, Clock,Safety/Assistance, Lights, Doors &
Locks, Engine Off Operation, Com-
pass Settings, Audio, and Phone/
Bluetooth.
NOTE: Only one touchscreen
area may be selected at a time.
When making a selection, press the
soft-key to enter the desired mode.
Once in the desired mode press and
release the preferred setting until a
check-mark appears next to the set-
ting, showing that setting has been
selected.
Once the setting is complete press the
Back Arrow soft-key to return to the
previous menu or press the X soft-key
to close out of the settings screen.
Pressing the Up or Down Arrow soft-
keys on the right side of the screen willallow you to toggle up or down
through the available settings.
Display
After pressing the Display soft-key
the following settings will be avail-
able.
Display Mode
When in this display you may select
one of the auto display settings. To
change Mode status, touch and re-
lease the Day, Night or Auto soft-key.
Then touch the arrow back soft-key.
Display Brightness With Head-
lights ON
When in this display, you may select
the brightness with the headlights on.
Adjust the brightness with the + and –
setting soft-keys or by selecting any
point on the scale between the + and –
soft-keys. Then touch the arrow back
soft-key.
Display Brightness With Head-
lights OFF
When in this display, you may select
the brightness with the headlights off.
Adjust the brightness with the + and –
Uconnect® 8.4 Soft-Keys
175
Page 182 of 332
setting soft-keys or by selecting any
point on the scale between the + and –
soft-keys. Then touch the arrow back
soft-key.
Language
Press the Language soft-key to
change this display. When in this dis-
play you may select a different lan-
guage for all display nomenclature,
including the trip functions and the
navigation system (for versions/
markets, where provided). Press the
German, French, Spanish, Italian,
Dutch or English button to select the
language preferred followed by press-
ing the arrow back soft-key. Then, as
you continue, the information will
display in the selected language.
Units
When in this display, you may select
to have the EVIC, odometer, and
navigation system (for versions/
markets, where provided) changed
between US and Metric units of mea-
sure. Touch US or Metric until a
check-mark appears next to the set-
ting, showing that setting has beenselected. Touch the back arrow soft-
key to return to the previous menu.
Voice Response Length
When in this display, you may change
the Voice Response Length settings.
To change the Voice Response Length,
touch the Brief or Detailed soft-key
until a check-mark appears next to
the setting, showing that setting has
been selected. Touch the back arrow
soft-key to return to the previous
menu.
Touchscreen Beep
When in this display, you may turn on
or shut off the sound heard when a
touch screen button (soft-key) is
pressed. Touch the Touchscreen Beep
soft-key until a check-mark appears
next to the setting, showing that set-
ting has been selected. Touch the back
arrow soft-key to return to the previ-
ous menu.
Navigation Turn-By-Turn In
Cluster (for versions/markets,
where provided)
When this feature is selected, the
turn-by-turn directions will appear inthe display as the vehicle approaches
a designated turn within a pro-
grammed route. To make your selec-
tion, touch the Navigation Turn-By-
Turn In Cluster soft-key, until a
check-mark appears next to the set-
ting, showing that setting has been
selected. Touch the back arrow soft-
key to return to the previous menu.
Fuel Saver Display In Cluster
The “ECO” message is located in the
instrument cluster display, this mes-
sage can be turned on or off. To make
your selection, touch the Fuel Saver
Display soft-key, until a check-mark
appears next to the setting, showing
that setting has been selected. Touch
the back arrow soft-key to return to
the previous menu.
Clock
After pressing the Clock soft-key the
following settings will be available.
Sync Time With GPS (for
versions/markets, where provided)
When in this display, you may auto-
matically have the radio set the time.
To change the Sync Time setting
176
Page 183 of 332
touch the Sync with GPS Time soft-
key until a check-mark appears next
to the setting, showing that setting has
been selected. Touch the back arrow
soft-key to return to the previous
menu.
Set Time Hours
When in this display, you may adjust
the hours. The Sync with GPS Time
soft-key must be unchecked. To make
your selection touch the + or - soft-
keys to adjust the hours up or down.
Touch the back arrow soft-key to re-
turn to the previous menu or touch the
X soft-key to close out of the settings
screen.
Set Time Minutes
When in this display, you may adjust
the minutes. The Sync with GPS Time
soft-key must be unchecked. To make
your selection touch the + or - soft-
keys to adjust the minutes up or
down. Touch the back arrow soft-key
to return to the previous menu or
touch the X soft-key to close out of the
settings screen. Time Format
When in this display, you may select
the time format display setting. Touch
the Time Format soft-key until a
check-mark appears next to the 12hrs
or 24hrs setting, showing that setting
has been selected. Touch the back ar-
row soft-key to return to the previous
menu.
Show Time In Status Bar
When in this display, you may turn on
or shut off the digital clock in the
status bar. To change the Show Time
Status setting touch the Show Time in
Status Bar soft-key until a check-
mark appears next to setting, showing
that setting has been selected. Touch
the back arrow soft-key to return to
the previous menu.
Safety / Assistance
After pressing the Safety / Assistance
soft-key the following settings will be
available.
Front Collision Sensitivity (for
versions/markets, where provided)
The Front Collision Warning (FCW)
feature can be can be set to Far, set to
Near or turned Off. The default status
of FCW is the Far setting. This means
the system will warn you of a possible
collision with the vehicle in front of
you when you are farther away. This
gives you the most reaction time. To
change the setting for more dynamic
driving, select the Near setting. This
warns you of a possible collision when
you are much closer to the vehicle in
front of you. This allows for a more
dynamic driving experience. To
change the FCW status, touch and
release the OFF, Near or Far button.
Then touch the arrow back soft-key.
For further information, refer to
“Adaptive Cruise Control (ACC)” in
“Understanding The Features Of
Your Vehicle”.
Park Assist
The Rear Park Assist system will scan
for objects behind the vehicle when
the transmission shift lever is in RE-
VERSE and the vehicle speed is less
177
Page 185 of 332
Rain Sensing Auto Wipers (for
versions/markets, where provided)
When this feature is selected, the sys-
tem will automatically activate the
windshield wipers if it senses moisture
on the windshield. To make your se-
lection, touch the Rain Sensing soft-
key, until a check-mark appears next
to setting, showing that setting has
been selected. Touch the back arrow
soft-key to return to the previous
menu.
Hill Start Assist
When this feature is selected, the Hill
Start Assist (HSA) system is active.
Refer to “Electronic Brake Control
System” in “Starting And Operating”
for system function and operating in-
formation. To make your selection,
touch the Hill Start Assist soft-key,
until a check-mark appears next to
setting, showing that setting has been
selected. Touch the back arrow soft-
key to return to the previous menu.
Lights
After pressing the Lights soft-key the
following settings will be available. Headlight Off Delay
When this feature is selected, the
driver can choose to have the head-
lights remain on for 0, 30, 60, or 90
seconds when exiting the vehicle. To
change the Headlight Off Delay status
touch the 0, 30, 60 or 90 soft-key.
Then touch the arrow back soft-key.
Headlight Illumination On Ap-
proach
When this feature is selected, the
headlights will activate and remain on
for 0, 30, 60, or 90 seconds when the
doors are unlocked with the Remote
Keyless Entry (RKE) transmitter. To
change the Illuminated Approach sta-
tus, touch the + or - soft-key to select
your desired time interval. Touch the
back arrow soft-key to return to the
previous menu.
Headlights With Wipers (for
versions/markets, where provided)
When this feature is selected, and the
headlight switch is in the AUTO posi-
tion, the headlights will turn on ap-
proximately 10 seconds after the wip-
ers are turned on. The headlights willalso turn off when the wipers are
turned off if they were turned on by
this feature. To make your selection,
touch the Headlights With Wipers
soft-key, until a check-mark appears
next to setting, showing that setting
has been selected. Touch the back ar-
row soft-key to return to the previous
menu.
Auto Dim High Beams “Smart-
Beam™” (for versions/markets,
where provided)
When this feature is selected, the high
beam headlights will deactivate auto-
matically under certain conditions. To
make your selection, touch the Auto
High Beams soft-key, until a check-
mark appears next to setting, showing
that setting has been selected. Touch
the back arrow soft-key to return to
the previous menu. Refer to “Lights/
SmartBeam™ (for versions/markets,
where provided)” in “Understanding
The Features Of Your Vehicle” for
further information.
179