change time Lancia Thesis 2006 Owner handbook (in English)
[x] Cancel search | Manufacturer: LANCIA, Model Year: 2006, Model line: Thesis, Model: Lancia Thesis 2006Pages: 386, PDF Size: 8.69 MB
Page 18 of 386
17
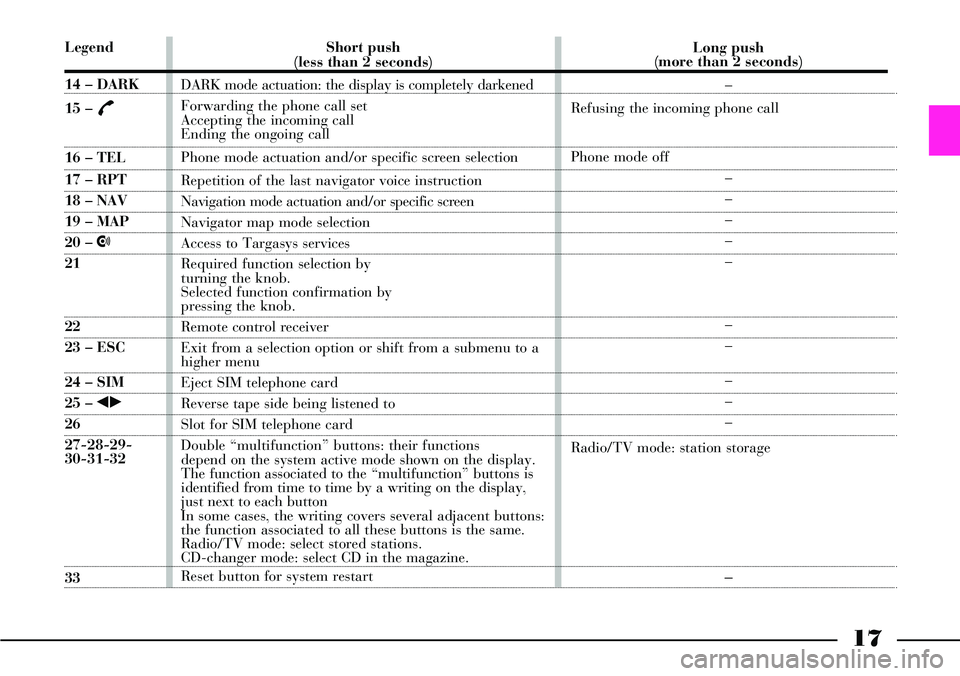
Legend
14 – DARK
15 –
£
16 – TEL
17 – RPT
18 – NAV
19 – MAP
20 – •
21
22
23 – ESC
24 – SIM
25 – ¯˙
26
27-28-29-
30-31-32
33Short push
(less than 2 seconds)
DARK mode actuation: the display is completely darkened
Forwarding the phone call set
Accepting the incoming call
Ending the ongoing call
Phone mode actuation and/or specific screen selection
Repetition of the last navigator voice instruction
Navigation mode actuation and/or specific screen
Navigator map mode selection
Access to Targasys services
Required function selection by
turning the knob.
Selected function confirmation by
pressing the knob.
Remote control receiver
Exit from a selection option or shift from a submenu to a
higher menu
Eject SIM telephone card
Reverse tape side being listened to
Slot for SIM telephone card
Double “multifunction” buttons: their functions
depend on the system active mode shown on the display.
The function associated to the “multifunction” buttons is
identified from time to time by a writing on the display,
just next to each button
In some cases, the writing covers several adjacent buttons:
the function associated to all these buttons is the same.
Radio/TV mode: select stored stations.
CD-changer mode: select CD in the magazine.
Reset button for system restart Long push
(more than 2 seconds)
–
Refusing the incoming phone call
Phone mode off
–
–
–
–
–
–
–
–
–
–
Radio/TV mode: station storage–
Page 81 of 386
80
Under no circumstances
should the components of
the seat belts and preten-
sioner be tampered with or
removed. Any operation should
be carried out by qualified and
authorised personnel. Always
contact a Lancia Dealership.
If the belt has been subjected to
heavy stress, for example after an
accident, it should be changed
completely together with the
anchors, anchor fastening screws
and the pretensioners. In fact,
even if the belt has no visible
defects, it could have lost its
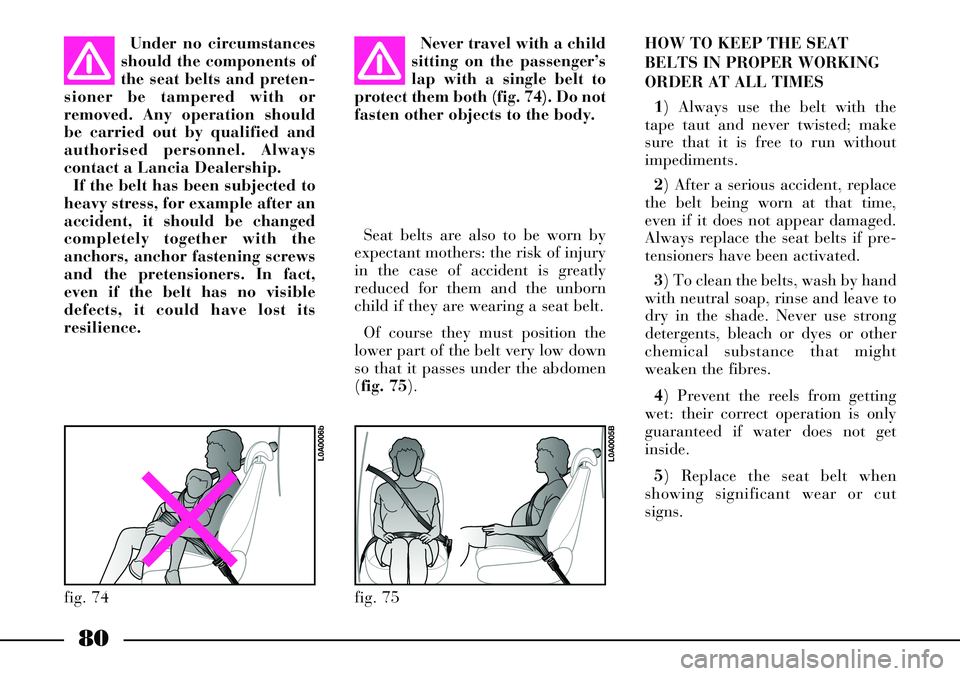
resilience.Never travel with a child
sitting on the passenger’s
lap with a single belt to
protect them both (fig. 74). Do not
fasten other objects to the body.
Seat belts are also to be worn by
expectant mothers: the risk of injury
in the case of accident is greatly
reduced for them and the unborn
child if they are wearing a seat belt.
Of course they must position the
lower part of the belt very low down
so that it passes under the abdomen
(fig. 75).HOW TO KEEP THE SEAT
BELTS IN PROPER WORKING
ORDER AT ALL TIMES
1) Always use the belt with the
tape taut and never twisted; make
sure that it is free to run without
impediments.
2) After a serious accident, replace
the belt being worn at that time,
even if it does not appear damaged.
Always replace the seat belts if pre-
tensioners have been activated.
3) To clean the belts, wash by hand
with neutral soap, rinse and leave to
dry in the shade. Never use strong
detergents, bleach or dyes or other
chemical substance that might
weaken the fibres.
4) Prevent the reels from getting
wet: their correct operation is only
guaranteed if water does not get
inside.
5) Replace the seat belt when
showing significant wear or cut
signs.
fig. 75
L0A0005B
fig. 74
L0A0006b
Page 100 of 386
99
Twilight sensor
It is composed by an infrared led
sensor installed on the windscreen in
order to detect the changes of the
external light intensity of the car , as
a function of the light sensitivity set;
greater is the sensitivity, smaller is
the amount of external light neces-
sary to control the switching-on of
the exterior headlights.
It consists of two sensors: a global
sensor for evaluating environment
light intensity and a directional one
for evaluating light intensity in run-
ning direction in order to recognize
tunnels, dark road sections, etc.When ring Ais turned to AUTO
(automatic light switching on), and
the twilight sensor is malfunction-
ing, side/taillights and dipped beam
headlights are switched on regard-
less of the light intensity and the dis-
play on the instrument panel shows
the message “TWILIGHT SENSOR
FAULT – GO TO DEALER”.
Failure indication will stay on as
long as ring Ais turned to AUTO. In
this case it is recommended to deac-
tivate the automatic function and
switch on the lights manually; con-
tact a Lancia Dealershipas soon as
possible.Delayed light switching off
(“Follow me home” device)
This device allows the illumination
of the space in front of the car for a
length of time of 30 seconds (or a
multiple of 30) and is activated with
the ignition key at STOPor
removed.
This device is activated by pulling
towards the steering wheel and then
releasing the left-hand stalk within 2
minutes from when the engine is
turned off. At each operation of the
stalk, the staying on of the lights is
extended by 30 seconds, up to a
maximum of 210 seconds that corre-
spond to 7 stalk operations, then the
lights are switched off automatical-
ly.
Total set time (in seconds) is
shown on the instrument panel dis-
play for about 20 seconds.
Page 102 of 386
101
IMPORTANTThis operation will
flash the main beam headlights.
Follow the Highway Code to prevent
being fined.
Direction indicators (fig. 96)
Move the stalk as follows:
up (position A) - to switch on the
right-hand indicators
down (position B) - to switch on
the left-hand indicators.
When direction indicators are on,
instrument panel warning light
Ÿor
∆will flash.
The direction indicators return
automatically to neutral position
when the car straightens up.
IMPORTANTIf you want the indi-
cator to flash briefly to show that
you are about to change lane, move
the stalk up or down without click-
ing into position. When you let it go
it will return to its original position.RIGHT-HAND STALK
The right-hand stalk controls all
the washer/wiper controls.
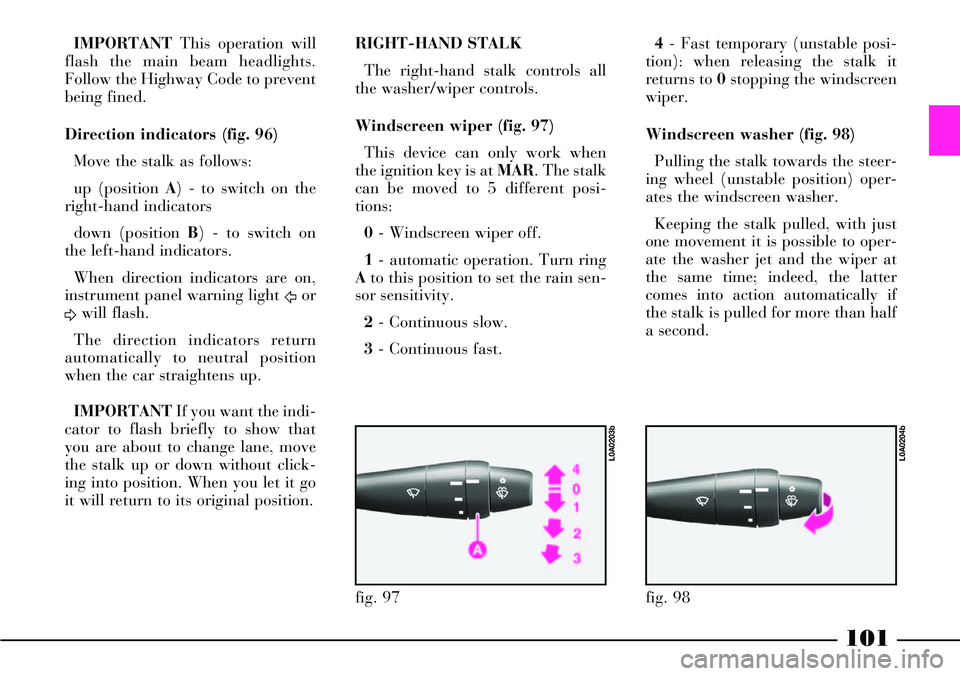
Windscreen wiper (fig. 97)
This device can only work when
the ignition key is at MAR. The stalk
can be moved to 5 different posi-
tions:
0- Windscreen wiper off.
1- automatic operation. Turn ring
Ato this position to set the rain sen-
sor sensitivity.
2- Continuous slow.
3- Continuous fast.4- Fast temporary (unstable posi-
tion): when releasing the stalk it
returns to 0stopping the windscreen
wiper.
Windscreen washer (fig. 98)
Pulling the stalk towards the steer-
ing wheel (unstable position) oper-
ates the windscreen washer.
Keeping the stalk pulled, with just
one movement it is possible to oper-
ate the washer jet and the wiper at
the same time; indeed, the latter
comes into action automatically if
the stalk is pulled for more than half
a second.
fig. 97
L0A0203b
fig. 98
L0A0204b
Page 120 of 386
119
ABS SYSTEM FAILURE
Turning the ignition key
to MAR, the instrument
panel warning light turns on but it
should go off after a few seconds.
When there is failure the warning
light stays on or comes on when
travelling together with message
“ABS SYSTEM FAULT” on the
multifunction display. In this case
the braking system keeps its effec-
tiveness unchanged, but without the
potential offered by the ABS system.
It is however recommended to con-
tact a Lancia Dealershipas soon
as possible.
In the event of instrument panel
warning light failure, the warning
light on the multifunction display
comes on together with message
“ABS INDICATOR FAULT”: con-
tact a Lancia Dealership as soon
as possible.In this case heavy brak-
ing may cause the rear
wheels to lock before
time, with the possibility of skid-
ding, stop the car immediately
and contact a Lancia Dealership.
>
EBD SYSTEM
FAULT
(ELECTRONIC
BRAKEFORCE DISTRIBUTOR)
The car is fitted with electronic
braking distributor (EBD). The
turning on at the same time of the
xand >warning lights on the
instrument panel together with mes-
sage “EBD SYSTEM FAULT” on
the multifunction display with the
engine running indicates an EBD
system failure.
x>
If the xwarning light
comes on when travelling,
stop immediately and
contact a Lancia Dealership.
In the event of instrument panel
warning light failure, the warning
light on the multifunction display
comes on together with message
“BRAKE FLUID INDICATOR
FAULT”: contact a Lancia
Dealership as soon as possible.
Page 152 of 386
151
HOW TO USE THE CLIMATE
CONTROL SYSTEM
The system can be switched on in
various ways. We recommend start-
ing by pressing the AUTObutton
and setting the required tempera-
tures on the display.
Since the system controls three
areas of the passenger compartment,
the driver and the front/back pas-
sengers can select different tempera-
ture values, with a maximum differ-
ence accepted by the system of 7 °
C.
In this way, the system will start
working fully automatically to reach
the required temperature as soon as
possible. It will maintain the tem-
perature by adjusting the amount
and distribution pattern of the air let
into the passenger compartment and
manage the recirculation function
and the climate control system com-
pressor.When the system is working auto-
matically, the only possible manual
functions are:
– MONO, to align air temperature
and distribution on the passenger
side or in the back-seat passengers’
area with that on the driver side;
– REAR, to activate the back con-
trol panel;
– √, to switch off the compressor:
in these conditions the system works
only as a heater;
– air recirculation, to keep recircu-
lation always turned on or off;
–-, for faster defrosting/demist-
ing the front windows, rear window,
external rearview mirrors and wind-
screen wiper nozzles;
– (,for defrosting/demisting the
heated rear window and external
rearview mirrors.The temperature, air distribution
and fan speed settings can be
changed at any time during auto-
matic system operation. The system
will automatically adjust to the new
request. When the system is fully
working in automatic mode (FULL
AUTO), if air distribution and/or
flow is changed, definition FULL
disappears. In this way functions
pass from the automatic mode to the
manual mode, until button AUTOis
pressed again. There is only one fan
speed for all the passenger compart-
ment areas and it can be changed
also by operating back controls,
when activated.
With one or more functions manu-
ally on, the air temperature let into
the passenger compartment is auto-
matically managed by the system
unless the climate control compres-
sor is off. In this condition, in fact,
the air inlet into the passenger com-
partment cannot have a lower tem-
perature than that of the external
air.
Page 158 of 386

The climate control system can be
deactivated also by the rear control
panel, when operating: press repeat-
edly or keep pressed button 7 (fig.
122) until all the fan bars on the dis-
play turn off and message OFFis
displayed.
To exclude the rear control panel,
press again button REAR; the but-
ton led turns off and the front-seat
passenger’s controls are operating
again.
Air recirculation on/off button
(3 fig. 121)
The air recirculation function is
controlled according to three strate-
gies:
– automatic operation (button left
led on);
– forced ventilation on (recircula-
tion always on), the right led on the
button will come on;– forced deactivation off (recircula-
tion always off, air taken from the
outside), both leds on the button will
go off.
The three conditions are obtained
by pressing the air recirculation but-
ton 3in sequence.
When the air recirculation function
is automatically controlled by the
system, the left led on the air recir-
culation button is turned on, while
the right led is on or off according to
the actual recirculation conditions
(on or off).
During automatic operation, the
recirculation function is automati-
cally switched on when the pollution
sensor detects the presence of pollut-
ed air, e.g. in cities, queues, tunnels
and during windscreen wiper opera-
tion (due to the characteristic smell
of alcohol). In addition, if the compressor is on
and the outside temperature is over
5 °C, to prevent air polluted by
exhaust gases getting inside the pas-
senger compartment during stops,
the system stops air recirculation
when the car speed is lower than 6
km/h. When the car speed returns
over 12 km/h, the system restores
the previous conditions.
After using the air recirculation
function for a long time (over 15
consecutive minutes), the system
automatically stops it for safety rea-
sons, thus letting air be changed.
When air recirculation manual
control is set (button left led off),
message FULLon the display is off.
157
Page 168 of 386

167
This control is accepted by CON-
NECT only if:
– outside temperature lower than 20
°C
– coolant temperature lower than 50
°C
– the ignition key is at STOPor re-
moved
– car battery charged
– sufficient fuel level
– the timer is deactivated.
Switching the heater on
To switch the heater on, press the
remote control button ONfor 1 or 2
seconds, while keeping the antenna in
vertical position; the positive or un-
successful activation is indicated by
the remote control red led Bin the fol-
lowing way:
– the led turns on for about 2 sec-
onds = the signal has been correctly
received and the heater has been ac-
tivated– the led flashes for about 2 seconds
= the signal has not been received.
In the latter case you are advised to
move before trying to activate it by
pressing again the ONbutton.
After the confirmation activation,
the led Bwill flash every 2 seconds for
the whole operation cycle duration.
IMPORTANTIf led Bturns on with
green colour, press twice both remote
control buttons ONand OFFwithin 1
second to set the red colour.
Activation length
When pressing the remote control
button ONthe last recorded activa-
tion length is always activated.
To see the recorded length, press at
the same time for three consecutive
times within 1 second, the remote
control buttons ONand OFF, count
the number of flashes of led Bthen
compare them to those shown in the
table below, including also the first
flash appearing the third time you
press the buttons. Default activation length is 30 min-
utes but it can be changed through
the following procedure:
– press at the same time for three
consecutive times within 1 second, the
remote control buttons ONand OFF
– count the number of flashes of led
Bincluding also the first flash ap-
pearing the third time you press but-
tons ONand OFF
– press OFFto set the length suc-
cessive to the set one (press OFFfor
several times to set the required
length in sequence)
– wait for about 10 seconds for timer
storing.
Page 180 of 386

179
The car is fitted also with an emer-
gency button A(fig. 134), placed in
the boot right compartment, which
can be used to unblock the car if it has
been stopped on the road for a break-
down or an accident and the key can-
not be turned to MAR(accident with
fire risk). To reach the button remove
the compartment cover turning the
catch A(fig. 135) to 1with the igni-
tion key.
To disengage the parking brake
through the emergency button pro-
ceed as follows:
– press and release the main button
on the central console
– press and release the emergency
button in the boot
– press again and release the main
button on the central console.
The time elapsed between these
operations should be lower than 30
seconds.MANUAL GEARBOX
To engage the gears, press down
the clutch and put the gear lever into
one of the positions shown in the
diagram (fig. 136); the diagram is
also on the gear lever knob.
To engage reverse (R), wait for the
car to come to a standstill and lift
the ring Aunder the knob (with the
fingers of the hand operating the
lever).
Release the ring after engaging
reverse gear. You do not need to lift
the ring to disengage reverse.To change gear properly
you must push the clutch
pedal fully down. It is
therefore essential that there is
nothing under the pedals: make
sure mats are lying flat and do
not get in the way of the pedals.
Reverse can only be
engaged when the car is at
a standstill. Wait for two
seconds or longer with the clutch
fully pressed before engaging
reverse when the engine is run-
ning to prevent scraping and
damaging the gears.
Do not drive with your
hand resting on the gear
stick as the force exerted,
even if only slight, could lead to
premature wearing of the gear-
box internal components.
fig. 136
L0A0357b
Page 192 of 386

191
To make ESP, ASR and
ABS systems work prop-
erly, the tyres must
absolutely be of the same brand
and type on all wheels, in perfect
conditions and, above all, of type,
brand and size specified. stantly changed and controlled in
the attempt to keep the driver’s
direction.
The ESP system considerably
increases the car safety in several
critical conditions and it is particu-
larly useful during overtaking, when
the grip conditions on the road bed
change.ASR FUNCTION (ANTISLIP
REGULATION)
General
The ASR function is part of the
ESP system and it checks the car
drive, taking action every time one
or both driving wheels slip, thus pre-
venting car instability and tyre wear.
On the basis of slipping conditions,
two different check systems are acti-
vated:
– if slipping affects both driving
wheels, as a result of the excessive
force transmitted, the ASR function
reduces the power supplied by the
engine;
– if slipping affects only one of the
driving wheels, the ASR function
automatically brakes the slipping
wheel, with an effect similar to the
self-locking differential.The action of the ASR function is
particularly useful in the following
conditions:
– internal wheel slipping when cor-
nering due to load dynamic varia-
tions and excessive acceleration;
– excessive power supplied to
wheels according to the road bed;
– acceleration on slippery ground,
covered with snow or ice;
– in case of grip loss on wet ground
(aquaplaning).
ASR function activation
The ASR function is activated
automatically whenever the engine
is started.
During driving it is possible to dis-
engage and engage this function by
pressing button A(fig. 142) on the
central console.
When the ASR function is on, sym-
bol Vis lighted on the multifunc-
tion display together with the mes-
sage “ASR ON”.