lumbar support Lancia Thesis 2006 Owner handbook (in English)
[x] Cancel search | Manufacturer: LANCIA, Model Year: 2006, Model line: Thesis, Model: Lancia Thesis 2006Pages: 386, PDF Size: 8.69 MB
Page 62 of 386

61
fig. 41- Electrically adjustable
seats, position memorization and
heating
A- Height and back and forth
adjustment, reclining
B- Back rest angle and head
restraint position
C- Lumbar adjustment
D- Seat position memorization
buttons
E- Heating.
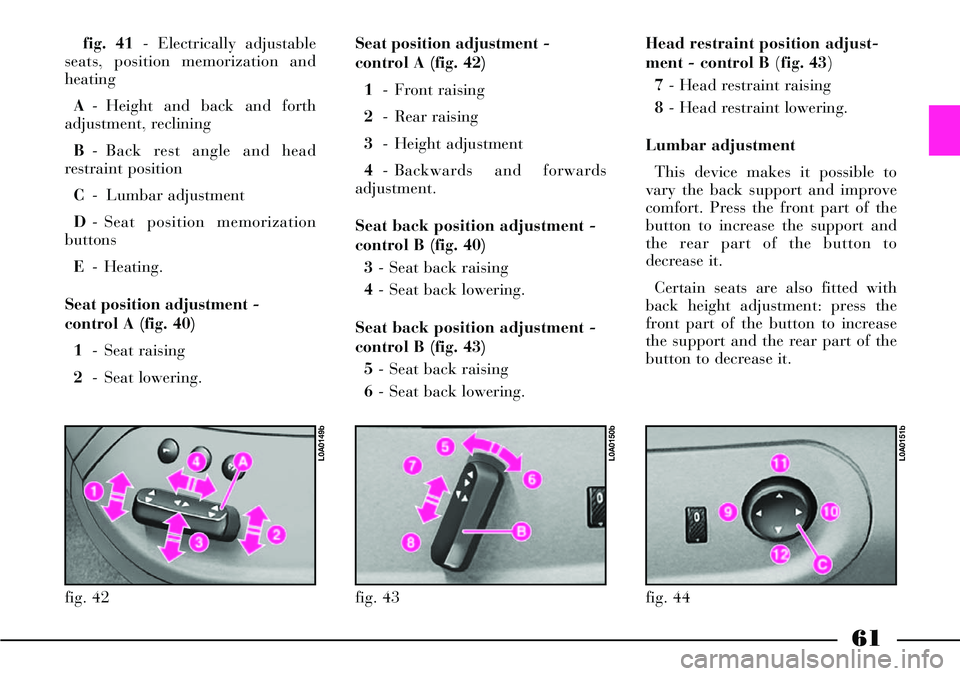
Seat position adjustment -
control A (fig. 40)
1- Seat raising
2- Seat lowering.Seat position adjustment -
control A (fig. 42)
1- Front raising
2- Rear raising
3- Height adjustment
4- Backwards and forwards
adjustment.
Seat back position adjustment -
control B (fig. 40)
3- Seat back raising
4- Seat back lowering.
Seat back position adjustment -
control B (fig. 43)
5- Seat back raising
6- Seat back lowering.
fig. 42
L0A0149b
fig. 43
L0A0150b
fig. 44
L0A0151b
Head restraint position adjust-
ment - control B (fig. 43)
7 - Head restraint raising
8- Head restraint lowering.
Lumbar adjustment
This device makes it possible to
vary the back support and improve
comfort. Press the front part of the
button to increase the support and
the rear part of the button to
decrease it.
Certain seats are also fitted with
back height adjustment: press the
front part of the button to increase
the support and the rear part of the
button to decrease it.
Page 63 of 386

62
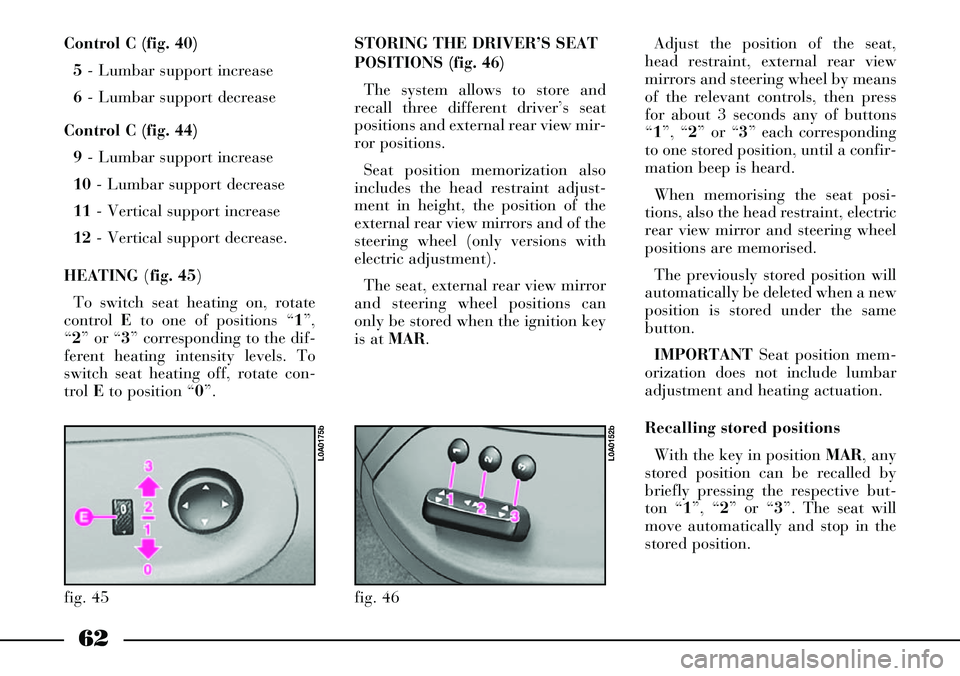
Control C (fig. 40)
5- Lumbar support increase
6- Lumbar support decrease
Control C (fig. 44)
9- Lumbar support increase
10- Lumbar support decrease
11- Vertical support increase
12- Vertical support decrease.
HEATING (fig. 45)
To switch seat heating on, rotate
control Eto one of positions “1”,
“2” or “3” corresponding to the dif-
ferent heating intensity levels. To
switch seat heating off, rotate con-
trol Eto position “0”.
fig. 45
L0A0175b
STORING THE DRIVER’S SEAT
POSITIONS (fig. 46)
The system allows to store and
recall three different driver’s seat
positions and external rear view mir-
ror positions.
Seat position memorization also
includes the head restraint adjust-
ment in height, the position of the
external rear view mirrors and of the
steering wheel (only versions with
electric adjustment).
The seat, external rear view mirror
and steering wheel positions can
only be stored when the ignition key
is at MAR.Adjust the position of the seat,
head restraint, external rear view
mirrors and steering wheel by means
of the relevant controls, then press
for about 3 seconds any of buttons
“1”, “2” or “3” each corresponding
to one stored position, until a confir-
mation beep is heard.
When memorising the seat posi-
tions, also the head restraint, electric
rear view mirror and steering wheel
positions are memorised.
The previously stored position will
automatically be deleted when a new
position is stored under the same
button.
IMPORTANTSeat position mem-
orization does not include lumbar
adjustment and heating actuation.
Recalling stored positions
With the key in position MAR, any
stored position can be recalled by
briefly pressing the respective but-
ton “1”, “2” or “3”. The seat will
move automatically and stop in the
stored position.
fig. 46
L0A0152b
Page 69 of 386

68
COMFORT SEATS
Side Comfort seats are fitted with
independent control buttons for
heating, lumbar adjustment, mas-
sage and adjusting function; these
controls are located inside the arm-
rest.
The armrest compartment houses
also the button for moving the front
passenger seat and the button con-
trolling the electric sunshade.
Controls are operative in one of the
following conditions:
– ignition switch to MAR
– for approx. 1 minute after
removing the ignition key or turning
it to STOP– for approx. 3 minutes with key
removed or turned to STOPand
with door open.
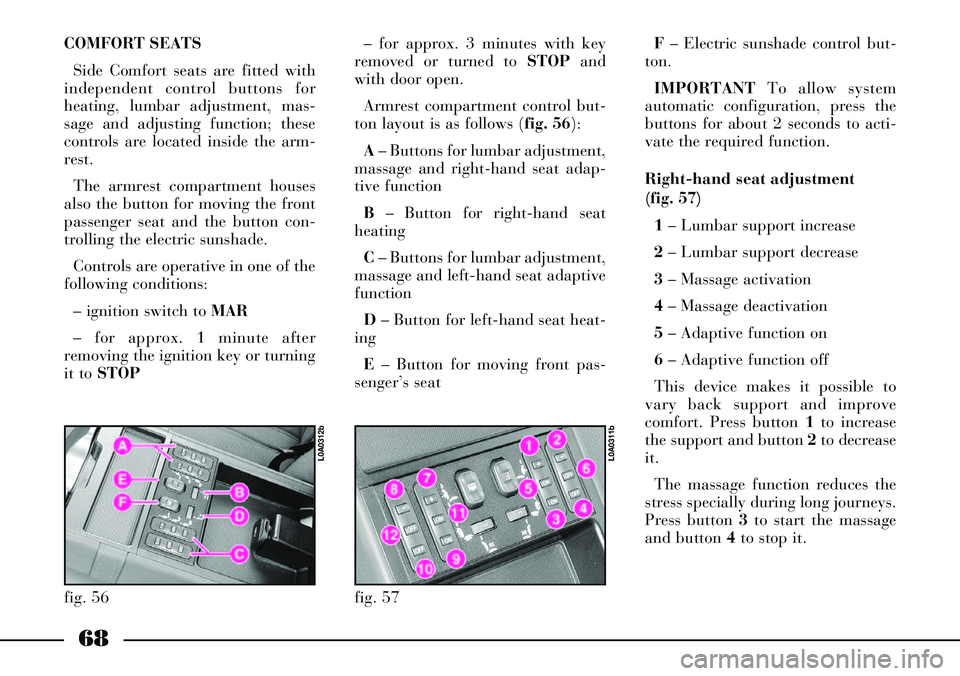
Armrest compartment control but-
ton layout is as follows (fig. 56):
A– Buttons for lumbar adjustment,
massage and right-hand seat adap-
tive function
B– Button for right-hand seat
heating
C– Buttons for lumbar adjustment,
massage and left-hand seat adaptive
function
D– Button for left-hand seat heat-
ing
E– Button for moving front pas-
senger’s seatF– Electric sunshade control but-
ton.
IMPORTANTTo allow system
automatic configuration, press the
buttons for about 2 seconds to acti-
vate the required function.
Right-hand seat adjustment
(fig. 57)
1 – Lumbar support increase
2– Lumbar support decrease
3– Massage activation
4– Massage deactivation
5– Adaptive function on
6– Adaptive function off
This device makes it possible to
vary back support and improve
comfort. Press button 1to increase
the support and button 2to decrease
it.
The massage function reduces the
stress specially during long journeys.
Press button 3to start the massage
and button 4to stop it.
fig. 56
L0A0312b
fig. 57
L0A0311b
Page 70 of 386

69
The adaptive function makes it
possible to adapt the seat back to the
passenger thus improving comfort
and back support. Press button 5to
activate this function and button 6
to deactivate it.
Right-hand seat heating – Button
B (fig. 56)
To switch seat heating on, turn
knob to “1”, “2” or “3” that corre-
spond to the different warming lev-
els. To switch seat heating off, turn
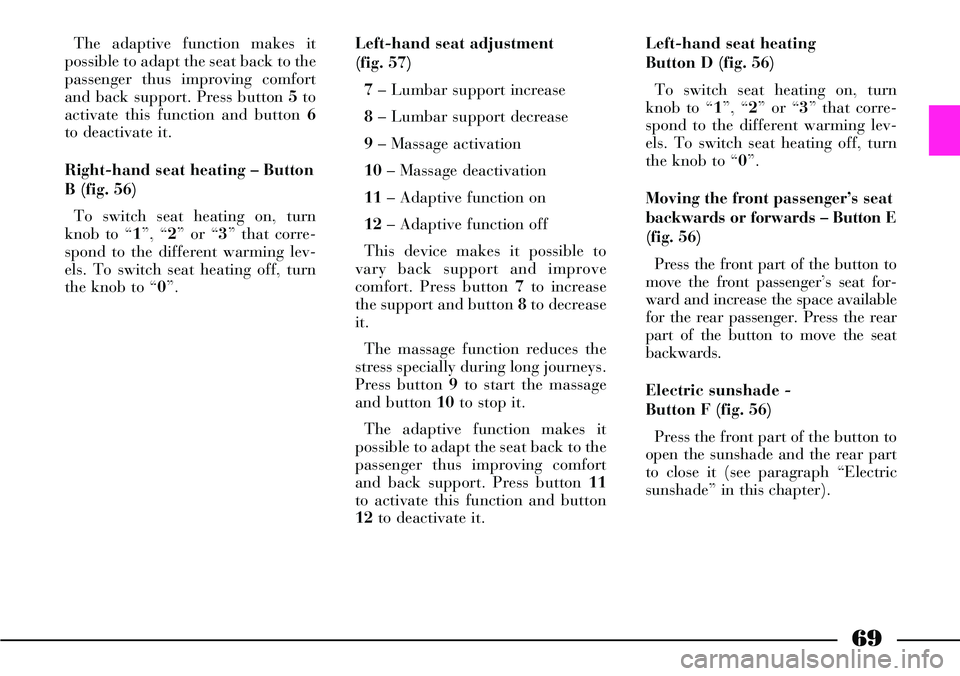
the knob to “0”.Left-hand seat adjustment
(fig. 57)
7– Lumbar support increase
8– Lumbar support decrease
9 – Massage activation
10– Massage deactivation
11– Adaptive function on
12– Adaptive function off
This device makes it possible to
vary back support and improve
comfort. Press button 7to increase
the support and button 8to decrease
it.
The massage function reduces the
stress specially during long journeys.
Press button 9to start the massage
and button 10to stop it.
The adaptive function makes it
possible to adapt the seat back to the
passenger thus improving comfort
and back support. Press button 11
to activate this function and button
12to deactivate it.Left-hand seat heating
Button D (fig. 56)
To switch seat heating on, turn
knob to “1”, “2” or “3” that corre-
spond to the different warming lev-
els. To switch seat heating off, turn
the knob to “0”.
Moving the front passenger’s seat
backwards or forwards – Button E
(fig. 56)
Press the front part of the button to
move the front passenger’s seat for-
ward and increase the space available
for the rear passenger. Press the rear
part of the button to move the seat
backwards.
Electric sunshade -
Button F (fig. 56)
Press the front part of the button to
open the sunshade and the rear part
to close it (see paragraph “Electric
sunshade” in this chapter).