remove seats Lancia Thesis 2006 Owner handbook (in English)
[x] Cancel search | Manufacturer: LANCIA, Model Year: 2006, Model line: Thesis, Model: Lancia Thesis 2006Pages: 386, PDF Size: 8.69 MB
Page 61 of 386

60
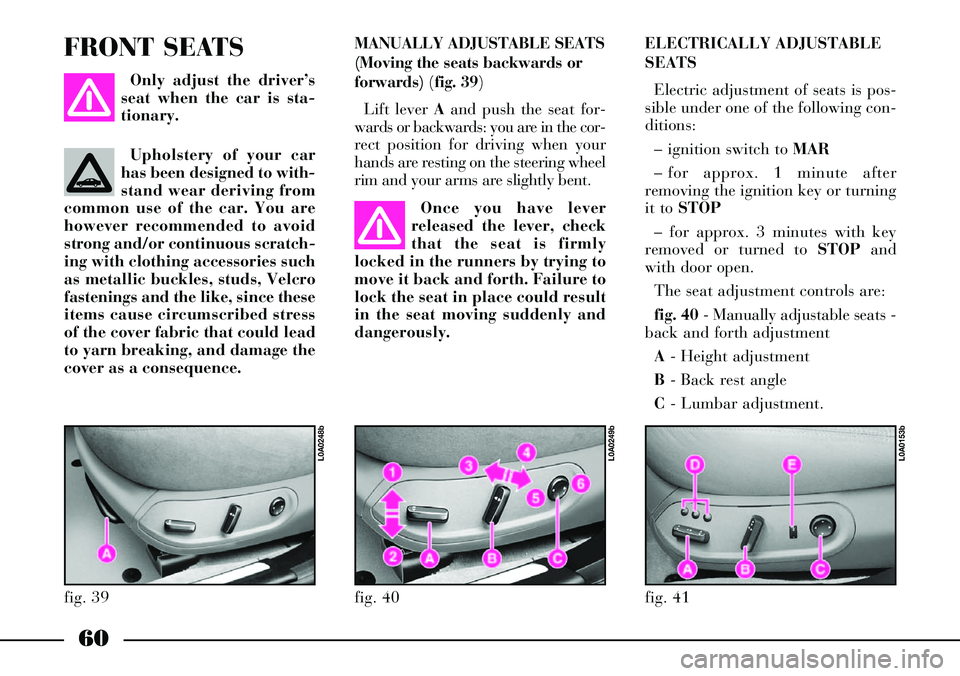
MANUALLY ADJUSTABLE SEATS
(Moving the seats backwards or
forwards) (fig. 39)
Lift lever Aand push the seat for-
wards or backwards: you are in the cor-
rect position for driving when your
hands are resting on the steering wheel
rim and your arms are slightly bent. FRONT SEATS
Only adjust the driver’s
seat when the car is sta-
tionary.
Once you have lever
released the lever, check
that the seat is firmly
locked in the runners by trying to
move it back and forth. Failure to
lock the seat in place could result
in the seat moving suddenly and
dangerously.ELECTRICALLY ADJUSTABLE
SEATS
Electric adjustment of seats is pos-
sible under one of the following con-
ditions:
– ignition switch to MAR
– for approx. 1 minute after
removing the ignition key or turning
it to STOP
– for approx. 3 minutes with key
removed or turned to STOPand
with door open.
The seat adjustment controls are:
fig. 40- Manually adjustable seats -
back and forth adjustment
A- Height adjustment
B- Back rest angle
C- Lumbar adjustment.
fig. 39
L0A0248b
fig. 41
L0A0153b
fig. 40
L0A0249b
Upholstery of your car
has been designed to with-
stand wear deriving from
common use of the car. You are
however recommended to avoid
strong and/or continuous scratch-
ing with clothing accessories such
as metallic buckles, studs, Velcro
fastenings and the like, since these
items cause circumscribed stress
of the cover fabric that could lead
to yarn breaking, and damage the
cover as a consequence.
Page 67 of 386

66
REAR SEATS
HEAD RESTRAINTS
The 3 rear head restraints (fig. 50-
51) can be adjusted for height. To
adjust, move the head restraint
upwards or downwards according to
the most suitable position.
Rear head restraints cannot be
removed.Remember that the head
restraints should be
adjusted to support the
back of your head and not your
neck. Only if they are in this posi-
tion will they be able to provide
effective protection in the event of
a rear-end shunt. Certain versions (where provided)
have a button A(fig. 52) on the cen-
tral console for lowering, with igni-
tion key at MAR, the rear side head
restraints.
fig. 50
L0A0166b
fig. 51
L0A0165b
fig. 52
L0A0168b
Page 69 of 386

68
COMFORT SEATS
Side Comfort seats are fitted with
independent control buttons for
heating, lumbar adjustment, mas-
sage and adjusting function; these
controls are located inside the arm-
rest.
The armrest compartment houses
also the button for moving the front
passenger seat and the button con-
trolling the electric sunshade.
Controls are operative in one of the
following conditions:
– ignition switch to MAR
– for approx. 1 minute after
removing the ignition key or turning
it to STOP– for approx. 3 minutes with key
removed or turned to STOPand
with door open.
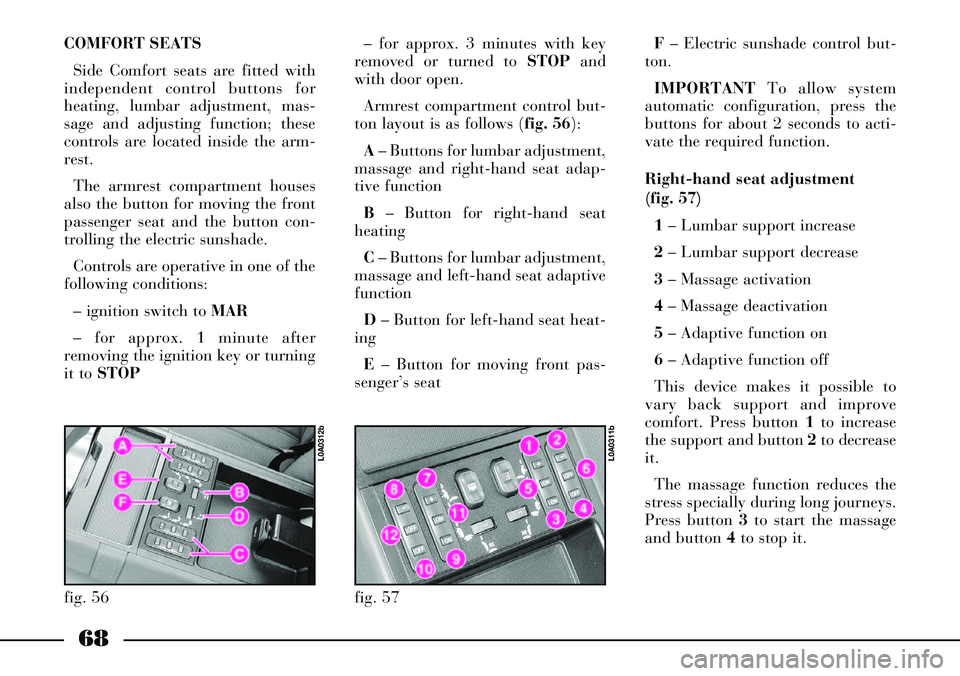
Armrest compartment control but-
ton layout is as follows (fig. 56):
A– Buttons for lumbar adjustment,
massage and right-hand seat adap-
tive function
B– Button for right-hand seat
heating
C– Buttons for lumbar adjustment,
massage and left-hand seat adaptive
function
D– Button for left-hand seat heat-
ing
E– Button for moving front pas-
senger’s seatF– Electric sunshade control but-
ton.
IMPORTANTTo allow system
automatic configuration, press the
buttons for about 2 seconds to acti-
vate the required function.
Right-hand seat adjustment
(fig. 57)
1 – Lumbar support increase
2– Lumbar support decrease
3– Massage activation
4– Massage deactivation
5– Adaptive function on
6– Adaptive function off
This device makes it possible to
vary back support and improve
comfort. Press button 1to increase
the support and button 2to decrease
it.
The massage function reduces the
stress specially during long journeys.
Press button 3to start the massage
and button 4to stop it.
fig. 56
L0A0312b
fig. 57
L0A0311b
Page 95 of 386

94
fig. 93
L0A0272b
Any diagnostic, repair or replace-
ment operations concerning the
airbag system must exclusively be
carried out at a Lancia Dealership.
If you are having the car scrapped,
have the airbag system deactivated
at a Lancia Dealershipfirst.
If the car changes hands, the new
owner must be made aware of the
indications given above and be given
this Owner Handbook.
IMPORTANTPretensioners, front
airbags and side bags are activated
by the electronic control unit
according to the type of impact.
Consequently, missed activation of
one or more system components
does not indicate a fault in the sys-
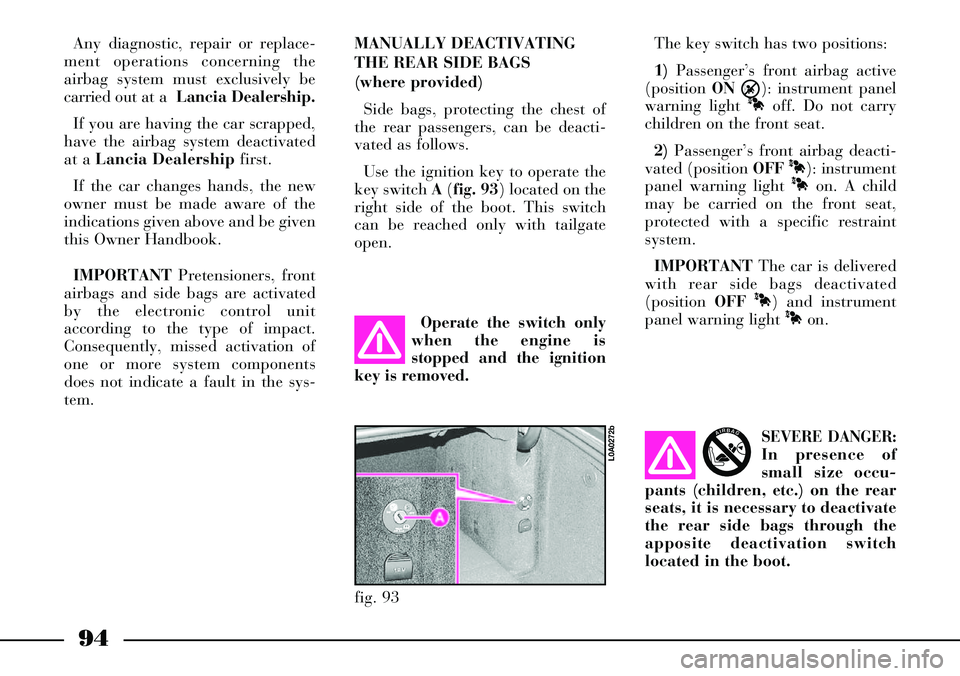
tem.MANUALLY DEACTIVATING
THE REAR SIDE BAGS
(where provided)
Side bags, protecting the chest of
the rear passengers, can be deacti-
vated as follows.
Use the ignition key to operate the
key switch A(fig. 93) located on the
right side of the boot. This switch
can be reached only with tailgate
open.The key switch has two positions:
1)Passenger’s front airbag active
(position ON
Õ): instrument panel
warning light
Àoff. Do not carry
children on the front seat.
2)Passenger’s front airbag deacti-
vated (position OFF
À): instrument
panel warning light
Àon. A child
may be carried on the front seat,
protected with a specific restraint
system.
IMPORTANTThe car is delivered
with rear side bags deactivated
(position OFF
À) and instrument
panel warning light
Àon.
Operate the switch only
when the engine is
stopped and the ignition
key is removed.
SEVERE DANGER:
In presence of
small size occu-
pants (children, etc.) on the rear
seats, it is necessary to deactivate
the rear side bags through the
apposite deactivation switch
located in the boot.
AIRBAG
Page 216 of 386

215
FRONT ASHTRAY AND CIGAR
LIGHTER
The ashtray and cigar lighter are
protected by a single flap. Press the
flap in the point shown (fig. 165).
Press button A(fig. 166) to work
the cigar lighter. After a few seconds
it will return to its initial position
and be ready for use.
The cigar lighter will only work
when the ignition key is at MAR.
Remove tray Bto empty the ash-
tray.Always verify that the
cigar lighter has been
switched off.
The cigar lighter gets
very hot. Be careful how
you handle it and make
sure it is not used by children:
danger of fire or burns.REAR ASHTRAYS (fig. 167)
Two ashtrays are provided for rear
seats: they are incorporated into rear
door panels.
To open the ashtray, press on the
point specified by the arrow.
To empty the ashtray, remove tray
A.
fig. 165
L0A0189b
fig. 166
L0A0188b
fig. 167
L0A0053b
Page 340 of 386

339
Engine compartment
At the end of each winter season,
carefully clean the engine compart-
ment without directing the water jet
against electronic control units.
Have this done at a garage.
Detergents pollute water.
For this reason the car
must be washed in an
area equipped for the collection
and purification of the liquids
used while washing.
IMPORTANTThe car should
washed with the engine cold and the
ignition key at STOP. After washing
make sure that the various protec-
tions (e.g. rubber caps and various
covers) have not been damaged or
removed.INTERIORS
From time to time check that water
has not collected under the mats
(from dripping shoes, umbrellas,
etc.) which could cause the steel to
rust.
Never use inflammable
products like fuel oil
ether or rectified petrol
for cleaning inside the car. The
electrostatic discharges generat-
ed when rubbing to clean may
cause fire.
Do not keep aerosol cans
in the car. There is the
risk they might explode.
Aerosol cans must never be
exposed to a temperature above
50°C; when the weather starts to
get hot the temperature inside the
car might go well beyond that fig-
ure.
PLASTIC PARTS INSIDE
THE CAR
Use special products designed not
to alter the appearance of the com-
ponents.
IMPORTANTDo not use alcohol
or petrol to clean the instrument
panel.
CLEANING ALCANTARA
SEATS
Alcantara upholstery is easy to
clean. Follow the same instructions
provided for velvet upholstery.
Page 341 of 386

340
CLEANING VELVET SEATS
AND FABRICS
– Remove dust with a soft brush
and vacuum cleaner. Use a moist
brush to clean velvet upholstery.
– Brush the seats with a damp
sponge with water and a neutral
soap.CLEANING LEATHER SEATS
– Remove the dry dirt with a
chamois leather or very slightly
moist loth without exerting too
much pressure.
– Remove liquid or grease stains
with a dry absorbent cloth without
rubbing. Then wipe with a chamois
leather or soft cloth moistened with
water and neutral soap. If the stain
does not come out, use a special
cleaning compound being particu-
larly careful to follow the instruc-
tions for use.
IMPORTANTNever use alcohol or
alcohol-based products.STEERING WHEEL/GEAR
LEVER KNOB WITH GENUINE
LEATHER COVERING
These components shall only be
cleaned with water and neutral soap.
Never use spirit or alcohol-based
products.
Before using special products for
cleaning interiors, read carefully label
instructions and indications to make
sure they are free from spirit and/or
alcohol-based substances.
If when cleaning the windscreen
with special glass products, some
drops fall on the leather covering of
the steering wheel/gear lever knob re-
move them immediately and then
clean with water and neutral soap.
IMPORTANT Take the utmost care
when engaging the steering lock to
prevent scratching the leather cover-
ing. Upholstery of your car
has been designed to with-
stand wear deriving from
common use of the car. You are
however recommended to avoid
strong and/or continuous scratch-
ing with clothing accessories such
as metallic buckles, studs, Velcro
fastenings and the like, since these
items cause circumscribed stress
of the cover fabric that could lead
to yarn breaking, and damage the
cover as a consequence.