seats Lancia Thesis 2006 Owner handbook (in English)
[x] Cancel search | Manufacturer: LANCIA, Model Year: 2006, Model line: Thesis, Model: Lancia Thesis 2006Pages: 386, PDF Size: 8.69 MB
Page 61 of 386
60
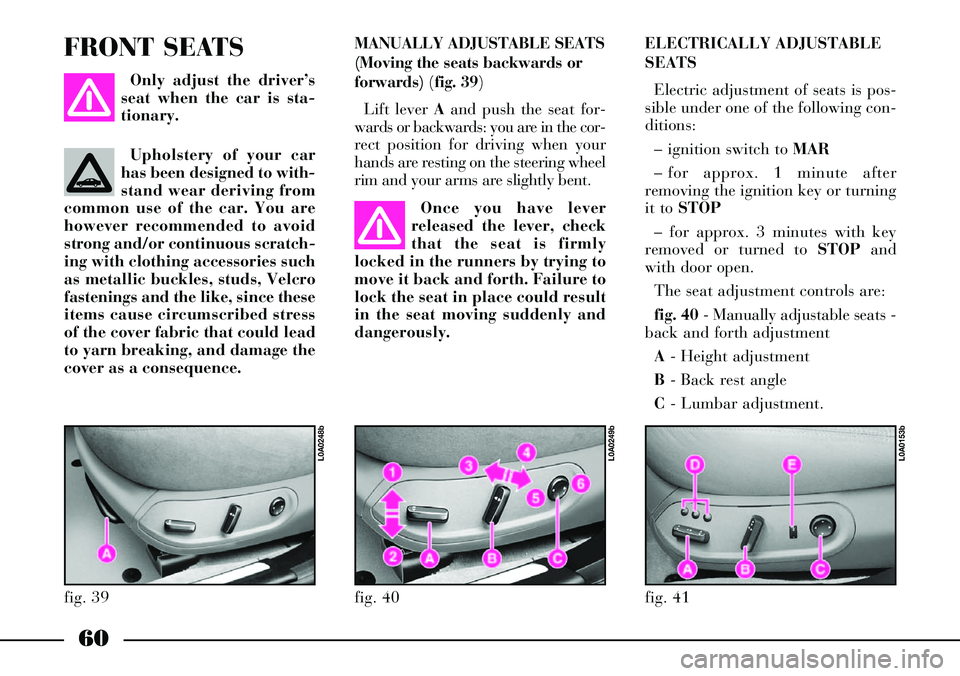
MANUALLY ADJUSTABLE SEATS
(Moving the seats backwards or
forwards) (fig. 39)
Lift lever Aand push the seat for-
wards or backwards: you are in the cor-
rect position for driving when your
hands are resting on the steering wheel
rim and your arms are slightly bent. FRONT SEATS
Only adjust the driver’s
seat when the car is sta-
tionary.
Once you have lever
released the lever, check
that the seat is firmly
locked in the runners by trying to
move it back and forth. Failure to
lock the seat in place could result
in the seat moving suddenly and
dangerously.ELECTRICALLY ADJUSTABLE
SEATS
Electric adjustment of seats is pos-
sible under one of the following con-
ditions:
– ignition switch to MAR
– for approx. 1 minute after
removing the ignition key or turning
it to STOP
– for approx. 3 minutes with key
removed or turned to STOPand
with door open.
The seat adjustment controls are:
fig. 40- Manually adjustable seats -
back and forth adjustment
A- Height adjustment
B- Back rest angle
C- Lumbar adjustment.
fig. 39
L0A0248b
fig. 41
L0A0153b
fig. 40
L0A0249b
Upholstery of your car
has been designed to with-
stand wear deriving from
common use of the car. You are
however recommended to avoid
strong and/or continuous scratch-
ing with clothing accessories such
as metallic buckles, studs, Velcro
fastenings and the like, since these
items cause circumscribed stress
of the cover fabric that could lead
to yarn breaking, and damage the
cover as a consequence.
Page 62 of 386
61
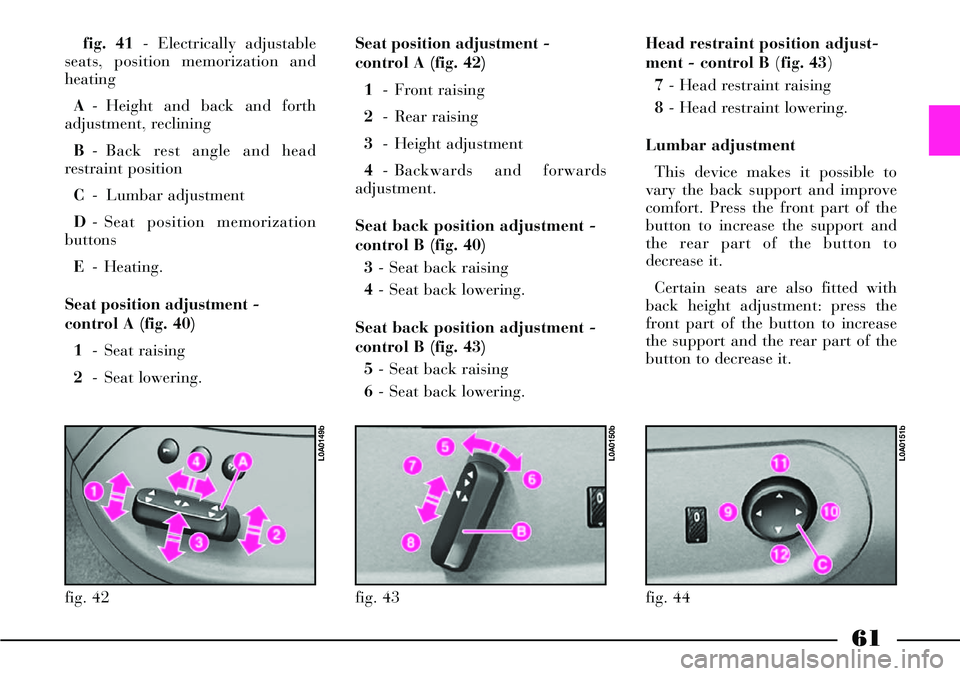
fig. 41- Electrically adjustable
seats, position memorization and
heating
A- Height and back and forth
adjustment, reclining
B- Back rest angle and head
restraint position
C- Lumbar adjustment
D- Seat position memorization
buttons
E- Heating.
Seat position adjustment -
control A (fig. 40)
1- Seat raising
2- Seat lowering.Seat position adjustment -
control A (fig. 42)
1- Front raising
2- Rear raising
3- Height adjustment
4- Backwards and forwards
adjustment.
Seat back position adjustment -
control B (fig. 40)
3- Seat back raising
4- Seat back lowering.
Seat back position adjustment -
control B (fig. 43)
5- Seat back raising
6- Seat back lowering.
fig. 42
L0A0149b
fig. 43
L0A0150b
fig. 44
L0A0151b
Head restraint position adjust-
ment - control B (fig. 43)
7 - Head restraint raising
8- Head restraint lowering.
Lumbar adjustment
This device makes it possible to
vary the back support and improve
comfort. Press the front part of the
button to increase the support and
the rear part of the button to
decrease it.
Certain seats are also fitted with
back height adjustment: press the
front part of the button to increase
the support and the rear part of the
button to decrease it.
Page 64 of 386
63
Stored position are recalled only if
the required position is different
from the current one and is not pos-
sible when the car speed exceeds 10
km/h.
Seats can be moved only when the
ignition key is at MARand, for
about 1 minute, also after removing
the key or turning it to STOP: dur-
ing this time, the external rear view
mirrors will not move, but when the
car is started again, they will be
automatically realigned together
with the seat position (see paragraph
“Automatic realignment of external
rear view mirrors”).
If stored seat position recalling is
still in course after this time has
elapsed, recalling will be concluded
in any case.If the engine is started during the
recalling stage, seat moving will be
stopped; once this stage is over the
seat will return automatically to the
stored position.
IMPORTANTPressing any of
memorisation or adjustment buttons
during the recalling stage, causes the
immediate stop of the seat (antipan-
ic mode).
Storing the “parking” position of
the external rear view mirror on
passenger side
You can achieve better visibility
during manoeuvres in reverse gear
(for instance, when parking the car)
by adjusting the external passenger
rear view mirror to a different posi-
tion from the one normally used.
This position can be stored by the
driver.To store the position proceed as
follows:
– with the car stopped and the igni-
tion key at MAR, engage the reverse
gear;
– adjust the position of the external
passenger rear view mirror by means
of the respective controls so as to
obtain the optimum position for the
parking manoeuvre;
– press down for at least 3 seconds
any of buttons “1”, “2” or “3” (fig.
46) used to store/recall the seat posi-
tion;
– together with the “parking” posi-
tion of the external passenger side
rear view mirror, also the seat posi-
tion, the driver rear view mirror
position and the driving position of
the external passenger side rear view
mirror are stored.
A sound signal warns the driver
that the mirror position has been
stored.
Page 65 of 386
64
fig. 47
L0A0310b
Recalling the “parking” position
of the external rear view mirror
on passenger side
To automatically recall the “park-
ing” position of the external passen-
ger rear view mirror, proceed as fol-
lows:
– with the car stopped and the igni-
tion key at MAR, engage the reverse
gear; the mirror will be automatical-
ly brought back to the previously
stored position .
If no “parking” position has been
stored, when engaging reverse the
passenger mirror slightly lowers
than normally to a preset position to
facilitate the driver during parking.
The rear view mirror will automat-
ically return to its initial position
after about 10 seconds from reverse
gear disengagement, or immediately
after exceeding a speed of 10 km/h
with forward gear. IMPORTANTThe “parking” posi-
tion memorisation and recall can
only be performed with ignition key
at MAR.
Automatic realignment
of external rear view mirrors
Every time the ignition key is
turned to MAR, the external rear
view mirrors automatically return to
the latest position reached and/or
recalled before removing the key.
This enables rear view mirror
alignment if, when the car is parked,
one of the rear view mirror has been
manually and/or accidentally
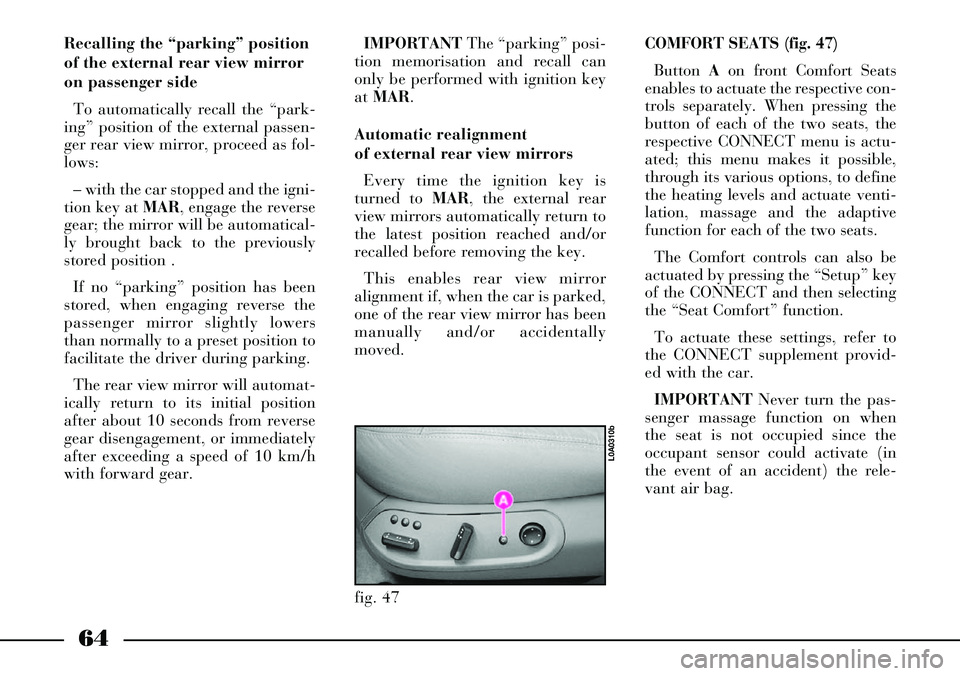
moved.COMFORT SEATS (fig. 47)
Button Aon front Comfort Seats
enables to actuate the respective con-
trols separately. When pressing the
button of each of the two seats, the
respective CONNECT menu is actu-
ated; this menu makes it possible,
through its various options, to define
the heating levels and actuate venti-
lation, massage and the adaptive
function for each of the two seats.
The Comfort controls can also be
actuated by pressing the “Setup” key
of the CONNECT and then selecting
the “Seat Comfort” function.
To actuate these settings, refer to
the CONNECT supplement provid-
ed with the car.
IMPORTANTNever turn the pas-
senger massage function on when
the seat is not occupied since the
occupant sensor could activate (in
the event of an accident) the rele-
vant air bag.
Page 67 of 386

66
REAR SEATS
HEAD RESTRAINTS
The 3 rear head restraints (fig. 50-
51) can be adjusted for height. To
adjust, move the head restraint
upwards or downwards according to
the most suitable position.
Rear head restraints cannot be
removed.Remember that the head
restraints should be
adjusted to support the
back of your head and not your
neck. Only if they are in this posi-
tion will they be able to provide
effective protection in the event of
a rear-end shunt. Certain versions (where provided)
have a button A(fig. 52) on the cen-
tral console for lowering, with igni-
tion key at MAR, the rear side head
restraints.
fig. 50
L0A0166b
fig. 51
L0A0165b
fig. 52
L0A0168b
Page 69 of 386
68
COMFORT SEATS
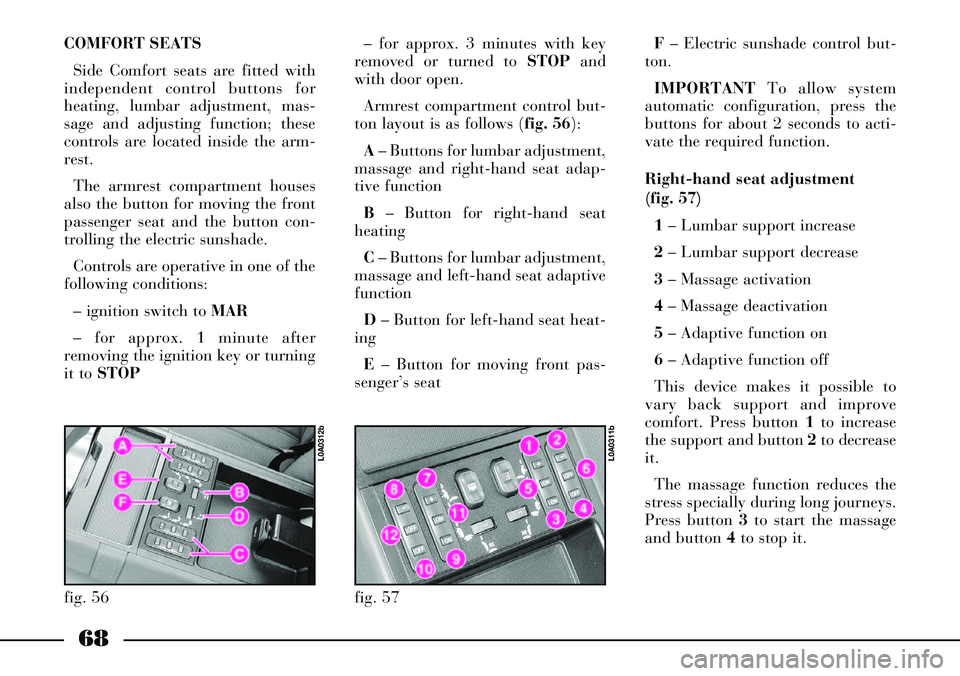
Side Comfort seats are fitted with
independent control buttons for
heating, lumbar adjustment, mas-
sage and adjusting function; these
controls are located inside the arm-
rest.
The armrest compartment houses
also the button for moving the front
passenger seat and the button con-
trolling the electric sunshade.
Controls are operative in one of the
following conditions:
– ignition switch to MAR
– for approx. 1 minute after
removing the ignition key or turning
it to STOP– for approx. 3 minutes with key
removed or turned to STOPand
with door open.
Armrest compartment control but-
ton layout is as follows (fig. 56):
A– Buttons for lumbar adjustment,
massage and right-hand seat adap-
tive function
B– Button for right-hand seat
heating
C– Buttons for lumbar adjustment,
massage and left-hand seat adaptive
function
D– Button for left-hand seat heat-
ing
E– Button for moving front pas-
senger’s seatF– Electric sunshade control but-
ton.
IMPORTANTTo allow system
automatic configuration, press the
buttons for about 2 seconds to acti-
vate the required function.
Right-hand seat adjustment
(fig. 57)
1 – Lumbar support increase
2– Lumbar support decrease
3– Massage activation
4– Massage deactivation
5– Adaptive function on
6– Adaptive function off
This device makes it possible to
vary back support and improve
comfort. Press button 1to increase
the support and button 2to decrease
it.
The massage function reduces the
stress specially during long journeys.
Press button 3to start the massage
and button 4to stop it.
fig. 56
L0A0312b
fig. 57
L0A0311b
Page 73 of 386
72
The mirrors are automatically
demisted/defrosted when the heated
rear window is operated.
IMPORTANTRearview mirror
surface is flat to make objects seem
at their actual distance. If the mirrors make it
difficult to get through
narrow gaps and in auto-
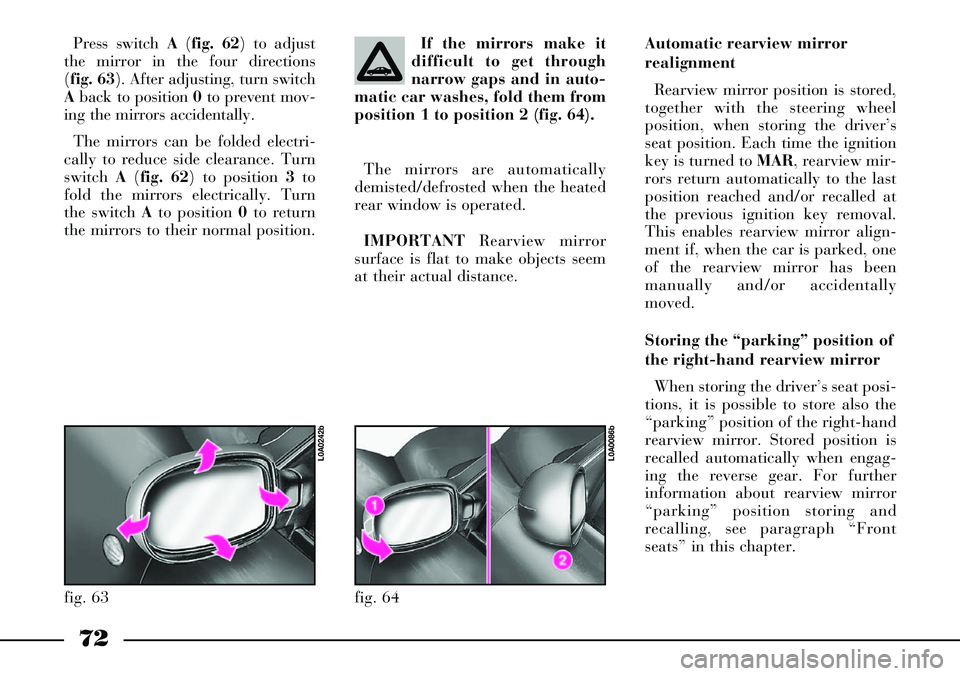
matic car washes, fold them from
position 1 to position 2 (fig. 64).Automatic rearview mirror
realignment
Rearview mirror position is stored,
together with the steering wheel
position, when storing the driver’s
seat position. Each time the ignition
key is turned to MAR, rearview mir-
rors return automatically to the last
position reached and/or recalled at
the previous ignition key removal.
This enables rearview mirror align-
ment if, when the car is parked, one
of the rearview mirror has been
manually and/or accidentally
moved.
Storing the “parking” position of
the right-hand rearview mirror
When storing the driver’s seat posi-
tions, it is possible to store also the
“parking” position of the right-hand
rearview mirror. Stored position is
recalled automatically when engag-
ing the reverse gear. For further
information about rearview mirror
“parking” position storing and
recalling, see paragraph “Front
seats” in this chapter.
fig. 64
L0A0086b
Press switch A(fig. 62) to adjust
the mirror in the four directions
(fig. 63). After adjusting, turn switch
Aback to position 0to prevent mov-
ing the mirrors accidentally.
The mirrors can be folded electri-
cally to reduce side clearance. Turn
switch A(fig. 62) to position 3to
fold the mirrors electrically. Turn
the switch Ato position 0to return
the mirrors to their normal position.
fig. 63
L0A0242b
Page 78 of 386
77
When the car is parked on a steep
slope the reel mechanism may block;
this is normal. The reel mechanism
prevents the webbing coming out
when it is jerked or if the car brakes
sharply, in a collision or when cor-
nering at high speed.
The rear seat is fitted with inertial
seat belts with three anchor points
and reel for the side and centre
seats.
Rear seat belts shall be worn as
shown in fig. 70.
To prevent incorrect fastening, the
tongues of the side seats and the
buckle of the centre lap belt are
incompatible.
fig. 71
L0A0096b
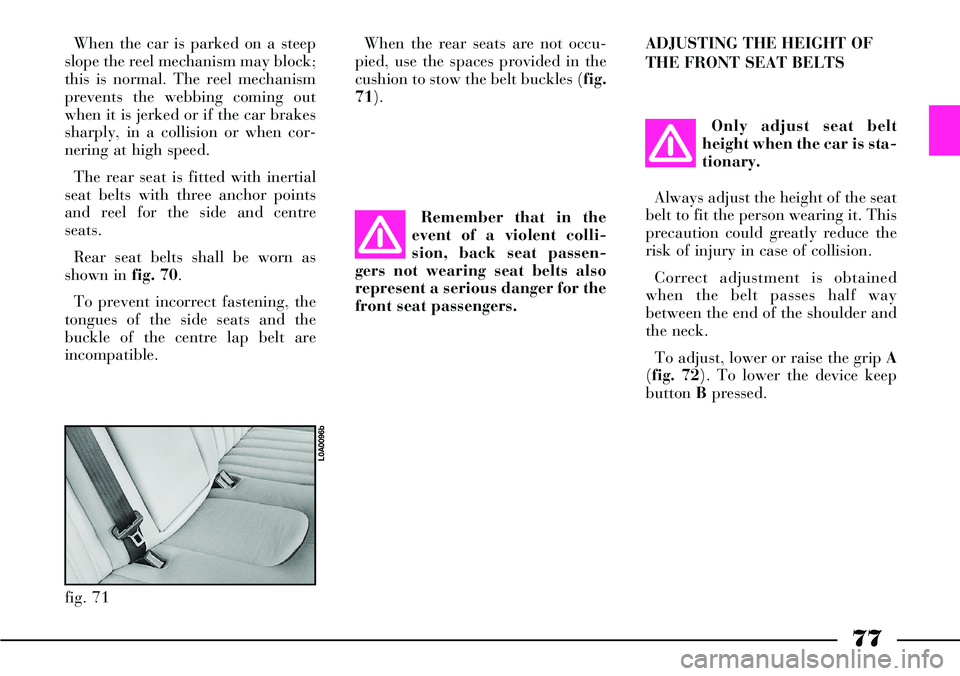
When the rear seats are not occu-
pied, use the spaces provided in the
cushion to stow the belt buckles (fig.
71).
Remember that in the
event of a violent colli-
sion, back seat passen-
gers not wearing seat belts also
represent a serious danger for the
front seat passengers.ADJUSTING THE HEIGHT OF
THE FRONT SEAT BELTS
Only adjust seat belt
height when the car is sta-
tionary.
Always adjust the height of the seat
belt to fit the person wearing it. This
precaution could greatly reduce the
risk of injury in case of collision.
Correct adjustment is obtained
when the belt passes half way
between the end of the shoulder and
the neck.
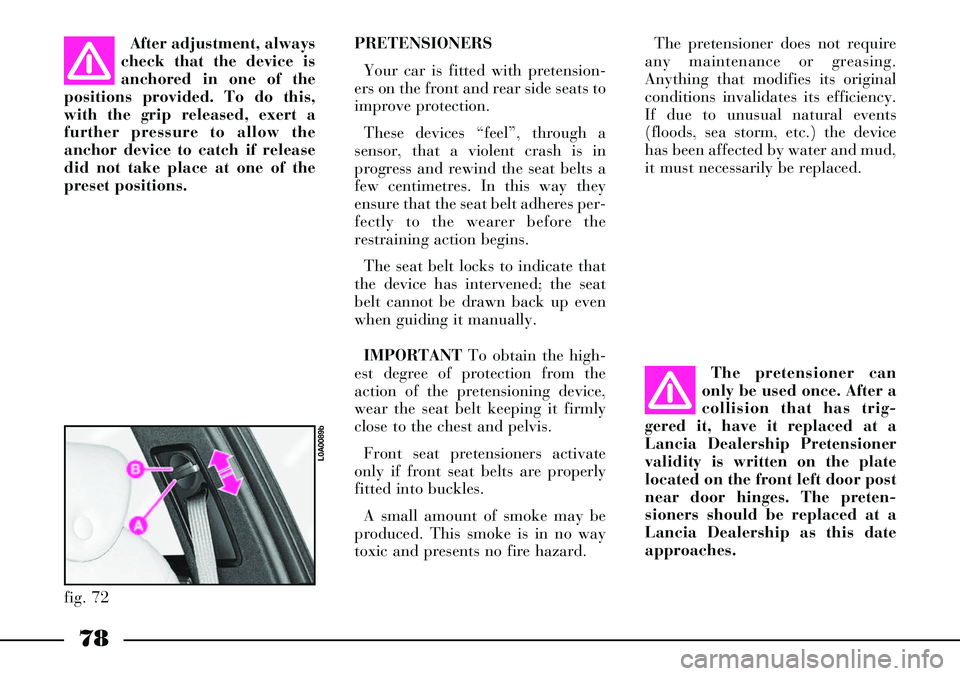
To adjust, lower or raise the grip A
(fig. 72). To lower the device keep
button Bpressed.
Page 79 of 386
78
The pretensioner does not require
any maintenance or greasing.
Anything that modifies its original
conditions invalidates its efficiency.
If due to unusual natural events
(floods, sea storm, etc.) the device
has been affected by water and mud,
it must necessarily be replaced.
The pretensioner can
only be used once. After a
collision that has trig-
gered it, have it replaced at a
Lancia Dealership Pretensioner
validity is written on the plate
located on the front left door post
near door hinges. The preten-
sioners should be replaced at a
Lancia Dealership as this date
approaches.After adjustment, always
check that the device is
anchored in one of the
positions provided. To do this,
with the grip released, exert a
further pressure to allow the
anchor device to catch if release
did not take place at one of the
preset positions. PRETENSIONERS
Your car is fitted with pretension-
ers on the front and rear side seats to
improve protection.
These devices “feel”, through a
sensor, that a violent crash is in
progress and rewind the seat belts a
few centimetres. In this way they
ensure that the seat belt adheres per-
fectly to the wearer before the
restraining action begins.
The seat belt locks to indicate that
the device has intervened; the seat
belt cannot be drawn back up even
when guiding it manually.
IMPORTANTTo obtain the high-
est degree of protection from the
action of the pretensioning device,
wear the seat belt keeping it firmly
close to the chest and pelvis.
Front seat pretensioners activate
only if front seat belts are properly
fitted into buckles.
A small amount of smoke may be
produced. This smoke is in no way
toxic and presents no fire hazard.
fig. 72
L0A0089b
Page 82 of 386
81
CARRYING
CHILDREN
SAFELYSERIOUS DANGER
Should it be ab-
solutely necessary
to carry a baby on the front pas-
senger seat with a child's seat with
the cradle facing backwards, de-
activate the passenger's air bags
using the key switch and then
check warning light F on the clus-
ter to make sure that deactivation
has actually took place (see para-
graph “ Manual deactivation of
passenger's air bag .For optimal protection in the event
of a crash, all passengers must be
seated and wearing adequate
restraint systems.
This is especially relevant for chil-
dren.
According to 2003/20/EC Directive,
this prescription is compulsory for all
European Community countries.
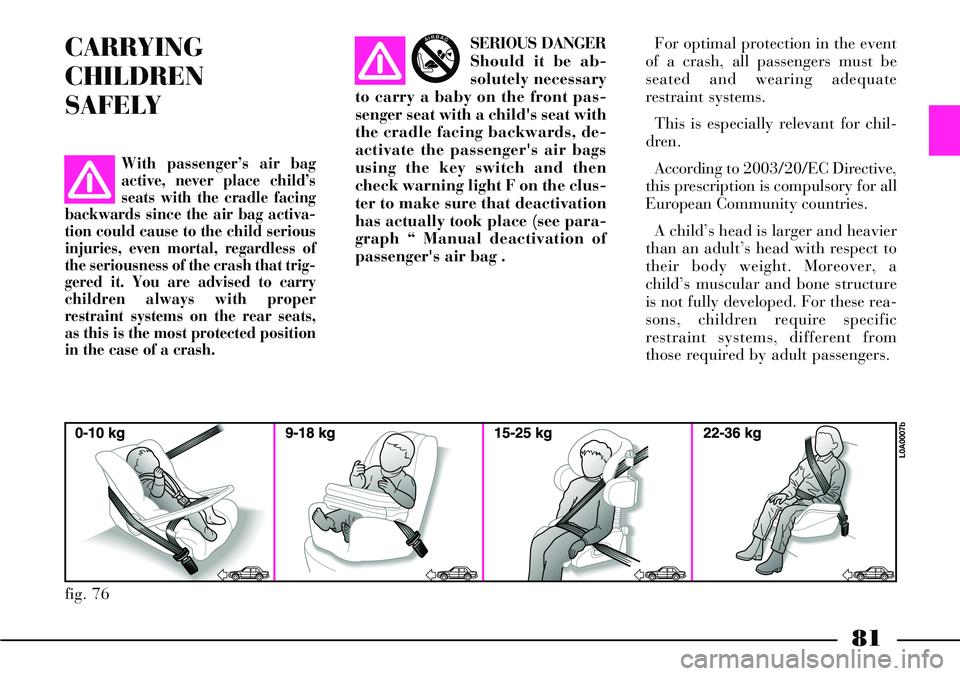
A child’s head is larger and heavier
than an adult’s head with respect to
their body weight. Moreover, a
child’s muscular and bone structure
is not fully developed. For these rea-
sons, children require specific
restraint systems, different from
those required by adult passengers.
fig. 76
L0A0007b
With passenger’s air bag
active, never place child’s
seats with the cradle facing
backwards since the air bag activa-
tion could cause to the child serious
injuries, even mortal, regardless of
the seriousness of the crash that trig-
gered it. You are advised to carry
children always with proper
restraint systems on the rear seats,
as this is the most protected position
in the case of a crash.
AIRBAG