Check Lancia Thesis 2007 Owner handbook (in English)
[x] Cancel search | Manufacturer: LANCIA, Model Year: 2007, Model line: Thesis, Model: Lancia Thesis 2007Pages: 386, PDF Size: 8.69 MB
Page 258 of 386
257
– Keep a greater safety distance
from the cars in front of you than
during daylight hours: it is hard to
judge how fast other cars are going
when all you can see are their lights.
– Only use main beam headlights
when you are driving outside town
and when you are sure they do not
annoy other drivers.
– Dip your headlights as soon as
you see cars coming in the other
direction and pass them with the
headlights dipped.
– Keep all lights clean.
– Be careful of animals crossing the
road when driving in the country.
DRIVING IN THE RAIN
Rain and wet road surfaces spell
danger.
All manoeuvres are more difficult
on a wet road because the grip of the
wheels on the tarmac is greatly
reduced. This is why braking dis-
tances are much longer and road-
holding is lower.Here is some advice for driving in
the rain:
– Reduce speed and maintain a
greater safety distance from the cars
in front.
– If it is raining particularly heavi-
ly, visibility is also reduced. In these
cases, switch on the dipped head-
lights even if it is still daylight so you
can be seen more easily.
– Do not drive through puddles at
speed and hold on tightly to the
wheel if you do: a puddle taken at
high speed might cause you to lose
control of the car (“aquaplaning”).
– Move the ventilation controls to
the position for demisting the win-
dows (see the section “Getting to
know your car”), so to avoid visibil-
ity problems.
– Periodically check the condition
of the windscreen wiper blades. – Do not drive too many hours at a
time but stop at intervals to stretch
your legs and recoup your energy.
– Make sure the air in the car is
being changed continuously.
– Never coast downhill (i.e.: with
the engine off): if you do, you lose
the aid of engine braking and power
brakes so that braking requires
greater effort.
DRIVING AT NIGHT
There are the main rules to follow
when you are driving at night.
– Drive especially carefully: it is
harder to drive at night.
– Slow down especially if the road
is not lit.
– At the first signs of sleepiness,
stop: continuing would be a risk for
yourself and everybody else. Only
start driving again when you have
had enough rest.
Page 261 of 386
260
CONTAINING RUNNING COSTS AND
POLLUTION
Some suggestions which may help
you to keep the running costs of the
car down and lower the amount of
toxic emissions released into the
atmosphere are given below.
GENERAL CONSIDERATIONS
Car maintenance
The overall state of the car is an
important factor which has a
marked influence over fuel con-
sumption and driving comfort and
on the life span of your car. For this
reason care should be taken to main-
tain your car by carrying out the
necessary checks and regulations in
accordance with the specifications
given in the “Service Schedule” (see
sections: spark plugs, air cleaners,
timing...).Tyres
Tyre pressure should be checked at
least once every four weeks: if the
pressure is too low fuel consumption
increases as the resistance to the
rolling movement of the tyre is
greater. In this state, tyre wear is
increased and handling suffers,
which will effect safety.
Unnecessary loads
Do not travel with too much load in
the boot. The weight of the car (in
town traffic above all), and its trim
greatly effect consumption and sta-
bility.Roof rack/ski rack
Remove the roof or ski racks from
the car as soon as they are no longer
needed. These accessories reduce the
aerodynamic penetration of the car
and will increase consumption.
When transporting particularly
large objects, use a trailer, where
possible.
Electrical devices
Use electrical devices for the neces-
sary time only. The heated rear win-
dow, fog lights, windscreen wipers,
heater fan require large amounts of
electricity and increasing the request
for power will also increase fuel con-
sumption (up to +25% when driving
in towns).
Climate control system
The climate control system is an
additional load which greatly effects
the engine leading to higher con-
sumption (up to +20% in average).
When the temperature outside
allows, use the air vents where pos-
sible.
Page 269 of 386
268
Snow chains cannot be
fitted on 225/50R17 (94W),
225/50ZR17 (94W) and
245/40ZR18 tyres, since they
interfere with the front suspension.Keep your speed
down when snow
chains are fitted.
Do not exceed 50 km/h. Avoid
potholes, steps and pavements
and do not drive for long dis-
tances on roads not covered with
snow to prevent damaging the car
and the roadbed.
Disconnect the ASR sys-
tem when snow chains
are fitted. Press the ASR-
OFF button: button led on.
SNOW CHAINS
The use of snow chains is regulated
by the legislation in force in the
country the car is driven in.
Snow chains must only be applied
to the driving wheels (front wheels).
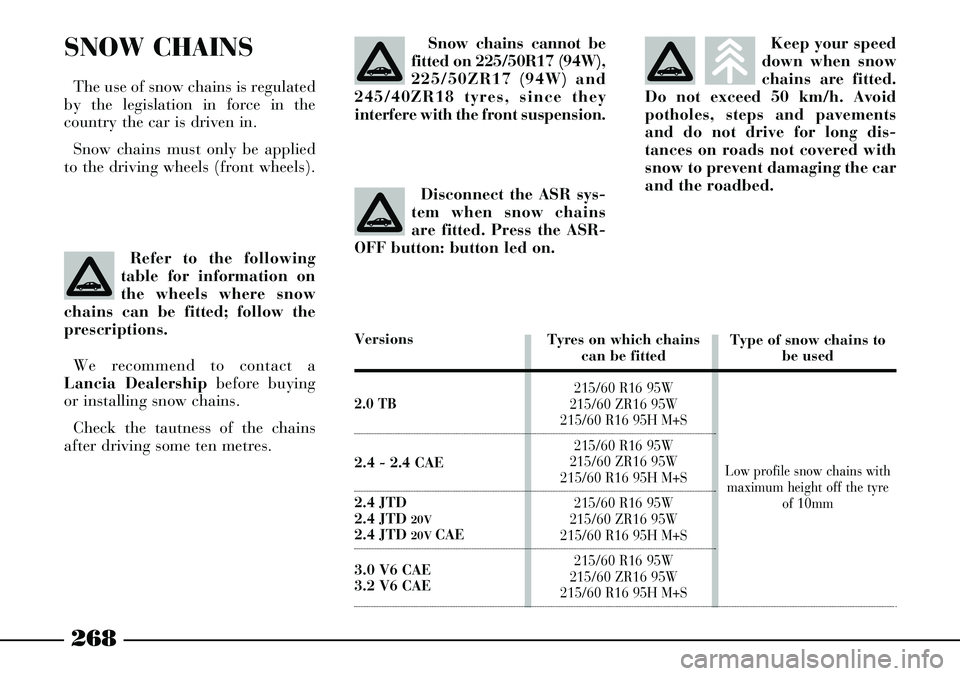
Versions
2.0 TB
2.4 - 2.4 CAE
2.4 JTD
2.4 JTD 20V2.4 JTD 20V CAE
3.0 V6 CAE
3.2 V6 CAE
Refer to the following
table for information on
the wheels where snow
chains can be fitted; follow the
prescriptions.
We recommend to contact a
Lancia Dealershipbefore buying
or installing snow chains.
Check the tautness of the chains
after driving some ten metres.
Tyres on which chains
can be fitted
215/60 R16 95W
215/60 ZR16 95W
215/60 R16 95H M+S
215/60 R16 95W
215/60 ZR16 95W
215/60 R16 95H M+S
215/60 R16 95W
215/60 ZR16 95W
215/60 R16 95H M+S
215/60 R16 95W
215/60 ZR16 95W
215/60 R16 95H M+S
Type of snow chains to
be used
Low profile snow chains with
maximum height off the tyre
of 10mm
Page 270 of 386
269
USING THE CAR AGAIN
Before using the car again after a
prolonged period of inactivity, the
following operations are recom-
mended:
– Do not dry-dust the car body.
– Check for fluid leaks (oil, brake
and clutch fluid, engine coolant
etc.).
– Change engine oil and filter.
– Check the level of:
– brake and clutch fluid
– engine coolant.
– Check the air cleaner and change
it, if required.
– Check the tyre pressure and the
tyres for signs of damage, cuts or
cracks. If this is the case, have them
replaced.
– Check the engine belt conditions.STORING THE CAR
The following precautions should
be taken if the car will not be used
for several months:
– Park the car in covered, dry and
if possible well-ventilated premises.
– Engage a gear.
– If the car is parked on flat
ground, disengage the electric park-
ing brake as described in the rele-
vant paragraph.
– Clean and protect the painted
parts using protective wax.
– Sprinkle talcum powder on the
rubber windscreen and rear window
wiper blades and lift them off the
glass.
– Slightly open the windows.
– Inflate the tyres to 0.5 bar above
the normal specified pressure, lean
them on wood boards, if possible
and check it at intervals.– Do not switch the electronic
alarm system on.
– Remove the negative cable (-)
from the battery terminal and check
the battery charge. This check
should be performed every month if
the car is to be stored for long peri-
ods. Recharge the battery if it falls
below 12.5V.
IMPORTANT Before opening the
luggage compartment bonnet to dis-
connect the battery, carefully read
and comply with instructions con-
tained in the paragraph “If battery is
to be disconnected” in the chapter
“In an emergency”.
– Do not drain the engine cooling
system.
– Cover the car with a cloth or per-
forated plastic sheet. Do not use
sheets of non-perforated plastic as
they do not allow moisture on the
body to evaporate.
Page 271 of 386

270
– Reconnect the negative battery
terminal (-) after checking the bat-
tery charge.
IMPORTANT Before connecting
the battery again carefully read and
comply with instructions contained
in the paragraph “If battery is to be
disconnected” in the chapter “In an
emergency”.
– With the gear lever to neutral,
start the engine and let it idle a few
minutes, pressing the clutch pedal
repeatedly.
This operation must be
carried out outdoor.
Exhaust gas contains car-
bon monoxide, an extremely
toxic gas.USEFUL
ACCESSORIES
In addition to the legal require-
ments we recommend keeping the
following in the car (fig. 2):
– first-aid kit with non-alcoholic
base disinfectant, sterile gauze, a roll
of gauze bandage, plasters, etc.,
– torch,
– round-nosed scissors,
– work gloves,
- fire extinguisher.
These articles are all available from
Lineaccessori Lancia range.
fig. 2
L0A0170b
Page 275 of 386
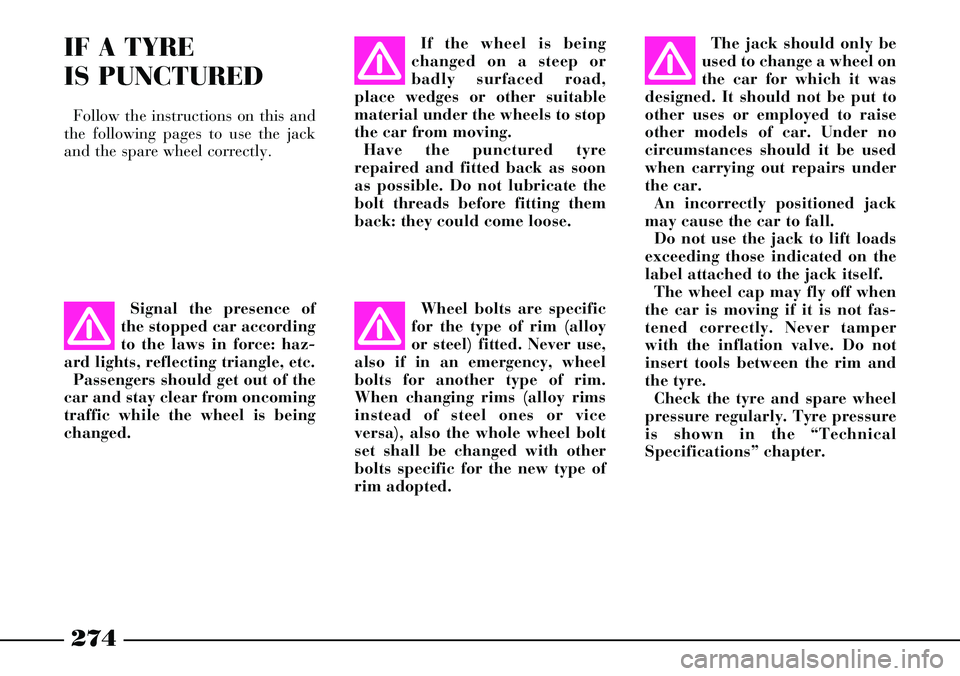
274
Signal the presence of
the stopped car according
to the laws in force: haz-
ard lights, reflecting triangle, etc.
Passengers should get out of the
car and stay clear from oncoming
traffic while the wheel is being
changed.
IF A TYRE
IS PUNCTURED
Follow the instructions on this and
the following pages to use the jack
and the spare wheel correctly.If the wheel is being
changed on a steep or
badly surfaced road,
place wedges or other suitable
material under the wheels to stop
the car from moving.
Have the punctured tyre
repaired and fitted back as soon
as possible. Do not lubricate the
bolt threads before fitting them
back: they could come loose.
Wheel bolts are specific
for the type of rim (alloy
or steel) fitted. Never use,
also if in an emergency, wheel
bolts for another type of rim.
When changing rims (alloy rims
instead of steel ones or vice
versa), also the whole wheel bolt
set shall be changed with other
bolts specific for the new type of
rim adopted.The jack should only be
used to change a wheel on
the car for which it was
designed. It should not be put to
other uses or employed to raise
other models of car. Under no
circumstances should it be used
when carrying out repairs under
the car.
An incorrectly positioned jack
may cause the car to fall.
Do not use the jack to lift loads
exceeding those indicated on the
label attached to the jack itself.
The wheel cap may fly off when
the car is moving if it is not fas-
tened correctly. Never tamper
with the inflation valve. Do not
insert tools between the rim and
the tyre.
Check the tyre and spare wheel
pressure regularly. Tyre pressure
is shown in the “Technical
Specifications” chapter.
Page 281 of 386

280
Bolt tightening torque
must be 98 Nm (10 kgm).
After replacing the
wheel, you are advised to have
the wheel bolt tightening checked
at a Lancia Dealership as soon as
possible.
Insufficient tightening could
actually make the wheel bolts
loosen too much, with clearly
dangerous consequences. If the
bolts are tightened too much, they
could be damaged and their
resistance might be compro-
mised.23) Place the removed wheel, the
jack and the tools in the boot and
fasten appropriately.
IMPORTANTPut the jack back
into B(fig. 8) and clamp it by
screwing handle A(fig. 8) manually
in order to prevent vibrations during
travelling.
fig. 19
L0A0045b
fig. 20
L0A0365b
fig. 21
L0A0368b
21) Tighten up the wheel bolts in a
criss-cross fashion, following the
sequence shown:
- fig. 19= versions with alloy rims
- fig. 20= versions with steel rims.
22) On versions with alloy rims,
refit the wheel hub cap pressing it
slightly. On versions with steel rims,
approach the wheel cap making the
inflating valve A(fig. 21) coincide
with flaring B. Press the cap circum-
ference starting near the inflating
valve and proceeding until fitting
the cap completely.
IMPORTANTThe wheel hub cap
(alloy rims) or the wheel cap (steel
rims) may fly off when the car is
moving if it is not fastened correctly.
Page 283 of 386

282
GENERAL INSTRUCTIONS
– When a light is not working,
check that it has not fused before
changing the bulb.
– For the location of the fuses, refer
to “If a fuse blows” in this chapter.
– Before replacing a bulb that does
not work, check that the contacts are
not oxidised.
– Burnt-out bulbs must be replaced
with ones of the same type and
power.
– Always check the slant of the
headlight beam after changing a
bulb for safety reasons.TYPES OF BULBS
Different types of bulbs are
installed in the car (fig. 22):
A - All glass bulbs
Snapped into position. Pull to
remove.
B - Bayonet connection bulbs
Remove from the bulb holder by
pressing the bulb and rotating it
anticlockwise.
C - Cylindrical bulbs
Remove by pulling away from ter-
minals.
D - E Halogen bulbs
To remove the bulb, release the
clip holding the bulb in place.
L0A0105b
fig. 22
Page 286 of 386

285
SIDE DIRECTION INDICATORS
(fig. 25)
To replace the bulb:
1) Push the lens in direction 1,
press tab Aand remove the cluster
from the back 2.
2) Turn the direction indicator
anticlockwise and remove the bulb
holder B.
3) Remove bulb Cand replace it.
4) Refit the direction indicator in
the bulb holder turning it clockwise.
5) Refit the direction indicator on
the fender first inserting the front
part and then pressing the rear part
until it fits. If the front fog lights are
not adjusted properly,
they could annoy other
drivers. Contact a Lancia
Dealership for a check and any
required adjustments.
fig. 24
L0A0154b
fig. 25
L0A0121b
FRONT FOG LIGHTS (where
provided) (fig. 24)
To replace front fog lights it is nec-
essary to operate under the vehicle,
after removing the protective cover
under the engine. For this reason, it
is suggested to have the bulbs
replaced at a Lancia Dealership.
Page 289 of 386

288
2) Loosen the screws C(fig. 32)
and remove the ceiling light.
3) To remove bulb holders turn
them anticlockwise (fig. 33).
D- Central ceiling light bulb.
E- Courtesy light bulbs.4) Remove the clipped in glass
bulbs from the bulb holder and
replace them.
5) Insert the bulb holders and turn
them clockwise.
6) Refit the ceiling light and secure
it with the screws.
7) Refit the clipped in caps.
IMPORTANTWhen refitting the
ceiling light check that the electrical
wires are positioned correctly.REAR CEILING LIGHT
To replace the bulbs:
1) Remove the ceiling light by lev-
ering with a screwdriver on the front
edge (fig. 34).
2) To remove bulb holders turn
them anticlockwise (fig. 35).
fig. 32
L0A0130b
fig. 33
L0A0131b
fig. 34
L0A0288b