turn signal Lancia Thesis 2007 Owner handbook (in English)
[x] Cancel search | Manufacturer: LANCIA, Model Year: 2007, Model line: Thesis, Model: Lancia Thesis 2007Pages: 386, PDF Size: 8.69 MB
Page 27 of 386
26
THE LANCIA CODE
SYSTEM
To further protect your car from
theft, it has been fitted with an
engine immobilising system (Lancia
CODE) which is automatically acti-
vated when the ignition key is
removed. An electronic device, in
fact, is fitted in each ignition key
grip. The device transmits a radio-
frequency signal when the engine is
started through a special aerial built
into the ignition switch. The modu-
lated signal is a password. Only if
the control unit recognises the key
can the engine be started.OPERATION
Each time the ignition key is
turned to STOPthe Lancia CODE
system will deactivate the engine
electronic control unit functions.
When the key is turned to MARto
start the engine, the Lancia CODE
system sends a password code to the
engine control unit to deactivate the
function lock. The encoded and
variable code, randomly selected
from over four billion possible com-
binations, is only sent if, in turn, the
system has recognised the code
transmitted by the electronic device
built into the ignition key via an aer-
ial surrounding the ignition switch.
If the code has not been recognised
correctly, the symbol Ywill appear
on the instrument panel display,
together with the message “VEHI-
CLE PROTECTION SYSTEM
FAULT”. In this case, turn the key to STOP
and then back to MAR. If the engine
remains immobilised, try with the
other keys provided with the car. If
you are still unable to start the
engine, carry out the emergency pro-
cedure described in chapter “In an
emergency”, and contact your
Lancia Dealership.
IMPORTANTEach key has its
own code that must be stored in the
system control unit. For storing new
keys, up to a maximum of eight,
apply solely to Lancia Dealership
taking with you all the keys in your
possession, the CODE card, a per-
sonal identity document and the
documents that certify car posses-
sion.
Page 42 of 386
41
SWITCHING THE ALARM OFF
To switch the alarm off, press the
key button A(fig. 14).
The following actions will be car-
ried out by the system (with the
exception of certain markets):
– the direction indicators will flash
twice;
– two beeps will be heard;
– driver’s door or doors unlocking,
depending on the setting selected on
the CONNECT menu.
IMPORTANTWhen operating the
central door unlocking with the
metal insert of the key, the alarm is
not deactivated.VOLUMETRIC PROTECTION
Do not leave passengers or pets in
the parked car and completely close
the windows and the sunroof to
ensure the correct operation of the
volumetric sensors. Furthermore,
make sure that the doors, bonnet
and boot/tailgate are properly
closed.
To deactivate the volumetric
protection, press button A(fig. 16)
on the front ceiling light: when the
function is off, the button warning
light will flash for about 3 seconds
and then goes out.
Protection cut out stays on until
activating the central door opening
again.
IMPORTANTVolumetric protec-
tion shall be deactivated after about
1 minute from turning the key to
STOP. To deactivate the volumetric
protection after this period, turn the
key to MARand then to STOP
again.ANTI-LIFTING SENSOR
The anti-lifting sensor detects vari-
ations in slant to signal lifting or
partial lifting (e.g. to remove a
wheel) of the car.
The sensor can detect minimal
variations in cat trim along both the
longitudinal axis and the transversal
axis. Variations in trim lower than
0.5°/min. (such as, for example, a
slow deflating tyre) are not take into
account.
To switch the anti-lifting protec-
tion off, press button B(fig. 16) on
the front ceiling light: when the
function is off, the button warning
light will flash for about 3 seconds
and then goes out.To ensure correct opera-
tion of the volumetric pro-
tection system, before acti-
vating the alarm, check that win-
dows and sunroof (where pro-
vided) are perfectly closed.
Page 64 of 386
63
Stored position are recalled only if
the required position is different
from the current one and is not pos-
sible when the car speed exceeds 10
km/h.
Seats can be moved only when the
ignition key is at MARand, for
about 1 minute, also after removing
the key or turning it to STOP: dur-
ing this time, the external rear view
mirrors will not move, but when the
car is started again, they will be
automatically realigned together
with the seat position (see paragraph
“Automatic realignment of external
rear view mirrors”).
If stored seat position recalling is
still in course after this time has
elapsed, recalling will be concluded
in any case.If the engine is started during the
recalling stage, seat moving will be
stopped; once this stage is over the
seat will return automatically to the
stored position.
IMPORTANTPressing any of
memorisation or adjustment buttons
during the recalling stage, causes the
immediate stop of the seat (antipan-
ic mode).
Storing the “parking” position of
the external rear view mirror on
passenger side
You can achieve better visibility
during manoeuvres in reverse gear
(for instance, when parking the car)
by adjusting the external passenger
rear view mirror to a different posi-
tion from the one normally used.
This position can be stored by the
driver.To store the position proceed as
follows:
– with the car stopped and the igni-
tion key at MAR, engage the reverse
gear;
– adjust the position of the external
passenger rear view mirror by means
of the respective controls so as to
obtain the optimum position for the
parking manoeuvre;
– press down for at least 3 seconds
any of buttons “1”, “2” or “3” (fig.
46) used to store/recall the seat posi-
tion;
– together with the “parking” posi-
tion of the external passenger side
rear view mirror, also the seat posi-
tion, the driver rear view mirror
position and the driving position of
the external passenger side rear view
mirror are stored.
A sound signal warns the driver
that the mirror position has been
stored.
Page 104 of 386
103
Operating the windscreen washer
with the rain sensor activated (stalk
at position 1) the normal washing
cycle is performed at the end of
which the rain sensor resumes its
normal automatic function.
The rain sensor is switched off
when the key is turned to STOP. It
will not come on again at the follow-
ing engine start-up (key at MAR)
even if the stalk is at position 1. This
will avoid accidental activation when
starting the engine that could result
in dangerous situations (e.g. manual
windscreen washing, wiper blades
sticking due to ice and risk of dam-
aging the windscreen wiper motor).
In this case to activate the rain sen-
sor, just take the stalk to position 0
or2and then to 1again, or change
sensitivity (increase or decrease)
through knurled ring A. When the rain sensor is again acti-
vated in this way, at least one wind-
screen wiper stroke occurs, even if
the windscreen is dry, to signal the
occurred re-activation.
The rain sensor is located behind
the driving mirror in contact with
the windscreen and inside the area
cleaned by the wiper and it controls
an electronic control unit which in
turns controls the wiper motor.
At starting, the rain sensor auto-
matically provides to stabilize at
about 40°C temperature to elimi-
nate, from the control surface, the
possible condensate and to prevent
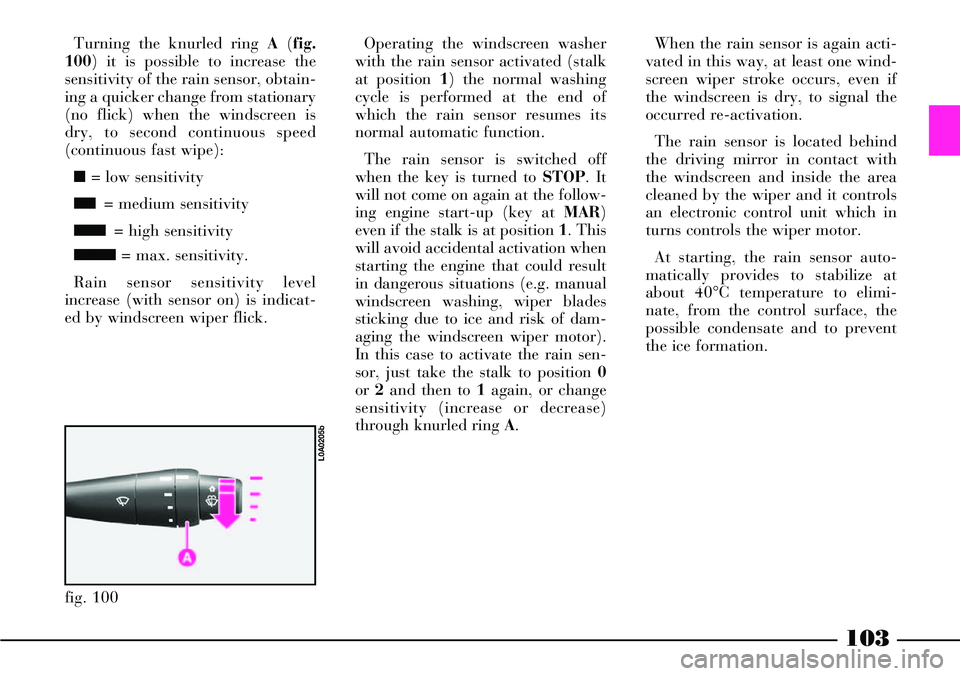
the ice formation. Turning the knurled ring A(fig.
100) it is possible to increase the
sensitivity of the rain sensor, obtain-
ing a quicker change from stationary
(no flick) when the windscreen is
dry, to second continuous speed
(continuous fast wipe):
■= low sensitivity
■■= medium sensitivity
■■■= high sensitivity
■■■■= max. sensitivity.
Rain sensor sensitivity level
increase (with sensor on) is indicat-
ed by windscreen wiper flick.
fig. 100
L0A0205b
Page 160 of 386
159
The air let into the passenger com-
partment cannot be cooled when the
compressor is off. Consequently:
– if the outside temperature is
lower than the set temperature, the
system works normally and can
reach and maintain the set tempera-
ture also when the compressor is off;
– if the outside temperature is
higher than the set temperature, the
system cannot reach the required
temperature. This will be signalled
by flashing the external temperature
value on the display.
When the compressor is off, it is
possible to reset manually the fan
speed; on the contrary, when the
compressor is on and the engine is
running, manual ventilation cannot
be lower than the bar indicated on
the display. Button for fast windscreen
demisting/defrosting (15 fig. 121)
Press this button: the climate con-
trol system will automatically switch
on all the functions required for fast
windscreen and side window demist-
ing/defrosting, that is:
– climate control system compres-
sor on;
– air recirculation off (if on);
– maximum air temperature (HI)
on both displays;
– fan speed according to engine
coolant temperature in order to limit
letting cold air into the passenger
compartment for demisting the win-
dows;
– air flow directed to the wind-
screen and front side window vents;
– heated rear window, external
rearview mirror and windscreen noz-
zle resistances on.The fast windscreen demisting/
defrosting function stays on for
approx. 3 minutes after the engine
coolant temperature exceeds 50 °C
(petrol versions) or 35 °C (diesel
versions).
When the fast demisting/defrosting
function is on, the led on the related
button and that on the heated rear
window button are lighted, while
both leds on the air recirculation
button and that on button √turn
off. Message FULL AUTOon the
display will turn off.
Only the fan speed can be adjusted
and the heated rear window can be
switched off when the fast demist-
ing/defrosting function is on.
Press the fast demisting/defrosting
button again or air recirculation
button or compressor off button to
switch the fast demisting/defrosting
function off and reset the previous
system operation conditions as well
as the last set function.
Page 165 of 386
164
This function can be activated with
the CONNECT (from the main
SETUP screen) or with the remote
control.
The system works with this mode on
if the following conditions are present
– outside temperature lower than 20
°C
– coolant temperature lower than 50
°C
– ignition key at STOPor removed
– car battery charged
– fuel not in reserve.
When this mode is on, the heater is
deactivated when one of the following
conditions occur:
– end of planned working time
– OFF signal from the remote con-
trol
– manual shutdown by the user
through CONNECT– ignition key at MAR
– partial battery rundown
– fuel in reserve
– malfunction detected by the heater
control unit.
Timed heater activation/
deactivation through CONNECT
Timed heater activation and deacti-
vation can be set through the CON-
NECT. Select and confirm “Heater”
on the main SETUP screen to display
the parked-car heater settings.
Settings available are the following:
– Operate now
– Timer 1
– Timer 2.
To activate/deactivate the required
function, select and confirm it with
the CONNECT right knob.“Operate now”
The option “Operate now” enables
to warm the passenger compartment
with the engine stopped and warm
and the ignition key to MAR, using
the engine coolant, heater coolant cir-
culation pump, automatic air distrib-
ution control (if not set manually) and
closing air recirculation. The timer
cannot be programmed when this
function is on.
To guarantee the required comfort,
this function shall be mainly activated
when coolant is hot enough. When
coolant temperature is lower than 50
°C the control unit starts the heater,
and when temperature is over 70 °C,
the control unit turns the heater off
and lets only the coolant circulation
pump keep on working.
Page 168 of 386

167
This control is accepted by CON-
NECT only if:
– outside temperature lower than 20
°C
– coolant temperature lower than 50
°C
– the ignition key is at STOPor re-
moved
– car battery charged
– sufficient fuel level
– the timer is deactivated.
Switching the heater on
To switch the heater on, press the
remote control button ONfor 1 or 2
seconds, while keeping the antenna in
vertical position; the positive or un-
successful activation is indicated by
the remote control red led Bin the fol-
lowing way:
– the led turns on for about 2 sec-
onds = the signal has been correctly
received and the heater has been ac-
tivated– the led flashes for about 2 seconds
= the signal has not been received.
In the latter case you are advised to
move before trying to activate it by
pressing again the ONbutton.
After the confirmation activation,
the led Bwill flash every 2 seconds for
the whole operation cycle duration.
IMPORTANTIf led Bturns on with
green colour, press twice both remote
control buttons ONand OFFwithin 1
second to set the red colour.
Activation length
When pressing the remote control
button ONthe last recorded activa-
tion length is always activated.
To see the recorded length, press at
the same time for three consecutive
times within 1 second, the remote
control buttons ONand OFF, count
the number of flashes of led Bthen
compare them to those shown in the
table below, including also the first
flash appearing the third time you
press the buttons. Default activation length is 30 min-
utes but it can be changed through
the following procedure:
– press at the same time for three
consecutive times within 1 second, the
remote control buttons ONand OFF
– count the number of flashes of led
Bincluding also the first flash ap-
pearing the third time you press but-
tons ONand OFF
– press OFFto set the length suc-
cessive to the set one (press OFFfor
several times to set the required
length in sequence)
– wait for about 10 seconds for timer
storing.
Page 169 of 386

168
- the led comes on for about 2 sec-
onds = the signal has been received
correctly and the heater has been de-
activated
- the led flashes for about 2 seconds
= the signal has not been received.
In the latter case you are advised to
move before trying to deactivate it by
pressing again the OFFbutton.Checking and replacing the
batteries
To check the battery charge, press
ONor OFF: if after about 5 seconds
led Bcomes on with orange colour it
means that the batteries are nearly
down and that they shall be replaced.
The batteries must be replaced with
new ones of the same type, available
at the usual sellers.
Replacing the batteries
Keep the ONand OFFbuttons
pressed for about 10 seconds, until led
Bturns off, to reset the 30 minutes
standard operation length.
Switching the heater off
To turn the heater off, press the re-
mote control button OFFfor 1 or 2
seconds, while keeping the antenna in
vertical position; the positive or un-
successful deactivation is indicate by
the remote control red led Bin the fol-
lowing way:Used batteries pollute the
environment. Dispose of
them in the special con-
tainers as specified by current leg-
islation. Keep batteries away from
open flames and high tempera-
tures. Keep away from children.
Number of flashes of led B
1
2
3
4
5
6Heater activation length
10 minutes
20 minutes
30 minutes
40 minutes
50 minutes
60 minutes
Page 179 of 386

178
fig. 135
L0A0275b
fig. 134
L0A0274b
Fault indication
The system is controlled by an elec-
tronic control unit signalling possible
failures by turning on the s! warn-
ing light on the multifunction display
together with the message “EPB
FAULT - GO TO DEALER”.
For a higher safety, every time the
parking brake button is pressed dur-
ing a failure, a buzzer will sound to
draw the driver’s attention and the
xwarning light will turn on.
If the parking brake does not reach
the required working force (e.g.
when the battery is partially flat),
the instrument panel warning light
xstarts flashing.
In case of instrument panel warn-
ing light xfault, the s!warning
light on the multifunction display
turns on together with the message
“EPB INDICATOR FAULT - GO TO
DEALER” to informthe driver
about the dangerous situation. In case of failure indi-
cated by the related
warning light and mes-
sage turning on, drive carefully to
a Lancia Dealership because the
parking brake might not work.
Emergency disengagement
The electric parking brake is fitted
with an independent battery which
can be used to disengage the brake,
for instance when the car main bat-
tery is completely flat or it has bro-
ken after an accident.The additional battery, always
kept charged by a dedicated elec-
tronic control unit, can engage and
disengage the parking brake when it
is necessary to push manually the
car.
To engage and disengage the elec-
tric parking brake when the car
main battery is completely flat, turn
the key to MARand press the main
button on the central console.
Page 189 of 386

188
If the failure is signalled when the
engine is started, it means that the
electronic control unit had stored it
previously, before stopping the
engine. Even in this case, go to a
Lancia Dealershipto have the
automatic gearbox checked.
When driving with auto-
matic gearbox faulty,
drive carefully consider-
ing the limited car efficiency in
terms of acceleration and speed.
In addition, when driving with
automatic gearbox faulty, the
reverse block might not be oper-
ating: for this reason it is
absolutely necessary to move the
lever to position R while the car
is moving.SOUND SIGNAL
A buzzer will sound in the follow-
ing conditions:
– for about 15 seconds when the
driver’s door is opened while the
engine is running or not and the gear
lever has a position different from P
– for about 15 seconds when the
engine is turned off and the gear
lever has a position different from P
– for about 4 seconds when the
gear lever is shifted to R(reverse)
– with the manual sequential oper-
ation on, when the selected gear is
not accepted by the electronic con-
trol unit (e.g. since it might generate
a runaway speed rate). BUMP STARTING
Never bump starting the engine (by
pushing, towing, etc.). In an emer-
gency, when the battery is flat, start
the engine with the appropriate
emergency battery according to the
instructions contained in chapter “In
an emergency”.