clutch Lancia Thesis 2008 Owner handbook (in English)
[x] Cancel search | Manufacturer: LANCIA, Model Year: 2008, Model line: Thesis, Model: Lancia Thesis 2008Pages: 386, PDF Size: 4.96 MB
Page 244 of 386

243
Automatic dynamic beam adjust-
ment device
Bi-Xeno headlights require, due to
produced brilliancy, an automatic,
dynamic beam adjustment system.
This system is managed by an elec-
tronic control unit that controls the
actuators mounted on each dipped
beam headlight. Actuator control
depends on the processing of the sig-
nals from two orientation sensors.
This automatic dynamic beam
adjustment system provides the fol-
lowing advantages:
– it avoids dazzling the vehicles
coming from the opposite direction
– it stabilizes the illuminated area
so as to improve active safety.Headlight beam adjustment con-
trol unit
The control unit calculates the
instant car trim, by comparing the
signals from the orientation sensors.
A “correction” signal is sent to the
actuators to adapt light beam orien-
tation to the calculated car trim.
To avoid oscillation of the anti-
dazzling beam in case of particular
road surfaces (paved surfaces, dirt
roads, etc.) or abrupt movements of
the car caused by the driver (clutch
disengagement, gear change, etc.),
the control unit reduces the number
of corrections to be made on the
light unit.Fault indication
Anomalies in the operation of one
or several system components are
signalled by the lighting of symbol
6on the multifunction display,
together with message “HEAD-
LAMP INCLINATION ADJUST-
MENT SYSTEM FAULT”.
IMPORTANTIn case of faults,
contact a Lancia Dealership.
In case of component anomaly or
voltage drop, the system controls in
any case system operation according
to the following logic:
– faulty front sensor: trim calcula-
tion is made by replacing the voltage
value read on the faulty sensor with
a stored, fixed value
– faulty rear sensor: the system is
switched to the safety operation
mode and keeps the headlights in a
preset position of maximum lower-
ing allowed by the light beam.
Page 252 of 386

251
HOW TO START PETROL
VERSIONS
IMPORTANTNever press the
accelerator before the engine has
started.
1) Ensure that the electric parking
brake is on (instrument panel warn-
ing light xon).
2) Ensure that electrical systems
and devices, especially high absorp-
tion ones (e.g. heated rear window),
are off.
3) On versions with manual gear-
box, set the gear lever to neutral and
press the clutch pedal fully down to
avoid the starter dragging the gears.4) On versions with electronic
automatic gearbox, ensure that the
selector is at Pand keep the brake
pedal pressed.
5) Turn the ignition key to AVV
and release it as soon as the engine
starts.
6) If the engine fails to start, return
the key to STOPand repeat the pro-
cedure.
IMPORTANTIf the engine does
not start at the first attempt, do not
keep turning the ignition key to
avoid damaging the catalyst.
Contact a Lancia Dealership.HOW TO START JTD VERSIONS
1) Ensure that the electric parking
brake is on (instrument panel warn-
ing light xon).
2) Put the gear lever to neutral.
3) Turn the ignition key to MAR.
4) Wait until the mwarning light
is off: the hotter the engine is, the
quicker this will happen.
When the engine is particularly hot
the warning light may come on so
quickly that it is impossible to notice
it.
5)Press the clutch pedal down to
the floor.
6) Turn the ignition key toAVV
immediately after the mwarning
light goes out. If you wait too long,
you will lose the benefit of the work
done by the glow plugs.
Page 262 of 386

261
Gear selections
As soon as the traffic and road con-
ditions allow it, shift to a higher
gear. Using a lower gear to liven up
acceleration greatly increases con-
sumption. In the same way, improp-
er use of the higher gears will
increase consumption, emissions
and wear and tear on the engine.
Top speeds
Fuel consumption increases con-
siderably as speed increases. For
example, when accelerating from 90
to 120 km/h, fuel consumption
increases up to approximately
+30%. Your speed should be kept as
even as possible and superfluous
braking and acceleration avoided, as
this increases both consumption and
emissions. A “smooth” driving style
should be adopted by attempting to
anticipate manoeuvres to avoid
imminent danger, and to keep a safe
distance from the vehicle in front to
avoid braking sharplyAcceleration
Accelerating violently increasing
the revs will greatly effect consump-
tion and emissions: acceleration
should be gradual and not exceed
the maximum torque.
CONDITIONS OF USE
Cold starting
Frequent cold starting will not
enable the engine to reach optimal
running temperature. It follows,
therefore, that consumption will be
higher (from +15 to +30% in towns)
as will the production of toxic emis-
sions. Spoilers
The use of optional extras which
are not certified for specific use on
the car may reduce the aerodynamic
penetration of the car and increase
consumption.
DRIVING STYLE
Starting
Do not warm the engine when the
car is stationary or at high or low
revs: in this way the engine will
warm up gradually increasing con-
sumption and emissions. You should
drive off slowly straight away avoid-
ing high revs so that the engine will
warm up more quickly.
Unnecessary actions
Avoid revving the engine when
stopped at traffic lights or before
switching off the engine and avoid
doubling the clutch as these actions
have no purpose on modern vehicles
and serve only to increase consump-
tion and pollution.
Page 270 of 386

269
USING THE CAR AGAIN
Before using the car again after a
prolonged period of inactivity, the
following operations are recom-
mended:
– Do not dry-dust the car body.
– Check for fluid leaks (oil, brake
and clutch fluid, engine coolant
etc.).
– Change engine oil and filter.
– Check the level of:
– brake and clutch fluid
– engine coolant.
– Check the air cleaner and change
it, if required.
– Check the tyre pressure and the
tyres for signs of damage, cuts or
cracks. If this is the case, have them
replaced.
– Check the engine belt conditions.STORING THE CAR
The following precautions should
be taken if the car will not be used
for several months:
– Park the car in covered, dry and
if possible well-ventilated premises.
– Engage a gear.
– If the car is parked on flat
ground, disengage the electric park-
ing brake as described in the rele-
vant paragraph.
– Clean and protect the painted
parts using protective wax.
– Sprinkle talcum powder on the
rubber windscreen and rear window
wiper blades and lift them off the
glass.
– Slightly open the windows.
– Inflate the tyres to 0.5 bar above
the normal specified pressure, lean
them on wood boards, if possible
and check it at intervals.– Do not switch the electronic
alarm system on.
– Remove the negative cable (-)
from the battery terminal and check
the battery charge. This check
should be performed every month if
the car is to be stored for long peri-
ods. Recharge the battery if it falls
below 12.5V.
IMPORTANTBefore opening the
luggage compartment bonnet to dis-
connect the battery, carefully read
and comply with instructions con-
tained in the paragraph “If battery is
to be disconnected” in the chapter
“In an emergency”.
– Do not drain the engine cooling
system.
– Cover the car with a cloth or per-
forated plastic sheet. Do not use
sheets of non-perforated plastic as
they do not allow moisture on the
body to evaporate.
Page 271 of 386

270
– Reconnect the negative battery
terminal (-) after checking the bat-
tery charge.
IMPORTANTBefore connecting
the battery again carefully read and
comply with instructions contained
in the paragraph “If battery is to be
disconnected” in the chapter “In an
emergency”.
– With the gear lever to neutral,
start the engine and let it idle a few
minutes, pressing the clutch pedal
repeatedly.
This operation must be
carried out outdoor.
Exhaust gas contains car-
bon monoxide, an extremely
toxic gas.USEFUL
ACCESSORIES
In addition to the legal require-
ments we recommend keeping the
following in the car (fig. 2):
– first-aid kit with non-alcoholic
base disinfectant, sterile gauze, a roll
of gauze bandage, plasters, etc.,
– torch,
– round-nosed scissors,
– work gloves,
- fire extinguisher.
These articles are all available from
Lineaccessori Lancia range.
fig. 2
L0A0170b
Page 313 of 386

312
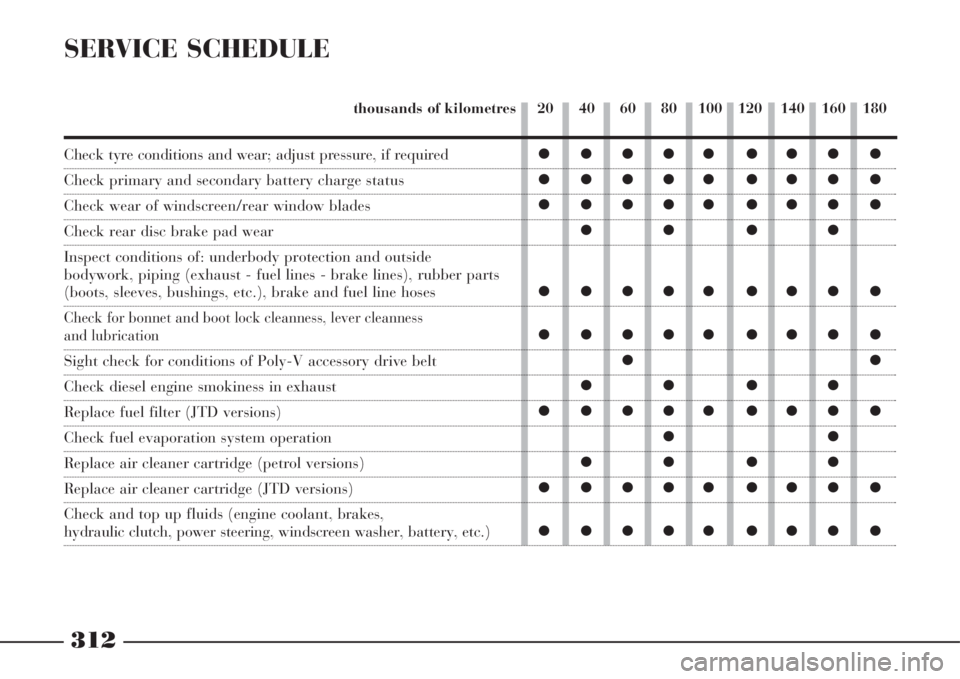
SERVICE SCHEDULE
20 40 60 80 100 120 140 160 180 thousands of kilometres
ççççç çççç
ççççç çççç
ççççç çççç
çç çç
ççççç çççç
ççççç çççç
çç
çç çç
ççççç çççç
çç
çç çç
ççççç çççç
ççççç ççççCheck tyre conditions and wear; adjust pressure, if required
Check primary and secondary battery charge status
Check wear of windscreen/rear window blades
Check rear disc brake pad wear
Inspect conditions of: underbody protection and outside
bodywork, piping (exhaust - fuel lines - brake lines), rubber parts
(boots, sleeves, bushings, etc.), brake and fuel line hoses
Check for bonnet and boot lock cleanness, lever cleanness
and lubrication
Sight check for conditions of Poly-V accessory drive belt
Check diesel engine smokiness in exhaust
Replace fuel filter (JTD versions)
Check fuel evaporation system operation
Replace air cleaner cartridge (petrol versions)
Replace air cleaner cartridge (JTD versions)
Check and top up fluids (engine coolant, brakes,
hydraulic clutch, power steering, windscreen washer, battery, etc.)
Page 315 of 386

314
ADDITIONAL
CHECKS
Every 1,000 kmor before long
trips, check and top up as necessary:
– engine coolant level
– brake/hydraulic clutch fluid
level
– power steering fluid level
– windscreen/rear window and
headlight washer fluid level
– tyre pressure and conditions.
Every 3,000 kmcheck the engine
oil level and top up as necessary.
You are recommended to use FL
Seleniaproducts that are designed
and produced specifically for LAN-
CIA cars (see “Capacities” in
“Technical Specifications”).
ANNUAL
INSPECTION
SCHEDULE
The following annual inspection
schedule is recommended for
cars travelling less than 20,000
km a year (e.g. approximately
10,000 km). The schedule
includes the following opera-
tions:
1) Check tyre condition and wear
and adjust pressure (including spare
wheel)
2) Check wear on windscreen/rear
window blades
3) Check rear disc brake pad con-
ditions and wear
4) Inspect conditions of: under-
body protection and outside body-
work, piping (exhaust - fuel lines -
brake lines), rubber parts (boots -
sleeves - bushings, etc.), brake and
fuel line hoses5) check for bonnet and boot lock
cleanness, lever cleanness and lubri-
cation
6) Check primary and secondary
battery charge status
7) Check conditions of various con-
trol belts
8) Check and top up fluid levels
(engine coolant, brakes, windscreen
washer, battery, etc.)
9) Change engine oil
10) Replace engine oil filter
11) Replace dust/pollen filter.
Page 324 of 386

323
Oil consumption is ex-
tremely low. If the oil level
needs topping up again af-
ter a short period of time, have the
system checked for leakage at a
Lancia Dealership.BRAKE AND HYDRAULIC
CLUTCH FLUID (fig. 16)
Unscrew cap A: check that the fluid
level in the reservoir is at maximum.
Fluid level in the reservoir shall not
exceed the MAXmark.
If fluid has to be added, it is sug-
gested to use the brake fluid in table
"Fluids and lubricants" (see chapter
"Technical characteristics").
NOTEClean accurately the tank cap
Aand the surrounding surface.
Prevent brake fluid, which
is highly corrosive, from
coming into contact with
painted parts. Should it happen,
immediately wash with water.
Do not let the power
steering fluid come into
contact with hot engine
parts. It catches fire very easily.
fig. 16
L0A0294b
– Refit hose C.
– Refit cap Aand check for seal
proper positioning into its seat, then
secure the cap with screws B.At plug opening, pay maximum at-
tention in order to prevent any impu-
rities from entering the tank.
For topping up, always use a funnel
with integrated filter with mesh equal
to or lower than 0.12 mm.
IMPORTANT Brake fluid absorbs
moisture, for this reason, if the car is
mainly used in areas with a high de-
gree of atmospheric humidity, the
fluid should be replaced at more fre-
quent intervals than specified in the
“Service schedule”.
Page 349 of 386

348
2.4
Mechanical
gearbox with
six forward gears
and reverse
with synchromesh
Single disc,
hydraulically
controlled
Front 2.0 TB
Mechanical
gearbox with
six forward gears
and reverse
with synchromesh
Single disc,
hydraulically
controlled
Front
2.0 TB
Self-ventilated discs
Self-ventilated discs
Electric control
on rear discs,
automatic
engagement/
disengagement2.4
Self-ventilated discs
Self-ventilated discs
Electric control
on rear discs,
automatic
engagement/
disengagement2.4 CAE
Self-ventilated discs
Self-ventilated discs
Electric control
on rear discs,
automatic
engagement/
disengagement2.4 CAE
Automatic gearbox
with five forward
gears and reverse
-
Front
TRANSMISSION
Gearbox
Clutch
Drive
BRAKES
Service brakes:
- front
- rear
Electric parking
brake (EPB)
Page 350 of 386

349
2.4 JTD 20VCAE
Self-ventilated discs
Self-ventilated discs
Electric control
on rear discs,
automatic
engagement/
disengagement3.2 V6 CAE
Self-ventilated discs
Self-ventilated discs
Electric control
on rear discs,
automatic
engagement/
disengagement
Gearbox
Clutch
Drive
Service brakes:
- front
- rear
Electric parking
brake (EPB)
2.4 JTD 20VCAE
Automatic gearbox
with five forward
gears and reverse
-
Front3.2 V6 CAE
Automatic gearbox
with five forward
gears and reverse
-
Front