Lancia Thesis 2008 Owner handbook (in English)
Manufacturer: LANCIA, Model Year: 2008, Model line: Thesis, Model: Lancia Thesis 2008Pages: 386, PDF Size: 4.96 MB
Page 71 of 386

It is absolutely forbidden
to carry out whatever af-
ter-market operation in-
volving steering system or steering
column modifications (e.g.: instal-
lation of anti-theft Device) that
could badly affect performance
and safety, cause the lapse of war-
ranty and also result in non-com-
pliance of the car with homologa-
tion requirements.
70
STEERING WHEELSteering wheel position is stored
together with external rearview mir-
ror position, when storing the dri-
ver’s seat position.
MANUAL ADJUSTMENT (fig. 59)
The steering wheel height and axial
position can be adjusted:
On certain versions the steering
wheel height and axial position can be
adjusted; proceed as follows:
1) Push lever Bto1.
2) Move the steering wheel to the re-
quired position by pulling, pushing,
lifting or lowering it.
3) Pull leverBto2to lock the steer-
ing wheel in place. Only make adjustments
when the car is station-
ary.
ELECTRIC ADJUSTMENT
(fig. 58)
The steering wheel height and axial
position can be adjusted electroni-
cally when the ignition key is at
MAR.
To make adjustments, move lever
Ain four directions.
fig. 58
L0A6015b
fig. 59
L0A6016b
Page 72 of 386

71
Automatically adjustable (fig. 61)
The mirror is automatically set to
day and night position, irrespective-
ly of exterior lights.
The mirror sets always in day posi-
tion when engage the reverse gear.EXTERNAL REARVIEW
MIRRORS
External rearview mirrors have flat
surface and can be heated and
adjusted automatically when the
ignition key is at MAR.
Turn switch A(fig. 62) to position
1(left-hand mirror) or to position 2
(right-hand mirror) to select the
mirror to be adjusted.
fig. 61
L0A0247b
fig. 62
L0A0085b
REARVIEW
MIRRORS
INTERNAL REARVIEW MIRROR
Manually adjustable (fig. 60)
The mirror can be adjusted in four
directions by means of lever A:
1) normal position
2) anti-dazzle position.
The mirror is also fitted with a
safety device that releases the mirror
in the event of an impact.
fig. 60
L0A0269b
Page 73 of 386

72
The mirrors are automatically
demisted/defrosted when the heated
rear window is operated.
IMPORTANTRearview mirror
surface is flat to make objects seem
at their actual distance.If the mirrors make it
difficult to get through
narrow gaps and in auto-
matic car washes, fold them from
position 1 to position 2 (fig. 64).Automatic rearview mirror
realignment
Rearview mirror position is stored,
together with the steering wheel
position, when storing the driver’s
seat position. Each time the ignition
key is turned to MAR, rearview mir-
rors return automatically to the last
position reached and/or recalled at
the previous ignition key removal.
This enables rearview mirror align-
ment if, when the car is parked, one
of the rearview mirror has been
manually and/or accidentally
moved.
Storing the “parking” position of
the right-hand rearview mirror
When storing the driver’s seat posi-
tions, it is possible to store also the
“parking” position of the right-hand
rearview mirror. Stored position is
recalled automatically when engag-
ing the reverse gear. For further
information about rearview mirror
“parking” position storing and
recalling, see paragraph “Front
seats” in this chapter.
fig. 64
L0A0086b
Press switch A(fig. 62) to adjust
the mirror in the four directions
(fig. 63). After adjusting, turn switch
Aback to position 0to prevent mov-
ing the mirrors accidentally.
The mirrors can be folded electri-
cally to reduce side clearance. Turn
switchA(fig. 62) to position 3to
fold the mirrors electrically. Turn
the switch Ato position 0to return
the mirrors to their normal position.
fig. 63
L0A0242b
Page 74 of 386

73
Improper use of the elec-
trical window winders can
be dangerous. Before and
during their operation ensure
that any passengers in the car are
not at risk from the moving glass
either by personal objects getting
caught in the mechanism or by
being injured by it directly.
Always remove the ignition key
when you get out of the car to
prevent the electrical window
winders being operated acciden-
tally and constituting a danger to
the people left in the car. IMPORTANTIn the event that the
anti-trap function is activated 5
times in only 1 minute, the system
will automatically enter the “recov-
ery” mode (self-protection). This
condition is pointed out by the fact
that, in the closing phase, the win-
dow goes up in jerks.
It is therefore necessary in this case
to carry out the system restore pro-
cedure by operating window open-
ing control or turning the ignition
key to STOPand then to MAR.
Regular operation is restored if no
malfunction is present: otherwise
contact a Lancia Dealership.
In the event that the system detects
a malfunction, the failure message
and symbol ª!will appear on the
instrument panel display (see
“Window anti-trap safety system” at
paragraph “Warning lights”).ELECTRIC
WINDOWS
ANTI-TRAP SAFETY SYSTEM
Front and rear electric windows are
provided with anti-trap safety
device. When the system control unit
detects an obstacle in the window
closing travel, it makes the window
travel stop and reverse immediately.
This system complies with regula-
tion 2000/4/EC coming soon in
force, which is destined to protect
passengers leaning out of the win-
dows. Therefore, in case of unlawful
intrusions from the outside, the anti-
trap safety device could not activate.
Page 75 of 386

74
CONTROLS
Electric windows work with igni-
tion key at MAR.
IMPORTANTWith ignition key at
STOPor after removing it, the elec-
tric windows can be still operated for
about 2 minutes. They will deacti-
vate immediately when opening one
of the doors.
Driver’s side
On the driver’s door panel mask
there are 5 buttons (fig. 65) for con-
trolling every window.Front windows
Press buttons AorBto open/close
the required window (driver or pas-
senger side). Pressing briefly the
button the window “jerks”, whereas
a prolonged pressing makes the win-
dow opening or closing in “automat-
ic and continuous” mode. When
pressing again the button the win-
dow stops in the required position.
A– Front left window opening/ clos-
ing, “continuous automatic” opera-
tion during window opening/ closing
B– Front right window opening/
closing, “continuous automatic” oper-
ation during window opening/ clos-
ing.
Rear windows
Press buttons CorDto open/close
the required window (left or right
side). Pressing briefly the button the
window “jerks”, whereas a prolonged
pressing makes the window opening
in “automatic and continuous” mode.
When pressing again the button the
window stops in the required posi-
tion.C– Rear left window opening/clos-
ing, “continuous automatic” opera-
tion just during window opening
D– Rear right window opening/
closing, “continuous automatic” oper-
ation just during window opening
E– Rear window controls enabling/
disabling button; controls are disabled
when the button led is on.
Passenger’s side
On the passenger’s door panel
mask there is button A(fig. 66), for
opening/closing the passenger’s win-
dow.
fig. 65
L0A0050b
fig. 66
L0A0065b
Page 76 of 386

75
Pressing briefly the button the win-
dow “jerks”, whereas a prolonged
pressing makes the window opening
or closing in “automatic and continu-
ous” mode. When pressing again the
button the window stops in the
required position.
Rear controls
On the rear doors panel mask there
is button A(fig. 67), for opening/
closing the corresponding window.
Pressing briefly the button the win-
dow “jerks”, whereas a prolonged
pressing makes the window opening
or closing in “automatic and contin-
uous” mode. When pressing again
the button the window stops in the
required position.MANUAL AND AUTOMATIC
OPERATION
Front and rear window winders
can be operated both automatically
(opening and closing) and manually.
Long or short pulse determines the
type of operation.
Pull up or press the control button
to activate automatic closing or
opening: the window will stop when
it reaches the end of its travel (or
when the button is pressed again).
A short pulse results in a short win-
dow movement that stops when
releasing the button.CENTRALISED WINDOW AND
SUNROOF OPENING/CLOSING
SYSTEM
Centralised window and sunroof
opening/closing is activated in the
following conditions:
– ignition key removed;
– doors perfectly closed.
To activate centralised window and
sunroof closing, keep the remote
control button B(fig. 68) pressed
for over 2 seconds after closing the
doors: window and sunroof will
move until complete closing or until
releasing the button.
fig. 67
L0A0066b
fig. 68
L0A0174b
Page 77 of 386

76
SEAT BELTS
HOW TO USE
THE SEAT BELTS
The belt should be worn keeping
the chest straight and rested against
the seat back.
Instrument panel warning light
<
will come on if the ignition key is
turned to MARand the driver’s seat
belt is not fastened.
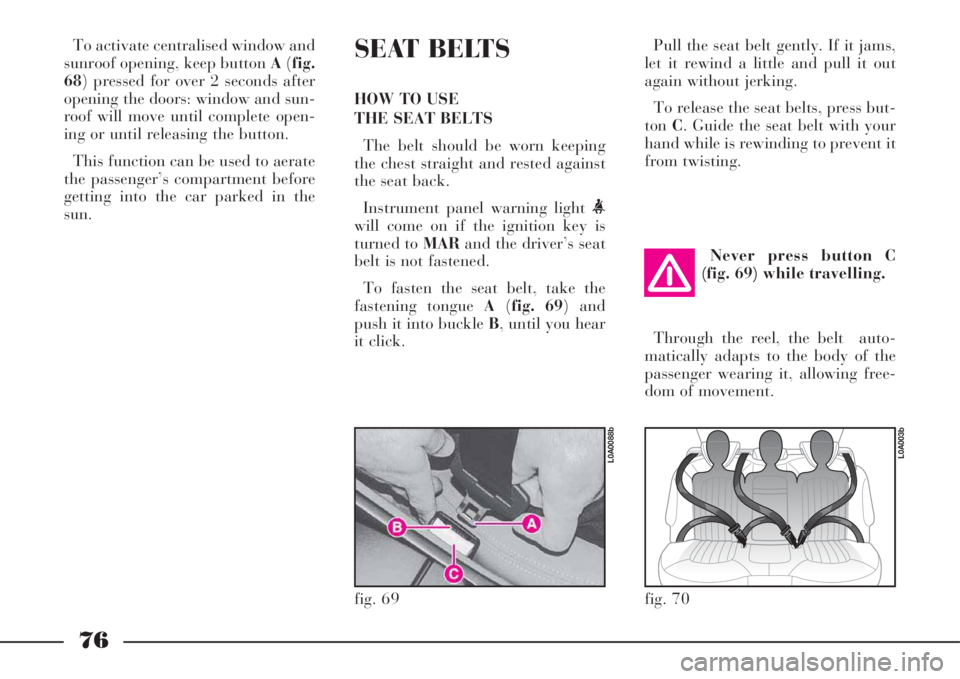
To fasten the seat belt, take the
fastening tongue A(fig. 69) and
push it into buckle B, until you hear
it click.Pull the seat belt gently. If it jams,
let it rewind a little and pull it out
again without jerking.
To release the seat belts, press but-
tonC. Guide the seat belt with your
hand while is rewinding to prevent it
from twisting.
Through the reel, the belt auto-
matically adapts to the body of the
passenger wearing it, allowing free-
dom of movement.Never press button C
(fig. 69) while travelling.
fig. 69
L0A0088b
fig. 70
L0A003b
To activate centralised window and
sunroof opening, keep button A(fig.
68) pressed for over 2 seconds after
opening the doors: window and sun-
roof will move until complete open-
ing or until releasing the button.
This function can be used to aerate
the passenger’s compartment before
getting into the car parked in the
sun.
Page 78 of 386

77
When the car is parked on a steep
slope the reel mechanism may block;
this is normal. The reel mechanism
prevents the webbing coming out
when it is jerked or if the car brakes
sharply, in a collision or when cor-
nering at high speed.
The rear seat is fitted with inertial
seat belts with three anchor points
and reel for the side and centre
seats.
Rear seat belts shall be worn as
shown in fig. 70.
To prevent incorrect fastening, the
tongues of the side seats and the
buckle of the centre lap belt are
incompatible.
fig. 71
L0A0096b
When the rear seats are not occu-
pied, use the spaces provided in the
cushion to stow the belt buckles (fig.
71).
Remember that in the
event of a violent colli-
sion, back seat passen-
gers not wearing seat belts also
represent a serious danger for the
front seat passengers.ADJUSTING THE HEIGHT OF
THE FRONT SEAT BELTS
Only adjust seat belt
height when the car is sta-
tionary.
Always adjust the height of the seat
belt to fit the person wearing it. This
precaution could greatly reduce the
risk of injury in case of collision.
Correct adjustment is obtained
when the belt passes half way
between the end of the shoulder and
the neck.
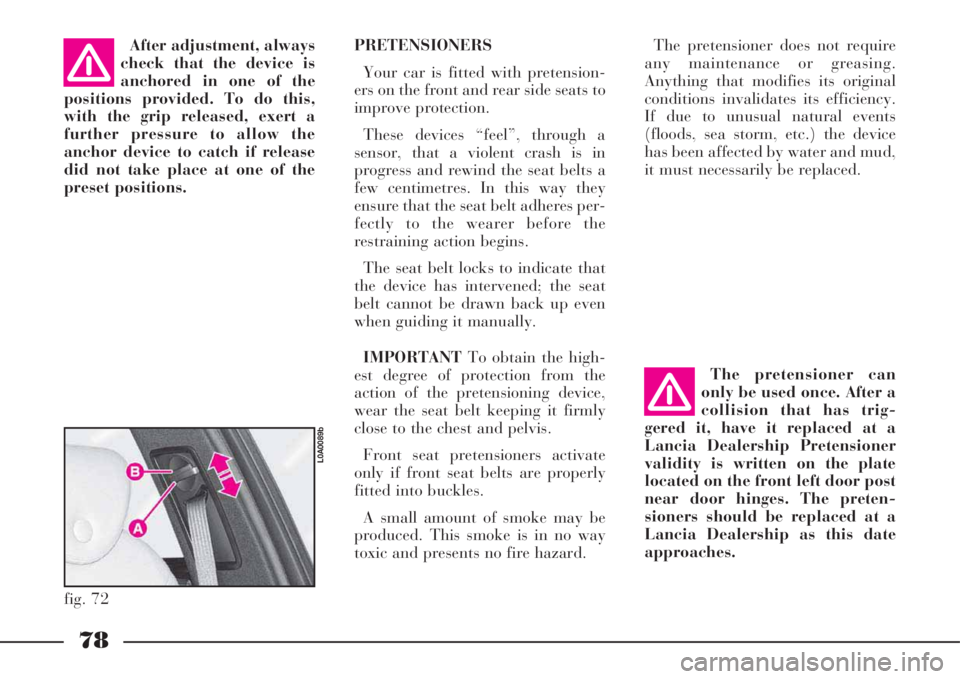
To adjust, lower or raise the grip A
(fig. 72). To lower the device keep
buttonBpressed.
Page 79 of 386

78
The pretensioner does not require
any maintenance or greasing.
Anything that modifies its original
conditions invalidates its efficiency.
If due to unusual natural events
(floods, sea storm, etc.) the device
has been affected by water and mud,
it must necessarily be replaced.
The pretensioner can
only be used once. After a
collision that has trig-
gered it, have it replaced at a
Lancia Dealership Pretensioner
validity is written on the plate
located on the front left door post
near door hinges. The preten-
sioners should be replaced at a
Lancia Dealership as this date
approaches.After adjustment, always
check that the device is
anchored in one of the
positions provided. To do this,
with the grip released, exert a
further pressure to allow the
anchor device to catch if release
did not take place at one of the
preset positions. PRETENSIONERS
Your car is fitted with pretension-
ers on the front and rear side seats to
improve protection.
These devices “feel”, through a
sensor, that a violent crash is in
progress and rewind the seat belts a
few centimetres. In this way they
ensure that the seat belt adheres per-
fectly to the wearer before the
restraining action begins.
The seat belt locks to indicate that
the device has intervened; the seat
belt cannot be drawn back up even
when guiding it manually.
IMPORTANTTo obtain the high-
est degree of protection from the
action of the pretensioning device,
wear the seat belt keeping it firmly
close to the chest and pelvis.
Front seat pretensioners activate
only if front seat belts are properly
fitted into buckles.
A small amount of smoke may be
produced. This smoke is in no way
toxic and presents no fire hazard.
fig. 72
L0A0089b
Page 80 of 386

LOAD LIMITING DEVICES
In order to increase passive safety,
the front and rear seat belt reels
have a built-in load limiting device
which collapse in a controlled fash-
ion so to dose the force on the pas-
senger’s shoulder and chest during
the retaining operation. GENERAL INSTRUCTIONS FOR
THE USE OF THE SEAT BELTS
The driver must comply with (and
have the vehicle occupants follow)
all the local legal regulations con-
cerning the use of seat belts.
Always fasten the seat belts before
starting.The belt should not be
twisted, make sure that it
is taut and adheres to the
passenger’s body. The upper part
should pass over the shoulder
and cross the chest diagonally.
The lower part should adhere to
the pelvis and to the abdomen of
the passenger (fig. 73). Do not use
any objects (pegs, stoppers, etc.)
to keep the belts away from the
body.
For maximum safety,
keep the back of your seat
upright, lean back into it
and make sure the seat belt fits
closely across your chest and
hips.
Make sure that the seat belts of
the front and rear passengers are
fastened at all times! You
increase the risk of serious injury
or death in a collision if you trav-
el with the belts unfastened.
fig. 73
L0A0004b
Operations which lead
to knocks, vibrations or
localised heating (over
100°C for a maximum of 6 hours)
in the area around the preten-
sioners may cause damage or
trigger them. These devices are
not affected by vibrations caused
by irregularities of the road sur-
face or low obstacles such as
kerbs, etc. Contact a Lancia
Dealership for any assistance.
79