remove seats Lancia Ypsilon 2001 Owner handbook (in English)
[x] Cancel search | Manufacturer: LANCIA, Model Year: 2001, Model line: Ypsilon, Model: Lancia Ypsilon 2001Pages: 191, PDF Size: 2.45 MB
Page 20 of 191

17
G
STEERING COLUMN LOCK
To set: remove the ignition key from
theSTOPorPARKposition, and
turn the steering wheel until it locks.
To release: move the steering wheel
slightly as you turn the ignition key to
MAR.
Never remove the ignition
key while the car is mov-
ing. The steering wheel
would automatically lock as soon
as you tried to turn it. This also
applies when the car is being
towed.INDIVIDUAL
SETTINGS
Adjustments must be
made only when the car is
stationary.
FRONT SEATS
Moving the seat backwards
or forwards
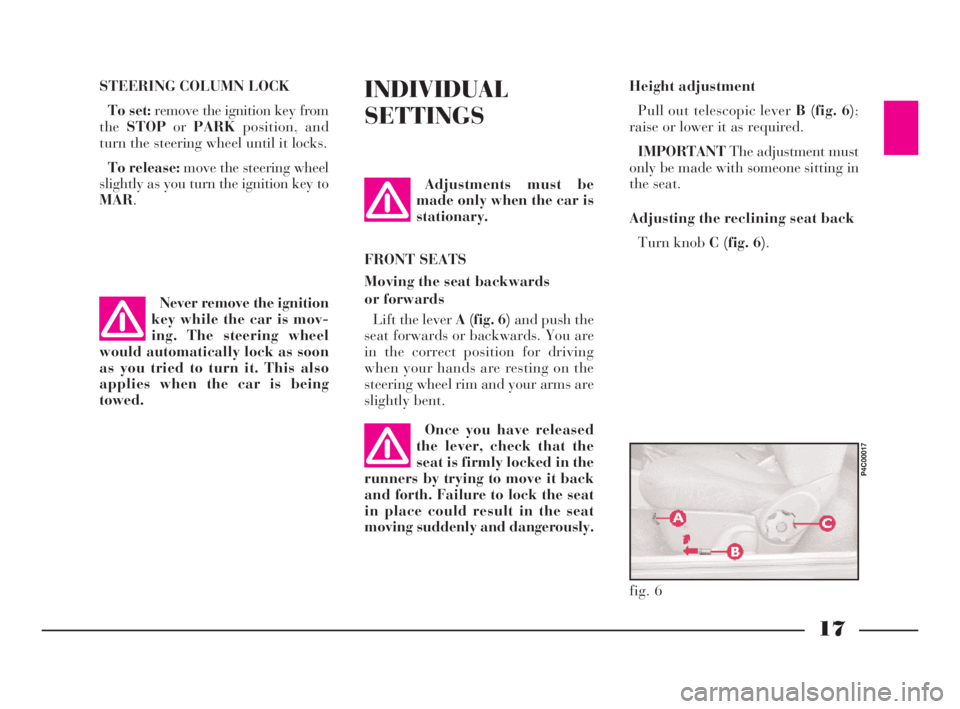
Lift the lever A (fig. 6)and push the
seat forwards or backwards. You are
in the correct position for driving
when your hands are resting on the
steering wheel rim and your arms are
slightly bent.Height adjustment
Pull out telescopic lever B (fig. 6);
raise or lower it as required.
IMPORTANTThe adjustment must
only be made with someone sitting in
the seat.
Adjusting the reclining seat back
Turn knob C (fig. 6).
fig. 6
P4C00017
Once you have released
the lever, check that the
seat is firmly locked in the
runners by trying to move it back
and forth. Failure to lock the seat
in place could result in the seat
moving suddenly and dangerously.
4C001-067 ING 11-03-2008 11:57 Pagina 17
Page 49 of 191

46
G
sition and the cigar lighter is ready to
use.
The ashtray can be removed.
IMPORTANTMake sure that the
cigar lighter does in fact pop out af-
ter it has been pushed in.
The rear seats have a concealed ash-
tray in the right side panel.
Follow the direction of the arrow to
use and extract the ashtray (fig. 61).
fig. 61
P4C00099
CEILING LAMP (fig. 59)
SwitchesAandBswitch the ceiling
lights on and off.
The following conditions are created
according to the position of these
switches:
–with switch A in the centre po-
sition, light Cin the ceiling lamp will
come on when the doors are opened;
–with switch A moved to the left,
lightCin the ceiling lamp is off and
will not light up if the doors are
opened;
–with switch A moved to the
right, light Cin the ceiling lamp will
light up regardless of whether the
doors are open or not.SwitchBwill switch the map-read-
ing light Don/off (spot light).
IMPORTANTBefore getting out of
the car, make sure that switch Ais in
the centre position; the ceiling light will
then go out when the doors are closed
and you will not drain the battery.
ASHTRAY AND CIGAR LIGHTER
How to use them:
1)Open flap A (fig. 60)in the di-
rection of the arrow to reach the cigar
lighter and the ashtray.
2)Press button B: after around fif-
teen seconds it returns to its initial po-
fig. 60
P4C00215
fig. 59
P4C00097
4C001-067 ING 11-03-2008 11:57 Pagina 46
Page 55 of 191

52
G
4)Fold the seat back forwards to
make a flat loading surface with the
boot floor (fig. 78).
If necessary, the cushion can also be
tilted(fig. 79). Consequently, before
releasing the seat back, lift the cush-
ion as shown and tip it against the
front seat backs; the rear seat back-
rest can then be released and tilted
forwards.
To return the seat to its normal po-
sition:
1)Return the seat back to the verti-
cal position and make sure it is prop-
erly locked into place; the red strip on
the hook-up button must disappear.
fig. 77
P4C00034
Removing the parcel shelf
If you wish to remove the parcel
shelf to extend the boot capacity, un-
hook the two tie-rods (one each side)
A (fig. 75)from the hooks B, then
pull the parcel shelf outwards so that
pinsCcome out.
The shelf can then be positioned be-
hind the front seats.INCREASING THE LOAD AREA
Proceed as follows:
1)Make sure that the side seat belts
A (fig. 76)have been inserted into the
corresponding bracket B.
2)Remove the rear head restraints
if required.
3)Release the seat back by pressing
buttonA (fig. 77)(one for each side)
located on the back seat back-rest
(even when a split back seat is fitted);
a red strip will appear on the short
side of the button (towards the inside
of the car) to indicate that it has been
released.
fig. 75
P4C00009
fig. 76
P4C00052
Heavy loads which are
not securely anchored
could seriously injure pas-
sengers in the event of an accident.
4C001-067 ING 11-03-2008 11:57 Pagina 52
Page 74 of 191

71
G
HANDBRAKE
The handbrake lever is situated be-
tween the two front seats.
To put the handbrake on, pull it up-
wards until the vehicle is blocked;
normally four or five clicks are suffi-
cient on flat ground, whereas seven or
eight might be necessary when park-
ing on steep slopes with the vehicle
laden.
IMPORTANTIf this is not the case,
take the car to a LANCIA Dealer-
shipto have the handbrake adjusted.
When the ignition key is turned to
MARand the handbrake pulled up,
the warning lamp xwill light up on
the instrument panel.To release the handbrake:
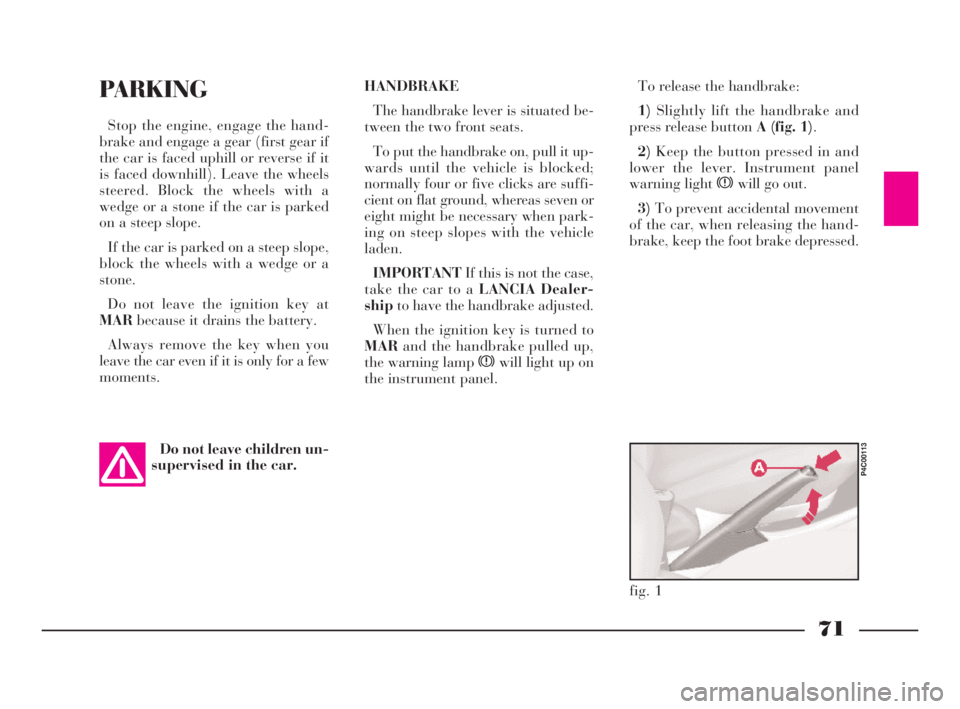
1)Slightly lift the handbrake and
press release button A (fig. 1).
2)Keep the button pressed in and
lower the lever. Instrument panel
warning light xwill go out.
3)To prevent accidental movement
of the car, when releasing the hand-
brake, keep the foot brake depressed.PARKING
Stop the engine, engage the hand-
brake and engage a gear (first gear if
the car is faced uphill or reverse if it
is faced downhill). Leave the wheels
steered. Block the wheels with a
wedge or a stone if the car is parked
on a steep slope.
If the car is parked on a steep slope,
block the wheels with a wedge or a
stone.
Do not leave the ignition key at
MARbecause it drains the battery.
Always remove the key when you
leave the car even if it is only for a few
moments.
Do not leave children un-
supervised in the car.
fig. 1
P4C00113
4C068-089 ING 11-03-2008 11:59 Pagina 71
Page 145 of 191

Detergents pollute water.
The car must therefore be
washed in an area
equipped for the collection and
purification of the liquids used
while washing.
IMPORTANTThe car should be
washed while the engine is cold and
with the ignition key at STOP. After
washing the car, make sure that the
various protections (e.g. rubber boots
and various guards) have not been re-
moved or damaged.
142
G
Windows
Use specific window cleaners to
clean the windows. Use very clean
cloths to avoid scratching the glass or
damaging its transparency.
IMPORTANTTo prevent damage
to the electric heater elements, wipe
the inside of the heated rear window
gently in the same direction as the el-
ements.
Engine compartment
At the end of each winter season,
carefully clean the engine compart-
ment. Be careful not to direct the jet
of water on the electronic control
units. Have this done at a garage.INTERIORS
From time to time check that water
has not collected under the mats
(from dripping shoes, umbrellas etc.)
which could cause the steel to rust.
CLEANING THE SEATS
AND FABRIC UPHOLSTERY
– Remove the dust with a soft brush
or a vacuum cleaner.
– Rub the seats with a sponge moist-
ened in a solution of water and neu-
tral detergent.
4C120-143 ING 11-03-2008 12:01 Pagina 142
Page 146 of 191

143
G
PLASTIC PARTS INSIDE
THE CAR
Use special products designed not to
alter the appearance of the compo-
nents.
IMPORTANTDo not use alcohol or
petrol for cleaning the glass of the in-
strument panel.CLEANING LEATHER SEATS
AND PARTS
– Remove the dry dirt with a buck-
skin or very slightly moist cloth with-
out exerting too much pressure.
– Remove liquid or grease stains
with a dry absorbent cloth without
rubbing. Then wipe with a buckskin
or soft cloth moistened with water and
neutral soap.
If the stain does not come out, use a
special cleaning compound being par-
ticularly careful to follow the instruc-
tions for use.
IMPORTANTNever use alcohol or
alcohol-base products.Do not keep aerosol cans
in the car. There is the risk
they might explode. Aerosol
cans must never be exposed to a
temperature above 50°C; when the
weather starts to get hot the tem-
perature inside the car might go
well beyond that figure.
Never use flammable
products (petroleum ether
or petrol) to clean the in-
side of the car. Electrostatic
charges generated by rubbing
while cleaning could cause fires.
4C120-143 ING 11-03-2008 12:01 Pagina 143