height Lancia Ypsilon 2002 Owner handbook (in English)
[x] Cancel search | Manufacturer: LANCIA, Model Year: 2002, Model line: Ypsilon, Model: Lancia Ypsilon 2002Pages: 191, PDF Size: 2.45 MB
Page 20 of 191
17
G
STEERING COLUMN LOCK
To set: remove the ignition key from
theSTOPorPARKposition, and
turn the steering wheel until it locks.
To release: move the steering wheel
slightly as you turn the ignition key to
MAR.
Never remove the ignition
key while the car is mov-
ing. The steering wheel
would automatically lock as soon
as you tried to turn it. This also
applies when the car is being
towed.INDIVIDUAL
SETTINGS
Adjustments must be
made only when the car is
stationary.
FRONT SEATS
Moving the seat backwards
or forwards
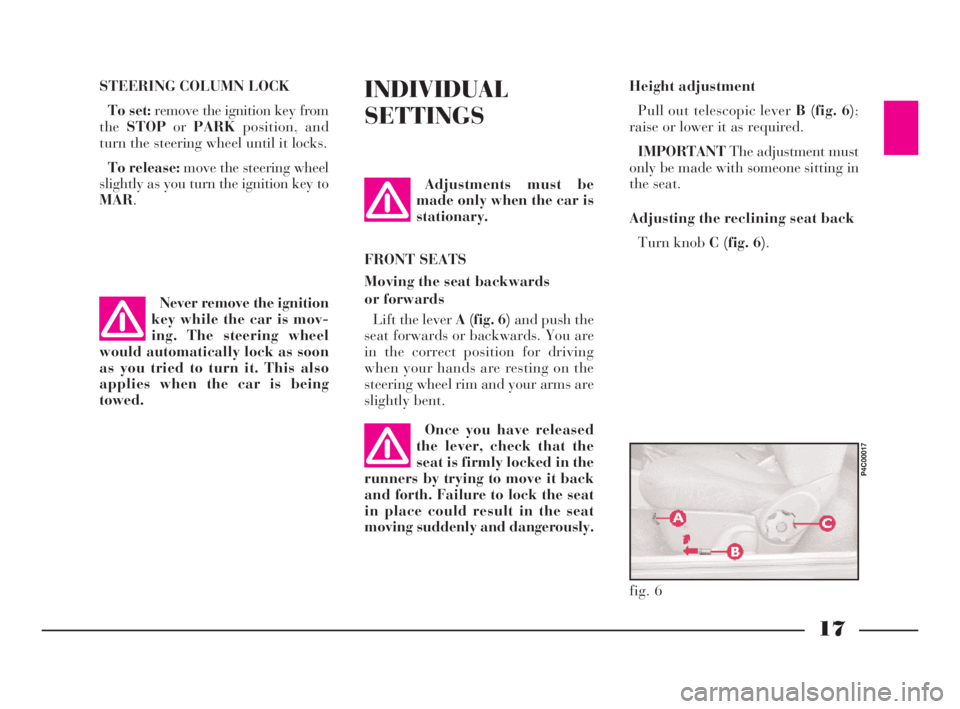
Lift the lever A (fig. 6)and push the
seat forwards or backwards. You are
in the correct position for driving
when your hands are resting on the
steering wheel rim and your arms are
slightly bent.Height adjustment
Pull out telescopic lever B (fig. 6);
raise or lower it as required.
IMPORTANTThe adjustment must
only be made with someone sitting in
the seat.
Adjusting the reclining seat back
Turn knob C (fig. 6).
fig. 6
P4C00017
Once you have released
the lever, check that the
seat is firmly locked in the
runners by trying to move it back
and forth. Failure to lock the seat
in place could result in the seat
moving suddenly and dangerously.
4C001-067 ING 11-03-2008 11:57 Pagina 17
Page 21 of 191

18
G
HEAD RESTRAINTS (fig. 8)The rear head restraints (fig. 9)can
be removed to fold the seat back:
– press tabs Aand remove the head
restraint.
To refit, fit it in the holes until you
hear a click.
fig. 9
P4C00391
Remember: head re-
straints should be adjusted
to support the back of your
head and not your neck. Only if
they are in this position will they
be able to provide effective protec-
tion in the event of a rear-end
shunt.
The height of the front head re-
straints can be adjusted to ensure that
the person’s head rests on it correctly. Lumbar support adjustment
This adjustment gives better back
support.
To adjust, turn knob D (fig. 7).
fig. 7
P4C00159
fig. 8
P4C00390
k),
the
D
be
the
4C001-067 ING 11-03-2008 11:57 Pagina 18
Page 22 of 191
19
G
ACCESS TO THE BACK SEATS
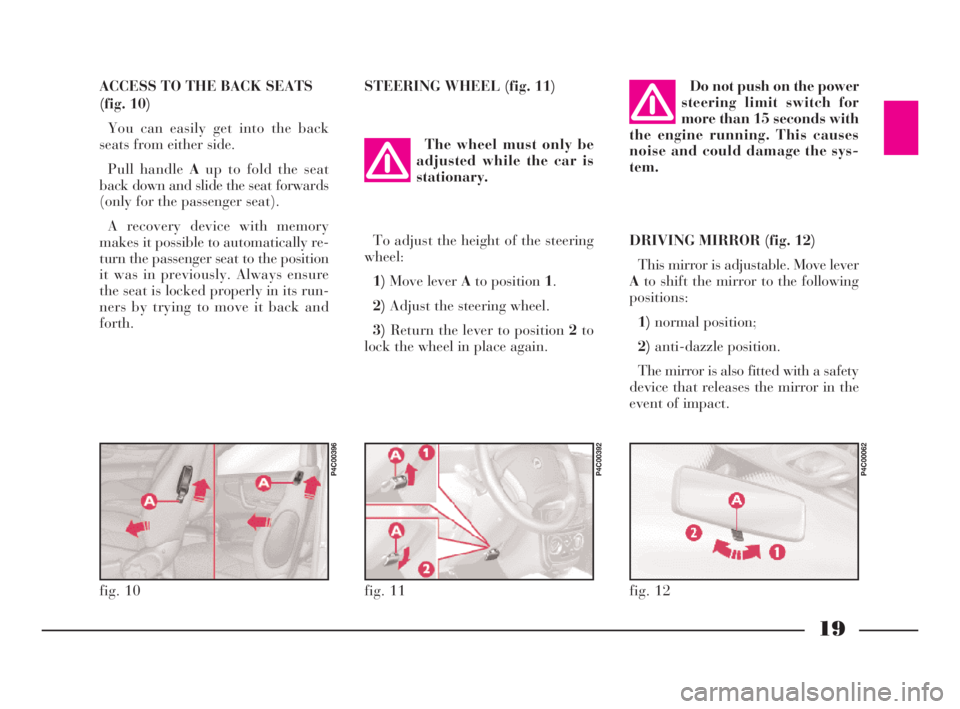
(fig. 10)
You can easily get into the back
seats from either side.
Pull handle Aup to fold the seat
back down and slide the seat forwards
(only for the passenger seat).
A recovery device with memory
makes it possible to automatically re-
turn the passenger seat to the position
it was in previously. Always ensure
the seat is locked properly in its run-
ners by trying to move it back and
forth.STEERING WHEEL (fig. 11)
DRIVING MIRROR (fig. 12)
This mirror is adjustable. Move lever
Ato shift the mirror to the following
positions:
1)normal position;
2)anti-dazzle position.
The mirror is also fitted with a safety
device that releases the mirror in the
event of impact. The wheel must only be
adjusted while the car is
stationary.Do not push on the power
steering limit switch for
more than 15 seconds with
the engine running. This causes
noise and could damage the sys-
tem.
fig. 11
P4C00392
fig. 12
P4C00062
To adjust the height of the steering
wheel:
1)Move lever Ato position 1.
2)Adjust the steering wheel.
3)Return the lever to position 2to
lock the wheel in place again.
fig. 10
P4C00396
4C001-067 ING 11-03-2008 11:57 Pagina 19
Page 24 of 191
21
G
SEAT BELTS
HOW TO USE THE SEAT BELTS
(for the front and back side seats)
(fig. 16)
Pull the seat belt out gently; if the
belt jams, let it rewind for a short
stretch, then pull it out again without
jerking.
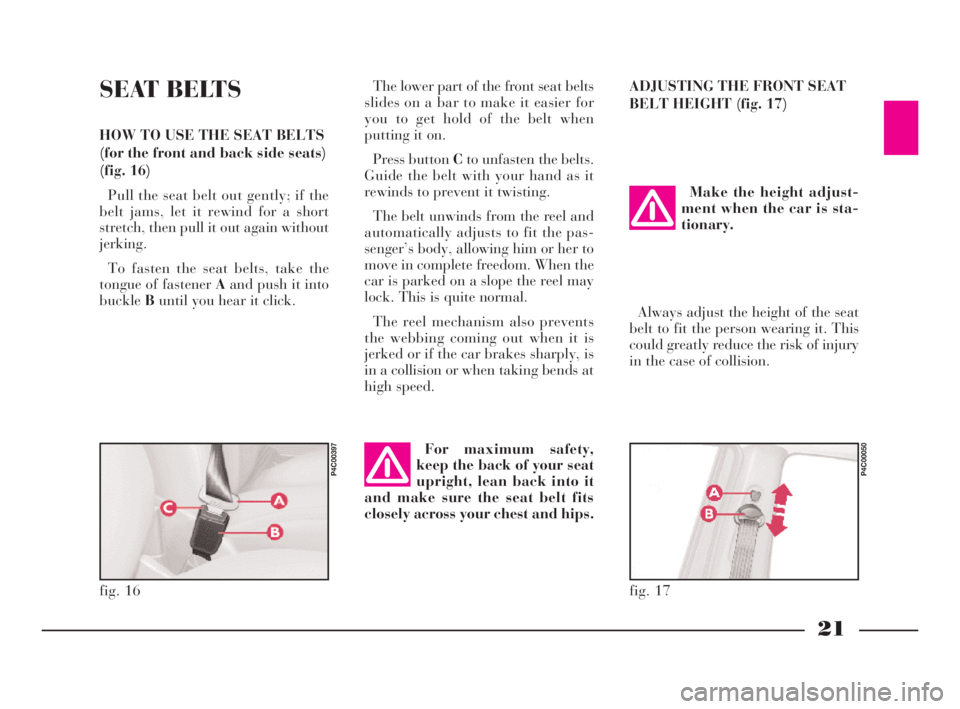
To fasten the seat belts, take the
tongue of fastener Aand push it into
buckleBuntil you hear it click.The lower part of the front seat belts
slides on a bar to make it easier for
you to get hold of the belt when
putting it on.
Press button Cto unfasten the belts.
Guide the belt with your hand as it
rewinds to prevent it twisting.
The belt unwinds from the reel and
automatically adjusts to fit the pas-
senger’s body, allowing him or her to
move in complete freedom. When the
car is parked on a slope the reel may
lock. This is quite normal.
The reel mechanism also prevents
the webbing coming out when it is
jerked or if the car brakes sharply, is
in a collision or when taking bends at
high speed.ADJUSTING THE FRONT SEAT
BELT HEIGHT (fig. 17)
For maximum safety,
keep the back of your seat
upright, lean back into it
and make sure the seat belt fits
closely across your chest and hips.
fig. 17
P4C00050
Make the height adjust-
ment when the car is sta-
tionary.
Always adjust the height of the seat
belt to fit the person wearing it. This
could greatly reduce the risk of injury
in the case of collision.
fig. 16
P4C00397
4C001-067 ING 11-03-2008 11:57 Pagina 21
Page 25 of 191
22
G
For maximum pretensioner protec-
tion, make sure your seat belt fits
snugly to your chest and hips.
Never dismantle or tam-
per with pretensioner
components. Any interven-
tion must be performed by skilled
and qualified personnel. Always
have interventions performed at a
LANCIA Dealership.PRETENSIONERS
The Lancia Y is fitted with preten-
sioners to enable the seat belts to of-
fer even more effective protection.
These devices “feel” that a violent col-
lision is in progress, via a sensor, and
call in a few inches of webbing. The
pretensioner, therefore, ensures the
belt is adhering perfectly to the body
before it begins to stop the wearer
moving forward.
When the seat belt locks, it indicates
the pretensioner has been activated.
The belt will not wind back even if
accompanied manually.
A small amount of smoke may be
noticed: this is not harmful and does
not indicate the beginning of a fire.
The pretensioner needs no mainte-
nance or lubrication. Any modifica-
tion to its original features will nullify
the pretensioner’s effectiveness. If wa-
ter or mud accidentally get into the
pretensioner as a result of floods or
storms, the device must be replaced. The belt is adjusted properly when
the webbing passes approximately
halfway between the edge of the
shoulder and the neck.
The seat belt can be adjusted to one
of four different heights.
To lift the belt
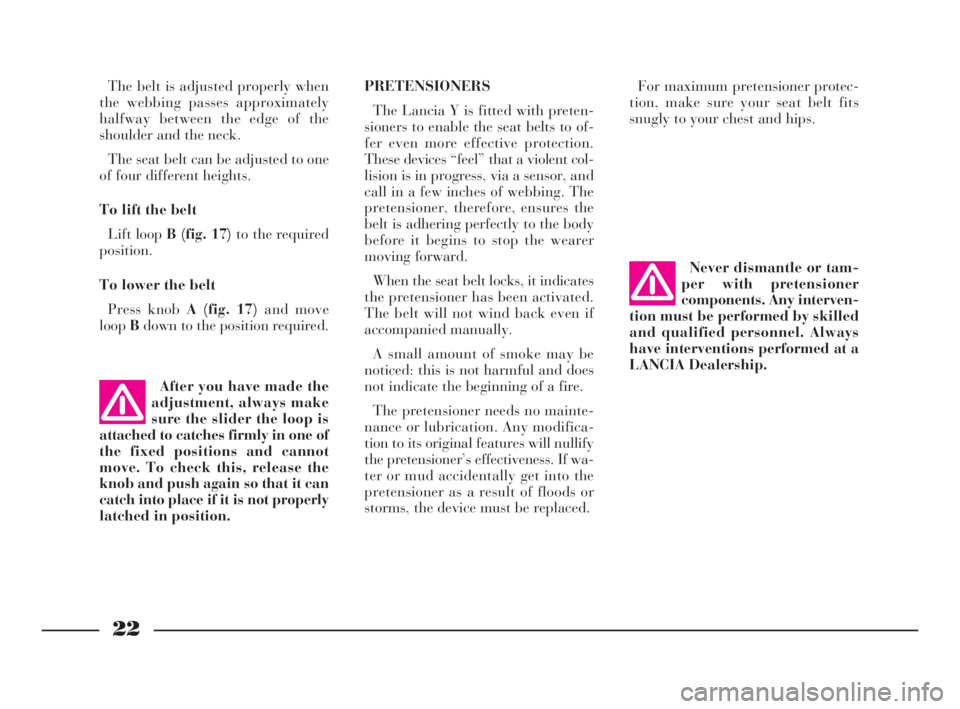
Lift loop B (fig. 17)to the required
position.
To lower the belt
Press knob A (fig. 17)and move
loopBdown to the position required.
After you have made the
adjustment, always make
sure the slider the loop is
attached to catches firmly in one of
the fixed positions and cannot
move. To check this, release the
knob and push again so that it can
catch into place if it is not properly
latched in position.
4C001-067 ING 11-03-2008 11:57 Pagina 22
Page 56 of 191
53
G
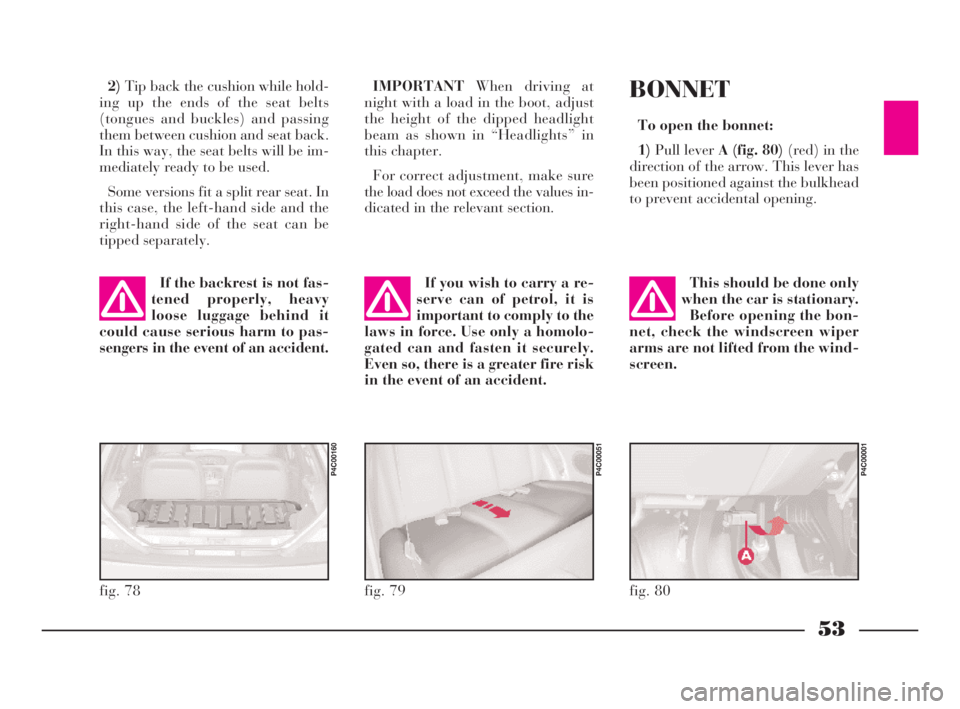
2)Tip back the cushion while hold-
ing up the ends of the seat belts
(tongues and buckles) and passing
them between cushion and seat back.
In this way, the seat belts will be im-
mediately ready to be used.
Some versions fit a split rear seat. In
this case, the left-hand side and the
right-hand side of the seat can be
tipped separately.IMPORTANTWhen driving at
night with a load in the boot, adjust
the height of the dipped headlight
beam as shown in “Headlights” in
this chapter.
For correct adjustment, make sure
the load does not exceed the values in-
dicated in the relevant section.
fig. 78
P4C00160
fig. 79
P4C00051
If the backrest is not fas-
tened properly, heavy
loose luggage behind it
could cause serious harm to pas-
sengers in the event of an accident.If you wish to carry a re-
serve can of petrol, it is
important to comply to the
laws in force. Use only a homolo-
gated can and fasten it securely.
Even so, there is a greater fire risk
in the event of an accident.
BONNET
To open the bonnet:
1)Pull lever A (fig. 80)(red) in the
direction of the arrow. This lever has
been positioned against the bulkhead
to prevent accidental opening.
fig. 80
P4C00001
This should be done only
when the car is stationary.
Before opening the bon-
net, check the windscreen wiper
arms are not lifted from the wind-
screen.
4C001-067 ING 11-03-2008 11:57 Pagina 53
Page 78 of 191
75
G
SAFE DRIVING
In designing the Lancia Y, we made
every effort to come up with a car
able to provide driver and passengers
with top-class levels of safety. Never-
theless it is always the behaviour of
the person at the wheel that deter-
mines road safety.
Below you will find some simple tips
to help you travel in safety under dif-
ferent conditions. You will no doubt
be familiar with many of them al-
ready but it will be useful to read
them all carefully.BEFORE GETTING BEHIND
THE WHEEL
– Make sure all lights including the
headlights are working properly.
– Adjust the position of the seats,
steering wheel, driving and door mir-
rors properly for the best driving po-
sition.
– On long journeys, it is a good idea
to slightly alter the lumber support
and/or seat inclination to vary the
weight on the spine and therefore re-
duce tiredness and strain.
– Carefully adjust the head restraints
so the back of the head and not the
nape of the neck is supported.
– Carefully adjust the height of the
seat belts to suit the wearer’s stature
(see the instructions given in the sec-
tion “Getting to know your car - seat
belts”).
– Make sure that nothing (mats etc.)
get in the way of the pedals.– Make sure that any child restraint
systems (child seats, carriers, etc.) are
properly fixed to the rear seat. Follow
the indications given in “Transport-
ing children safely” in the section
“Getting to know your car”.
– Make sure that objects are care-
fully arranged in the boot so they will
not fly forward if you have to brake
sharply.
– Avord placing light-coloured arti-
cles or papers on the object tray which
may be reflected on the windscreen.
– Do not eat a heavy meal before
travelling. Light eating will help keep
your reflexes prompt. Above all, do
not have anything alcoholic to drink.
The use of some drugs may affect
your driving, read the relevant in-
structions sheet carefully.
Remember to periodically check
what is specified in the “Repeated
checks and checks before long trips”
paragraph given in this section.
4C068-089 ING 11-03-2008 11:59 Pagina 75
Page 88 of 191

85
G
The ABS system with
which the car may be fitted
does not control the brak-
ing system of a trailer. Special care
must therefore be taken on slip-
pery surfaces.
Under no circumstances
modify the car’s braking
system for trailer braking
control. The trailer’s braking sys-
tem must be completely indepen-
dent of the car’s hydraulic system.The weight the trailer exerts on the
car’s tow hitch coupling reduces the
car’s carrying capacity by the same
amount.
In order to be sure you are not ex-
ceeding the maximum towing weight
(given on the car’s registration pa-
pers), you have to take into account
the trailer’s weight fully laden in-
cluding the accessories and personal
luggage.
Do not exceed the speed limits for
towing a trailer in the country you are
driving in. In any case, do not exceed
the top speed of 100 km/h.SNOW CHAINS
The use of snow chains is regulated
by the legislation in force in the coun-
try the car is driven in.
The chains may only be applied to
the drive wheel tyres (front wheels).
Use only low profile chains (maxi-
mum height off the tyre: 12 mm).
Check the tautness of the chains af-
ter driving some twenty to thirty me-
tres.
IMPORTANTAs the spare wheel is
small (space-saver), it is not possible
to fit snow chains to it. If a front tyre
is punctured, first exchange a rear
wheel with the spare tyre and then
change the flat tyre with the rear wheel
thus removed. This way there will be
two ordinary wheels at the front and
the snow chains can be fitted.
Remember that the wheels should
always be exchanged on the same side
of the vehicle; never change wheels
over from one side of the car to the
other.
4C068-089 ING 11-03-2008 11:59 Pagina 85
Page 153 of 191

150
G
GEARBOX AND DIFFERENTIAL
Five forward speeds with synchromesh, and reverse.
The ratios are as follows:TRANSMISSION
CLUTCH
Mechanically controlled with travel-
free pedal.
Pedal with adjustable height.
1.2 1.2 16V
In first gear 3.909 3.909
In second gear 2.158 2.158
In third gear 1.480 1.480
In fourth gear 1.121 1.121
In fifth gear 0.897 0.897
In reverse 3.818 3.818
4C144-167 ING 11-03-2008 12:02 Pagina 150
Page 157 of 191

154
G
SNOW CHAINS
The maximum height off the tyre allowed is 12 mm.
Snow chains cannot be fitted on the 1.2
16VM Nredversion standard 195/50 R15
82 H tyres.
Alternatively, have 185/60 R14 82H tyres fitted on which snow chains can be
mounted.
Rim Tyre
1.2
16VM Nblue- 1.2 (except for ABSoption - 185/60 tyre-alloy wheels) 4.50Bx13"H 135/80 B13 78T
All versions with ABS,
versions with 185/60 tyres,
versions with alloy rims 4.00Bx14"H 135/80 B14 80P
1.216VM Nred4.00Bx14"H 135/80 B14 80P
SPARE WHEEL
Pressed-steel rim.
Tubeless tyre.UNDERSTANDING
TYRE MARKINGS
Example
185/60 R 14 82 H
185= Nominal width (distance
between sidewalls in mm).
60= Height/width ratio
(as a percentage).
R= Radial tyre.
14= Rim diameter (in inches).
82= Load rating.
H= Maximum speed rating.
Maximum speed rating
Q= up to 160 km/h.
R= up to 170 km/h.
S= up to 180 km/h.
T= up to 190 km/h.
U=up to 200 km/h.
H= up to 210 km/h.
V= over 210 km/h.
4C144-167 ING 11-03-2008 12:02 Pagina 154