steering Lancia Ypsilon 2002 Owner handbook (in English)
[x] Cancel search | Manufacturer: LANCIA, Model Year: 2002, Model line: Ypsilon, Model: Lancia Ypsilon 2002Pages: 191, PDF Size: 2.45 MB
Page 11 of 191
G
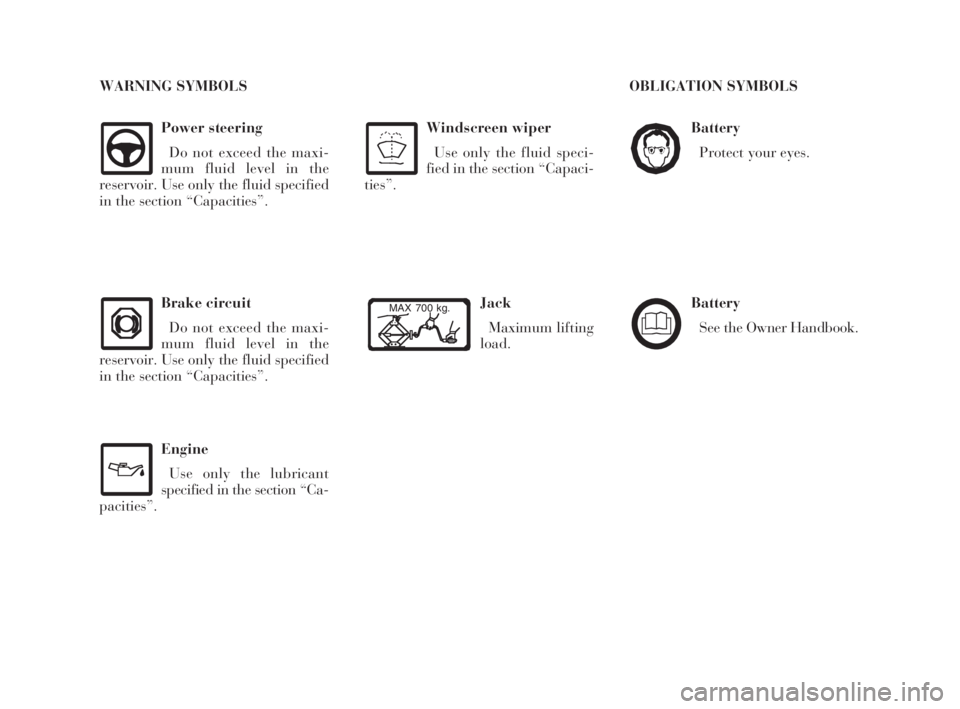
Battery
Protect your eyes.
Battery
See the Owner Handbook.
Power steering
Do not exceed the maxi-
mum fluid level in the
reservoir. Use only the fluid specified
in the section “Capacities”.
Brake circuit
Do not exceed the maxi-
mum fluid level in the
reservoir. Use only the fluid specified
in the section “Capacities”.
Windscreen wiper
Use only the fluid speci-
fied in the section “Capaci-
ties”.
Jack
Maximum lifting
load.MAX 700 kg.
WARNING SYMBOLS OBLIGATION SYMBOLS
Engine
Use only the lubricant
specified in the section “Ca-
pacities”.
4C001-067 ING 11-03-2008 11:57 Pagina 8
Page 13 of 191
You are recommended to read this chapter sit-
ting comfortably in your new Lancia Y. In this
way you will be able to identify the parts de-
scribed immediate and see for yourself what you
have just read.
In short, you will increase your knowledge of your
Lancia Y with its controls and other devices. Later,
when you start the engine and join the traffic you
will make a host of other pleasant discoveries.
DASHBOARD................................................. 11
THE LANCIA CODE SYSTEM....................... 13
IGNITION SWITCH ........................................ 16
INDIVIDUAL SETTINGS ............................... 17
SEAT BELTS .................................................. 21
TRANSPORTING CHILDREN SAFELY .......... 26
INSTRUMENT PANEL ................................... 29
INSTRUMENTS............................................. 31
WARNING LIGHTS ........................................ 34HEATING AND VENTILATION ..................... 37
CLIMATE CONTROL SYSTEM....................... 40
STEERING COLUMN STALKS ...................... 41
CONTROLS.................................................... 43
INTERIOR EQUIPMENT ................................ 45
SUNROOF...................................................... 48
DOORS........................................................... 49
BOOT ............................................................. 51
BONNET........................................................ 53
SKI AND ROOF RACKS................................. 55
HEADLIGHTS............................................... 55
ABS ................................................................ 56
FRONT AND SIDE AIRBAGS.......................... 58
EOBD SYSTEM............................................... 63
SOUND SYSTEM ........................................... 64
RADIO-NAVIGATION SYSTEM..................... 65
CELLULAR PHONE SETUP........................... 66
FUEL TANK CAP ............................................ 67
10
G
GETTING TO KNOW YOUR CAR
4C001-067 ING 11-03-2008 11:57 Pagina 10
Page 14 of 191
11
G
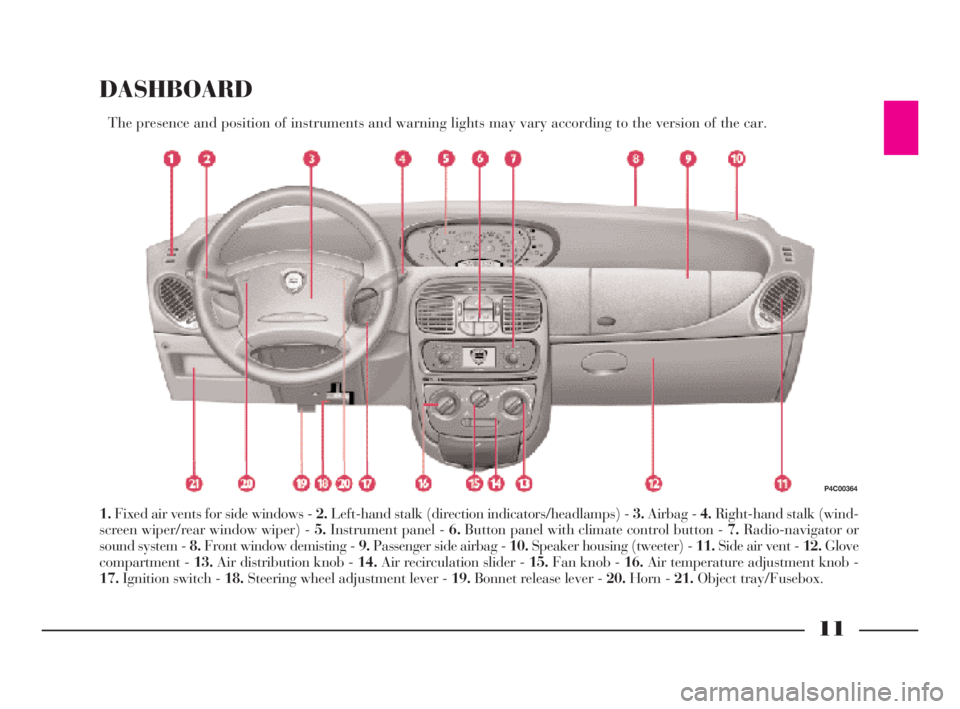
DASHBOARD
The presence and position of instruments and warning lights may vary according to the version of the car.
1.Fixed air vents for side windows - 2.Left-hand stalk (direction indicators/headlamps) - 3.Airbag - 4.Right-hand stalk (wind-
screen wiper/rear window wiper) - 5.Instrument panel - 6.Button panel with climate control button - 7.Radio-navigator or
sound system - 8.Front window demisting - 9.Passenger side airbag - 10.Speaker housing (tweeter) - 11.Side air vent - 12.Glove
compartment - 13.Air distribution knob - 14.Air recirculation slider - 15.Fan knob - 16.Air temperature adjustment knob -
17.Ignition switch - 18.Steering wheel adjustment lever - 19.Bonnet release lever - 20.Horn - 21.Object tray/Fusebox.
P4C00364
4C001-067 ING 11-03-2008 11:57 Pagina 11
Page 15 of 191
12
G
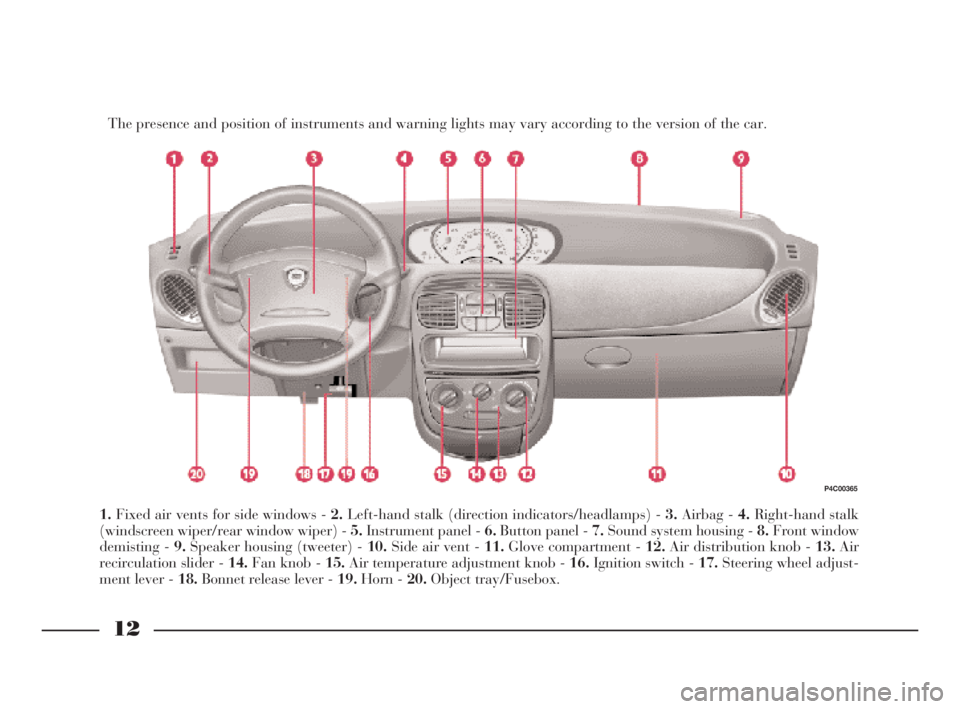
The presence and position of instruments and warning lights may vary according to the version of the car.
1.Fixed air vents for side windows - 2.Left-hand stalk (direction indicators/headlamps) - 3.Airbag - 4.Right-hand stalk
(windscreen wiper/rear window wiper) - 5.Instrument panel - 6.Button panel - 7.Sound system housing - 8.Front window
demisting - 9.Speaker housing (tweeter) - 10.Side air vent - 11.Glove compartment - 12.Air distribution knob - 13.Air
recirculation slider - 14.Fan knob - 15.Air temperature adjustment knob - 16.Ignition switch - 17.Steering wheel adjust-
ment lever - 18.Bonnet release lever - 19.Horn - 20.Object tray/Fusebox.
P4C00365
4C001-067 ING 11-03-2008 11:57 Pagina 12
Page 19 of 191
IGNITION SWITCH
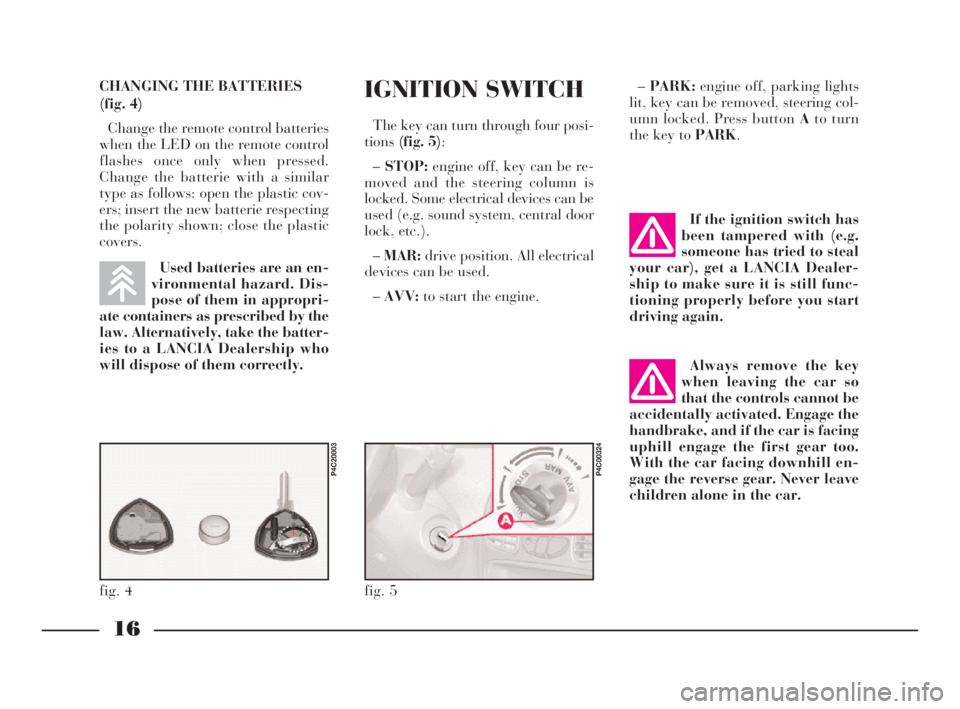
The key can turn through four posi-
tions(fig. 5):
–STOP:engine off, key can be re-
moved and the steering column is
locked. Some electrical devices can be
used (e.g. sound system, central door
lock, etc.).
–MAR:drive position. All electrical
devices can be used.
–AVV:to start the engine.–PARK:engine off, parking lights
lit, key can be removed, steering col-
umn locked. Press button Ato turn
the key to PARK.
fig. 5
P4C00324
If the ignition switch has
been tampered with (e.g.
someone has tried to steal
your car), get a LANCIA Dealer-
ship to make sure it is still func-
tioning properly before you start
driving again.
Always remove the key
when leaving the car so
that the controls cannot be
accidentally activated. Engage the
handbrake, and if the car is facing
uphill engage the first gear too.
With the car facing downhill en-
gage the reverse gear. Never leave
children alone in the car.
16
G
CHANGING THE BATTERIES
(fig. 4)
Change the remote control batteries
when the LED on the remote control
flashes once only when pressed.
Change the batterie with a similar
type as follows: open the plastic cov-
ers; insert the new batterie respecting
the polarity shown; close the plastic
covers.
Used batteries are an en-
vironmental hazard. Dis-
pose of them in appropri-
ate containers as prescribed by the
law. Alternatively, take the batter-
ies to a LANCIA Dealership who
will dispose of them correctly.
fig. 4
P4C20003
4C001-067 ING 11-03-2008 11:57 Pagina 16
Page 20 of 191
17
G
STEERING COLUMN LOCK
To set: remove the ignition key from
theSTOPorPARKposition, and
turn the steering wheel until it locks.
To release: move the steering wheel
slightly as you turn the ignition key to
MAR.
Never remove the ignition
key while the car is mov-
ing. The steering wheel
would automatically lock as soon
as you tried to turn it. This also
applies when the car is being
towed.INDIVIDUAL
SETTINGS
Adjustments must be
made only when the car is
stationary.
FRONT SEATS
Moving the seat backwards
or forwards
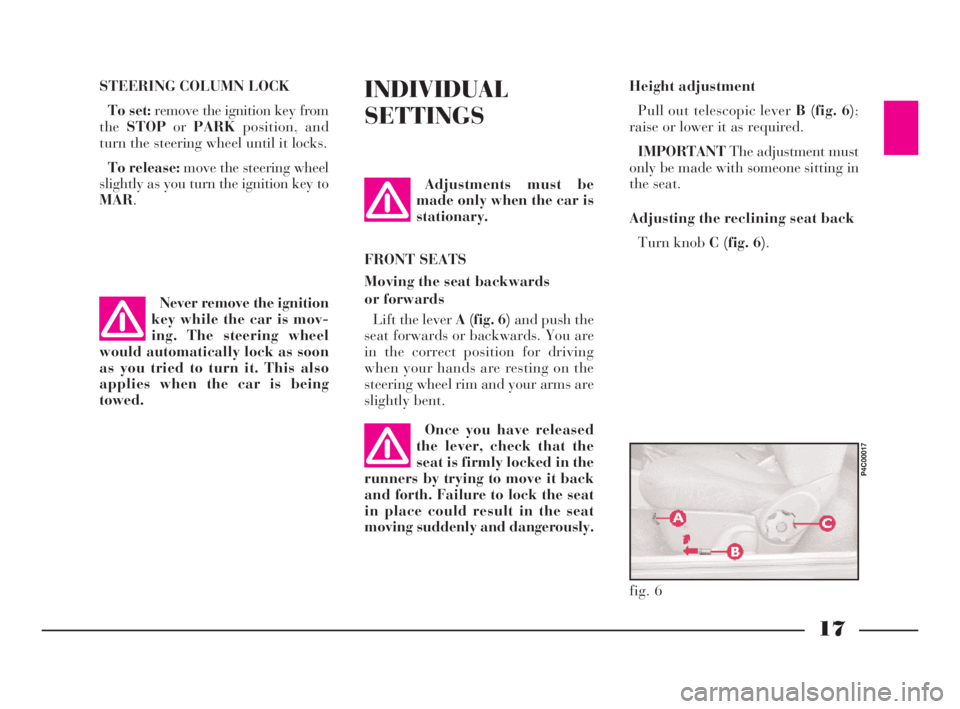
Lift the lever A (fig. 6)and push the
seat forwards or backwards. You are
in the correct position for driving
when your hands are resting on the
steering wheel rim and your arms are
slightly bent.Height adjustment
Pull out telescopic lever B (fig. 6);
raise or lower it as required.
IMPORTANTThe adjustment must
only be made with someone sitting in
the seat.
Adjusting the reclining seat back
Turn knob C (fig. 6).
fig. 6
P4C00017
Once you have released
the lever, check that the
seat is firmly locked in the
runners by trying to move it back
and forth. Failure to lock the seat
in place could result in the seat
moving suddenly and dangerously.
4C001-067 ING 11-03-2008 11:57 Pagina 17
Page 22 of 191
19
G
ACCESS TO THE BACK SEATS
(fig. 10)
You can easily get into the back
seats from either side.
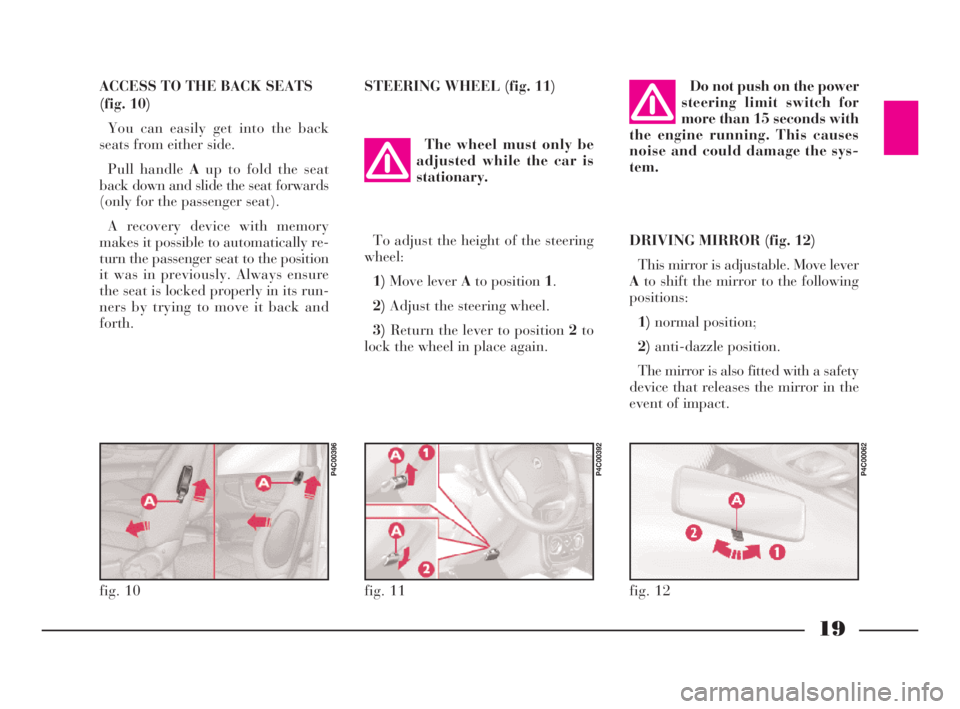
Pull handle Aup to fold the seat
back down and slide the seat forwards
(only for the passenger seat).
A recovery device with memory
makes it possible to automatically re-
turn the passenger seat to the position
it was in previously. Always ensure
the seat is locked properly in its run-
ners by trying to move it back and
forth.STEERING WHEEL (fig. 11)
DRIVING MIRROR (fig. 12)
This mirror is adjustable. Move lever
Ato shift the mirror to the following
positions:
1)normal position;
2)anti-dazzle position.
The mirror is also fitted with a safety
device that releases the mirror in the
event of impact. The wheel must only be
adjusted while the car is
stationary.Do not push on the power
steering limit switch for
more than 15 seconds with
the engine running. This causes
noise and could damage the sys-
tem.
fig. 11
P4C00392
fig. 12
P4C00062
To adjust the height of the steering
wheel:
1)Move lever Ato position 1.
2)Adjust the steering wheel.
3)Return the lever to position 2to
lock the wheel in place again.
fig. 10
P4C00396
4C001-067 ING 11-03-2008 11:57 Pagina 19
Page 44 of 191
41
G
IMPORTANTThe climate control
is very useful for speeding up demist-
ing because it dries the air. Simply
adjust the controls for the demisting
function and turn on the climate con-
trol by pressing button
√.
IMPORTANTThe versions with cli-
mate control have a factory-fitted
pollen filter.
IMPORTANTThe climate control
compressor will be temporarily ex-
cluded when accelerating sharply, and
reengaged after an established period
of time.STEERING
COLUMN STALKS
LEFT-HAND STALK
This stalk controls the following out-
side lights:
– side/taillights;
– dipped beam headlights;
– main beam headlights;
– direction indicators.
The outside lights can only be lit up
with the control stalk when the igni-
tion key is at MAR.
When the outside lights are turned
on, the instrument panel and the var-
ious controls located in the dashboard
light up.Side and taillights (fig. 46)
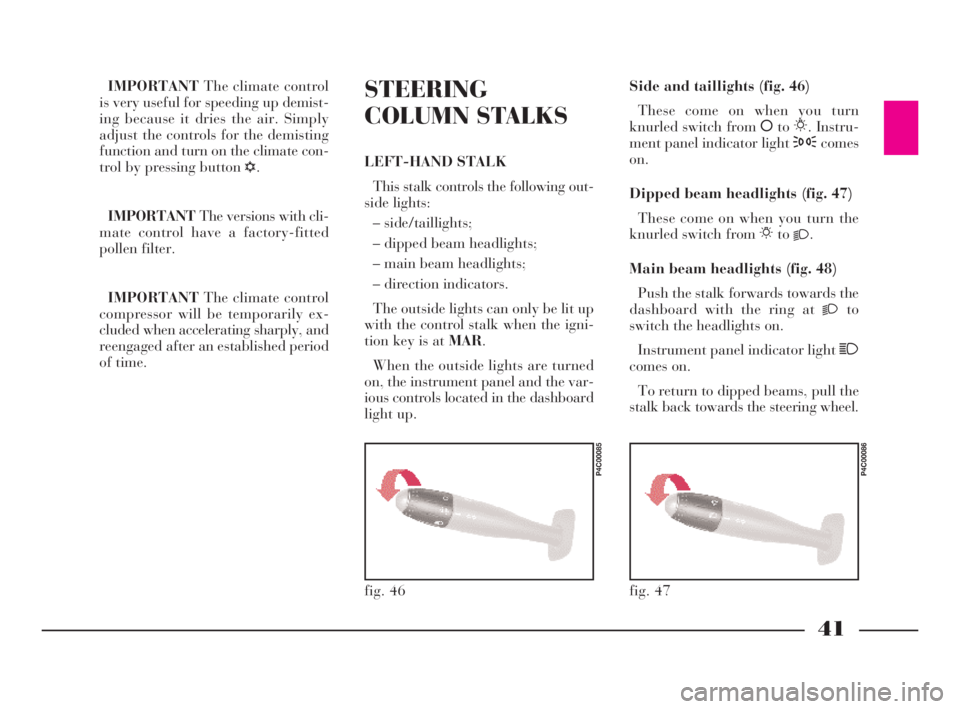
These come on when you turn
knurled switch from åto6. Instru-
ment panel indicator light 3comes
on.
Dipped beam headlights (fig. 47)
These come on when you turn the
knurled switch from 6to
2.
Main beam headlights (fig. 48)
Push the stalk forwards towards the
dashboard with the ring at
2to
switch the headlights on.
Instrument panel indicator light 1
comes on.
To return to dipped beams, pull the
stalk back towards the steering wheel.
fig. 46
P4C00085
fig. 47
P4C00086
4C001-067 ING 11-03-2008 11:57 Pagina 41
Page 45 of 191

42
G
RIGHT-HAND STALK
Windscreen wash/wipe (fig. 51)
This feature can only work when the
ignition key is at MAR.
Controls:
0- windscreen wiper off;
1- flick wipe;
2- slow continuous wipe;
3- fast continuous wipe;
4- temporary function: when you
release the stalk it returns to position
0and automatically turns off the
windscreen wiper.
fig. 51
P4C00090
To flash the lights (fig. 49)
Pull the stalk towards the steering
wheel (temporary position).Direction indicators (fig. 50)
Move the stalk as follows to turn on
the direction indicators:
up - for the right indicator;
down - for the left indicator.
Instrument panel indicator light y
flashes.
The direction indicators automati-
cally return to the neutral position
when the car straightens up.
If you want the indicator to flash
briefly, move the stalk up or down
without it clicking into position. When
you let it go it will return to its origi-
nal position.
fig. 48
P4C00087
fig. 49
P4C00088
fig. 50
P4C00089
4C001-067 ING 11-03-2008 11:57 Pagina 42
Page 46 of 191

43
G
When you pull the lever towards the
steering wheel (fig. 52), a jet of liquid
shoots out from the windscreen
washer.Rear window wash/wipe (fig. 53)
This function is only possible when
the ignition key is at MAR.
Controls:
1)turn the control from åto'for
continous wiper operation;
2)when you push the control stalk
forward (temporary position), a jet of
liquid shoots out from the rear win-
dow washer and the rear window
wiper comes into operation. When you
let the lever go again the rear window
washer/ wiper ceases to function.
fig. 52
P4C00091
fig. 53
P4C00092
CONTROLS
HAZARD LIGHTS
These come on when switch A
(fig. 54)is pressed, regardless of the
position of the ignition key.
When these lights are on, the panel
warning light
rflashes.
Press the switch again to turn the
lights off.
fig. 54
P4C00343
4C001-067 ING 11-03-2008 11:57 Pagina 43