windscreen Lancia Ypsilon 2013 Owner handbook (in English)
[x] Cancel search | Manufacturer: LANCIA, Model Year: 2013, Model line: Ypsilon, Model: Lancia Ypsilon 2013Pages: 315, PDF Size: 13.18 MB
Page 226 of 315

PERIODIC CHECKSEvery 1,000 km or before long journeys, check
and, if necessary, restore:
❒engine coolant, brake fluid and windscreen
washer fluid level;
❒tyre inflation pressure and condition;
❒operation of lighting system (headlights,
direction indicators, hazard warning lights,
etc.);
❒operation of screen washer/wiper system and
positioning/wear of windscreen/rear window
wiper blades.
Every 3,000 km, check and top up, if required,
the engine oil level.
HEAVY-DUTY USE OF THE CARIf the car is used mainly under one of the
following conditions:
❒towing a trailer or caravan;
❒dusty roads;
❒short, repeated journeys (less than 7-8 km) at
sub-zero outside temperatures;
❒engine often idling or driving long distances at
low speeds or long periods of idleness;
the following checks must be performed more
frequently than indicated in the Scheduled
Servicing Plan:
❒check front disc brake pad conditions and wear;
❒check cleanliness of bonnet and boot locks,
cleanliness and lubrication of linkage;
❒visually inspect conditions of: engine, gearbox,
transmission, pipes and hoses (exhaust - fuel
system - brakes) and rubber elements (boots -
sleeves - bushes - etc.);
❒check battery charge and battery fluid level
(electrolyte);
❒visually inspect condition of the accessory drive
belts;
222
GETTING TO KNOW
YOUR CAR
SAFETY
STARTING AND
DRIVING
WARNING LIGHTS
AND MESSAGES
IN AN EMERGENCYSERVICING AND
MAINTENANCE
TECHNICAL
SPECIFICATIONS
INDEX
Page 228 of 315

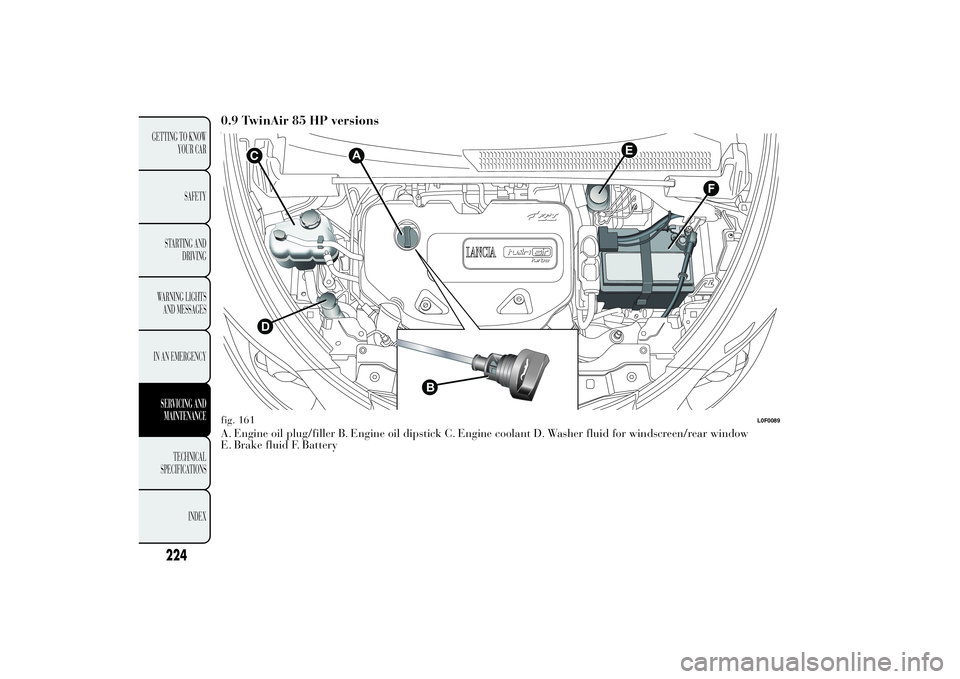
0.9 TwinAir 85 HP versionsA. Engine oil plug/filler B. Engine oil dipstick C. Engine coolant D. Washer fluid for windscreen/rear window
E. Brake fluid F. Battery
F
E
CD
B
A
fig. 161
L0F0089
224
GETTING TO KNOW
YOUR CAR
SAFETY
STARTING AND
DRIVING
WARNING LIGHTS
AND MESSAGES
IN AN EMERGENCYSERVICING AND
MAINTENANCE
TECHNICAL
SPECIFICATIONS
INDEX
Page 229 of 315

1.2 8V 69 HP versionsA. Engine oil dipstick B. Engine oil plug/filler C. Engine coolant D. Washer fluid for windscreen/rear window
E. Brake fluid F. Batteryfig. 162
L0F0050
225GETTING TO KNOW
YOUR CAR
SAFETY
STARTING AND
DRIVING
WARNING LIGHTS
AND MESSAGES
IN AN EMERGENCYSERVICING AND
MAINTENANCETECHNICAL
SPECIFICATIONS
INDEX
Page 230 of 315

1.3 16V MultiJet versionsA. Engine oil dipstick B. Engine oil plug/filler C. Engine coolant D. Washer fluid for windscreen/rear window
E. Brake fluid F. Battery
E
A
CD
B
F
fig. 163
L0F0090
226
GETTING TO KNOW
YOUR CAR
SAFETY
STARTING AND
DRIVING
WARNING LIGHTS
AND MESSAGES
IN AN EMERGENCYSERVICING AND
MAINTENANCE
TECHNICAL
SPECIFICATIONS
INDEX
Page 232 of 315

ENGINE COOLANT
The coolant level must be checked when the
engine is cold and must be between the MIN and
MAX marks on the reservoir.
If the level is too low, undo reservoir cap C (see
previous pages) and add the fluid described in the
chapter "Technical Specifications".
PARAFLU
UP
anti-freeze is used in the
engine cooling system. Use the same
fluid as in the cooling system when
topping up. PARAFLU
UP
may not be mixed
with any other types of fluids. If this occurs,
do not start the engine and contact your
Lancia Dealership immediately.
WARNING
The cooling system is pressurised. If
necessary, only replace the cap with
another genuine one or the operation of the
system may be adversely affected. Do not
remove the reservoir cap when the engine is
hot: you risk scalding yourself.WINDSCREEN/REAR WINDOW WASHING
FLUID
If the level is too low, raise reservoir cap D (see
previous pages) and add the fluid described in the
chapter "Technical Specifications".
WARNING
Do not travel if the windscreen
washer reservoir is empty: using the
windscreen washer is essential for
improving visibility. Some commercial
windscreen washer additives are flammable.
The engine compartment contains hot
components which may set it on fire.
228
GETTING TO KNOW
YOUR CAR
SAFETY
STARTING AND
DRIVING
WARNING LIGHTS
AND MESSAGES
IN AN EMERGENCYSERVICING AND
MAINTENANCE
TECHNICAL
SPECIFICATIONS
INDEX
BRAKE FLUID
Check that the liquid is at the maximum level (the
fluid level in the reservoir must not exceed the
MAX mark). If the fluid level in the tank is too
low, undo reservoir cap E (see previous pages) and
add the fluid described in the chapter "Technical
Specifications".
NoteCarefully clean the cap of the reservoir E
and the surrounding surface.
When opening the cap, make sure that no dirt gets
into the reservoir.
For topping-up, always use a funnel with
integrated filter with mesh equal to or lower than
0.12 mm.
Page 237 of 315

WARNING
The road holding qualities of the car
also depend on the correct inflation
pressure of the tyres.
WARNING
If the pressure is too low the tyre
overheats and this can cause it
serious damage.
WARNING
Do not cross switch the tyres, moving
them from the right of the car to the
left and vice versa.
WARNING
Never submit alloy rims to repainting
treatments requiring the use of
temperatures exceeding 150°C. The
mechanical properties of the wheels could
be impaired.
WINDSCREEN/REAR WINDOW
WIPERBLADES
Replace the blades if the rubber edge is deformed
or worn. In any event, it is advisable to replace
them approximately once a year.
A few simple precautions can reduce the
possibility of damage to the blades:
❒if the temperature falls below zero, make sure
that ice has not frozen the rubber against the
glass. Use an antifreeze product to release it
if required;
❒remove any snow from the glass: in addition to
protecting the blades, this prevents effort on
the motor and over-heating;
❒do not operate the windscreen/rear window
wipers on dry glass.
WARNING
Driving with worn windscreen/rear
window wiper blades is a serious
hazard, because visibility is reduced in bad
weather.
233GETTING TO KNOW
YOUR CAR
SAFETY
STARTING AND
DRIVING
WARNING LIGHTS
AND MESSAGES
IN AN EMERGENCYSERVICING AND
MAINTENANCETECHNICAL
SPECIFICATIONS
INDEX
Page 238 of 315

Replacing the windscreen wiper blades
Proceed as follows:
❒raise the wiper arm, press tab A fig. 165 of the
attachment spring and remove the blade from
the arm;
❒fit the new blade, inserting the tab into the
special slot in the arm, making sure that it
is locked.
❒lower the windscreen wiper arm on the
windscreen.
Do not operate the windscreen wiper
with the blades lifted from the
windscreen.Replacing the rear window wiper blade
Proceed as follows:
❒raise cover A fig. 166, undo nut B and remove
arm C;
❒correctly position the new arm, fully tighten nut
B then lower cover A.
fig. 165
L0F0186
fig. 166
L0F0222
234
GETTING TO KNOW
YOUR CAR
SAFETY
STARTING AND
DRIVING
WARNING LIGHTS
AND MESSAGES
IN AN EMERGENCYSERVICING AND
MAINTENANCE
TECHNICAL
SPECIFICATIONS
INDEX
Page 239 of 315

SPRAY NOZZLES
Windscreen washer
The window washer jets A fig. 167 are fixed. If
there is no jet of fluid, firstly check that there
is fluid in the reservoir (see "Checking fluid
levels" in this chapter).
Then check that the nozzle holes are not clogged;
use a needle to unblock them if necessary.
IMPORTANT In versions with a sun roof, make
sure that the sun roof is closed before operating
the window washer jets.Rear window washer
The rear window washer jets are fixed. The nozzle
holder is on the rear window fig. 168.
fig. 167
L0F0221
fig. 168
L0F0223
235GETTING TO KNOW
YOUR CAR
SAFETY
STARTING AND
DRIVING
WARNING LIGHTS
AND MESSAGES
IN AN EMERGENCYSERVICING AND
MAINTENANCETECHNICAL
SPECIFICATIONS
INDEX
Page 240 of 315

HEADLIGHT WASHERS
(for versions/markets, where provided)
They are located inside the front bumper fig. 169.
They are activated when the dipped beam and/or
main beam headlights are on and the windscreen
washer is activated.
Check the correct condition and cleanliness of
nozzles at regular intervals.
BODYWORKPROTECTION FROM ATMOSPHERIC
AGENTS
The car is equipped with the best available
technological solutions to protect the bodywork
against corrosion.
These are the most important:
❒painting products and systems which give the
car particular resistance to corrosion and
abrasion
❒use of galvanised (or pretreated) steel sheets,
with high resistance to corrosion
❒spraying the underbody, engine compartment,
wheel arch interiors and other parts with highly
protective wax products
❒spraying of plastic parts, with a protective
function in the more exposed points: underdoor,
inner wing, edges, etc.
❒use of “open” boxed sections to prevent
condensation and pockets of moisture from
triggering rust inside.
fig. 169
L0F0023
236
GETTING TO KNOW
YOUR CAR
SAFETY
STARTING AND
DRIVING
WARNING LIGHTS
AND MESSAGES
IN AN EMERGENCYSERVICING AND
MAINTENANCE
TECHNICAL
SPECIFICATIONS
INDEX
Page 242 of 315

In order to preserve the aesthetic
properties of the paintwork, abrasive
products and/or polishes should not be
used to clean the car.
Windows
Use specific detergents and clean cloths to prevent
scratching or altering the transparency.
IMPORTANT Wipe the inside surface of the rear
window gently with a cloth in the direction of
the filaments to avoid damaging the heating
device.
Front headlights
Use a soft, damp cloth soaked in water and
detergent for washing cars.
IMPORTANT Never use aromatic substances (e.g.
petrol) or ketenes (e.g. acetone) for cleaning the
plastic lenses of the front headlights.Engine compartment
At the end of every winter, wash the engine
compartment thoroughly, taking care not to aim
the jet of water directly at the electronic control
units or at the windscreen wiper motors. Have this
operation performed at a specialised workshop.
IMPORTANT The washing should take place with
the engine cold and the ignition key in the STOP
position. After washing, make sure that the
various protective devices (e.g. rubber caps and
guards) have not been removed or damaged.
238
GETTING TO KNOW
YOUR CAR
SAFETY
STARTING AND
DRIVING
WARNING LIGHTS
AND MESSAGES
IN AN EMERGENCYSERVICING AND
MAINTENANCE
TECHNICAL
SPECIFICATIONS
INDEX