handbrake Lancia Ypsilon 2015 Owner handbook (in English)
[x] Cancel search | Manufacturer: LANCIA, Model Year: 2015, Model line: Ypsilon, Model: Lancia Ypsilon 2015Pages: 315, PDF Size: 10.85 MB
Page 169 of 315

HANDBRAKE ENGAGED
When the key is turned to MAR position, the
warning light switches on but should switch off
after a few seconds.
IMPORTANT If the warning light comes on when
the car is in motion, check that the handbrake
is not on.
EBD FAILURE (red)
(amber)
The simultaneous switching on of the
(red),
(amber) andESCwarning lights with the
engine on, indicates either a failure of the EBD
system or that the system is not available. In this
case, the rear wheels may suddenly lock and
the vehicle may swerve when braking sharply.
Drive very carefully to the nearest Lancia
Dealership to have the system inspected
immediately. On some versions the display shows
the dedicated message.
ABS SYSTEM FAILURE (amber)
Turning the key to the MAR position switches on
the warning light, but it should switch off after
a few seconds. The warning light switches on (on
some versions, with a message on the display
and a symbol on the display) when the system is
not efficient. In this case the braking system
maintains its own efficiency unaltered but without
the advantage of the ABS system.
Drive carefully and contact a Lancia Dealership as
soon as possible.
AIRBAG FAILURE (red)
Turning the key to the MAR-ON position
illuminates the warning light, but it should switch
off after a few seconds.
The warning light switches on constantly (on some
versions, with a message on the display and a
symbol on the display) to indicate an airbag
system fault.
165
GETTING TO KNOW
YOUR CAR
SAFETY
STARTING AND
DRIVING
WARNING LIGHTS
AND MESSAGES
IN AN EMERGENCY
SERVICING AND
MAINTENANCE
TECHNICAL
SPECIFICATIONS
INDEX
The warning light (or symbol on the display)
comes on when the handbrake is on.
Page 186 of 315

To change a wheel proceed as follows:
❒Stop the car in a position that is not dangerous
for oncoming traffic where you can change the
wheel safely. The ground must be flat and
sufficiently compact;
❒switch off the engine, pull up the handbrake
and engage the 1
stgear or the reverse gear.
Wear the reflective safety jacket (compulsory by
law in certain countries) before getting out of
the car;
❒open the luggage compartment, pull tab A
fig. 115 and lift up the mat;❒using the wrench A fig. 116 located in the tool
box, loosen the locking device, take the tool
box B and place it close to the wheel to be
replaced. Then take the space-saver wheel C;
fig. 115L0F0099fig. 116L0F0183
182
GETTING TO KNOW
YOUR CAR
SAFETY
STARTING AND
DRIVING
WARNING LIGHTS
AND MESSAGES
IN AN EMERGENCY
SERVICING AND
MAINTENANCE
TECHNICAL
SPECIFICATIONS
INDEX
Page 191 of 315

187
GETTING TO KNOW
YOUR CAR
SAFETY
STARTING AND
DRIVING
WARNING LIGHTS
AND MESSAGES
IN AN EMERGENCY
SERVICING AND
MAINTENANCE
TECHNICAL
SPECIFICATIONS
INDEX
The sealing fluid has an expiry date.
WARNING
Never operate the compressor for
longer than 20 consecutive minutes.
Risk of overheating. The Fix&Go kit is not
suitable for definitive repairs, so the
repaired tyres may only be used temporarily.
WARNING
The bottle contains ethylene glycol. It
contains latex that might cause
allergic reactions. It is harmful if swallowed.
It is irritant for the eyes. May cause a
reaction if inhaled or on contact. Avoid
contact with eyes, skin and clothes. In the
event of contact, wash immediately with
plenty of water. If ingested, do not induce
vomiting. Rinse out your mouth, drink large
quantities of water and seek immediate
medical attention. Keep out of the reach of
children. The product must not be used
by asthmatics. Do not inhale the vapours
during insertion and suction. Call a doctor
immediately if allergic reactions are noted.
Store the spray bottle away from heat
sources. The sealing fluid has an expiry
date.
Replace the bottle if the sealing fluid
has expired. Dispose of the bottle
and the sealant liquid properly. Have
the sealing fluid and the bottle disposed of in
compliance with national and local
regulations.
INFLATION PROCEDURE
WARNING
Wear the protective gloves provided
with the Fix&Go kit.
To carry out the inflation procedure proceed as
follows:
❒engage the handbrake;
❒place the Fix&Go kit close to the tyre to be
repaired;
❒locate the filler pipe fig. 124 already
connected to the spray bottle A;
❒open the side lid E fig. 125 then connect the
spray bottle A to the fitting, following the
direction of the arrow;
❒undo the cap of the tyre valve F and connect the
filling pipe B tightening the relevant ring nut on
the tyre valve;
❒Make sure that the switch G fig. 126 is in position
0(off), then start the engine;
Page 193 of 315

189
GETTING TO KNOW
YOUR CAR
SAFETY
STARTING AND
DRIVING
WARNING LIGHTS
AND MESSAGES
IN AN EMERGENCY
SERVICING AND
MAINTENANCE
TECHNICAL
SPECIFICATIONS
INDEX
IMPORTANT To get a more precise reading, it is
recommended to check the value with compressor
off.
❒If the pressure does not reach at least 1.5 bar in
5 minutes, switch the compressor off and
disconnect the filling pipe B from the tyre valve,
then remove the plug H;
❒move the car of about 10 m, to distribute the
sealant inside the tyre, then inflate again;
IMPORTANT If after this operation it is still
impossible, after 5 minutes, to reach at least 1.5
bar, do not start driving since the tyre is
excessively damaged and the Fix&Go kit cannot
guarantee proper hold. In this case, go to a Lancia
Dealership.
fig. 127L0F0305
❒if the tyre reaches the pressure specified, start
driving immediately;
❒after driving for about 10 minutes stop, operate
the handbrake and check the tyre pressure
again.
WARNING
Apply the adhesive label where it can
be easily seen by the driver as a
reminder that the tyre has been treated with
the Fix&Go kit. Drive carefully, particularly
on bends. Do not exceed 80 km/h. Do not
accelerate or brake suddenly.
WARNING
If pressure has fallen below 1.5 bar,
do not drive any further: the Fix&Go
kit cannot guarantee the correct hold
because the tyre is too damaged, contact a
Lancia Dealership. If instead a pressure
value of at least 1.5 bar is detected, restore
the correct pressure (with the engine
running and the handbrake engaged),
resume driving and drive with care to the
nearest Lancia Dealership.
Page 223 of 315
219
GETTING TO KNOW
YOUR CAR
SAFETY
STARTING AND
DRIVING
WARNING LIGHTS
AND MESSAGES
IN AN EMERGENCY
SERVICING AND
MAINTENANCE
TECHNICAL
SPECIFICATIONS
INDEX
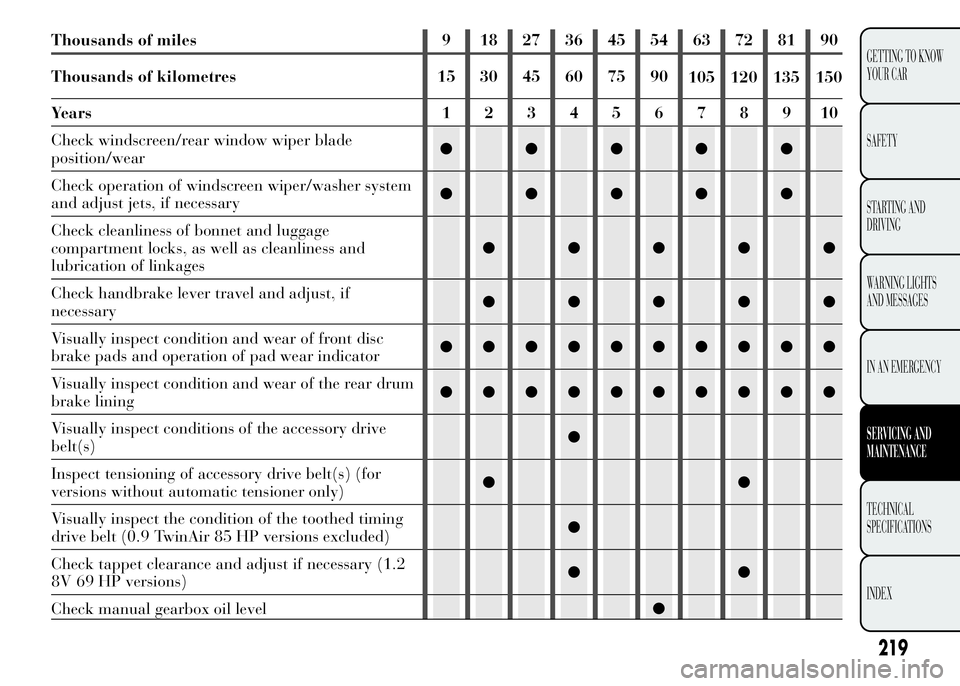
Thousands of miles 9 18 27 36 45 54 63 72 81 90
Thousands of kilometres 15 30 45 60 75 90
105 120 135 150
Years12345678910
Check windscreen/rear window wiper blade
position/wear●●●●●
Check operation of windscreen wiper/washer system
and adjust jets, if necessary●●●●●
Check cleanliness of bonnet and luggage
compartment locks, as well as cleanliness and
lubrication of linkages●●●●●
Check handbrake lever travel and adjust, if
necessary●●●●●
Visually inspect condition and wear of front disc
brake pads and operation of pad wear indicator●●●●●●●●●●
Visually inspect condition and wear of the rear drum
brake lining●●●●●●●●●●
Visually inspect conditions of the accessory drive
belt(s)●
Inspect tensioning of accessory drive belt(s) (for
versions without automatic tensioner only)●●
Visually inspect the condition of the toothed timing
drive belt (0.9 TwinAir 85 HP versions excluded)●
Check tappet clearance and adjust if necessary (1.2
8V 69 HP versions)●●
Check manual gearbox oil level●
Page 226 of 315
222
GETTING TO KNOW
YOUR CAR
SAFETY
STARTING AND
DRIVING
WARNING LIGHTS
AND MESSAGES
IN AN EMERGENCY
SERVICING AND
MAINTENANCE
TECHNICAL
SPECIFICATIONS
INDEX
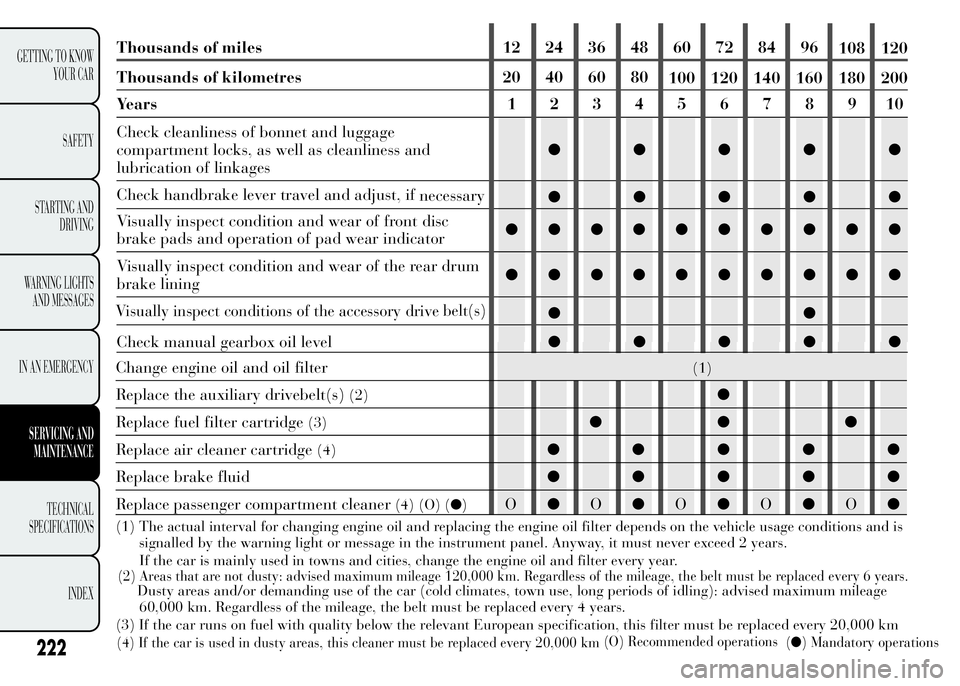
Thousands of miles 12 24 36 48 60 72 84 96
108 120
Thousands of kilometres 20 40 60 80
100 120 140 160 180 200
Years12345678910
Check cleanliness of bonnet and luggage
compartment locks, as well as cleanliness and
lubrication of linkages●●●●●
Check handbrake lever travel and adjust, if
necessary
●●●●●
Visually inspect condition and wear of front disc
brake pads and operation of pad wear indicator●●●●●●●●●●
Visually inspect condition and wear of the rear drum
brake lining●●●●●●●●●●
Visually inspect conditions of the accessory drivebelt(s)●●
Check manual gearbox oil level●●●●●
Change engine oil and oil filter(1)
Replace the auxiliary drivebelt(s)(2)●
Replace fuel filter cartridge
(3)●●●
Replace air cleaner cartridge
(4)●●●●●
Replace brake fluid●●●●●
Replace passenger compartment cleaner
(4) (O) (●)O●O●O●O●O●
(1) The actual interval for changing engine oil and replacing the engine oil filter depends on the vehicle usage conditions and is
signalled by the warning light or message in the instrument panel. Anyway, it must never exceed 2 years.
If the car is mainly used in towns and cities, change the engine oil and filter every year.
(2) Areas that are not dusty: advised maximum mileage 120,000 km. Regardless of the mileage, the belt must be replacedevery 6 years.Dusty areas and/or demanding use of the car (cold climates, town use, long periods of idling): advised maximum mileage
60,000 km. Regardless of the mileage, the belt must be replaced every 4 years.
(3) If the car runs on fuel with quality below the relevant European specification, this filter must be replaced every 20,000 km
(4) If the car is used in dusty areas, this cleaner must be replaced every 20,000 km(O) Recommended operations
(●) Mandatory operations
Page 312 of 315

Handbrake ......................... 15
Hazard warning lights .......... 69
Headlights - fog light
alignment ........................... 94
Headlights............................ 93
– adjusting headlights
abroad ............................. 94
– bulb replacement............ 195
– headlamp alignment
corrector .......................... 94
– light beam direction ......... 93
Headlight washers .............. 236
Head restraints..................... 35
Hill Holder system ............... 97
Identification data
– bodywork paint plate ..... 242
– chassis marking .............. 242
– engine marking .............. 242
– identification data plate.. 241
Ignition device...................... 31
Instrument panel .................. 4
Interior fittings ..................... 73
Interiors (cleaning) ............. 239
Jack ................................... 181
Keys
– key without remote
control ............................. 27
– key with remote control ... 27
– replacing remote
control battery ................. 29
– request for additional
remote controls ................ 29
Key with remote control
(replacing the battery) ........ 29
Knowing your car................. 3
Lancia CODE (system) ........ 26
(capacity) ....................... 255
Light clusters
– front light clusters
(changing a bulb) ........... 195
– rear light clusters
(changing a bulb) ........... 199
Load limiters ...................... 135
Lubricants (specifications).. 260
Luggage compartment ......... 86
Luggage compartment
roof light
– bulb replacement............ 203
Magic Parking.................... 11
Main beam headlights
– bulb replacement............ 196
– control ............................. 56
Manual climate control......... 42
– maintenance .................... 44
Mechanical Brake Assist ....... 96
Menu items .......................... 12
MSR (system)....................... 99
Multifunction display ........... 7
Number plate lights
– bulb replacement............ 201
On board instruments
– engine coolant
temperature indicator ...... 6
– Fuel level gauge ............... 6
– multifunction display ....... 4
308
GETTING TO KNOW
YOUR CAR
SAFETY
STARTING AND
DRIVING
WARNING LIGHTS
AND MESSAGES
IN AN EMERGENCY
SERVICING AND
MAINTENANCE
TECHNICAL
SPECIFICATIONS
INDEX
On-board instruments
– On-board instruments...... 4
On board instruments
– reconfigurable
multifunction display ....... 5
– rev counter ...................... 6
– Speedometer .................... 6
Parking .............................. 157
Parking lights....................... 551
Luggage compartment 7