sensor Lancia Ypsilon 2016 Owner handbook (in English)
[x] Cancel search | Manufacturer: LANCIA, Model Year: 2016, Model line: Ypsilon, Model: Lancia Ypsilon 2016Pages: 200, PDF Size: 4.53 MB
Page 19 of 200
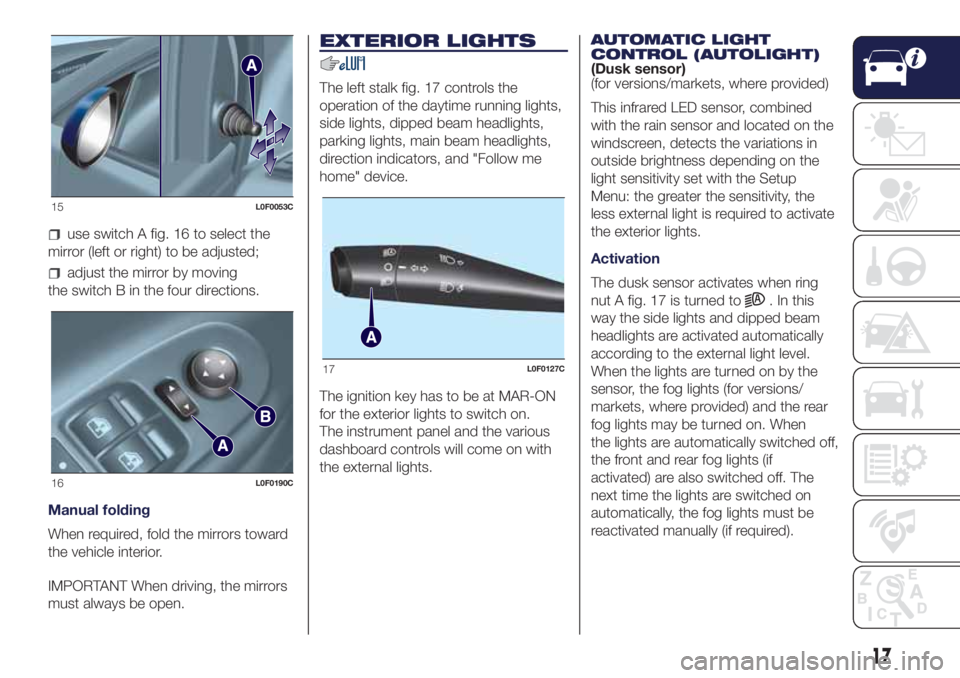
use switch A fig. 16 to select the
mirror (left or right) to be adjusted;
adjust the mirror by moving
the switch B in the four directions.
Manual folding
When required, fold the mirrors toward
the vehicle interior.
IMPORTANT When driving, the mirrors
must always be open.
EXTERIOR LIGHTS
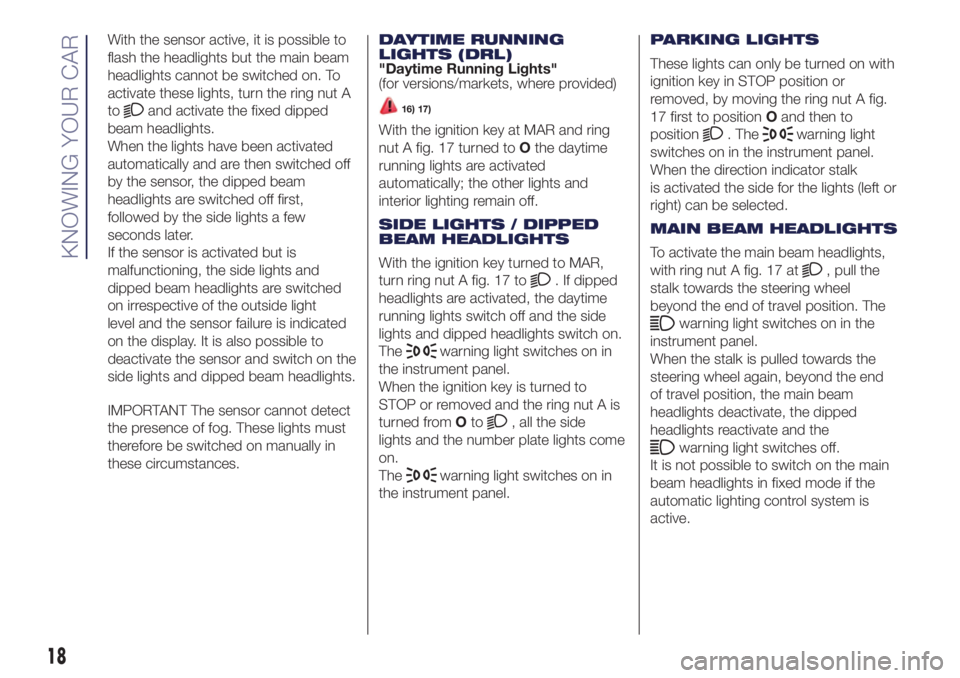
The left stalk fig. 17 controls the
operation of the daytime running lights,
side lights, dipped beam headlights,
parking lights, main beam headlights,
direction indicators, and "Follow me
home" device.
The ignition key has to be at MAR-ON
for the exterior lights to switch on.
The instrument panel and the various
dashboard controls will come on with
the external lights.AUTOMATIC LIGHT
CONTROL (AUTOLIGHT)
(Dusk sensor)
(for versions/markets, where provided)
This infrared LED sensor, combined
with the rain sensor and located on the
windscreen, detects the variations in
outside brightness depending on the
light sensitivity set with the Setup
Menu: the greater the sensitivity, the
less external light is required to activate
the exterior lights.
Activation
The dusk sensor activates when ring
nut A fig. 17 is turned to
. In this
way the side lights and dipped beam
headlights are activated automatically
according to the external light level.
When the lights are turned on by the
sensor, the fog lights (for versions/
markets, where provided) and the rear
fog lights may be turned on. When
the lights are automatically switched off,
the front and rear fog lights (if
activated) are also switched off. The
next time the lights are switched on
automatically, the fog lights must be
reactivated manually (if required).
15L0F0053C
16L0F0190C
17L0F0127C
17
Page 20 of 200
With the sensor active, it is possible to
flash the headlights but the main beam
headlights cannot be switched on. To
activate these lights, turn the ring nut A
to
and activate the fixed dipped
beam headlights.
When the lights have been activated
automatically and are then switched off
by the sensor, the dipped beam
headlights are switched off first,
followed by the side lights a few
seconds later.
If the sensor is activated but is
malfunctioning, the side lights and
dipped beam headlights are switched
on irrespective of the outside light
level and the sensor failure is indicated
on the display. It is also possible to
deactivate the sensor and switch on the
side lights and dipped beam headlights.
IMPORTANT The sensor cannot detect
the presence of fog. These lights must
therefore be switched on manually in
these circumstances.DAYTIME RUNNING
LIGHTS (DRL)
"Daytime Running Lights"
(for versions/markets, where provided)16) 17)
With the ignition key at MAR and ring
nut A fig. 17 turned toOthe daytime
running lights are activated
automatically; the other lights and
interior lighting remain off.
SIDE LIGHTS / DIPPED
BEAM HEADLIGHTS
With the ignition key turned to MAR,
turn ring nut A fig. 17 to
. If dipped
headlights are activated, the daytime
running lights switch off and the side
lights and dipped headlights switch on.
The
warning light switches on in
the instrument panel.
When the ignition key is turned to
STOP or removed and the ring nut A is
turned fromOto
, all the side
lights and the number plate lights come
on.
The
warning light switches on in
the instrument panel.PARKING LIGHTS
These lights can only be turned on with
ignition key in STOP position or
removed, by moving the ring nut A fig.
17 first to positionOand then to
position
. Thewarning light
switches on in the instrument panel.
When the direction indicator stalk
is activated the side for the lights (left or
right) can be selected.
MAIN BEAM HEADLIGHTS
To activate the main beam headlights,
with ring nut A fig. 17 at
, pull the
stalk towards the steering wheel
beyond the end of travel position. The
warning light switches on in the
instrument panel.
When the stalk is pulled towards the
steering wheel again, beyond the end
of travel position, the main beam
headlights deactivate, the dipped
headlights reactivate and the
warning light switches off.
It is not possible to switch on the main
beam headlights in fixed mode if the
automatic lighting control system is
active.
18
KNOWING YOUR CAR
Page 23 of 200
WINDSCREEN /
REAR WINDOW
WIPERS
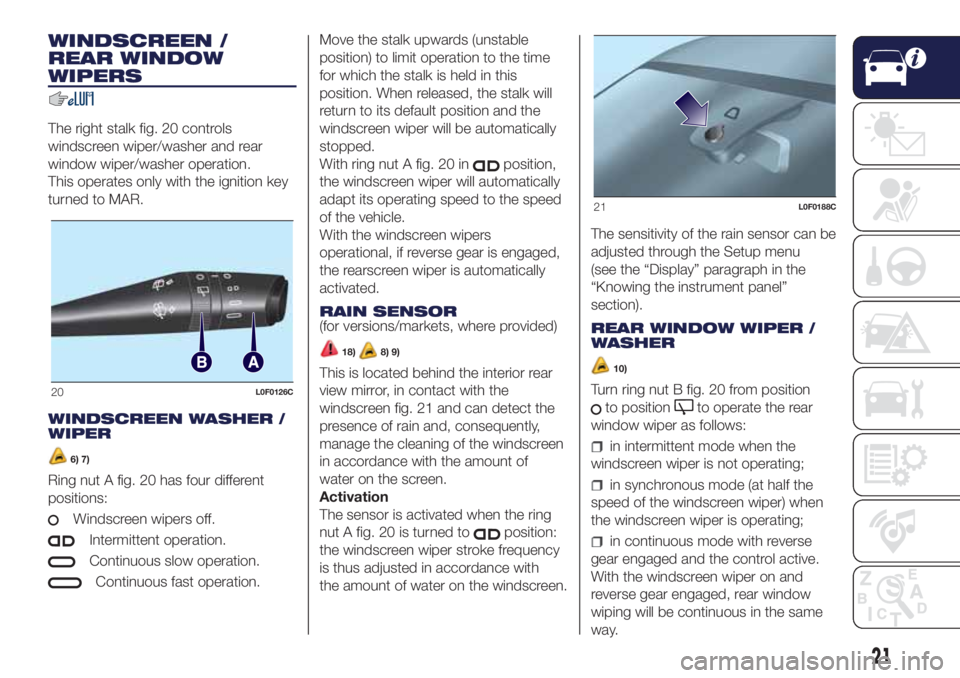
The right stalk fig. 20 controls
windscreen wiper/washer and rear
window wiper/washer operation.
This operates only with the ignition key
turned to MAR.
WINDSCREEN WASHER /
WIPER
6) 7)
Ring nut A fig. 20 has four different
positions:
Windscreen wipers off.
Intermittent operation.
Continuous slow operation.
Continuous fast operation.Move the stalk upwards (unstable
position) to limit operation to the time
for which the stalk is held in this
position. When released, the stalk will
return to its default position and the
windscreen wiper will be automatically
stopped.
With ring nut A fig. 20 in
position,
the windscreen wiper will automatically
adapt its operating speed to the speed
of the vehicle.
With the windscreen wipers
operational, if reverse gear is engaged,
the rearscreen wiper is automatically
activated.
RAIN SENSOR
(for versions/markets, where provided)
18)8) 9)
This is located behind the interior rear
view mirror, in contact with the
windscreen fig. 21 and can detect the
presence of rain and, consequently,
manage the cleaning of the windscreen
in accordance with the amount of
water on the screen.
Activation
The sensor is activated when the ring
nut A fig. 20 is turned to
position:
the windscreen wiper stroke frequency
is thus adjusted in accordance with
the amount of water on the windscreen.The sensitivity of the rain sensor can be
adjusted through the Setup menu
(see the “Display” paragraph in the
“Knowing the instrument panel”
section).
REAR WINDOW WIPER /
WASHER
10)
Turn ring nut B fig. 20 from position
to positionto operate the rear
window wiper as follows:
in intermittent mode when the
windscreen wiper is not operating;
in synchronous mode (at half the
speed of the windscreen wiper) when
the windscreen wiper is operating;
in continuous mode with reverse
gear engaged and the control active.
With the windscreen wiper on and
reverse gear engaged, rear window
wiping will be continuous in the same
way.
20L0F0126C
21L0F0188C
21
Page 24 of 200
Pushing the stalk towards the
dashboard (rocking position) will
activate the rear window washer jet.
Keep the stalk pushed for more than
half a second to activate the rear
window wiper as well. Releasing the
stalk will activate the smart washing
function, as described for the
windscreen wiper.
The function stops when the stalk is
released.
WARNING
18)Make sure the device is switched off
whenever the windscreen must be
cleaned.
WARNING
6)Never use the windscreen wipers to
remove layers of snow or ice from the
windscreen. In such conditions, the
windscreen wiper may be subjected to
excessive stress and the motor cut-out
switch, which prevents operation for a few
seconds, may intervene. If operation is
not restored (even after using the key to
restart the engine), contact a Lancia
Dealership.
7)Do not operate the windscreen wiper
with the blades lifted from the windscreen.
8)Do not activate the rain sensor when
washing the car in an automatic car wash.9)Make sure the device is switched off if
there is ice on the windscreen.
10)Do not use the rear window wiper to
remove layers of snow or ice. In such
conditions, the wiper may be subjected to
excessive stress and the motor cut-out
switch, which prevents operation for a few
seconds, may intervene. If afterwards
operation is not restored, contact a Lancia
Dealership.
22
KNOWING YOUR CAR
Page 44 of 200
/: press and release the
buttons to scroll the menu items
upwards or downwards, or to
increase/decrease the displayed value.
: press briefly to access the
menu and/or go to next screen
or confirm the desired selection. Hold
pressed to go back to the standard
screen.
SETUP MENU
The menu includes the following items:
MENU
DIMMER
SPEED BUZZER
HEADLAMP SENSOR (for
versions/markets where provided)
RAIN SENSOR (for versions/
markets, where provided)
TRIP B ACTIVATION/DATA
SET TIME
SET DATE
FIRST PAGE (for versions/markets,
where provided)
AUTOCLOSE
MEASUREMENT UNIT
LANGUAGE
BUZZER VOLUME
BUTTON VOLUME
BELT BUZZER
SERVICE
AIRBAG/PASSENGER BAG (for
versions/markets, where provided)
DAYTIME RUNNING LIGHTS
TYRE RESET
OIL LEVEL RESET (for versions/
markets, where provided)
EXIT MENU
Front passenger airbag and Side
Bag activation/deactivation
(for versions/markets, where provided)
This function is used to activate/
deactivate the front passenger's airbag.
Proceed as follows:
press thebutton and, after the
display shows the message "Bag pass:
Off" (to deactivate) or the message
"Passenger Bag: On (to activate) by
pressing
or, press SET once
again
;
a confirmation request message will
appear on the display;
by pressing theor
buttons, select "Yes" (to confirm
activation/deactivation) or "No" (to
cancel);
press thebutton briefly; a
message confirming the selection is
displayed and you return to the menu
screen. Hold down the button to return
to the standard screen without storing.Oil level reset
(for versions/markets, where provided)
28)
This function resets the oil top-up
warning that occurs approximately
every 8,000 km.
Proceed as follows to reset this warning
after topping up the oil:
Press buttonbriefly. The display
will ask you to confirm the reset.
Press theorbutton and
select “YES” to reset the warning or
“NO” to cancel the operation.
TRIP COMPUTER
The Trip computer is used to display
information on car operation when the
key is turned to MAR.
This function comprises two separate
trips, called “Trip A” and “Trip B”, where
the vehicle's "complete missions"
(journeys) are monitored in a
reciprocally independent manner.
"Trip A" can be used to display the
values relating to: "Range", "Distance
travelled A", "Average fuel consumption
A", "Instantaneous fuel consumption",
"Average speed A", "Journey time A
(driving time)".
42
KNOWING THE INSTRUMENT PANEL
Page 59 of 200

Warning light What it means
GENERAL FAILURE INDICATION
(for versions/markets, where provided)
The warning light (or symbol for versions with multifunction reconfigurable display) switches on in the
following circumstances. In these cases contact a Lancia Dealership to have the fault fixed as soon as
possible.
Speed limit exceeded(for versions/markets where provided)
The warning light (or symbol for versions with multifunction reconfigurable display) switches on when the
speed limit set in the Setup Menu is exceeded.
When the vehicle exceeds this value an acoustic signal is emitted, and on some versions a dedicated
message is shown on the display.
Fuel cut-out system operation/fault(for versions/markets where provided)
The warning light (or symbol for versions with multifunction reconfigurable display) switches on together
with a dedicated message on the display, in the event of fuel cut-off system intervention/fault.
Start&Stop fault(for versions/markets where provided)
This warning light (or symbol for versions with multifunction reconfigurable display) switches on together
with a dedicated message on the display, when a Start&Stop fault is detected.
Rain sensor failure(for versions/markets where provided)
The warning light (or symbol for versions with multifunction reconfigurable display) switches on together
with a message on the display, when a fault is detected on the rain sensor.
57
Page 60 of 200

Warning light What it means
Parking sensor fault(for versions/markets where provided)
The warning light (or symbol for versions with multifunction reconfigurable display) switches on together
with a dedicated message on the display, when a parking sensors fault is detected.
Dusk sensor fault(for versions/markets where provided)
The warning light (or symbol for versions with multifunction reconfigurable display) switches on together
with a dedicated message on the display, when a dusk sensor fault is detected.
Engine oil pressure sensor failure
The engine oil pressure sensor fault is signalled by the warning light (or symbol for versions with
reconfigurable multifunction display) on the instrument panel that switches on.
Airbag warning light fault(for versions/markets where provided)
The warning light (or symbol for versions with multifunction reconfigurable display) switches on flashing
when a fault is detected on the
warning light.
Tyre pressure monitoring system (iTPMS) not available
The warning light (or symbol for versions with multifunction reconfigurable display) switches on together
with a dedicated message on the display, to indicate that the tyre pressure monitoring system (iTPMS) is
not available.
58
KNOWING THE INSTRUMENT PANEL
Page 65 of 200

SYMBOLS AND MESSAGES ON THE DISPLAY
Symbols and Messages What it means
POSSIBLE ICE ON ROAD
(for versions/markets, where provided)
On versions equipped with "reconfigurable multifunction display", a message together with
a symbol will appear on the display when the outdoor temperature falls to, or is below,
3°C.
IMPORTANT In the event of outside temperature sensor failure, dashes are shown on the
display instead of the value.
ASR SYSTEM DEACTIVATION
The ASR system can be deactivated by pressing the ASR OFF button.
On versions equipped with reconfigurable multifunction display, the system deactivation is
indicated by the displaying of a dedicated message and a symbol on the display; at the
same time the LED on the ASR OFF button switches on.
PETROL/METHANE SWITCHING
(for versions/markets, where provided)
Warning light on constantly: methane operation.
Warning light off: petrol operation.
The symbol is displayed, along with a dedicated message, in the event of a methane
supply system failure.
In this case, contact a Lancia Dealership as soon as possible, running on petrol
START&STOP SYSTEM ACTIVATION/
DEACTIVATIONStart&Stop system activation
A message will appear on the display when the Start&Stop system is activated.
In this condition the LED on the
button located on the dashboard control panel is off.
Start&Stop system deactivation
The Start & Stop system deactivation is indicated by a message on the display and, for
versions with reconfigurable multifunction display, by the
symbol that switches on.
The LED above the
button is on when the system is deactivated.
63
Page 72 of 200
DRIVING
ASSISTANCE
SYSTEMS
iTPMS System (indirect
Tyre Pressure
Monitoring System)
(for versions/markets, where provided)
67) 68) 69) 70) 71) 72)
The car can be equipped with the
iTPMS (indirect Tire Pressure
Monitoring System) which monitors the
tyre inflation status thanks to wheel
speed sensors.
The system warns the driver if one or
more tyres are flat by the
warning
light continuously lit on the instrument
panel and a dedicated warning
message on the display.
If one tyre only is flat, the system can
indicate its position: it is in any case
recommended to check the pressure
on all four tyres.
The system does not recognise the tyre
pressure value, but it is able to indicate
if the pressure of one or more tyres
falls below a certain pressure threshold.
This indication is displayed also when
turning the engine off and on again until
the RESET procedure is carried out.Reset procedure
The iTPMS needs an initial "self-
learning" phase (with length depending
on the driving style and road conditions:
optimal conditions being driving on a
straight road at 80 km/h for at least 20
minutes) which starts when the Reset
procedure is carried out.
The Reset procedure must be carried
out:
each time tyre pressure is modified;
when even only one tyre is changed;
when tyres are rotated/inverted;
when the space-saver wheel is
fitted.
Before carrying out the Reset
procedure, inflate the tyres to the rated
pressure values specified in the inflation
pressure table (see "Wheels" paragraph
in the "Technical specifications"
chapter).
If the Reset procedure is not carried
out, in all above cases, the
warning
light may give false indications on
one or more tyres.
To carry out the RESET procedure, with
the car stopped and the ignition device
at MAR, use the Main Menu as follows:
briefly press thebutton: the
display will show Reset;
press thebutton or the
button to select ("Yes" or "No");
briefly press thebutton: the
display will show "Confirm";
pressbutton orto select
("Yes" to Reset or "No" to exit the video
page);
press thebutton again to return
to the standard screen or to the main
menu according to where you are in the
menu.
At the end of the Reset procedure the
display will show the "Reset saved"
message, indicating that the self-
learning has been started and you will
hear an acoustic warning beep.
If the iTPMS self-learning is not properly
executed, the message is not
displayed, and no beep is heard.
Operating conditions
The system is active for speeds above
15 km/h.
In a few situations such as sporty
driving, particular conditions of the road
surface (e.g. icy, snowy, unsurfaced
roads...) the signalling may be delayed
or partial in detecting the contemporary
deflation of more than one tyre.
70
SAFETY
Page 95 of 200
STARTING AND DRIVING
Let’s get to the core of the vehicle:
seeing how you can exploit all of its
potential to the full.
We’ll look at how to drive it safely in any
situation, so that it can be a welcome
companion, with our comfort and
our wallets in mind.STARTING THE ENGINE ................. 94
HANDBRAKE .................................. 95
MANUAL GEARBOX ....................... 96
DUAL FUNCTION SYSTEM
GEARBOX....................................... 97
STOP/START SYSTEM ................... 98
CRUISE CONTROL ......................... 99
PARKING SENSORS.......................101
TOWING TRAILERS ........................102
REFUELLING THE VEHICLE ..........103
93