front light Lancia Ypsilon 2017 Owner handbook (in English)
[x] Cancel search | Manufacturer: LANCIA, Model Year: 2017, Model line: Ypsilon, Model: Lancia Ypsilon 2017Pages: 200, PDF Size: 4.53 MB
Page 110 of 200

Light bulbs
Use Type Power Ref. Figure
Dipped/main beam headlights H4 55 W D
Front side lights W5W 5 W TO
Daytime running lights (DRL) W21W 21 W B
Rear side lights LED - -
Front direction indicators PY24W 24W B
Side direction indicators W5W 5 W TO
Rear direction indicators PY21W 21 W B
Stop W16W 16 W B
Third brake light LED - -
Fog lights H3 55 W E
Reversing light P21W 21 W B
Rear fog light P21W 21 W B
Number plate W5W 5 W C
Front courtesy light C5W 5 W C
Luggage compartment light W5W 5 W TO
Glove compartment light C5W 5 W C
108
IN AN EMERGENCY
Page 111 of 200

REPLACING AN
EXTERNAL BULB
FRONT LIGHT CLUSTERS
These contain the bulbs for the daytime
running lights (DRL), side lights,
dipped/main beam headlights and
direction indicators.
The bulbs are arranged as follows fig.
83:
Daytime running lights (DRL)
Dipped/main beam headlights and
side lights
Direction indicators
Daytime running lights (DRL)
To replace the bulb, proceed as follows:
remove cover A fig. 83;
turn the snap-fitted bulb holder unit
B fig. 84 anticlockwise, remove bulb
C and replace it;
refit the new bulb then reinsert the
bulb holder B fig. 84 in its housing;
then refit the cover A fig. 83.
Side lights
To replace the bulb, proceed as follows:
remove cover B fig. 83;
remove snap-fitted bulb holder C fig.
85, remove the bulb D and replace it;
refit the new bulb then reinsert
the bulb holder unit C fig. 85 in
its housing;
then refit the cover B fig. 83.
Dipped/main beam headlights
To replace the bulb, proceed as follows:
remove the cover B fig. 83 and
then the snap-fitted bulb holder C fig.
86;
remove bulb D from the connector E
and replace it;
refit the new bulb on the connector
making sure that it is locked correctly,
then reinsert bulb holder C in its
housing;
then refit the cover B fig. 83.
Front direction indicators
To replace the bulb, proceed as follows:
turn the cover C fig. 83
anticlockwise, extract the bulb D fig. 87
from its housing and replace it;
83L0F0033C
84L0F0070C
85L0F0069C
86L0F0068C
109
Page 112 of 200

refit the bulb D in the housing E and
then fit the cover C fig. 83.
Side direction indicators
To replace the bulb, proceed as follows:
adjust the lens A fig. 89 to
compress in the internal catch B, then
pull the unit outwards;
turn the bulb holder C anticlockwise,
extract the bulb and replace it;
refit the bulb holder C in the lens and
turn it clockwise;
refit the cluster making sure that the
internal catch B clips into position.
Front fog lights
(for versions/markets, where provided)
To replace the bulb, proceed as follows:
steer the wheel completely, adjust
the tabs A fig. 89 and remove the
flap B;
adjust the clip C fig. 90 and
disconnect the electrical connector D;
remove the cover E by turning it
clockwise (see the word OFF and the
arrow on the cover);
release the catches F fig. 91
removing them outwards;
release the connector G fig. 92 and
replace the bulb H;
87L0F0071C
88L0F0209C
89L0F0205C
90L0F0206C
91L0F0207C
92L0F0208C
110
IN AN EMERGENCY
Page 116 of 200
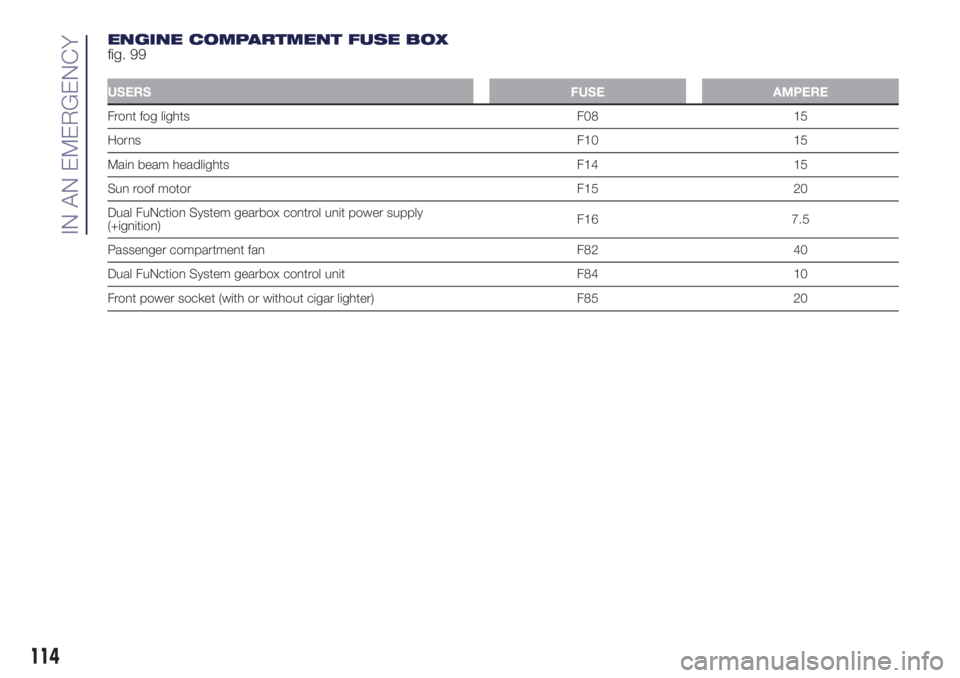
ENGINE COMPARTMENT FUSE BOX
fig. 99
USERSFUSE AMPERE
Front fog lights F08 15
HornsF10 15
Main beam headlights F14 15
Sun roof motor F15 20
Dual FuNction System gearbox control unit power supply
(+ignition)F16 7.5
Passenger compartment fan F82 40
Dual FuNction System gearbox control unit F84 10
Front power socket (with or without cigar lighter) F85 20
114
IN AN EMERGENCY
Page 117 of 200
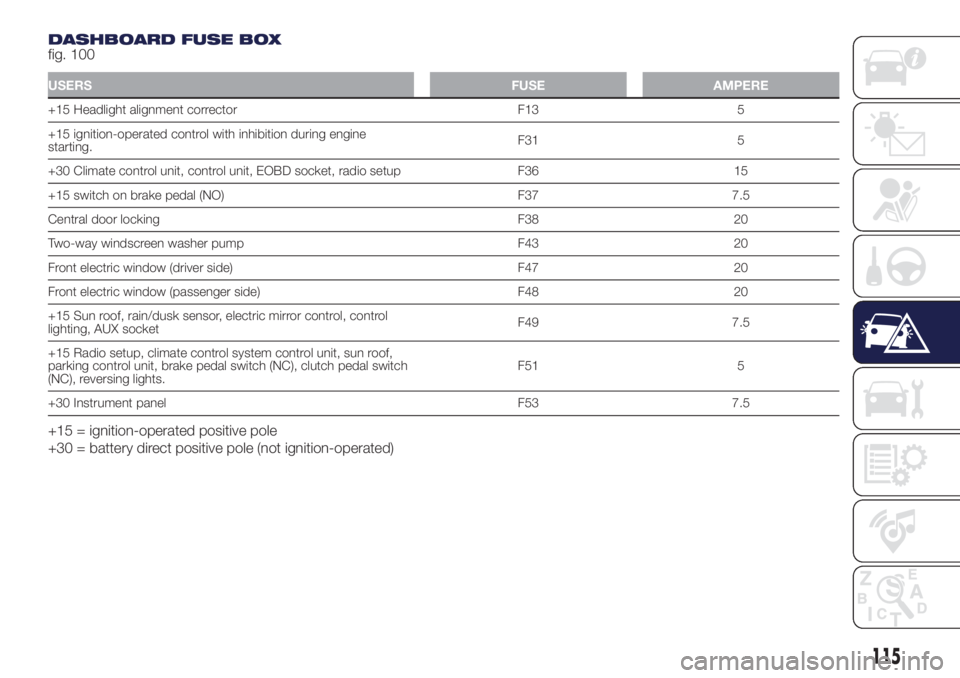
DASHBOARD FUSE BOX
fig. 100
USERSFUSE AMPERE
+15 Headlight alignment corrector F13 5
+15 ignition-operated control with inhibition during engine
starting.F31 5
+30 Climate control unit, control unit, EOBD socket, radio setup F36 15
+15 switch on brake pedal (NO) F37 7.5
Central door locking F38 20
Two-way windscreen washer pump F43 20
Front electric window (driver side) F47 20
Front electric window (passenger side) F48 20
+15 Sun roof, rain/dusk sensor, electric mirror control, control
lighting, AUX socketF49 7.5
+15 Radio setup, climate control system control unit, sun roof,
parking control unit, brake pedal switch (NC), clutch pedal switch
(NC), reversing lights.F51 5
+30 Instrument panel F53 7.5
+15 = ignition-operated positive pole
+30 = battery direct positive pole (not ignition-operated)
115
Page 126 of 200
FUEL CUT-OFF
SYSTEM
147)
FUEL CUT-OFF SYSTEM
This intervenes in the case of an impact
causing:
the interruption of the fuel supply
with the engine consequently cutting
out;
the automatic unlocking of the
doors;
turning on of the lights inside the
vehicle;
the switching on of the hazard
warning lights.
On some versions, the intervention of
the system is indicated by a message
shown on the display.
IMPORTANT Carefully check the vehicle
for fuel leaks, for instance in the engine
compartment, under the vehicle or
near the tank area. After an impact, turn
the ignition key to STOP to prevent the
battery from running down.
To restore the correct operation of the
vehicle, proceed as follows:
turn the ignition key to the MAR
position;
activate the right direction indicator;
deactivate the right direction
indicator;
activate the left direction indicator;
deactivate the left direction indicator;
activate the right direction indicator;
deactivate the right direction
indicator;
activate the left direction indicator;
deactivate the left direction indicator;
ignition key turned to the OFF
position;
turn the ignition key to the MAR-ON
position.
LPG / Natural Power versions:inthe
event of an impact, petrol supply is
immediately cut-off, the LPG safety
valves are closed and the injection is
interrupted, switching off the engine.
WARNING
147)If, after an impact, you smell fuel or
notice leaks from the fuel system, do
not reactivate the system to avoid the risk
of fire.
TOWING THE
VEHICLE
148) 149) 150) 151)
The tow hook, which is supplied with
the vehicle, is housed in the tool box,
under the carpet in the luggage
compartment.
ATTACHING THE TOW
RING
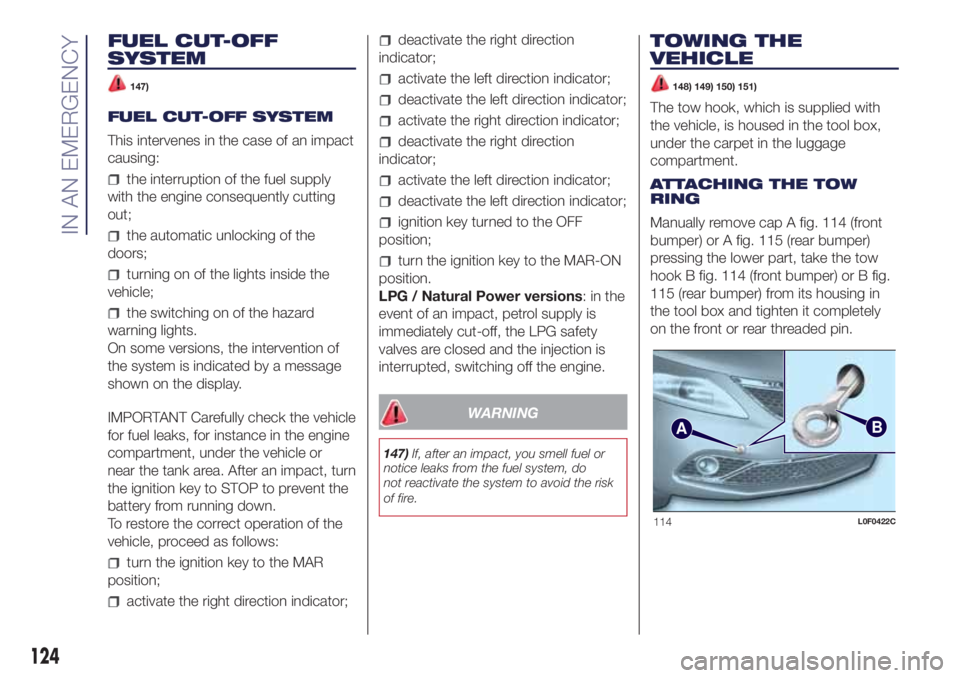
Manually remove cap A fig. 114 (front
bumper) or A fig. 115 (rear bumper)
pressing the lower part, take the tow
hook B fig. 114 (front bumper) or B fig.
115 (rear bumper) from its housing in
the tool box and tighten it completely
on the front or rear threaded pin.
AB
114L0F0422C
124
IN AN EMERGENCY
Page 138 of 200
REGULAR CHECKS
Every 1,000 km or before long
journeys, check and, if necessary, top
up:
engine coolant, brake fluid and
windscreen washer fluid level;
tyre inflation pressure and condition;
operation of lighting system
(headlights, direction indicators, hazard
warning lights, etc.);
operation of windscreen washer/
wiper system and positioning/wear of
rear window wiper blades.
Every 3,000 km, check and top up if
required: engine oil level.
For cars with 0.9 TwinAir engines:
every3,000km check the engine oil
level and top it up to the maximum level
if necessary.
DEMANDING USE OF THE
CAR
If the car is used mainly under one of
the following conditions:
towing a trailer or caravan;
dusty roads;
short, repeated journeys (less than
7-8 Km) at sub-zero outdoor
temperatures;
engine often idling or driving long
distances at low speeds or long periods
of inactivity;perform the following inspections more
frequently than shown on the
Scheduled Servicing Plan:
check front disc brake pad condition
and wear;
check cleanliness of bonnet and
luggage compartment locks,
cleanliness and lubrication of linkage;
visually inspect conditions of:
engine, gearbox, transmission, pipes
and hoses (exhaust/fuel system/brakes)
and rubber elements (gaiters/sleeves/
bushes, etc.);
check battery charge and battery
fluid level (electrolyte);
visually inspect conditions of the
accessory drive belts;
check and, if necessary, change
engine oil and replace oil filter;
check and, if necessary, replace
pollen filter;
check and, if necessary, replace air
cleaner.
136
SERVICING AND CARE
Page 147 of 200
WHEELS AND TYRES
165) 166) 167) 168) 169)
IMPORTANT NOTES
Take the following precautions to
prevent damage to the tyres:
avoid braking suddenly, racing starts
and violent impact against the curb,
potholes or other obstacles and driving
for extended periods on uneven road
surfaces;
periodically check that the tyres
have no cuts in the side wall, abnormal
swelling or irregular tread wear;
avoid travelling with the vehicle
overloaded. If a tyre is punctured, stop
immediately and change it;
tyres age even if they are not used
much. Cracks in the tread rubber
and at the sides are a sign of ageing. In
any case, if the tyres have been on
the car for over 6 years, they should be
checked by specialised personnel.
Also remember to check the
space-saver wheel very carefully (for
versions/markets, where provided);
alternate the tyres, between front
and rear, every 10-15 thousand
kilometres, keeping them on the same
side of the car so as not to reverse
the direction of rotation;
in the case of replacement, always
fit new tyres, avoiding those of
unknown origin;
if a tyre is changed, also change the
inflation valve.
avoid travelling with partially or
completely deflated tyres as this can
compromise safety and damage the
tyres beyond repair.
WARNING
165)The road holding qualities of the car
also depend on the correct inflation
pressure of the tyres.
166)If tyre pressure is too low, it may
overheat and be severely damaged as a
result.
167)Do not cross switch the tyres, moving
them from the right of the car to the left
and vice versa.
168)Do not repaint alloy wheel rims at
temperatures higher than 150°C. The
mechanical characteristics of the wheels
might be compromised.
169)Travelling with partially or completely
deflated tyres can cause safety problems
and damage the concerned tyre beyond
repair.
BODY
PRESERVING THE
BODYWORK
Paint
Touch up abrasions and scratches
immediately to prevent the formation of
rust.
Maintenance of paintwork consists of
washing the car: the frequency
depends on the conditions and
environment where the car is used. For
example, in highly polluted areas, or if
the roads are spread with salt, it is
advisable to wash the car more
frequently.
To correctly wash the car, proceed as
follows:
remove the aerial from the roof to
prevent damage to it if the car is
washed in an automatic system;
if there is any decorative sticker or if
high pressure jets or cleaners are used
to wash the car, keep a distance of
at least 40 cm from the bodywork to
avoid damage or alteration;
wash the bodywork using a low
pressure jet of water;
wipe a sponge with a slightly soapy
solution over the bodywork, frequently
rinsing the sponge;
145
Page 148 of 200

rinse well with water and dry with a
jet of air or a chamois.
Dry the less visible parts (e.g. door
frames, bonnet, headlight frames etc.)
with special care, as water may
stagnate more easily in these areas.
The car should not be taken to a closed
area immediately, but left outside so
that residual water can evaporate.
Do not wash the car after it has been
left in the sun or with the bonnet hot:
this may alter the shine of the
paintwork.
Exterior plastic parts must be cleaned
in the same way as the rest of the
vehicle.
Avoid parking under trees; the resin
dropped by trees makes the paintwork
go opaque and increases the possibility
of corrosion.
IMPORTANT Bird droppings must be
washed off immediately and thoroughly
as the acid they contain is particularly
aggressive.
66)8)
Windows
Use specific detergents and clean
cloths to prevent scratching or altering
the transparency.IMPORTANT Wipe the rear window
inside gently with a cloth following the
direction of the filaments to avoid
damaging the heating device.
Front headlights
Use a soft cloth soaked in water and
detergent for washing cars.
IMPORTANT Never use aromatic
substances (e.g. petrol) or ketones (e.g.
acetone) for cleaning the plastic lenses
of the headlights.
IMPORTANT When cleaning with a
pressure washer, keep the water jet at
least 20 cm away from the headlights.
Engine compartment
At the end of every winter, wash the
engine compartment thoroughly, taking
care not to aim the jet of water directly
at the electronic control units or at
the windscreen wiper motors. Have this
operation performed at a specialised
workshop.
IMPORTANT The washing should take
place with the engine cold and the
ignition key in the STOP position. After
the washing operation, make sure
that the various protections (e.g. rubber
caps and guards) have not been
removed or damaged.
WARNING
66)In order to preserve the aesthetic
appearance of the paint abrasive products
and/or polishes should not be used for
cleaning the vehicle.
WARNING
8)Detergents pollute the environment.
Only wash your vehicle in areas equipped
to collect and treat wastewater from this
type of activity.
146
SERVICING AND CARE
Page 176 of 200
SWITCHING THE SYSTEM
ON/OFF
The system is switched on/off by
pressing the
(ON/OFF) button/knob.
Turn the button/knob clockwise to
increase the radio volume or
anticlockwise to decrease it.
The system is equipped with the
following tuners: AM, FM and DAB (for
versions/markets, where provided).
RADIO MODE
Press the RADIO button on the front
panel to activate radio mode.
After the desired radio station is
selected, the following information is
shown on the display:
At the top: the list of radio stations
stored (preset) is displayed; the station
currently playing is highlighted.
In the middle: display of the name of
the current radio station and the
buttons for selecting the previous or
next radio station.
At the bottom: display of the following
buttons:
"Browse": list of the radio stations
available;
"AM/FM", "AM/DAB", "FM/DAB":
selection of the desired frequency band
(button reconfigurable according to
the band selected: AM, FM or DAB);
"Tune" : manual radio station tuning
(not available for DAB radios);
"Info": additional information on the
source being listened to;
"Audio": access to the "Audio
settings" screen.
Radio station selection
To search for the desired radio station
press buttons
oron the display
or use the steering wheel controls.
Previous/next radio station search
Briefly press buttons
oron
the display: when the button is released
the previous or the next radio station
is displayed.
Previous/next radio station fast
search
Hold down buttons
oron the
display to start fast search: when the
button is released, the first tunable
radio station can be heard.
Audio menu
To access the "Audio" menu press the
Audio" button located at the bottom
of the display.
The following adjustments can be
carried out using the "Audio" menu:
"Equaliser" (for versions/markets,
where provided);
"Balance/Fader" (left/right and
front/rear audio balance adjustment);
"Speed/Volume" (speed-dependent
automatic volume control);
"Loudness" (for versions/markets,
where provided);
"Auto-On Radio";
"Radio Off Delay".
To exit the "Audio" menu, press the
/Done button.
MEDIA MODE
Audio source selection
Press the "Source" button to select the
desired audio source among those
available: AUX, USB, iPod or
Bluetooth®.
NOTE Applications used on portable
devices may be not compatible with the
Uconnect™system
Track change
Briefly press the
button or turn the
BROWSE ENTER button/knob
clockwise to play the next track or
briefly press the
button or turn the
BROWSE ENTER button/knob
anticlockwise to return to the beginning
of the selected track or to the beginning
of the previous track if it has been
played for less than 3 seconds.
174
MULTIMEDIA