mirror Lancia Ypsilon 2018 Owner handbook (in English)
[x] Cancel search | Manufacturer: LANCIA, Model Year: 2018, Model line: Ypsilon, Model: Lancia Ypsilon 2018Pages: 200, PDF Size: 4.53 MB
Page 5 of 200
USE OF THE OWNER HANDBOOK
OPERATING INSTRUCTIONS
Each time direction instructions (left/right or forwards/backwards) about the vehicle are given, these must be intended as
regarding an occupant in the driver's seat. Special cases not complying with this rule will be specified as appropriate in the text.
The figures in the Owner Handbook are provided by way of example only: this might imply that some details of the image do
not correspond to the actual arrangement of your car. In addition, the Handbook has been conceived considering vehicles with
steering wheel on the left side; it is therefore possible that on vehicles with steering wheel on the right side, the position or
construction of some controls is not exactly mirror-like with respect to the figure.
To identify the chapter with the information needed you can consult the index at the end of this Owner Handbook.
Chapters can be rapidly identified with dedicated graphic tabs, at the side of each odd page. A few pages further there is a key
for getting to know the chapter order and the relevant symbols in the tabs. There is in any case a textual indication of the
current chapter at the side of each even page.
WARNINGS AND PRECAUTIONS
While reading this Owner Handbook you will find a series ofWARNINGSto prevent procedures that could damage your
vehicle.
There are alsoPRECAUTIONSthat must be carefully followed to prevent incorrect use of the components of the vehicle,
which could cause accidents or injuries.
Therefore, allWARNINGSandPRECAUTIONSmust always be followed carefully.
WARNINGSandPRECAUTIONSare recalled in the text with the following symbols:
personal safety;
vehicle safety;
environmental protection.
NOTE These symbols, when necessary, are indicated besides the title or at the end of the line and are followed by a number.
That number recalls the corresponding warning at the end of the relevant section.
Page 9 of 200
KNOWING YOUR CAR
In-depth knowledge of your new vehicle
starts here.
The booklet that you are reading simply
and directly explains how it is made
and how it works.
That’s why we advise you to read it
seated comfortably on board, so that
you can see immediately what is
described here for yourself.INSTRUMENT PANEL ..................... 8
THE KEYS ...................................... 9
IGNITION DEVICE ........................... 10
THE LANCIA CODE SYSTEM.......... 11
DOORS ........................................... 11
SEATS ............................................ 13
HEADRESTS ................................... 15
STEERING WHEEL ......................... 16
REAR VIEW MIRRORS .................... 16
EXTERIOR LIGHTS ......................... 17
INTERIOR LIGHTS .......................... 20
WINDSCREEN / REAR WINDOW
WIPERS .......................................... 21
CLIMATE CONTROL ....................... 23
ELECTRIC WINDOWS .................... 27
ELECTRIC SUN ROOF .................... 28
CONTROLS .................................... 29
BONNET ......................................... 30
BOOT ............................................. 32
VERSION WITH LPG SYSTEM ........ 33
VERSION WITH METHANE
SYSTEM (NATURAL POWER) ......... 35
7
Page 18 of 200
STEERING WHEEL
14) 15)
ADJUSTMENTS
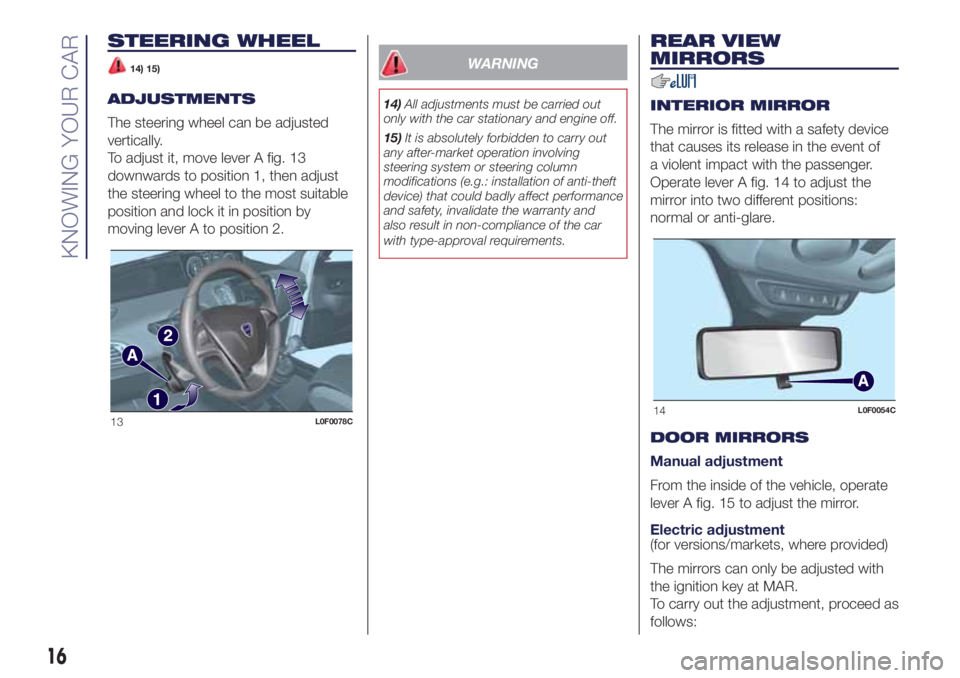
The steering wheel can be adjusted
vertically.
To adjust it, move lever A fig. 13
downwards to position 1, then adjust
the steering wheel to the most suitable
position and lock it in position by
moving lever A to position 2.
WARNING
14)All adjustments must be carried out
only with the car stationary and engine off.
15)It is absolutely forbidden to carry out
any after-market operation involving
steering system or steering column
modifications (e.g.: installation of anti-theft
device) that could badly affect performance
and safety, invalidate the warranty and
also result in non-compliance of the car
with type-approval requirements.
REAR VIEW
MIRRORS
INTERIOR MIRROR
The mirror is fitted with a safety device
that causes its release in the event of
a violent impact with the passenger.
Operate lever A fig. 14 to adjust the
mirror into two different positions:
normal or anti-glare.
DOOR MIRRORS
Manual adjustment
From the inside of the vehicle, operate
lever A fig. 15 to adjust the mirror.
Electric adjustment
(for versions/markets, where provided)
The mirrors can only be adjusted with
the ignition key at MAR.
To carry out the adjustment, proceed as
follows:
13L0F0078C14L0F0054C
16
KNOWING YOUR CAR
Page 19 of 200
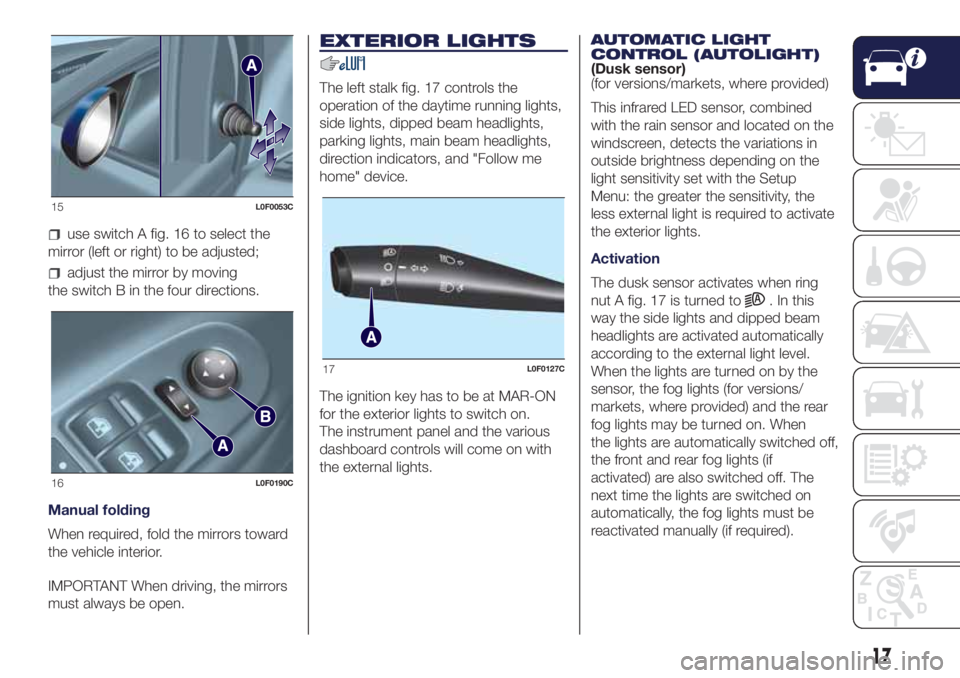
use switch A fig. 16 to select the
mirror (left or right) to be adjusted;
adjust the mirror by moving
the switch B in the four directions.
Manual folding
When required, fold the mirrors toward
the vehicle interior.
IMPORTANT When driving, the mirrors
must always be open.
EXTERIOR LIGHTS
The left stalk fig. 17 controls the
operation of the daytime running lights,
side lights, dipped beam headlights,
parking lights, main beam headlights,
direction indicators, and "Follow me
home" device.
The ignition key has to be at MAR-ON
for the exterior lights to switch on.
The instrument panel and the various
dashboard controls will come on with
the external lights.AUTOMATIC LIGHT
CONTROL (AUTOLIGHT)
(Dusk sensor)
(for versions/markets, where provided)
This infrared LED sensor, combined
with the rain sensor and located on the
windscreen, detects the variations in
outside brightness depending on the
light sensitivity set with the Setup
Menu: the greater the sensitivity, the
less external light is required to activate
the exterior lights.
Activation
The dusk sensor activates when ring
nut A fig. 17 is turned to
. In this
way the side lights and dipped beam
headlights are activated automatically
according to the external light level.
When the lights are turned on by the
sensor, the fog lights (for versions/
markets, where provided) and the rear
fog lights may be turned on. When
the lights are automatically switched off,
the front and rear fog lights (if
activated) are also switched off. The
next time the lights are switched on
automatically, the fog lights must be
reactivated manually (if required).
15L0F0053C
16L0F0190C
17L0F0127C
17
Page 23 of 200
WINDSCREEN /
REAR WINDOW
WIPERS
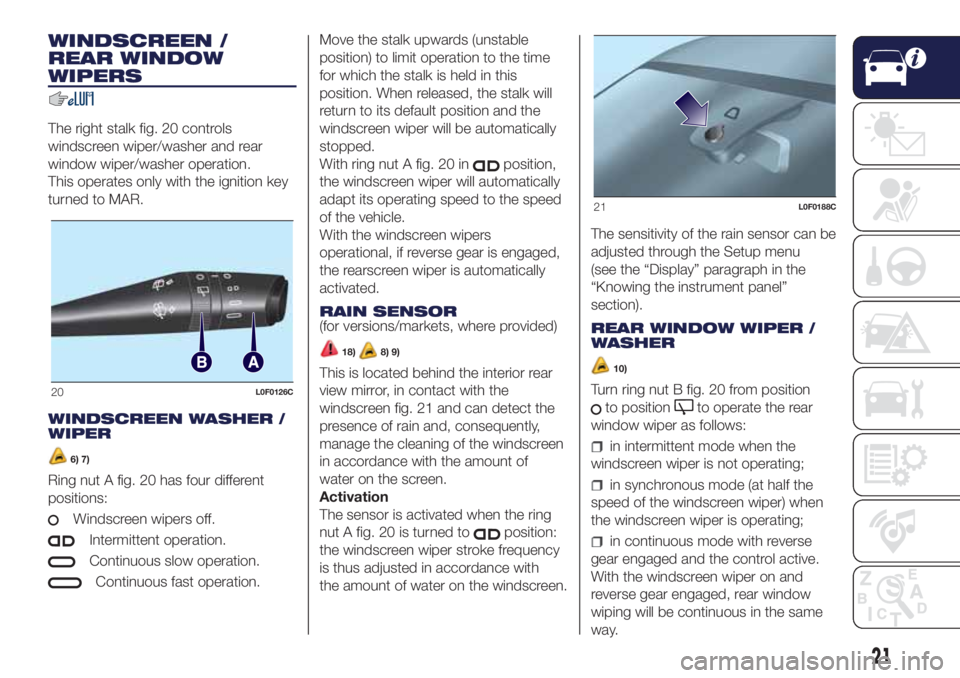
The right stalk fig. 20 controls
windscreen wiper/washer and rear
window wiper/washer operation.
This operates only with the ignition key
turned to MAR.
WINDSCREEN WASHER /
WIPER
6) 7)
Ring nut A fig. 20 has four different
positions:
Windscreen wipers off.
Intermittent operation.
Continuous slow operation.
Continuous fast operation.Move the stalk upwards (unstable
position) to limit operation to the time
for which the stalk is held in this
position. When released, the stalk will
return to its default position and the
windscreen wiper will be automatically
stopped.
With ring nut A fig. 20 in
position,
the windscreen wiper will automatically
adapt its operating speed to the speed
of the vehicle.
With the windscreen wipers
operational, if reverse gear is engaged,
the rearscreen wiper is automatically
activated.
RAIN SENSOR
(for versions/markets, where provided)
18)8) 9)
This is located behind the interior rear
view mirror, in contact with the
windscreen fig. 21 and can detect the
presence of rain and, consequently,
manage the cleaning of the windscreen
in accordance with the amount of
water on the screen.
Activation
The sensor is activated when the ring
nut A fig. 20 is turned to
position:
the windscreen wiper stroke frequency
is thus adjusted in accordance with
the amount of water on the windscreen.The sensitivity of the rain sensor can be
adjusted through the Setup menu
(see the “Display” paragraph in the
“Knowing the instrument panel”
section).
REAR WINDOW WIPER /
WASHER
10)
Turn ring nut B fig. 20 from position
to positionto operate the rear
window wiper as follows:
in intermittent mode when the
windscreen wiper is not operating;
in synchronous mode (at half the
speed of the windscreen wiper) when
the windscreen wiper is operating;
in continuous mode with reverse
gear engaged and the control active.
With the windscreen wiper on and
reverse gear engaged, rear window
wiping will be continuous in the same
way.
20L0F0126C
21L0F0188C
21
Page 75 of 200
75)The rear central seat belt is provided
with a service buckle . Do not use the seat
belt with the service buckle not fastened.
In this case there is a high risk of injury
or death in the event of an accident. Before
using the belt, always make sure that the
service buckle is correctly fastened.SBR (Seat Belt
Reminder) SYSTEM
The SBR system warns the passengers
of the front and rear (for versions/
markets, where provided) seats if their
seat belt is not fastened.
The system signals unfastened seat
belts with visual warnings (warning light
on in the instrument panel or panel
and icon on the display) and an
acoustic signal (see the following
paragraphs).
NOTE Contact a Lancia Dealership to
deactivate this acoustic warning
permanently. The acoustic warning can
be reactivated at any time through the
display Setup Menu.
Seat belts warning light operation
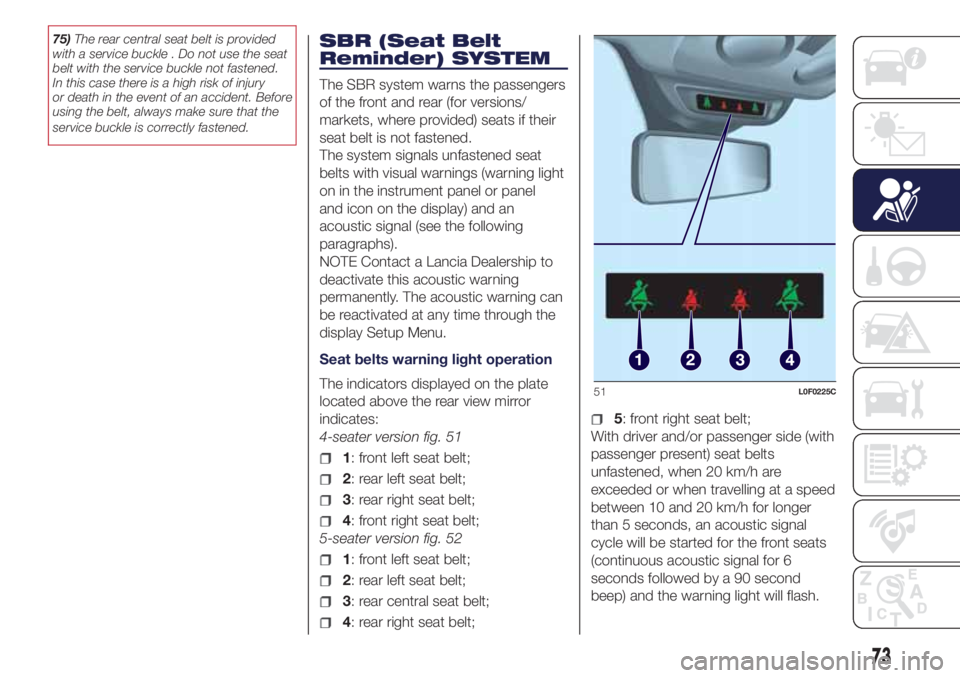
The indicators displayed on the plate
located above the rear view mirror
indicates:
4-seater version fig. 51
1: front left seat belt;
2: rear left seat belt;
3: rear right seat belt;
4: front right seat belt;
5-seater version fig. 52
1: front left seat belt;
2: rear left seat belt;
3: rear central seat belt;
4: rear right seat belt;
5: front right seat belt;
With driver and/or passenger side (with
passenger present) seat belts
unfastened, when 20 km/h are
exceeded or when travelling at a speed
between 10 and 20 km/h for longer
than 5 seconds, an acoustic signal
cycle will be started for the front seats
(continuous acoustic signal for 6
seconds followed by a 90 second
beep) and the warning light will flash.
51L0F0225C
73
Page 96 of 200
STARTING THE
ENGINE
107) 108)34) 35) 36) 37)
Before starting the engine, adjust the
seat, the interior rear view mirrors,
the door mirrors and fasten the seat
belt correctly.
Never press the accelerator pedal for
starting the engine.
PETROL VERSIONS
Proceed as follows:
engage the handbrake and put the
gear lever in neutral.On 0.9 TwinAir
versionsengage the handbrake and
place the gear lever in neutral or fully
press the clutch pedal if a gear other
than neutral is engaged;
for all versions (except 0.9
TwinAir)fully depress the clutch pedal
without touching the accelerator;
turn the ignition key to AVV and
release it as soon as the engine starts.
DIESEL VERSIONS
Proceed as follows:
engage the handbrake and put the
gear lever in neutral;
turn the ignition key to MAR: the
warning lights
andon the
instrument panel will turn on;
wait for the warning lightsand
to switch off;
fully depress the clutch pedal
without touching the accelerator;
turn the ignition key to the AVV
position as soon as the warning light
turns off. Waiting too long will waste
the heating work carried out by the
plugs. Release the key as soon as the
engine starts.
IMPORTANT With cold engine, the
accelerator must be entirely released
when turning the ignition key to position
AVV. If the engine does not start at the
first attempt, return the ignition key
to STOP before repeating the starting
procedure. If, when the ignition key is at
MAR, the instrument panel warning
light
remains lit, turn the key to
STOP and then back to MAR. If the
warning light remains on, try with the
other keys provided with the car.
Contact a Lancia Dealership if you still
cannot start the engine.VERSIONS WITH DUAL
FUNCTION SYSTEM
TRANSMISSION
109)
The system allows the engine to be
started both with a gear engaged and
with the transmission in neutral (N).
However, the brake pedal must always
be pressed first if neutral is not
engaged. It is therefore advisable to
position the gear lever at N before
starting the engine.
LPG AND NATURAL
POWER VERSIONS
38)
The engine always starts up on petrol
independently of the previously
selected mode.
SWITCHING OFF THE
ENGINE
39)
Turn the ignition key to STOP while the
engine is idling.
IMPORTANT After a demanding drive,
before turning the engine off you should
allow it to idle to allow the temperature
in the engine compartment to
decrease.
94
STARTING AND DRIVING
Page 104 of 200
WARNING
118)Parking manoeuvres, however, are
always the driver’s responsibility. While
carrying out these manoeuvres, always
make sure that no people (especially
children) or animals are in the area
concerned. The parking sensors are used
to assist the driver, who must never allow
his attention to lapse during potentially
dangerous manoeuvres, even those
executed at low speeds.
WARNING
44)For correct operation of the system,
sensors must always be clean from mud,
dirt, snow or ice. Be careful not to scratch
or damage the sensors while cleaning
them. Avoid using dry, rough or hard
cloths. The sensors must be washed using
clean water, with the addition of vehicle
shampoo if necessary. When using special
washing equipment such as high pressure
jets or steam cleaning, clean the sensors
very quickly keeping the jet more than
10 cm away. Also, do not apply stickers to
the sensors.
45)Have interventions on the bumper in
the area of the sensors carried out only by
a Lancia Dealership. Interventions on the
bumper that are not carried out properly
may compromise the operation of the
parking sensors.
TOWING TRAILERS
119) 120)
IMPORTANT NOTES
For towing caravans or trailers the
vehicle must be fitted with an approved
tow hook and an adequate electrical
system. Installation must be carried out
by a specialist.
Install any specific and/or additional
door mirrors as specified by the
Highway Code.
Remember that when towing a trailer,
steep hills are harder to climb, braking
distances increase and overtaking
takes longer depending on the overall
weight of the trailer.
Engage a low gear when driving
downhill, rather than constantly using
the brake.
The weight the trailer exerts on the
vehicle tow hook reduces the vehicle's
loading capacity by the same amount.
To make sure that the maximum
towable weight is not exceeded (given
in the vehicle registration document)
account should be taken of the fully
laden trailer, including accessories and
luggage.Do not exceed the speed limits specific
to each country you are driving in, in
the case of vehicles towing trailers.
In any case, the top speed must not
exceed 100 km/h.
Any electric brake must be powered
directly by the battery through a cable
with a cross-section of no less than 2.5
mm
2.
In addition to the electrical branches,
the vehicle electrical system can only
be connected to the supply cable for an
electric brake and to the cable for an
internal light for the trailer, not
exceeding 15 W. For connections, use
the preset control unit with a battery
cable with section not less than 2.5
mm
2.
IMPORTANT The use of auxiliary loads
other than external lights (electric brake,
etc.) must take place with engine
running.
IMPORTANT To install a tow hook
contact a Lancia Dealership.
102
STARTING AND DRIVING
Page 117 of 200
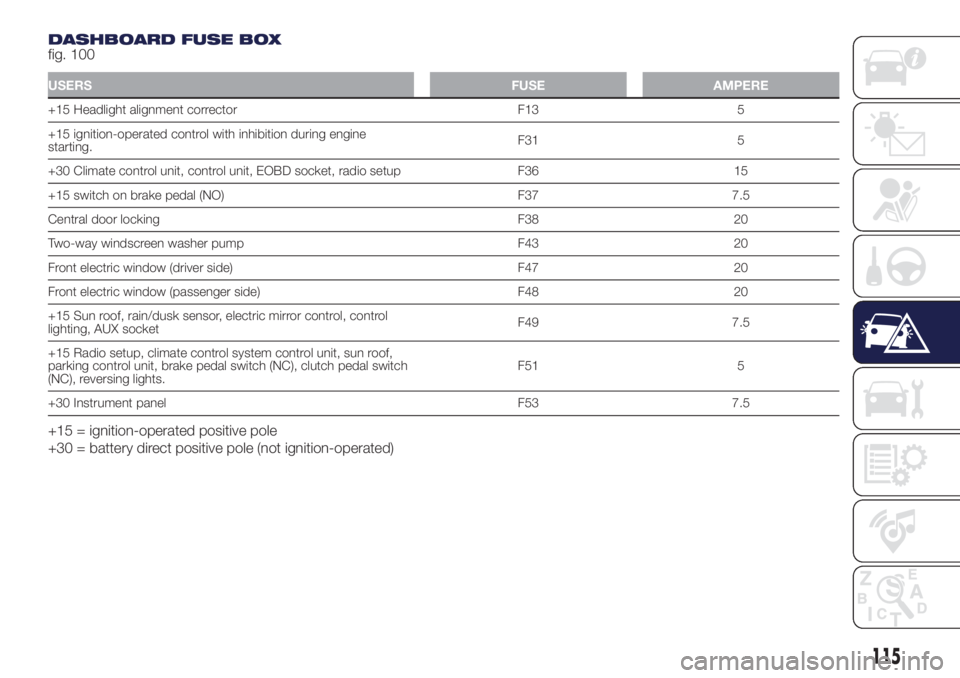
DASHBOARD FUSE BOX
fig. 100
USERSFUSE AMPERE
+15 Headlight alignment corrector F13 5
+15 ignition-operated control with inhibition during engine
starting.F31 5
+30 Climate control unit, control unit, EOBD socket, radio setup F36 15
+15 switch on brake pedal (NO) F37 7.5
Central door locking F38 20
Two-way windscreen washer pump F43 20
Front electric window (driver side) F47 20
Front electric window (passenger side) F48 20
+15 Sun roof, rain/dusk sensor, electric mirror control, control
lighting, AUX socketF49 7.5
+15 Radio setup, climate control system control unit, sun roof,
parking control unit, brake pedal switch (NC), clutch pedal switch
(NC), reversing lights.F51 5
+30 Instrument panel F53 7.5
+15 = ignition-operated positive pole
+30 = battery direct positive pole (not ignition-operated)
115
Page 198 of 200
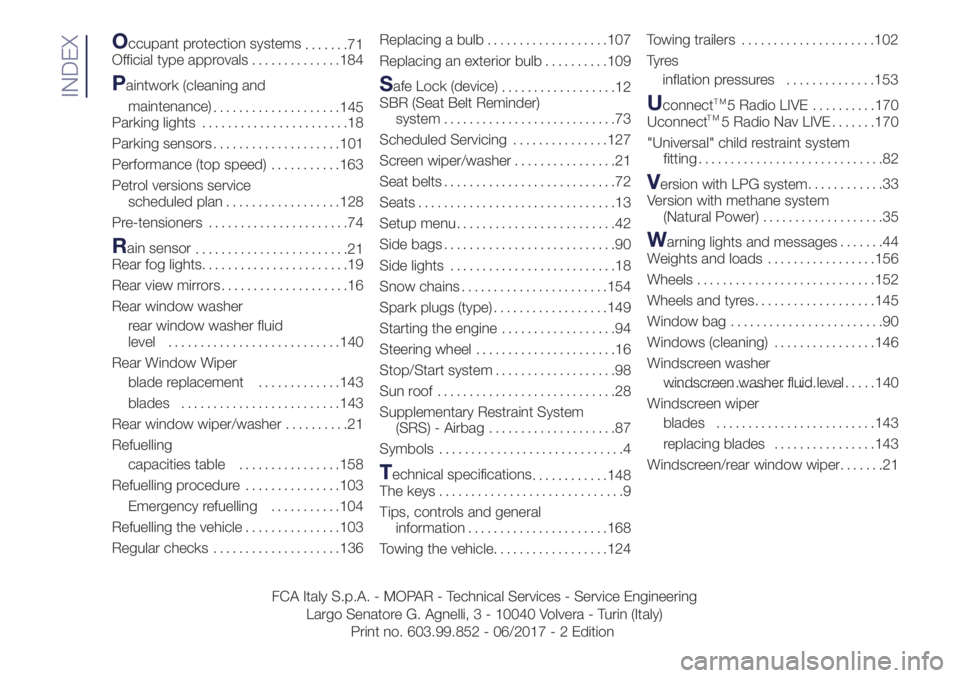
Occupant protection systems
.......71
Official type approvals..............184
Paintwork (cleaning and
maintenance)
....................145
Parking lights.......................18
Parking sensors....................101
Performance (top speed)...........163
Petrol versions service
scheduled plan..................128
Pre-tensioners......................74
Rain sensor
........................21
Rear fog lights.......................19
Rear view mirrors....................16
Rear window washer
rear window washer fluid
level...........................140
Rear Window Wiper
blade replacement.............143
blades.........................143
Rear window wiper/washer..........21
Refuelling
capacities table................158
Refuelling procedure...............103
Emergency refuelling...........104
Refuelling the vehicle...............103
Regular checks....................136Replacing a bulb...................107
Replacing an exterior bulb..........109
Safe Lock (device)
..................12
SBR (Seat Belt Reminder)
system...........................73
Scheduled Servicing...............127
Screen wiper/washer................21
Seat belts...........................72
Seats...............................13
Setup menu.........................42
Side bags...........................90
Side lights..........................18
Snow chains.......................154
Spark plugs (type)..................149
Starting the engine..................94
Steering wheel......................16
Stop/Start system...................98
Sun roof ............................28
Supplementary Restraint System
(SRS) - Airbag....................87
Symbols.............................4
Technical specifications
............148
The keys.............................9
Tips, controls and general
information......................168
Towing the vehicle..................124Towing trailers.....................102
Ty r e s
inflation pressures..............153
UconnectTM5 Radio LIVE. . . . . . . . . .170
Uconnect 5 Radio Nav LIVE . . . . . . .170
"Universal" child restraint system
fitting.............................82
Version with LPG system............33
Version with methane system
(Natural Power)...................35
Warning lights and messages.......44
Weights and loads.................156
Wheels............................152
Wheels and tyres...................145
Window bag........................90
Windows (cleaning)................146
Windscreen washer
windscreen washer fluid level.................................140
Windscreen wiper
blades.........................143
replacing blades................143
Windscreen/rear window wiper.......21
INDEX
FCA Italy S.p.A. - MOPAR - Technical Services - Service Engineering
Largo Senatore G. Agnelli, 3 - 10040 Volvera - Turin (Italy)
Print no. 603.99.852 - 06/2017 - 2 Edition
TM