ignition Lancia Ypsilon 2020 Owner handbook (in English)
[x] Cancel search | Manufacturer: LANCIA, Model Year: 2020, Model line: Ypsilon, Model: Lancia Ypsilon 2020Pages: 200, PDF Size: 4.53 MB
Page 96 of 200
STARTING THE
ENGINE
107) 108)34) 35) 36) 37)
Before starting the engine, adjust the
seat, the interior rear view mirrors,
the door mirrors and fasten the seat
belt correctly.
Never press the accelerator pedal for
starting the engine.
PETROL VERSIONS
Proceed as follows:
engage the handbrake and put the
gear lever in neutral.On 0.9 TwinAir
versionsengage the handbrake and
place the gear lever in neutral or fully
press the clutch pedal if a gear other
than neutral is engaged;
for all versions (except 0.9
TwinAir)fully depress the clutch pedal
without touching the accelerator;
turn the ignition key to AVV and
release it as soon as the engine starts.
DIESEL VERSIONS
Proceed as follows:
engage the handbrake and put the
gear lever in neutral;
turn the ignition key to MAR: the
warning lights
andon the
instrument panel will turn on;
wait for the warning lightsand
to switch off;
fully depress the clutch pedal
without touching the accelerator;
turn the ignition key to the AVV
position as soon as the warning light
turns off. Waiting too long will waste
the heating work carried out by the
plugs. Release the key as soon as the
engine starts.
IMPORTANT With cold engine, the
accelerator must be entirely released
when turning the ignition key to position
AVV. If the engine does not start at the
first attempt, return the ignition key
to STOP before repeating the starting
procedure. If, when the ignition key is at
MAR, the instrument panel warning
light
remains lit, turn the key to
STOP and then back to MAR. If the
warning light remains on, try with the
other keys provided with the car.
Contact a Lancia Dealership if you still
cannot start the engine.VERSIONS WITH DUAL
FUNCTION SYSTEM
TRANSMISSION
109)
The system allows the engine to be
started both with a gear engaged and
with the transmission in neutral (N).
However, the brake pedal must always
be pressed first if neutral is not
engaged. It is therefore advisable to
position the gear lever at N before
starting the engine.
LPG AND NATURAL
POWER VERSIONS
38)
The engine always starts up on petrol
independently of the previously
selected mode.
SWITCHING OFF THE
ENGINE
39)
Turn the ignition key to STOP while the
engine is idling.
IMPORTANT After a demanding drive,
before turning the engine off you should
allow it to idle to allow the temperature
in the engine compartment to
decrease.
94
STARTING AND DRIVING
Page 98 of 200
WARNING
110)Never leave children unattended in
the car. Always remove the key from the
ignition when leaving the car and take
it with you.
111)The car should be braked after a few
clicks of the lever, if it is not, contact a
Lancia Dealership to have it adjusted.
112)In the case of parking manoeuvres on
roads on a gradient, the front wheels
must be steered towards the pavement
(when parking downhill), or in the opposite
direction if the vehicle is parked uphill.
Block the wheels with a wedge or a stone if
the car is parked on a steep slope.
MANUAL GEARBOX
113)40)
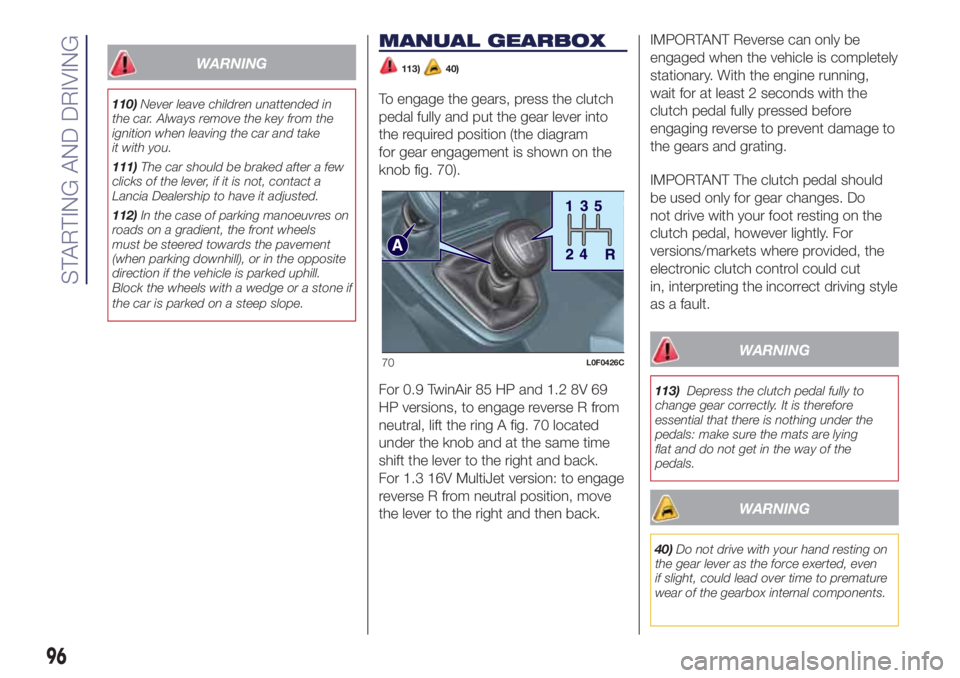
To engage the gears, press the clutch
pedal fully and put the gear lever into
the required position (the diagram
for gear engagement is shown on the
knob fig. 70).
For 0.9 TwinAir 85 HP and 1.2 8V 69
HP versions, to engage reverse R from
neutral, lift the ring A fig. 70 located
under the knob and at the same time
shift the lever to the right and back.
For 1.3 16V MultiJet version: to engage
reverse R from neutral position, move
the lever to the right and then back.IMPORTANT Reverse can only be
engaged when the vehicle is completely
stationary. With the engine running,
wait for at least 2 seconds with the
clutch pedal fully pressed before
engaging reverse to prevent damage to
the gears and grating.
IMPORTANT The clutch pedal should
be used only for gear changes. Do
not drive with your foot resting on the
clutch pedal, however lightly. For
versions/markets where provided, the
electronic clutch control could cut
in, interpreting the incorrect driving style
as a fault.
WARNING
113)Depress the clutch pedal fully to
change gear correctly. It is therefore
essential that there is nothing under the
pedals: make sure the mats are lying
flat and do not get in the way of the
pedals.
WARNING
40)Do not drive with your hand resting on
the gear lever as the force exerted, even
if slight, could lead over time to premature
wear of the gearbox internal components.
70L0F0426C
96
STARTING AND DRIVING
Page 101 of 200
Thesymbol appears on the display
when the engine stops.
Restarting the engine
With manual gearbox: press the clutch
pedal.
With Dual FuNction System gearbox:if
the gear lever is in position N (Neutral),
place it in any other gear, otherwise
release the brake pedal or move the
gear lever to+,–or R (Reverse).
MANUAL SYSTEM
ACTIVATION/
DEACTIVATION
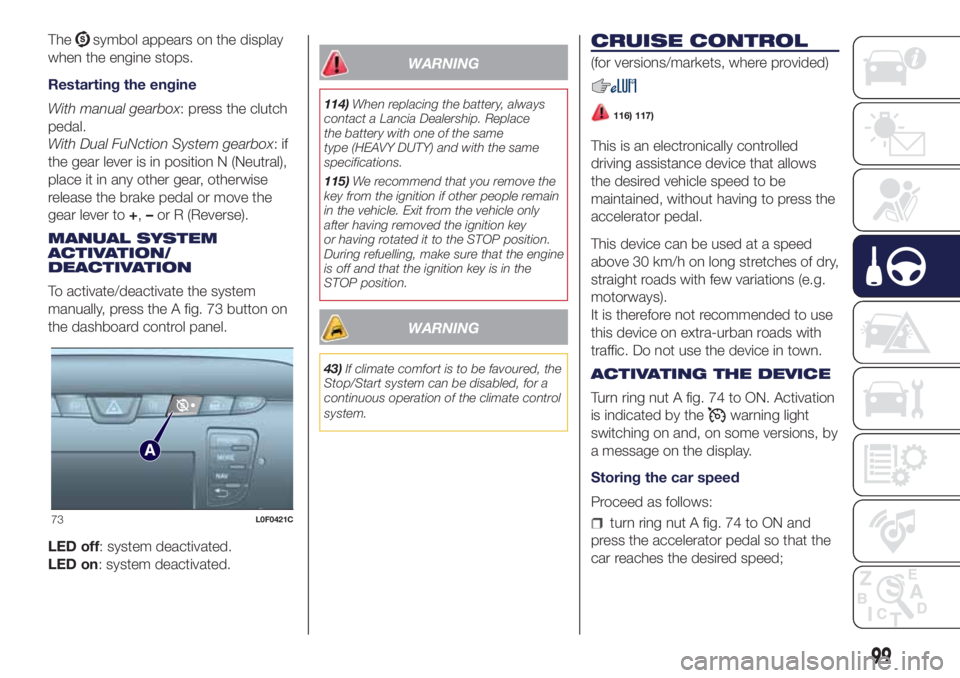
To activate/deactivate the system
manually, press the A fig. 73 button on
the dashboard control panel.
LED off: system deactivated.
LED on: system deactivated.
WARNING
114)When replacing the battery, always
contact a Lancia Dealership. Replace
the battery with one of the same
type (HEAVY DUTY) and with the same
specifications.
115)We recommend that you remove the
key from the ignition if other people remain
in the vehicle. Exit from the vehicle only
after having removed the ignition key
or having rotated it to the STOP position.
During refuelling, make sure that the engine
is off and that the ignition key is in the
STOP position.
WARNING
43)If climate comfort is to be favoured, the
Stop/Start system can be disabled, for a
continuous operation of the climate control
system.
CRUISE CONTROL
(for versions/markets, where provided)
116) 117)
This is an electronically controlled
driving assistance device that allows
the desired vehicle speed to be
maintained, without having to press the
accelerator pedal.
This device can be used at a speed
above 30 km/h on long stretches of dry,
straight roads with few variations (e.g.
motorways).
It is therefore not recommended to use
this device on extra-urban roads with
traffic. Do not use the device in town.
ACTIVATING THE DEVICE
Turn ring nut A fig. 74 to ON. Activation
is indicated by the
warning light
switching on and, on some versions, by
a message on the display.
Storing the car speed
Proceed as follows:
turn ring nut A fig. 74 to ON and
press the accelerator pedal so that the
car reaches the desired speed;73L0F0421C
99
Page 105 of 200
WARNING
119)The ABS with which the car is
equipped will not control the braking
system of the trailer. Particular caution is
required on slippery roads.
120)Never modify the braking system of
the vehicle to control the trailer brake.
The trailer braking system must be fully
independent of the car’s hydraulic system.
REFUELLING THE
VEHICLE
46) 47) 48)
Always stop the engine before
refuelling.
PETROL ENGINES
Only use unleaded petrol, with an
octane number (R.O.N.) not lower than
95.
In order to prevent damage to the
catalytic converter never introduce even
the smallest amount of leaded petrol,
even in the event of an emergency.
DIESEL ENGINES
49)
Only use Diesel for motor vehicles (EN
590 specification).
When using or parking the vehicle for a
long time in the mountains or cold
areas, it is advisable to refuel using
locally available diesel. In this case, it is
also advisable to keep the tank over
50% full.REFUELLING
PROCEDURE
Petrol and Diesel versions equipped
with fuel tank cap
(for versions/markets, where provided)
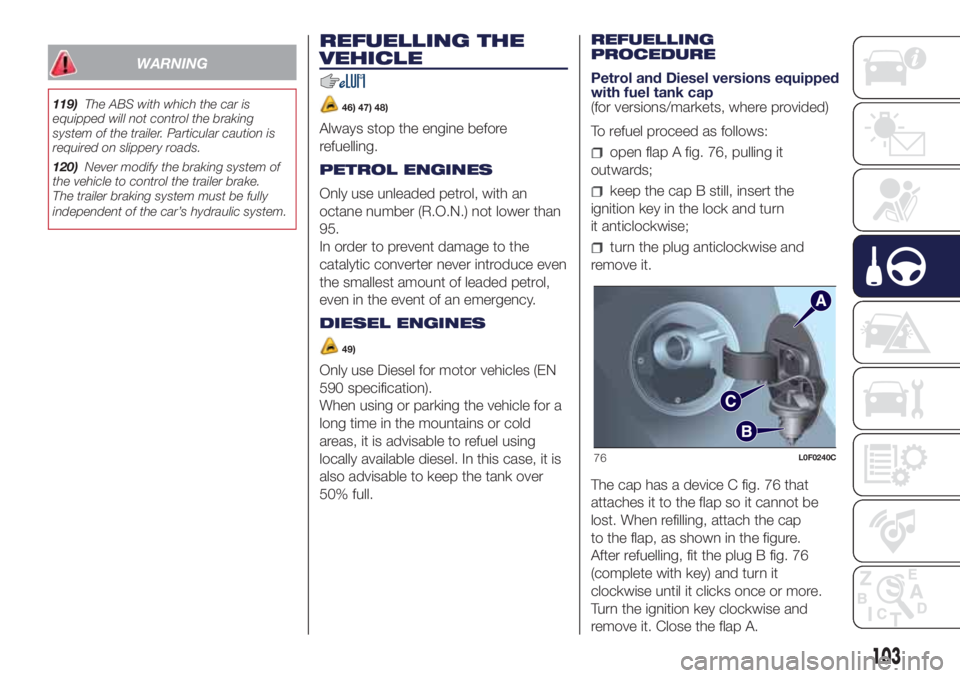
To refuel proceed as follows:
open flap A fig. 76, pulling it
outwards;
keep the cap B still, insert the
ignition key in the lock and turn
it anticlockwise;
turn the plug anticlockwise and
remove it.
The cap has a device C fig. 76 that
attaches it to the flap so it cannot be
lost. When refilling, attach the cap
to the flap, as shown in the figure.
After refuelling, fit the plug B fig. 76
(complete with key) and turn it
clockwise until it clicks once or more.
Turn the ignition key clockwise and
remove it. Close the flap A.
76L0F0240C
103
Page 106 of 200
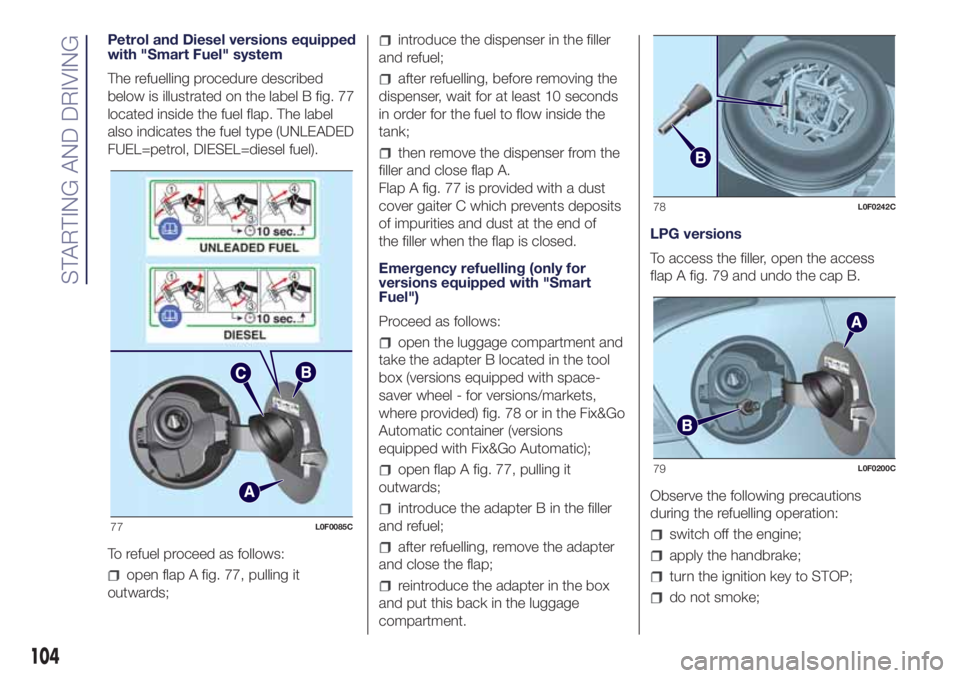
Petrol and Diesel versions equipped
with "Smart Fuel" system
The refuelling procedure described
below is illustrated on the label B fig. 77
located inside the fuel flap. The label
also indicates the fuel type (UNLEADED
FUEL=petrol, DIESEL=diesel fuel).
To refuel proceed as follows:
open flap A fig. 77, pulling it
outwards;
introduce the dispenser in the filler
and refuel;
after refuelling, before removing the
dispenser, wait for at least 10 seconds
in order for the fuel to flow inside the
tank;
then remove the dispenser from the
filler and close flap A.
Flap A fig. 77 is provided with a dust
cover gaiter C which prevents deposits
of impurities and dust at the end of
the filler when the flap is closed.
Emergency refuelling (only for
versions equipped with "Smart
Fuel")
Proceed as follows:
open the luggage compartment and
take the adapter B located in the tool
box (versions equipped with space-
saver wheel - for versions/markets,
where provided) fig. 78 or in the Fix&Go
Automatic container (versions
equipped with Fix&Go Automatic);
open flap A fig. 77, pulling it
outwards;
introduce the adapter B in the filler
and refuel;
after refuelling, remove the adapter
and close the flap;
reintroduce the adapter in the box
and put this back in the luggage
compartment.LPG versions
To access the filler, open the access
flap A fig. 79 and undo the cap B.
Observe the following precautions
during the refuelling operation:
switch off the engine;
apply the handbrake;
turn the ignition key to STOP;
do not smoke;
77L0F0085C
78L0F0242C
79L0F0200C
104
STARTING AND DRIVING
Page 116 of 200
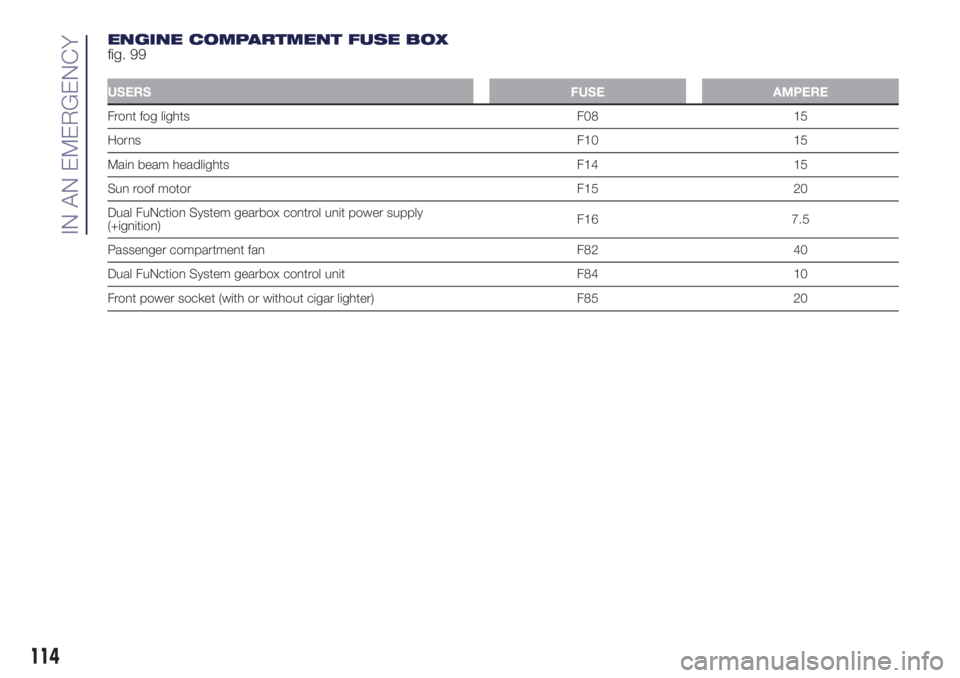
ENGINE COMPARTMENT FUSE BOX
fig. 99
USERSFUSE AMPERE
Front fog lights F08 15
HornsF10 15
Main beam headlights F14 15
Sun roof motor F15 20
Dual FuNction System gearbox control unit power supply
(+ignition)F16 7.5
Passenger compartment fan F82 40
Dual FuNction System gearbox control unit F84 10
Front power socket (with or without cigar lighter) F85 20
114
IN AN EMERGENCY
Page 117 of 200
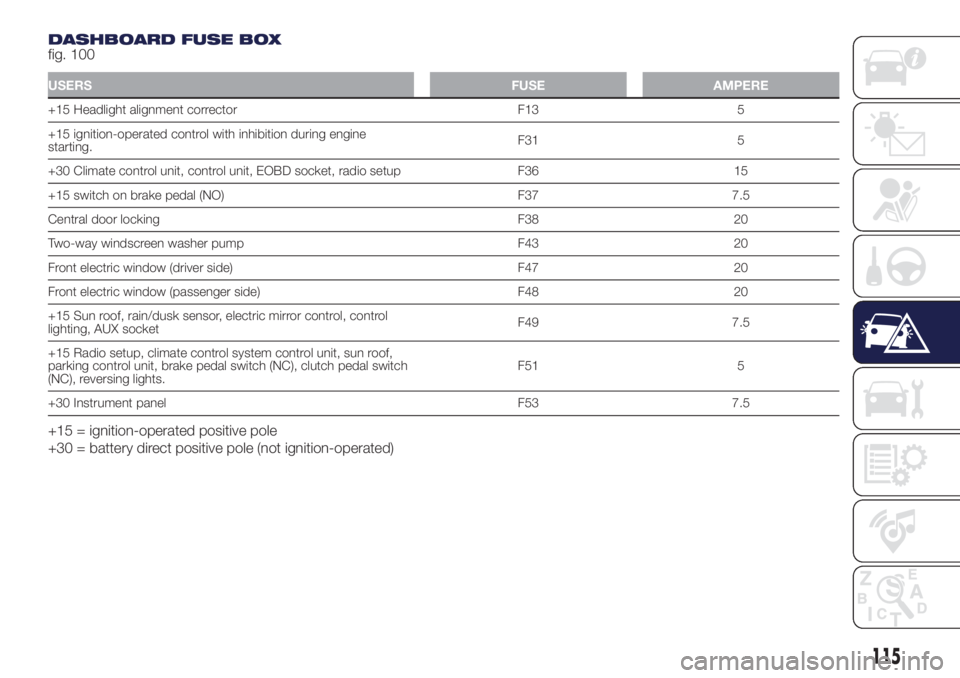
DASHBOARD FUSE BOX
fig. 100
USERSFUSE AMPERE
+15 Headlight alignment corrector F13 5
+15 ignition-operated control with inhibition during engine
starting.F31 5
+30 Climate control unit, control unit, EOBD socket, radio setup F36 15
+15 switch on brake pedal (NO) F37 7.5
Central door locking F38 20
Two-way windscreen washer pump F43 20
Front electric window (driver side) F47 20
Front electric window (passenger side) F48 20
+15 Sun roof, rain/dusk sensor, electric mirror control, control
lighting, AUX socketF49 7.5
+15 Radio setup, climate control system control unit, sun roof,
parking control unit, brake pedal switch (NC), clutch pedal switch
(NC), reversing lights.F51 5
+30 Instrument panel F53 7.5
+15 = ignition-operated positive pole
+30 = battery direct positive pole (not ignition-operated)
115
Page 118 of 200
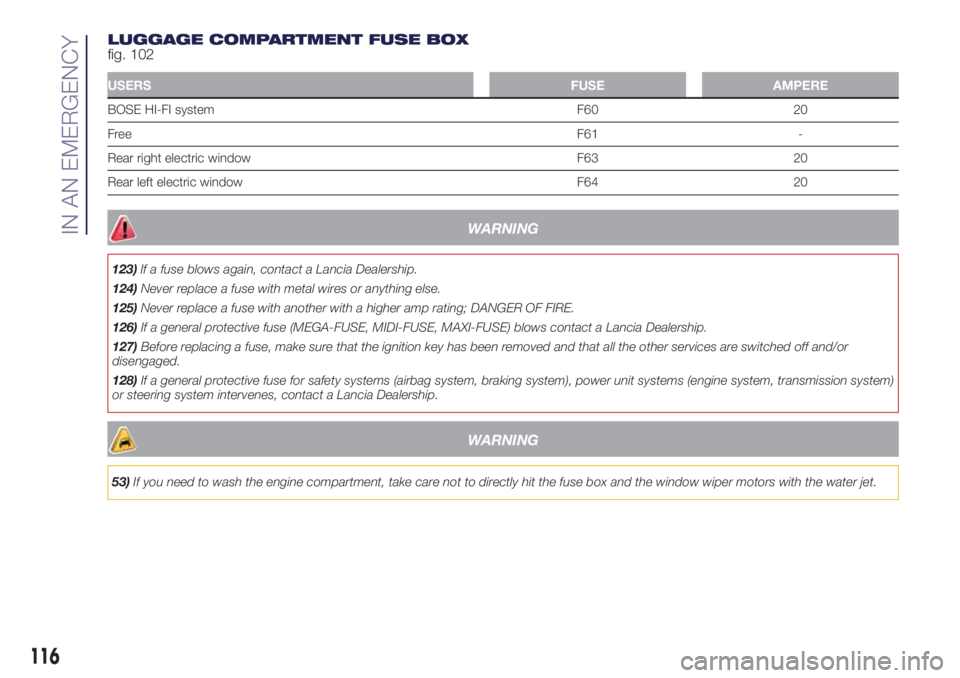
LUGGAGE COMPARTMENT FUSE BOX
fig. 102
USERSFUSE AMPERE
BOSE HI-FI system F60 20
FreeF61 -
Rear right electric window F63 20
Rear left electric window F64 20
WARNING
123)If a fuse blows again, contact a Lancia Dealership.
124)Never replace a fuse with metal wires or anything else.
125)Never replace a fuse with another with a higher amp rating; DANGER OF FIRE.
126)If a general protective fuse (MEGA-FUSE, MIDI-FUSE, MAXI-FUSE) blows contact a Lancia Dealership.
127)Before replacing a fuse, make sure that the ignition key has been removed and that all the other services are switched off and/or
disengaged.
128)If a general protective fuse for safety systems (airbag system, braking system), power unit systems (engine system, transmission system)
or steering system intervenes, contact a Lancia Dealership.
WARNING
53)If you need to wash the engine compartment, take care not to directly hit the fuse box and the window wiper motors with the water jet.
116
IN AN EMERGENCY
Page 125 of 200

with a second lead, connect the
negative terminal–of the auxiliary
battery to an earth point
on
the engine or the gearbox of the car to
be started;
start the engine;
when the engine has been started,
remove the leads reversing the order
above.
For versions with Start&Stop system, to
carry out the jump starting procedure,
refer to paragraph “Start&Stop system”
in the “Knowing your vehicle” section.
If after a few attempts the engine does
not start, do not persist but contact
a Lancia Dealership.IMPORTANT Do not directly connect
the negative terminals of the two
batteries: sparks could ignite explosive
gas released from the battery. If the
auxiliary battery is installed on another
car, prevent accidental contact
between metallic parts of the two cars.
WARNING
145)This starting procedure must be
performed by expert personnel because
incorrect actions could cause electrical
discharge of considerable intensity.
Furthermore, battery fluid is poisonous and
corrosive: avoid contact with skin and
eyes. Keep naked flames and lighted
cigarettes away from the battery and do
not cause sparks.
146)Remove any metal objects (e.g. rings,
watches, bracelets), that might cause an
accidental electrical contact and cause
serious injury.
WARNING
57)Never use a fast battery-charger to
start the engine as this could damage the
electronic systems of your vehicle,
particularly the ignition and engine fuel
supply control units.58)Do not connect the cable to the
negative terminal (–) of the flat battery. The
following spark could lead to battery
explosion and cause serious harm. Only
use the specific earth point; do not use any
other exposed metallic part.
113L0F0084C
123
Page 126 of 200
FUEL CUT-OFF
SYSTEM
147)
FUEL CUT-OFF SYSTEM
This intervenes in the case of an impact
causing:
the interruption of the fuel supply
with the engine consequently cutting
out;
the automatic unlocking of the
doors;
turning on of the lights inside the
vehicle;
the switching on of the hazard
warning lights.
On some versions, the intervention of
the system is indicated by a message
shown on the display.
IMPORTANT Carefully check the vehicle
for fuel leaks, for instance in the engine
compartment, under the vehicle or
near the tank area. After an impact, turn
the ignition key to STOP to prevent the
battery from running down.
To restore the correct operation of the
vehicle, proceed as follows:
turn the ignition key to the MAR
position;
activate the right direction indicator;
deactivate the right direction
indicator;
activate the left direction indicator;
deactivate the left direction indicator;
activate the right direction indicator;
deactivate the right direction
indicator;
activate the left direction indicator;
deactivate the left direction indicator;
ignition key turned to the OFF
position;
turn the ignition key to the MAR-ON
position.
LPG / Natural Power versions:inthe
event of an impact, petrol supply is
immediately cut-off, the LPG safety
valves are closed and the injection is
interrupted, switching off the engine.
WARNING
147)If, after an impact, you smell fuel or
notice leaks from the fuel system, do
not reactivate the system to avoid the risk
of fire.
TOWING THE
VEHICLE
148) 149) 150) 151)
The tow hook, which is supplied with
the vehicle, is housed in the tool box,
under the carpet in the luggage
compartment.
ATTACHING THE TOW
RING
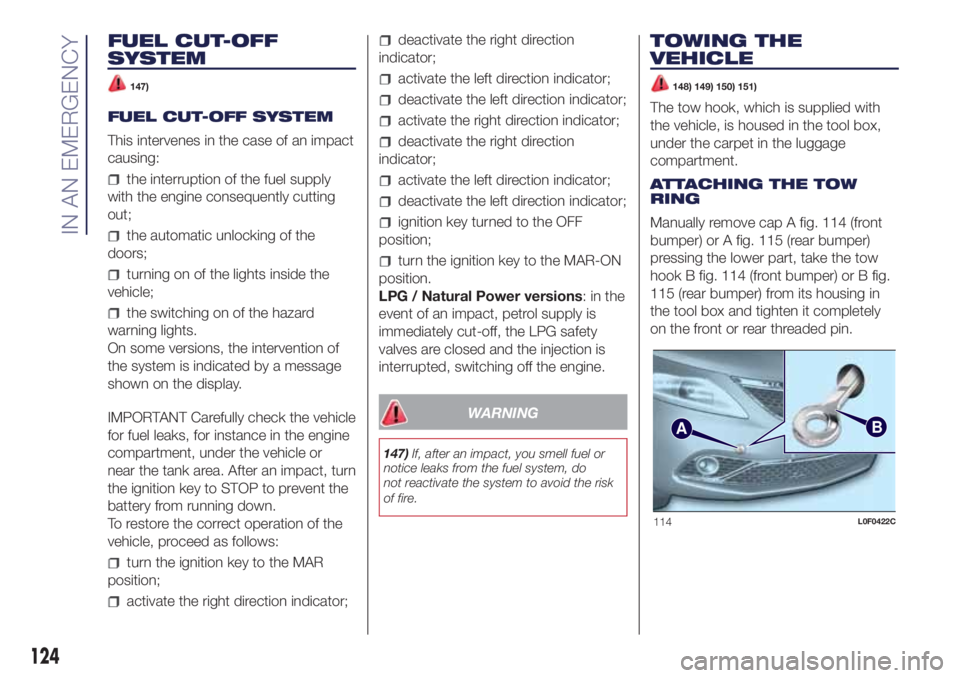
Manually remove cap A fig. 114 (front
bumper) or A fig. 115 (rear bumper)
pressing the lower part, take the tow
hook B fig. 114 (front bumper) or B fig.
115 (rear bumper) from its housing in
the tool box and tighten it completely
on the front or rear threaded pin.
AB
114L0F0422C
124
IN AN EMERGENCY