check engine Lancia Ypsilon 2021 Owner handbook (in English)
[x] Cancel search | Manufacturer: LANCIA, Model Year: 2021, Model line: Ypsilon, Model: Lancia Ypsilon 2021Pages: 200, PDF Size: 4.53 MB
Page 93 of 200
Pretensioners and airbags are deployed
in different ways on the basis of the
type of collision. Failure to activate one
or more of the devices does not
indicate a system malfunction.
94) 95) 96) 97) 98) 99) 100) 101) 102) 103) 104) 105)
106)
WARNING
91)Do not apply stickers or other objects
on the steering wheel, on the dashboard in
the passenger side airbag area, on side
upholstery on the roof or on the seats.
Never put objects (e.g. mobile phones) on
the passenger side of the dashboard
since they could interfere with correct
inflation of the passenger airbag and also
cause serious injury to the passengers.
92)Always drive with your hands on the
rim of the steering wheel so that the airbag
can inflate freely if required. Do not drive
with your body bent forward. Keep your
back straight against the backrest.93)When there is an active passenger
airbag, DO NOT install rearward facing
child restraint systems on the front seat.
Deployment of the airbag in an accident
could cause fatal injuries to the child
regardless of the severity of the impact.
Therefore, always deactivate the passenger
side airbag when a rearward facing child
restraint system is installed on the front
passenger seat. The front passenger seat
must also be positioned back as far as
possible in order to prevent the child
restraint system from coming into contact
with the dashboard. Immediately reactivate
the passenger airbag as soon as the child
restraint system has been removed.
94)Do not affix rigid objects to the garment
hooks or support handles.
95)Do not rest your head, arms or elbows
on the door, windows or the area in which
the window bag is located to avoid
possible injury during airbag inflation.
96)Never lean your head, arms or elbows
out of the window.
97)If, when the key is turned to MAR, the
warning light does not switch on or
stays on whilst driving, a fault may have
occurred in the restraint systems. In this
case the airbags or pretensioners may not
be deployed in an impact or, in a lower
number of cases, they may be deployed
accidentally. Before continuing, contact
a Lancia Dealership immediately to have
the system checked.
98)For versions/markets where provided,
in the event of
warning light failure,
thewarning light switches on and the
explosive charges of the passenger airbag
are deactivated.99)On cars with side bags, do not cover
the front seat backrests with extra covers.
100)Do not travel carrying objects in
your lap, in front of your chest or between
your lips (pipe, pencils, etc.): they could
cause severe injury if the airbag is
deployed.
101)If your car has been subject to theft,
attempted theft, vandalism, or flooding,
contact a Lancia Dealership to have the
airbag system checked.
102)The airbags may also be deployed
when the car is not moving, if the key is in
the ignition and turned to MAR-ON or
when the engine is off, if the car is hit by
another moving vehicle. Therefore, even if
the vehicle is stationary, when an active
front passenger airbag is fitted, DO NOT
install rearward facing child restraint
systems on the front passenger seat.
Deployment of the airbag following an
impact could cause fatal injuries to the
child. Therefore, always deactivate the
passenger side airbag when a rearward
facing child restraint system is installed on
the front passenger seat. The front
passenger seat must also be positioned
back as far as possible in order to prevent
the child restraint system from coming
into contact with the dashboard.
Immediately reactivate the passenger
airbag as soon as the child restraint system
has been removed. Also remember that, if
the key is turned to STOP, none of the
safety devices (airbags or pretensioners)
will be deployed in the event of collision.
Non-deployment in such cases does
not indicate a system malfunction.
91
Page 97 of 200
WARNING
107)It is dangerous to run the engine in
enclosed areas. The engine consumes
oxygen and engine exhaust contains
carbon dioxide, carbon monoxide and
other toxic gasses.
108)Remember that the brake servo and
power steering are not operational until the
engine has been started, therefore much
effort than usual is required on the brake
pedal and steering wheel.
109)If the engine fails to start with a gear
engaged, the potentially dangerous
situation due to the fact that the gearbox is
automatically placed in neutral will be
signalled by a buzzer.
WARNING
34)The flashing of the warning lightfor
60 seconds after starting or during
prolonged cranking of the engine indicates
a fault with the glow plug heating system.
You can use the car as usual if the engine
starts but you should contact a Lancia
Dealership as soon as possible.
35)It is advisable not to demand maximum
performance from your car (e.g. excessive
acceleration, long distances at maximum
rpm, excessively intense braking, etc.)
when it is first used.
36)When the engine is switched off never
leave the key turned to MAR-ON to prevent
useless current absorption from draining
the battery.37)Never, under any circumstances, jump
start the engine by pushing, towing or
coasting downhill. This could cause fuel to
flow into the catalytic converter and
damage it beyond repair.
38)There must therefore always be
enough petrol in the tank to protect the
petrol pump and to guarantee temporary
switching from methane to petrol
operation, if high performance is required.
39)A quick burst on the accelerator before
turning off the engine serves absolutely
no practical purpose, it wastes fuel and is
especially damaging to turbocharged
engines.
HANDBRAKE
110) 111) 112)
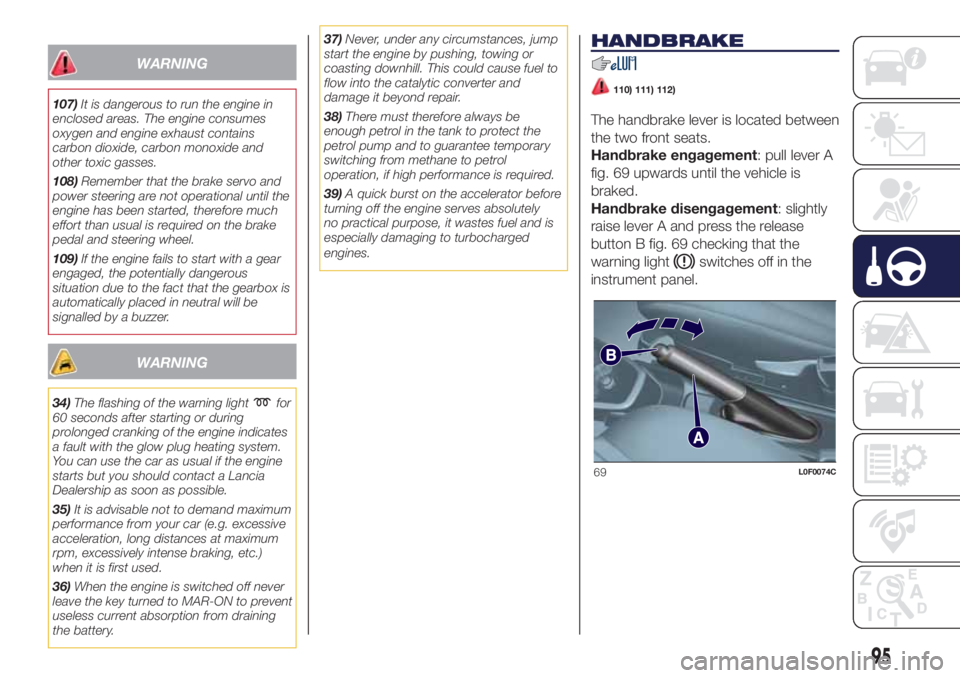
The handbrake lever is located between
the two front seats.
Handbrake engagement: pull lever A
fig. 69 upwards until the vehicle is
braked.
Handbrake disengagement: slightly
raise lever A and press the release
button B fig. 69 checking that the
warning light
switches off in the
instrument panel.
69L0F0074C
95
Page 123 of 200
INFLATION PROCEDURE
141) 142) 143) 144)
Proceed as follows:
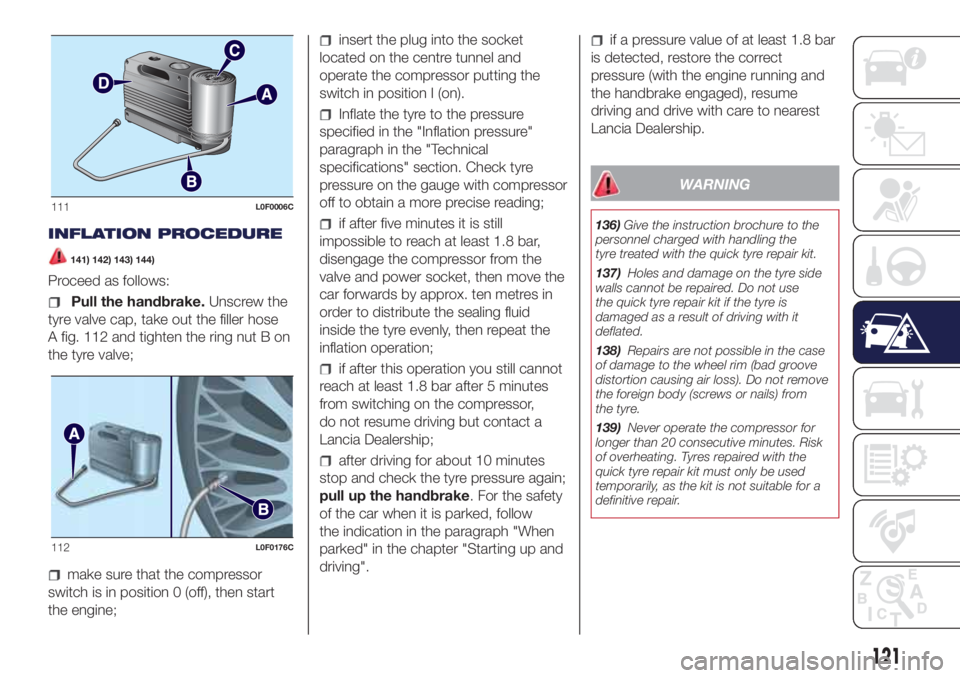
Pull the handbrake.Unscrew the
tyre valve cap, take out the filler hose
A fig. 112 and tighten the ring nut B on
the tyre valve;
make sure that the compressor
switch is in position 0 (off), then start
the engine;
insert the plug into the socket
located on the centre tunnel and
operate the compressor putting the
switch in position I (on).
Inflate the tyre to the pressure
specified in the "Inflation pressure"
paragraph in the "Technical
specifications" section. Check tyre
pressure on the gauge with compressor
off to obtain a more precise reading;
if after five minutes it is still
impossible to reach at least 1.8 bar,
disengage the compressor from the
valve and power socket, then move the
car forwards by approx. ten metres in
order to distribute the sealing fluid
inside the tyre evenly, then repeat the
inflation operation;
if after this operation you still cannot
reach at least 1.8 bar after 5 minutes
from switching on the compressor,
do not resume driving but contact a
Lancia Dealership;
after driving for about 10 minutes
stop and check the tyre pressure again;
pull up the handbrake. For the safety
of the car when it is parked, follow
the indication in the paragraph "When
parked" in the chapter "Starting up and
driving".
if a pressure value of at least 1.8 bar
is detected, restore the correct
pressure (with the engine running and
the handbrake engaged), resume
driving and drive with care to nearest
Lancia Dealership.
WARNING
136)Give the instruction brochure to the
personnel charged with handling the
tyre treated with the quick tyre repair kit.
137)Holes and damage on the tyre side
walls cannot be repaired. Do not use
the quick tyre repair kit if the tyre is
damaged as a result of driving with it
deflated.
138)Repairs are not possible in the case
of damage to the wheel rim (bad groove
distortion causing air loss). Do not remove
the foreign body (screws or nails) from
the tyre.
139)Never operate the compressor for
longer than 20 consecutive minutes. Risk
of overheating. Tyres repaired with the
quick tyre repair kit must only be used
temporarily, as the kit is not suitable for a
definitive repair.
111L0F0006C
112L0F0176C
121
Page 126 of 200
FUEL CUT-OFF
SYSTEM
147)
FUEL CUT-OFF SYSTEM
This intervenes in the case of an impact
causing:
the interruption of the fuel supply
with the engine consequently cutting
out;
the automatic unlocking of the
doors;
turning on of the lights inside the
vehicle;
the switching on of the hazard
warning lights.
On some versions, the intervention of
the system is indicated by a message
shown on the display.
IMPORTANT Carefully check the vehicle
for fuel leaks, for instance in the engine
compartment, under the vehicle or
near the tank area. After an impact, turn
the ignition key to STOP to prevent the
battery from running down.
To restore the correct operation of the
vehicle, proceed as follows:
turn the ignition key to the MAR
position;
activate the right direction indicator;
deactivate the right direction
indicator;
activate the left direction indicator;
deactivate the left direction indicator;
activate the right direction indicator;
deactivate the right direction
indicator;
activate the left direction indicator;
deactivate the left direction indicator;
ignition key turned to the OFF
position;
turn the ignition key to the MAR-ON
position.
LPG / Natural Power versions:inthe
event of an impact, petrol supply is
immediately cut-off, the LPG safety
valves are closed and the injection is
interrupted, switching off the engine.
WARNING
147)If, after an impact, you smell fuel or
notice leaks from the fuel system, do
not reactivate the system to avoid the risk
of fire.
TOWING THE
VEHICLE
148) 149) 150) 151)
The tow hook, which is supplied with
the vehicle, is housed in the tool box,
under the carpet in the luggage
compartment.
ATTACHING THE TOW
RING
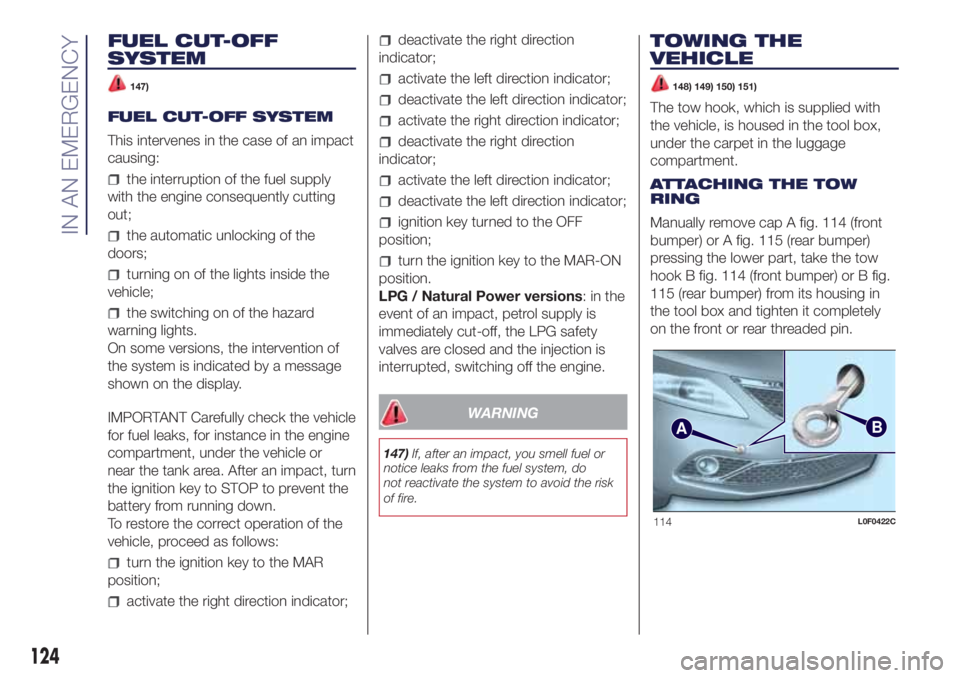
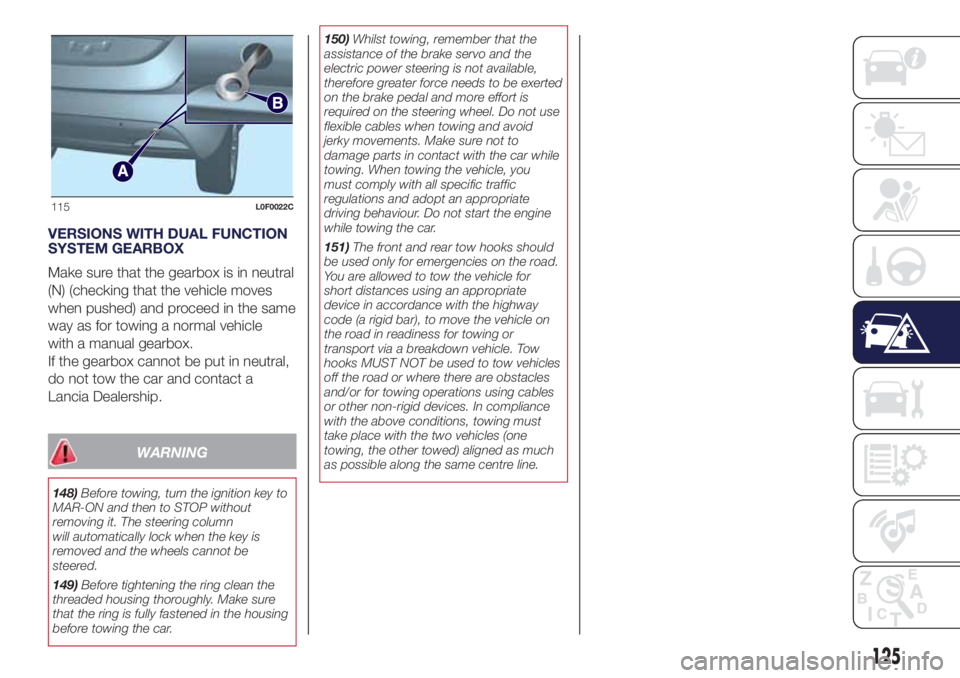
Manually remove cap A fig. 114 (front
bumper) or A fig. 115 (rear bumper)
pressing the lower part, take the tow
hook B fig. 114 (front bumper) or B fig.
115 (rear bumper) from its housing in
the tool box and tighten it completely
on the front or rear threaded pin.
AB
114L0F0422C
124
IN AN EMERGENCY
Page 127 of 200
VERSIONS WITH DUAL FUNCTION
SYSTEM GEARBOX
Make sure that the gearbox is in neutral
(N) (checking that the vehicle moves
when pushed) and proceed in the same
way as for towing a normal vehicle
with a manual gearbox.
If the gearbox cannot be put in neutral,
do not tow the car and contact a
Lancia Dealership.
WARNING
148)Before towing, turn the ignition key to
MAR-ON and then to STOP without
removing it. The steering column
will automatically lock when the key is
removed and the wheels cannot be
steered.
149)Before tightening the ring clean the
threaded housing thoroughly. Make sure
that the ring is fully fastened in the housing
before towing the car.150)Whilst towing, remember that the
assistance of the brake servo and the
electric power steering is not available,
therefore greater force needs to be exerted
on the brake pedal and more effort is
required on the steering wheel. Do not use
flexible cables when towing and avoid
jerky movements. Make sure not to
damage parts in contact with the car while
towing. When towing the vehicle, you
must comply with all specific traffic
regulations and adopt an appropriate
driving behaviour. Do not start the engine
while towing the car.
151)The front and rear tow hooks should
be used only for emergencies on the road.
You are allowed to tow the vehicle for
short distances using an appropriate
device in accordance with the highway
code (a rigid bar), to move the vehicle on
the road in readiness for towing or
transport via a breakdown vehicle. Tow
hooks MUST NOT be used to tow vehicles
off the road or where there are obstacles
and/or for towing operations using cables
or other non-rigid devices. In compliance
with the above conditions, towing must
take place with the two vehicles (one
towing, the other towed) aligned as much
as possible along the same centre line.
115L0F0022C
125
Page 130 of 200
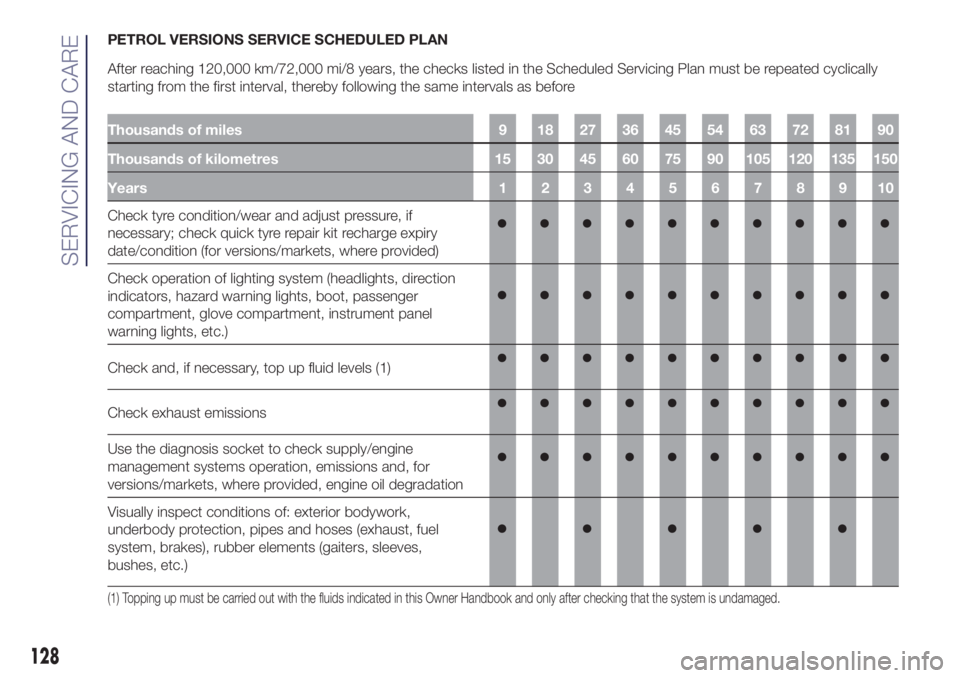
PETROL VERSIONS SERVICE SCHEDULED PLAN
After reaching 120,000 km/72,000 mi/8 years, the checks listed in the Scheduled Servicing Plan must be repeated cyclically
starting from the first interval, thereby following the same intervals as before
Thousands of miles 9 18 27 36 45 54 63 72 81 90
Thousands of kilometres 15 30 45 60 75 90 105 120 135 150
Years12345678910
Check tyre condition/wear and adjust pressure, if
necessary; check quick tyre repair kit recharge expiry
date/condition (for versions/markets, where provided)
Check operation of lighting system (headlights, direction
indicators, hazard warning lights, boot, passenger
compartment, glove compartment, instrument panel
warning lights, etc.)
Check and, if necessary, top up fluid levels (1)
Check exhaust emissions
Use the diagnosis socket to check supply/engine
management systems operation, emissions and, for
versions/markets, where provided, engine oil degradation
Visually inspect conditions of: exterior bodywork,
underbody protection, pipes and hoses (exhaust, fuel
system, brakes), rubber elements (gaiters, sleeves,
bushes, etc.)
(1) Topping up must be carried out with the fluids indicated in this Owner Handbook and only after checking that the system is undamaged.
128
SERVICING AND CARE
Page 135 of 200
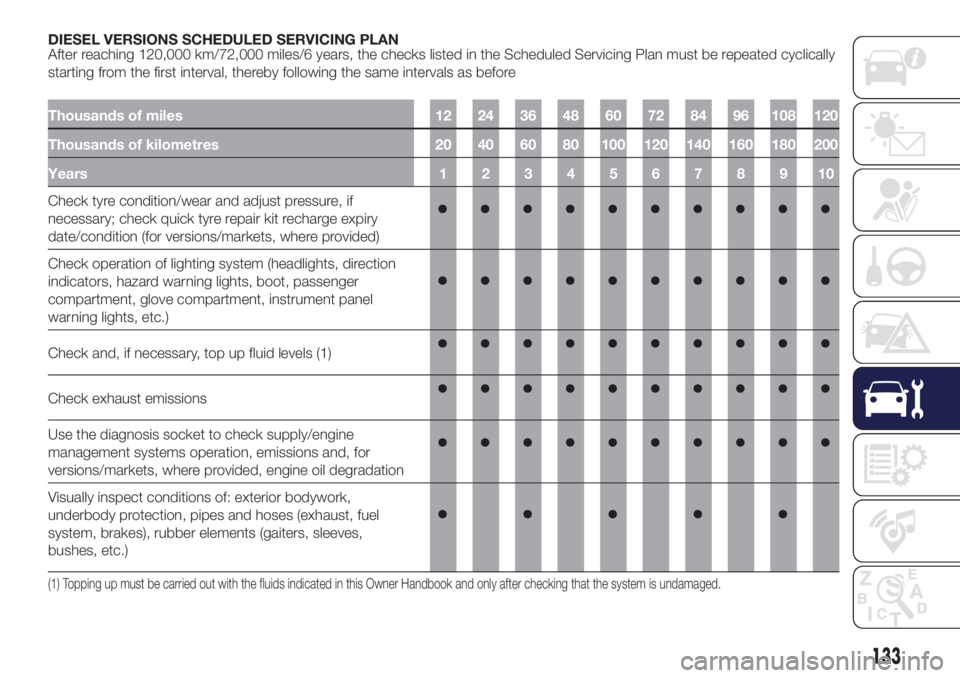
DIESEL VERSIONS SCHEDULED SERVICING PLAN
After reaching 120,000 km/72,000 miles/6 years, the checks listed in the Scheduled Servicing Plan must be repeated cyclically
starting from the first interval, thereby following the same intervals as before
Thousands of miles 12 24 36 48 60 72 84 96 108 120
Thousands of kilometres 20 40 60 80 100 120 140 160 180 200
Years12345678910
Check tyre condition/wear and adjust pressure, if
necessary; check quick tyre repair kit recharge expiry
date/condition (for versions/markets, where provided)
Check operation of lighting system (headlights, direction
indicators, hazard warning lights, boot, passenger
compartment, glove compartment, instrument panel
warning lights, etc.)
Check and, if necessary, top up fluid levels (1)
Check exhaust emissions
Use the diagnosis socket to check supply/engine
management systems operation, emissions and, for
versions/markets, where provided, engine oil degradation
Visually inspect conditions of: exterior bodywork,
underbody protection, pipes and hoses (exhaust, fuel
system, brakes), rubber elements (gaiters, sleeves,
bushes, etc.)
(1) Topping up must be carried out with the fluids indicated in this Owner Handbook and only after checking that the system is undamaged.
133
Page 138 of 200
REGULAR CHECKS
Every 1,000 km or before long
journeys, check and, if necessary, top
up:
engine coolant, brake fluid and
windscreen washer fluid level;
tyre inflation pressure and condition;
operation of lighting system
(headlights, direction indicators, hazard
warning lights, etc.);
operation of windscreen washer/
wiper system and positioning/wear of
rear window wiper blades.
Every 3,000 km, check and top up if
required: engine oil level.
For cars with 0.9 TwinAir engines:
every3,000km check the engine oil
level and top it up to the maximum level
if necessary.
DEMANDING USE OF THE
CAR
If the car is used mainly under one of
the following conditions:
towing a trailer or caravan;
dusty roads;
short, repeated journeys (less than
7-8 Km) at sub-zero outdoor
temperatures;
engine often idling or driving long
distances at low speeds or long periods
of inactivity;perform the following inspections more
frequently than shown on the
Scheduled Servicing Plan:
check front disc brake pad condition
and wear;
check cleanliness of bonnet and
luggage compartment locks,
cleanliness and lubrication of linkage;
visually inspect conditions of:
engine, gearbox, transmission, pipes
and hoses (exhaust/fuel system/brakes)
and rubber elements (gaiters/sleeves/
bushes, etc.);
check battery charge and battery
fluid level (electrolyte);
visually inspect conditions of the
accessory drive belts;
check and, if necessary, change
engine oil and replace oil filter;
check and, if necessary, replace
pollen filter;
check and, if necessary, replace air
cleaner.
136
SERVICING AND CARE
Page 139 of 200
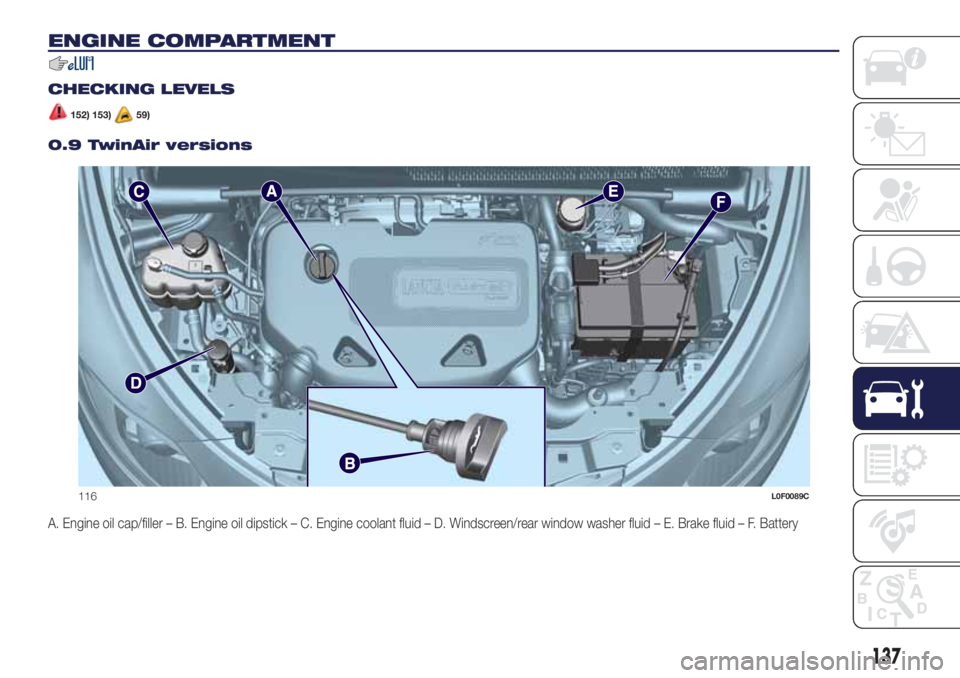
ENGINE COMPARTMENT
.
CHECKING LEVELS
152) 153)59)
0.9 TwinAir versions
A. Engine oil cap/filler – B. Engine oil dipstick – C. Engine coolant fluid – D. Windscreen/rear window washer fluid – E. Brake fluid – F. Battery
116L0F0089C
137
Page 142 of 200
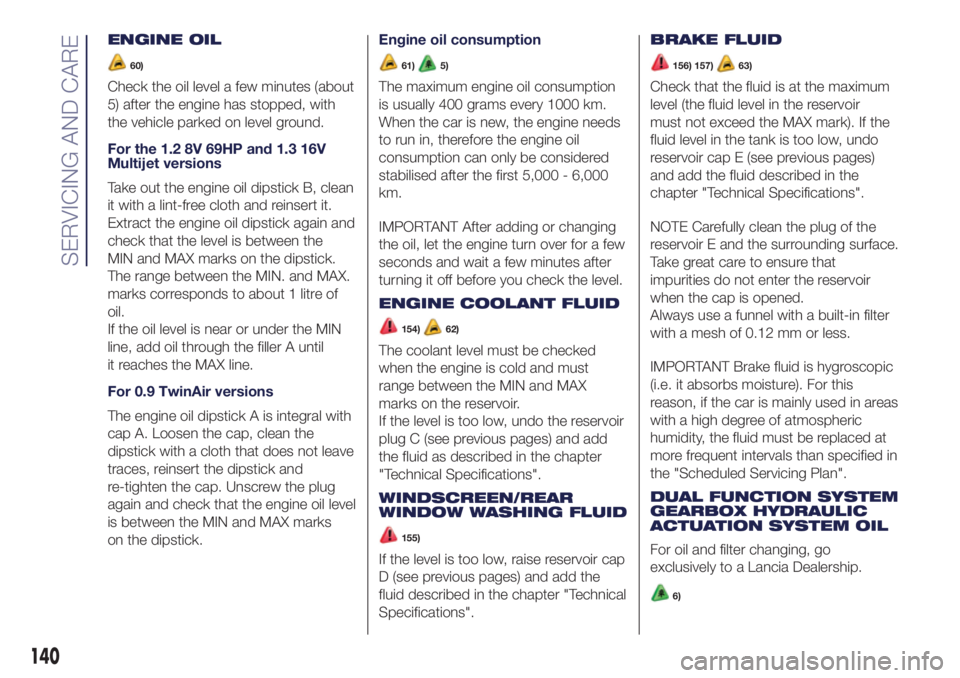
ENGINE OIL
60)
Check the oil level a few minutes (about
5) after the engine has stopped, with
the vehicle parked on level ground.
For the 1.2 8V 69HP and 1.3 16V
Multijet versions
Take out the engine oil dipstick B, clean
it with a lint-free cloth and reinsert it.
Extract the engine oil dipstick again and
check that the level is between the
MIN and MAX marks on the dipstick.
The range between the MIN. and MAX.
marks corresponds to about 1 litre of
oil.
If the oil level is near or under the MIN
line, add oil through the filler A until
it reaches the MAX line.
For 0.9 TwinAir versions
The engine oil dipstick A is integral with
cap A. Loosen the cap, clean the
dipstick with a cloth that does not leave
traces, reinsert the dipstick and
re-tighten the cap. Unscrew the plug
again and check that the engine oil level
is between the MIN and MAX marks
on the dipstick.Engine oil consumption
61)5)
The maximum engine oil consumption
is usually 400 grams every 1000 km.
When the car is new, the engine needs
to run in, therefore the engine oil
consumption can only be considered
stabilised after the first 5,000 - 6,000
km.
IMPORTANT After adding or changing
the oil, let the engine turn over for a few
seconds and wait a few minutes after
turning it off before you check the level.
ENGINE COOLANT FLUID
154)62)
The coolant level must be checked
when the engine is cold and must
range between the MIN and MAX
marks on the reservoir.
If the level is too low, undo the reservoir
plug C (see previous pages) and add
the fluid as described in the chapter
"Technical Specifications".
WINDSCREEN/REAR
WINDOW WASHING FLUID
155)
If the level is too low, raise reservoir cap
D (see previous pages) and add the
fluid described in the chapter "Technical
Specifications".BRAKE FLUID
156) 157)63)
Check that the fluid is at the maximum
level (the fluid level in the reservoir
must not exceed the MAX mark). If the
fluid level in the tank is too low, undo
reservoir cap E (see previous pages)
and add the fluid described in the
chapter "Technical Specifications".
NOTE Carefully clean the plug of the
reservoir E and the surrounding surface.
Take great care to ensure that
impurities do not enter the reservoir
when the cap is opened.
Always use a funnel with a built-in filter
with a mesh of 0.12 mm or less.
IMPORTANT Brake fluid is hygroscopic
(i.e. it absorbs moisture). For this
reason, if the car is mainly used in areas
with a high degree of atmospheric
humidity, the fluid must be replaced at
more frequent intervals than specified in
the "Scheduled Servicing Plan".
DUAL FUNCTION SYSTEM
GEARBOX HYDRAULIC
ACTUATION SYSTEM OIL
For oil and filter changing, go
exclusively to a Lancia Dealership.
6)
140
SERVICING AND CARE