LAND ROVER DISCOVERY 1999 Workshop Manual
Manufacturer: LAND ROVER, Model Year: 1999, Model line: DISCOVERY, Model: LAND ROVER DISCOVERY 1999Pages: 1529, PDF Size: 34.8 MB
Page 1141 of 1529

CORROSION PREVENTION AND SEALING
77-4-8 CORROSION PREVENTION
After refitting mechanical components, including hoses and pipes and other fixtures, mask off the brake discs and
apply a coat of approved underbody wax.
NOTE: Where repairs include the application of finish paint coats in the areas requiring underbody wax, carry out paint
operations before applying wax.
Cavity wax injection
Areas treated with cavity wax are shown in the previous figures. After repairs, always re-treat these areas with an
approved cavity wax. In addition, treat all interior surfaces which have been disturbed during repairs whether they
have been treated in production or not. This includes all box members, cavities and door interiors. It is permissible to
drill extra holes for access where necessary, provided these are not positioned in load-bearing members. Ensure that
such holes are treated with a suitable zinc rich primer, brushed with wax and then sealed with a rubber grommet.
Before wax injection, ensure that the cavity to be treated is free from any contamination or foreign matter. Where
necessary, clear out any debris using compressed air.
Ensure that cavity wax is applied AFTER the final paint process and BEFORE refitting any trim components.
During application, ensure that the wax covers all flange and seam areas and that it is adequately applied to all
repaired areas of both new and existing panels.
It should be noted that new panel assemblies and complete body shells are supplied without wax injection treatment.
Ensure that such treatment is carried out after repairs.
Effective cavity wax protection is vital. Always observe the following points:
lComplete all paint refinish operations before wax application;
lClean body panel areas and blow-clean cavities if necessary, before treatment;
lMaintain a temperature of 18° C (64° F) during application and drying;
lCheck the spray pattern of injection equipment;
lMask off all areas not to be wax coated and which could be contaminated by wax overspray;
lRemove body fixings, such as seat belt retractors, if contamination is at all likely;
lMove door glasses to fully closed position before treating door interiors;
lTreat body areas normally covered by trim before refitting items;
lCheck that body and door drain holes are clear after the protective wax has dried;
lKeep all equipment clean, especially wax injection nozzles.
Underbody wax
The underbody wax must be reinstated following all repairs affecting floor panels. The wax is applied over paints and
underbody sealers.
Remove old underbody wax completely from a zone extending at least 200 mm (7.874 in) beyond the area where new
underbody sealer is to be applied.
Engine bay wax
Reinstate all protective engine bay wax disturbed during repairs using an approved material.
Where repairs have involved replacement of engine bay panels, treat the entire engine compartment including all
components, clips and other fixtures with an approved underbonnet lacquer or wax.
+ BODY SEALING MATERIALS, MATERIALS AND APPLICATIONS, Approved materials.
Page 1142 of 1529
CORROSION PREVENTION AND SEALING
SEALING 77-4-9
SEALING
Body Sealing
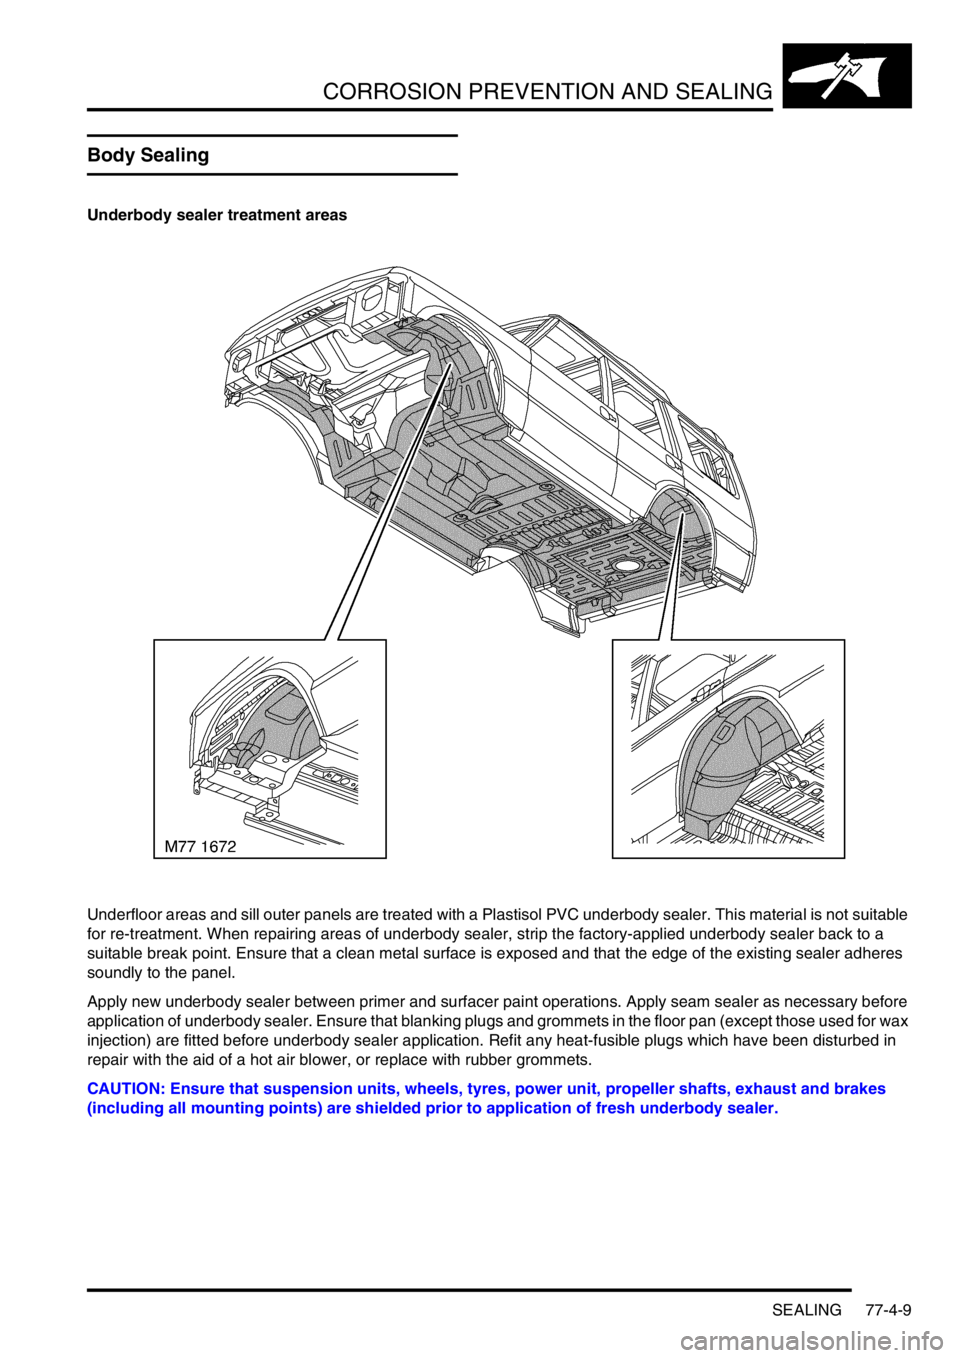
Underbody sealer treatment areas
Underfloor areas and sill outer panels are treated with a Plastisol PVC underbody sealer. This material is not suitable
for re-treatment. When repairing areas of underbody sealer, strip the factory-applied underbody sealer back to a
suitable break point. Ensure that a clean metal surface is exposed and that the edge of the existing sealer adheres
soundly to the panel.
Apply new underbody sealer between primer and surfacer paint operations. Apply seam sealer as necessary before
application of underbody sealer. Ensure that blanking plugs and grommets in the floor pan (except those used for wax
injection) are fitted before underbody sealer application. Refit any heat-fusible plugs which have been disturbed in
repair with the aid of a hot air blower, or replace with rubber grommets.
CAUTION: Ensure that suspension units, wheels, tyres, power unit, propeller shafts, exhaust and brakes
(including all mounting points) are shielded prior to application of fresh underbody sealer.
Page 1143 of 1529
CORROSION PREVENTION AND SEALING
77-4-10 SEALING
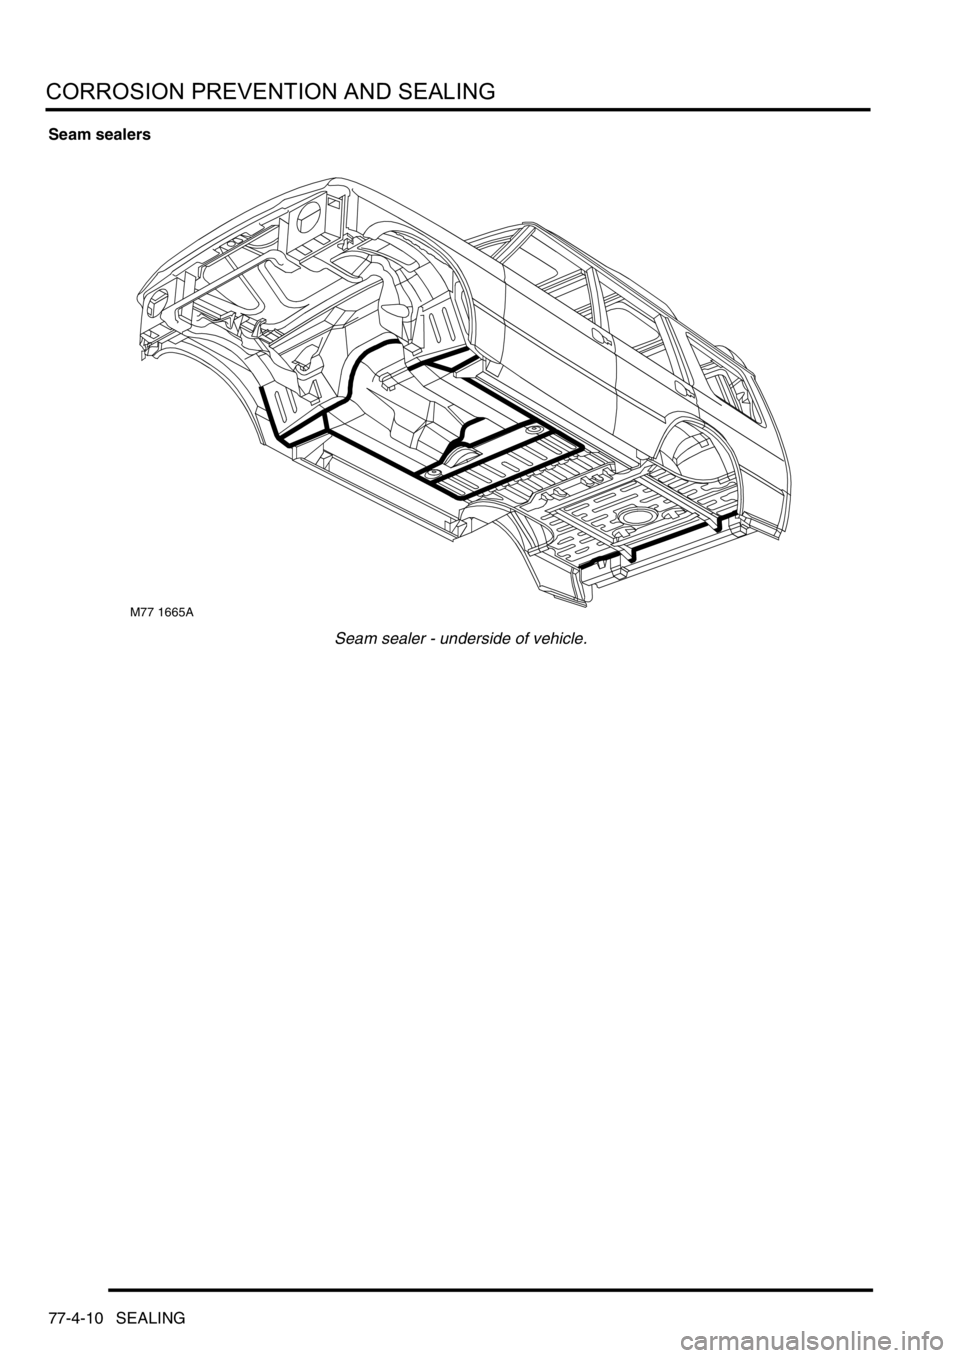
Seam sealers
Seam sealer - underside of vehicle.
M77 1665A
Page 1144 of 1529
CORROSION PREVENTION AND SEALING
SEALING 77-4-11
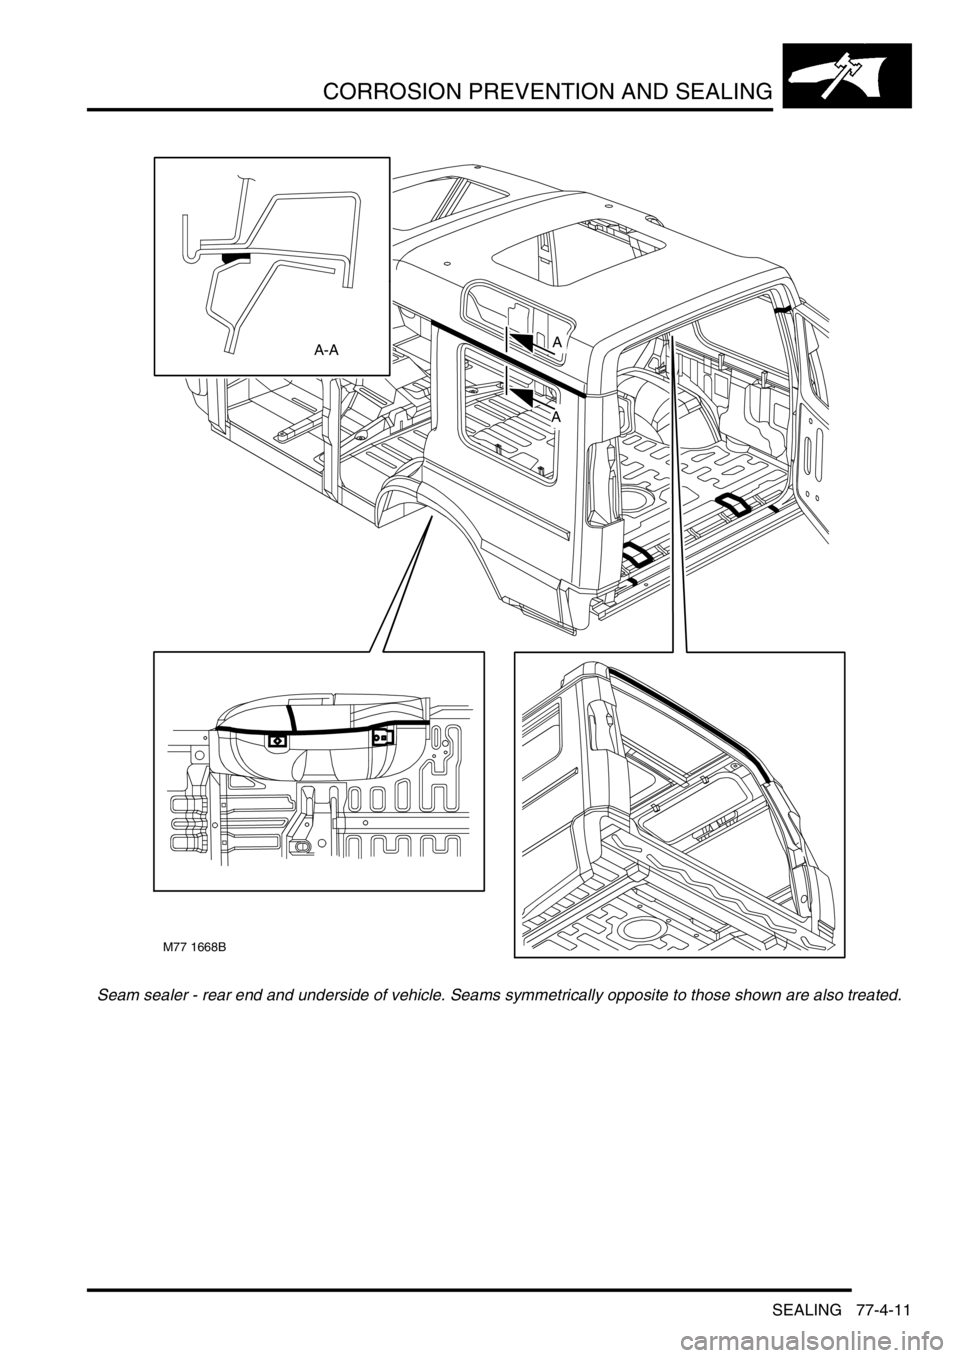
Seam sealer - rear end and underside of vehicle. Seams symmetrically opposite to those shown are also treated.
M77 1668B
A
A
A-A
Page 1145 of 1529
CORROSION PREVENTION AND SEALING
77-4-12 SEALING
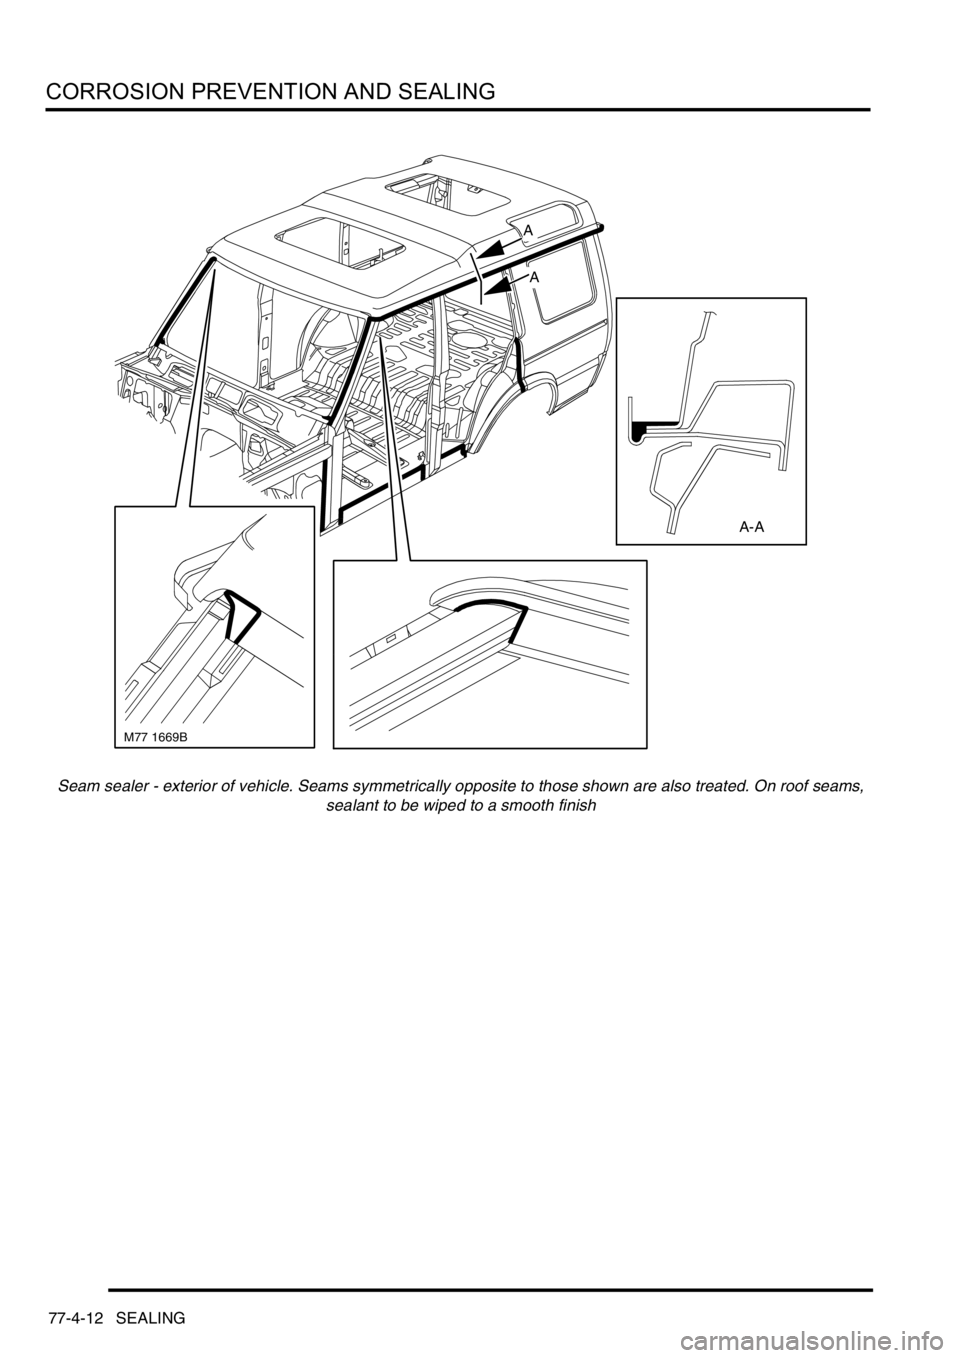
Seam sealer - exterior of vehicle. Seams symmetrically opposite to those shown are also treated. On roof seams,
sealant to be wiped to a smooth finish
A
A
A-A
M77 1669B
Page 1146 of 1529
CORROSION PREVENTION AND SEALING
SEALING 77-4-13
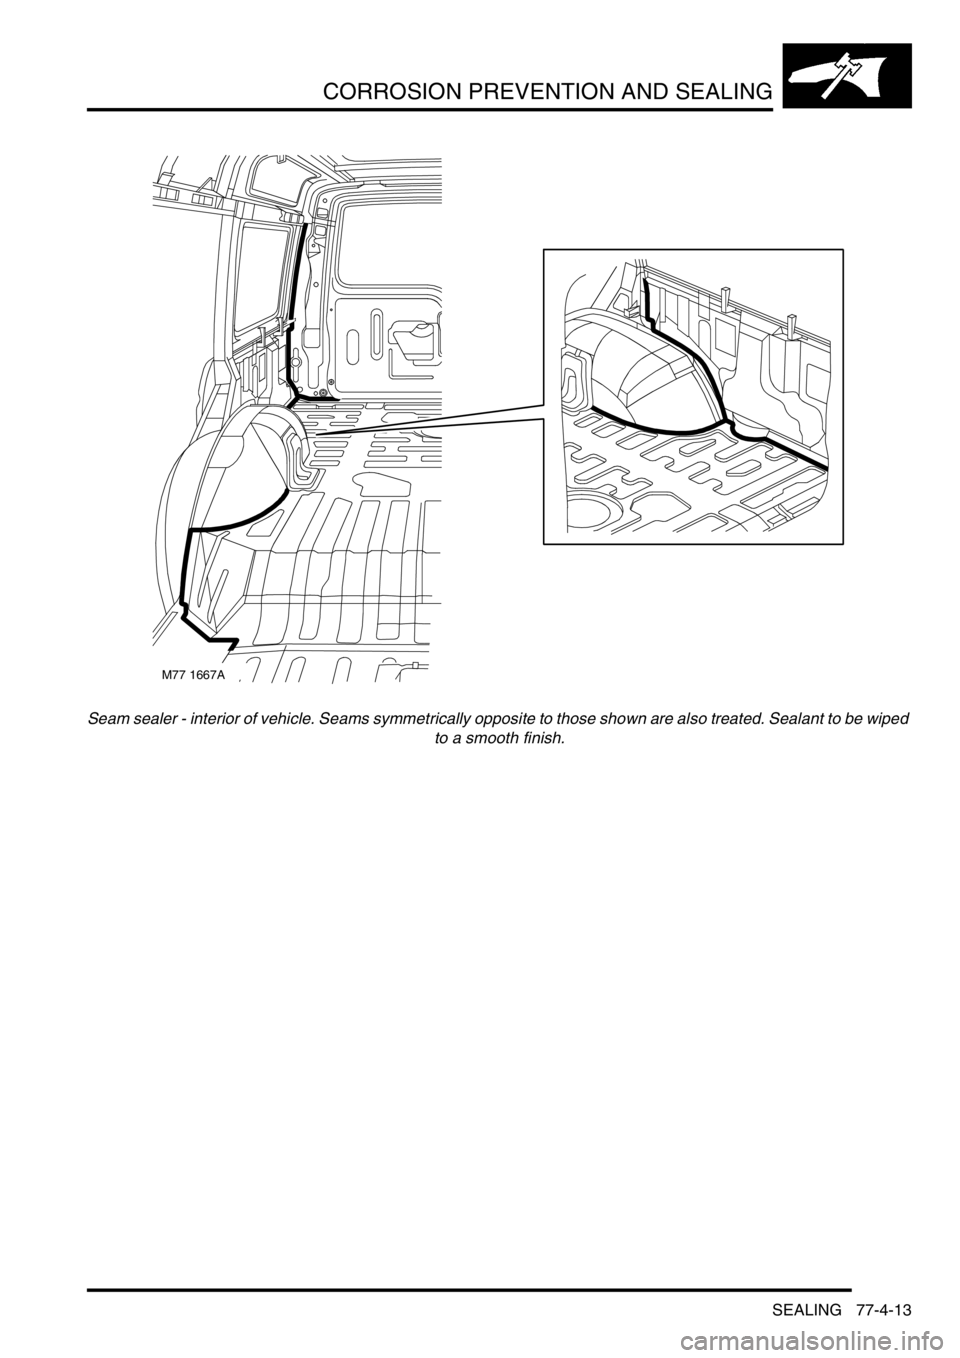
Seam sealer - interior of vehicle. Seams symmetrically opposite to those shown are also treated. Sealant to be wiped
to a smooth finish.
M77 1667A
Page 1147 of 1529
CORROSION PREVENTION AND SEALING
77-4-14 SEALING
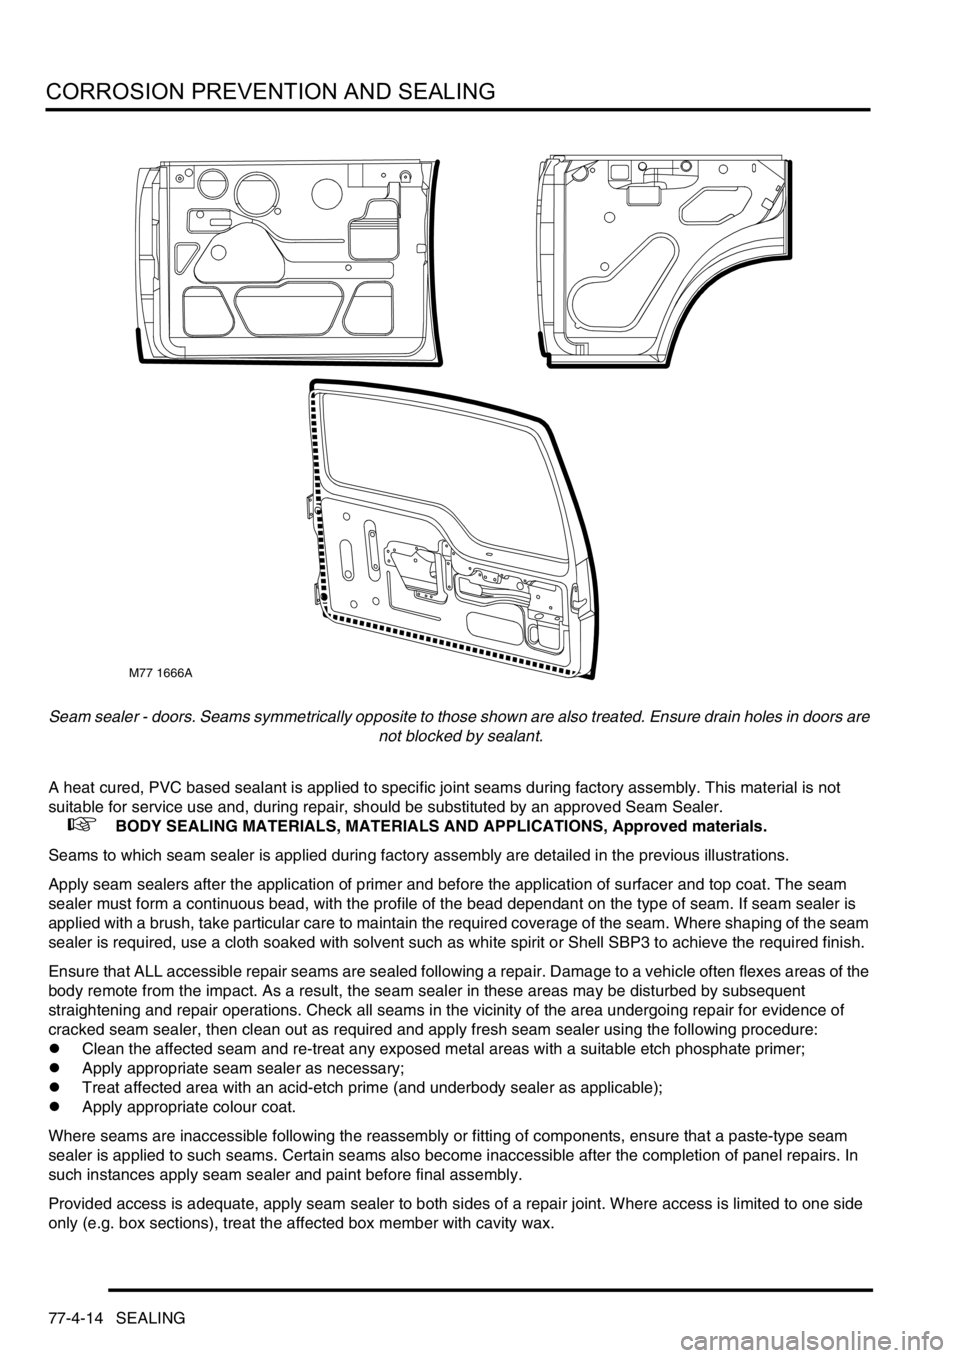
Seam sealer - doors. Seams symmetrically opposite to those shown are also treated. Ensure drain holes in doors are
not blocked by sealant.
A heat cured, PVC based sealant is applied to specific joint seams during factory assembly. This material is not
suitable for service use and, during repair, should be substituted by an approved Seam Sealer.
+ BODY SEALING MATERIALS, MATERIALS AND APPLICATIONS, Approved materials.
Seams to which seam sealer is applied during factory assembly are detailed in the previous illustrations.
Apply seam sealers after the application of primer and before the application of surfacer and top coat. The seam
sealer must form a continuous bead, with the profile of the bead dependant on the type of seam. If seam sealer is
applied with a brush, take particular care to maintain the required coverage of the seam. Where shaping of the seam
sealer is required, use a cloth soaked with solvent such as white spirit or Shell SBP3 to achieve the required finish.
Ensure that ALL accessible repair seams are sealed following a repair. Damage to a vehicle often flexes areas of the
body remote from the impact. As a result, the seam sealer in these areas may be disturbed by subsequent
straightening and repair operations. Check all seams in the vicinity of the area undergoing repair for evidence of
cracked seam sealer, then clean out as required and apply fresh seam sealer using the following procedure:
lClean the affected seam and re-treat any exposed metal areas with a suitable etch phosphate primer;
lApply appropriate seam sealer as necessary;
lTreat affected area with an acid-etch prime (and underbody sealer as applicable);
lApply appropriate colour coat.
Where seams are inaccessible following the reassembly or fitting of components, ensure that a paste-type seam
sealer is applied to such seams. Certain seams also become inaccessible after the completion of panel repairs. In
such instances apply seam sealer and paint before final assembly.
Provided access is adequate, apply seam sealer to both sides of a repair joint. Where access is limited to one side
only (e.g. box sections), treat the affected box member with cavity wax.
M77 1666A
Page 1148 of 1529
CORROSION PREVENTION AND SEALING
SEALING 77-4-15
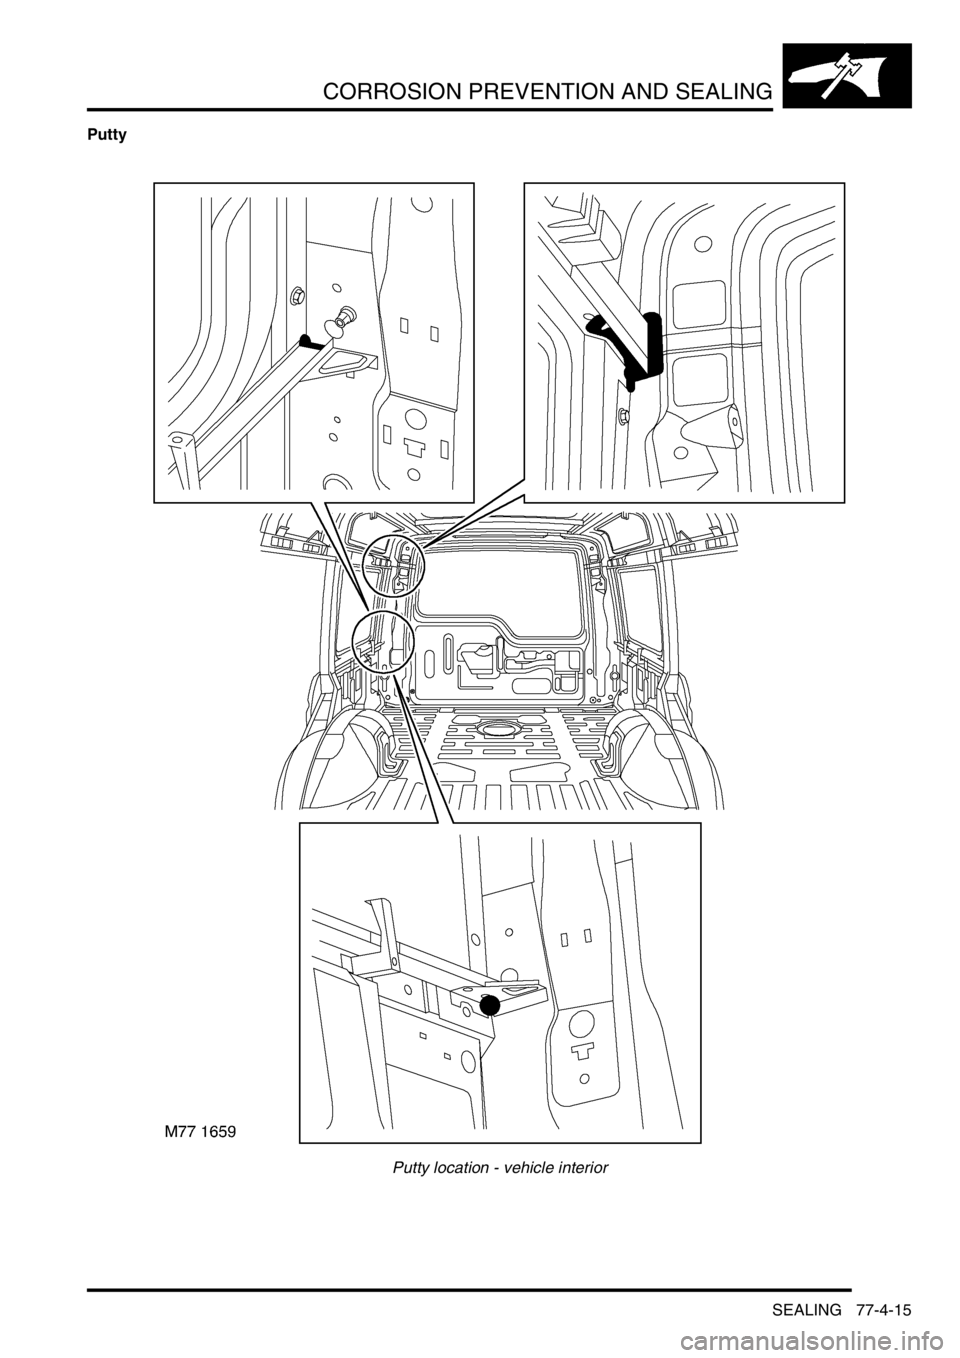
Putty
Putty location - vehicle interior
Page 1149 of 1529
CORROSION PREVENTION AND SEALING
77-4-16 SEALING
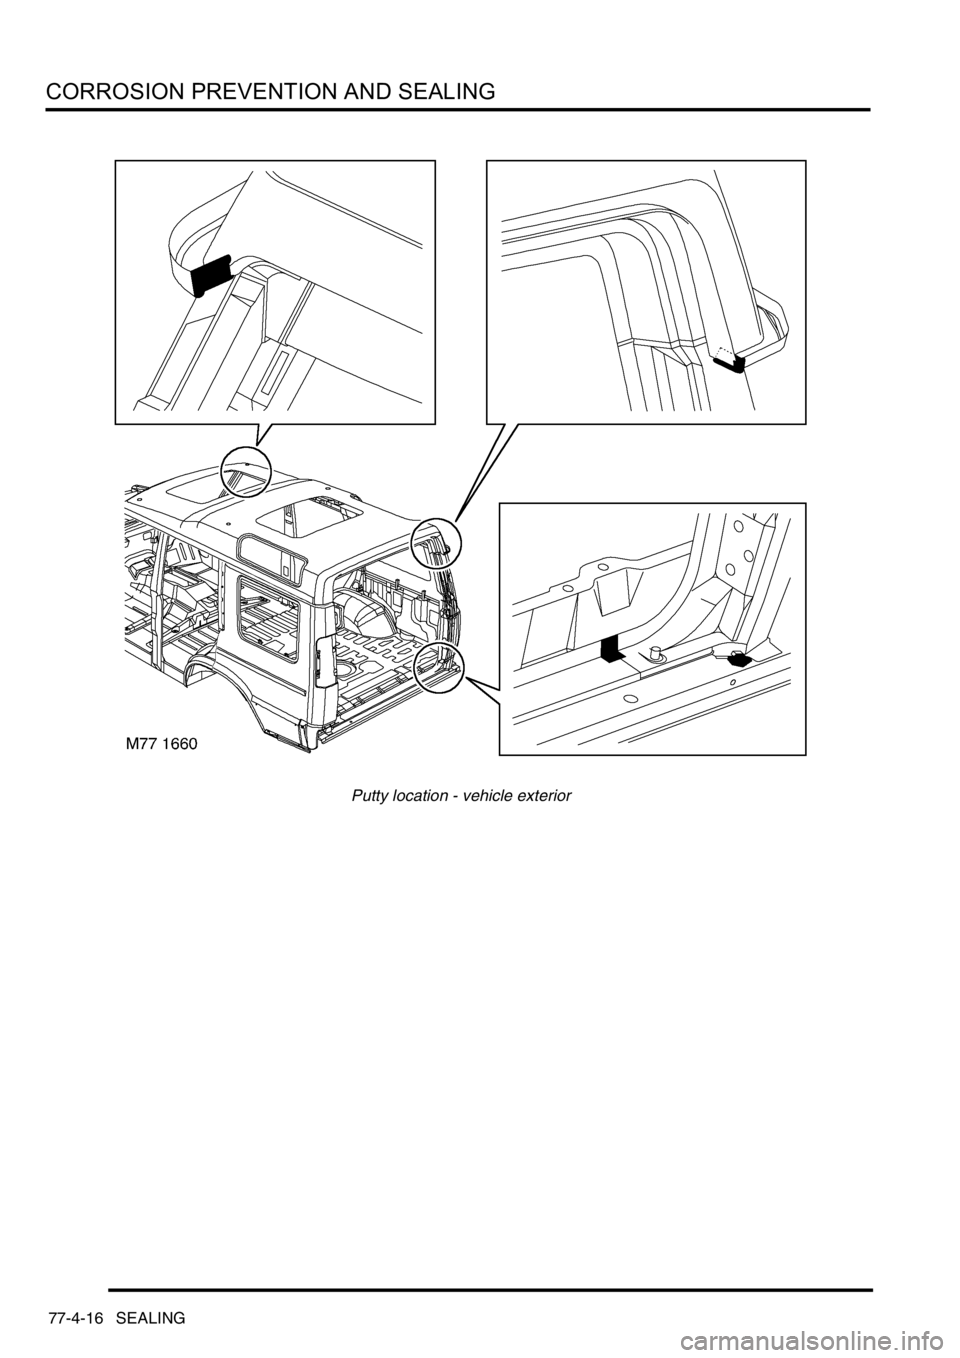
Putty location - vehicle exterior
Page 1150 of 1529
CORROSION PREVENTION AND SEALING
SEALING 77-4-17
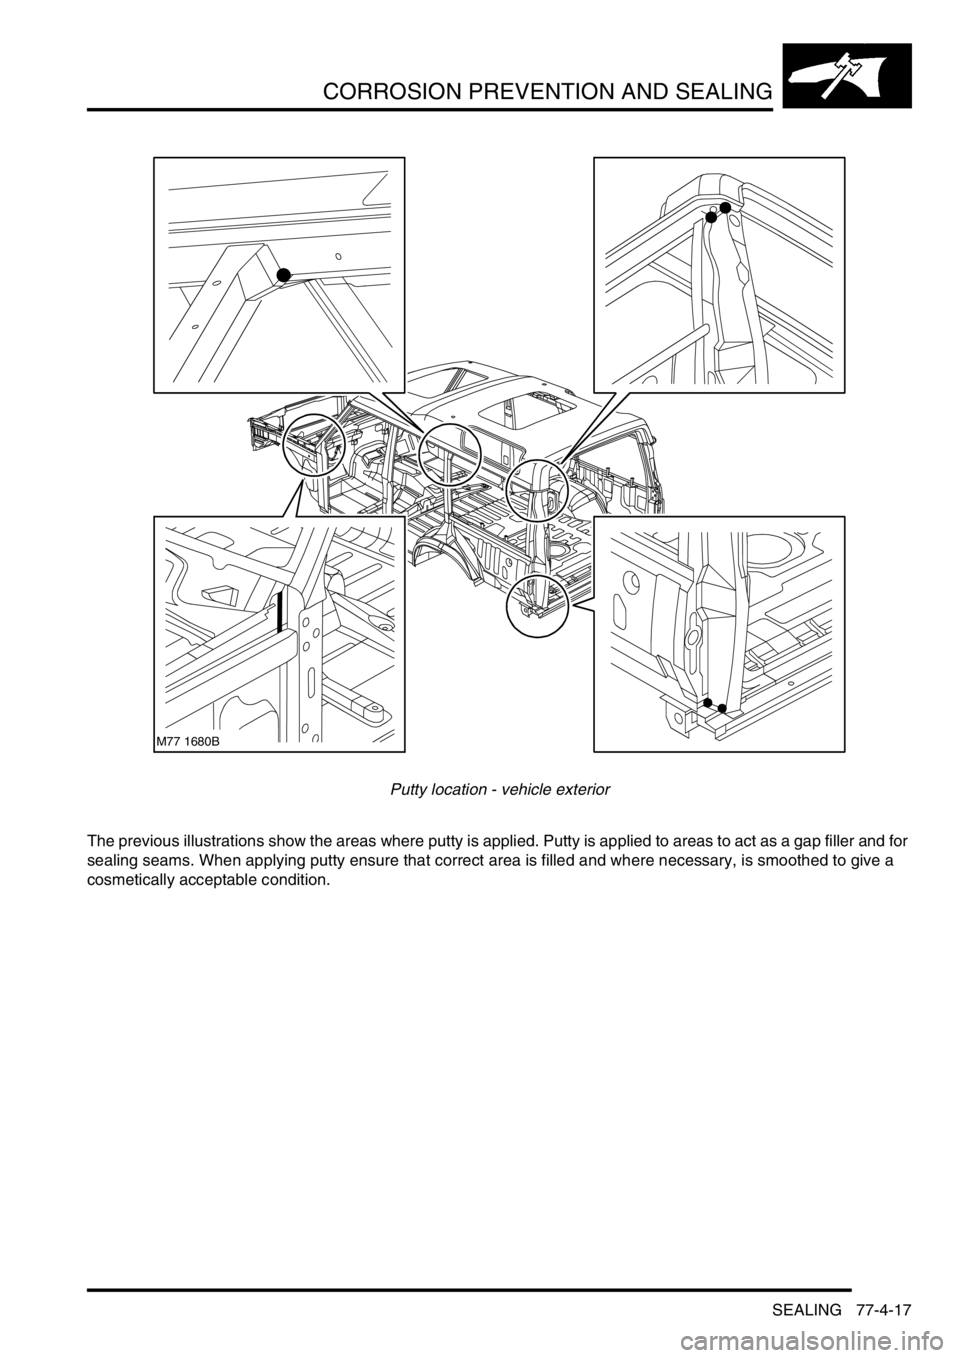
Putty location - vehicle exterior
The previous illustrations show the areas where putty is applied. Putty is applied to areas to act as a gap filler and for
sealing seams. When applying putty ensure that correct area is filled and where necessary, is smoothed to give a
cosmetically acceptable condition.
M77 1680B