checking oil LAND ROVER DISCOVERY 1999 Workshop Manual
[x] Cancel search | Manufacturer: LAND ROVER, Model Year: 1999, Model line: DISCOVERY, Model: LAND ROVER DISCOVERY 1999Pages: 1529, PDF Size: 34.8 MB
Page 38 of 1529
GENERAL INFORMATION
03-3
Environmental Precautions
General
This section provides general information which can
help to reduce the environmental impacts from the
activities carried out in workshops.
Emissions to air
Many of the activities that are carried out in
workshops emit gases and fumes which contribute to
global warming, depletion of the ozone layer and/or
the formation of photochemical smog at ground
level. By considering how the workshop activities are
carried out, these gases and fumes can be
minimised, thus reducing the impact on the
environment.
Exhaust fumes
Running car engines is an essential part of workshop
activities and exhaust fumes need to be ventilated to
atmosphere. However, the amount of time engines
are running and the position of the vehicle should be
carefully considered at all times, to reduce the
release of poisonous gases and minimise the
inconvenience to people living nearby.
Solvents
Some of the cleaning agents used are solvent based
and will evaporate to atmosphere if used carelessly,
or if cans are left unsealed. All solvent containers
should be firmly closed when not needed and
solvent should be used sparingly. Suitable
alternative materials may be available to replace
some of the commonly used solvents. Similarly,
many paints are solvent based and the spray should
be minimised to reduce solvent emissions.
Refrigerant
It is illegal to release any refrigerants into the
atmosphere. Discharge and replacement of these
materials from air conditioning units should only be
carried out using the correct equipment.
Checklist
Always adhere to the following.
Engines:
ldon't leave engines running unnecessarily;
lminimise testing times and check where the
exhaust fumes are being blown.
Materials:
lkeep lids on containers of solvents;
lonly use the minimum quantity;
lconsider alternative materials;
lminimise over-spray when painting. Gases:
luse the correct equipment for collecting
refrigerants;
ldon't burn rubbish on site.
Discharges to water
Most sites will have two systems for discharging
water: storm drains and foul drains. Storm drains
should only receive clean water, foul drains will take
dirty water.
The foul drain will accept many of the normal waste
waters such as washing water, detergents and
domestic type wastes, but oil, petrol, solvent, acids,
hydraulic oil, antifreeze and other such substances
should never be poured down the drain. If in any
doubt speak to the Water Company first.
Every precaution must be taken to prevent spillage of
oil, fuel, solvents etc. reaching the drains. All
handling of such materials must take place well away
from the drains and preferably in an area with a kerb
or wall around it, to prevent discharge into the drain.
If a spillage occurs it should be soaked up
immediately. Having a spill kit available will make
this easier.
Additional precautions
Check whether the surface water drains are
connected to an oil water separator, this could
reduce the pollution if an incident was to occur. Oil
water separators do need regular maintenance to
ensure effectiveness.
Checklist
Always adhere to the following.
Disposal:
lnever pour anything down a drain without first
checking that it is environmentally safe to do so,
and that it does not contravene any local
regulations or bye-laws;
l have oil traps emptied regularly.
Spillage prevention:
lstore liquids in a walled area;
lmake sure that taps on liquid containers are
secure and cannot be accidentally turned on;
lprotect bulk storage tanks from vandalism by
locking the valves;
ltransfer liquids from one container to another in
an area away from open drains;
lensure lids are replaced securely on containers;
lhave spill kits available near to points of storage
and handling of liquids.
Page 41 of 1529
GENERAL INFORMATION
03-6
General Fitting Instructions
Component removal
Whenever possible, clean components and
surrounding area before removal.
lBlank off openings exposed by component
removal.
lImmediately seal fuel, oil or hydraulic lines when
apertures are exposed; use plastic caps or
plugs to prevent loss of fluid and ingress of dirt.
lClose the open ends of oilways exposed by
component removal with tapered hardwood
plugs or conspicuous plastic plugs.
lImmediately a component is removed, place it in
a suitable container; use a separate container
for each component and its associated parts.
lClean bench and provide marking materials,
labels and containers before dismantling a
component.
Dismantling
Observe scrupulous cleanliness when dismantling
components, particularly when brake, fuel or
hydraulic system parts are being worked on. A
particle of dirt or a cloth fragment could cause a
serious malfunction if trapped in these systems.
lBlow out all tapped holes, crevices, oilways and
fluid passages with an air line. Ensure that any
'O' rings used for sealing are correctly replaced
or renewed, if disturbed during the process.
lUse marking ink to identify mating parts and
ensure correct reassembly. Do not use a centre
punch or scriber to mark parts, they could
initiate cracks or distortion in marked
components.
lWire together mating parts where necessary to
prevent accidental interchange (e.g. roller
bearing components).
lWire labels on to all parts which are to be
renewed, and to parts requiring further
inspection before being passed for reassembly;
place these parts in separate containers from
those containing parts for rebuild.
lDo not discard a part due for renewal until after
comparing it with a new part, to ensure that its
correct replacement has been obtained.Cleaning components
Always use the recommended cleaning agent or
equivalent. Ensure that adequate ventilation is
provided when volatile degreasing agents are being
used. Do not use degreasing equipment for
components containing items which could be
damaged by the use of this process.
General inspection
All components should be inspected for wear or
damage before being reassembled.
lNever inspect a component for wear or
dimensional check unless it is absolutely clean;
a slight smear of grease can conceal an
incipient failure.
lWhen a component is to be checked
dimensionally against recommended values,
use the appropriate measuring equipment
(surface plates, micrometers, dial gauges etc.).
Ensure the measuring equipment is calibrated
and in good serviceable condition.
lReject a component if its dimensions are
outside the specified tolerances, or if it appears
to be damaged.
lA part may be refitted if its critical dimension is
exactly to its tolerance limit and it appears to be
in satisfactory condition. Use 'Plastigauge' 12
Type PG-1 for checking bearing surface
clearances.
Page 261 of 1529
EMISSION CONTROL - V8
17-2-28 DESCRIPTION AND OPERATION
The air delivery pipe is a flexible plastic type, and is connected to the air pump outlet via a plastic quick-fit connector.
The other end of the flexible plastic pipe connects to the fixed metal pipework via a short rubber hose. The part of the
flexible plastic pipe which is most vulnerable to engine generated heat is protected by heat reflective sleeving. The
metal delivery pipe has a fabricated T-piece included where the pressurised air is split for delivery to each exhaust
manifold via the SAI control valves.
The pipes from the T-piece to each of the SAI control valves are approximately the same length, so that the pressure
and mass of the air delivered to each bank will be equal. The ends of the pipes are connected to the inlet port of each
SAI control valve through short rubber hose connections.
The T-piece is mounted at the rear of the engine (by the ignition coils) and features a welded mounting bracket which
is fixed to the engine by two studs and nuts.
The foam filter in the air intake of the SAI pump provides noise reduction and protects the pump from damage due to
particulate contamination. In addition, the pump is fitted on rubber mountings to help prevent noise which is generated
by pump operation from being transmitted through the vehicle body into the passenger compartment.
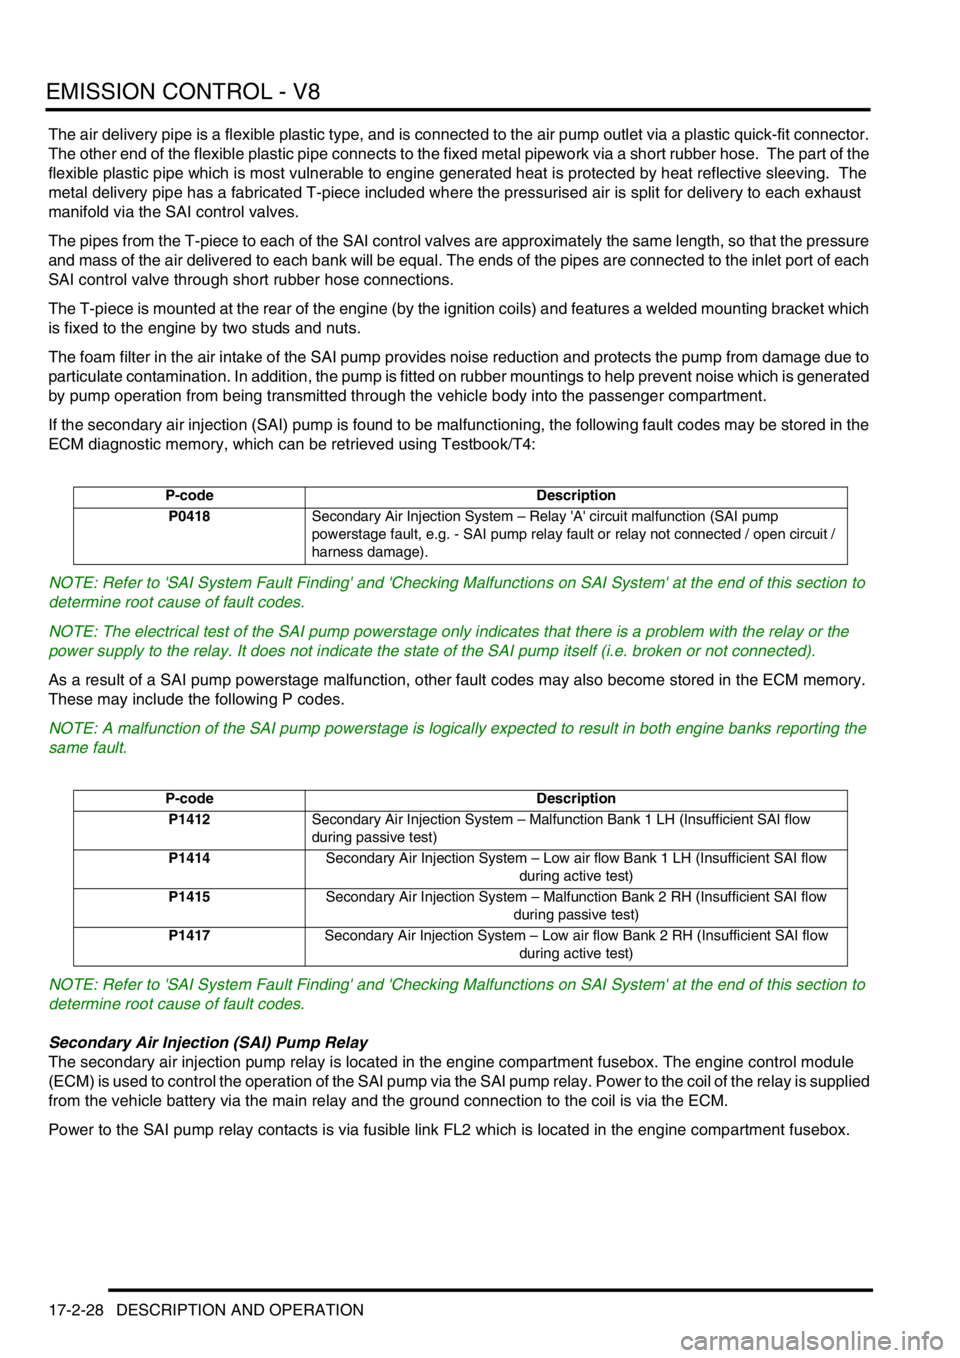
If the secondary air injection (SAI) pump is found to be malfunctioning, the following fault codes may be stored in the
ECM diagnostic memory, which can be retrieved using Testbook/T4:
NOTE: Refer to 'SAI System Fault Finding' and 'Checking Malfunctions on SAI System' at the end of this section to
determine root cause of fault codes.
NOTE: The electrical test of the SAI pump powerstage only indicates that there is a problem with the relay or the
power supply to the relay. It does not indicate the state of the SAI pump itself (i.e. broken or not connected).
As a result of a SAI pump powerstage malfunction, other fault codes may also become stored in the ECM memory.
These may include the following P codes.
NOTE: A malfunction of the SAI pump powerstage is logically expected to result in both engine banks reporting the
same fault.
NOTE: Refer to 'SAI System Fault Finding' and 'Checking Malfunctions on SAI System' at the end of this section to
determine root cause of fault codes.
Secondary Air Injection (SAI) Pump Relay
The secondary air injection pump relay is located in the engine compartment fusebox. The engine control module
(ECM) is used to control the operation of the SAI pump via the SAI pump relay. Power to the coil of the relay is supplied
from the vehicle battery via the main relay and the ground connection to the coil is via the ECM.
Power to the SAI pump relay contacts is via fusible link FL2 which is located in the engine compartment fusebox.
P-code Description
P0418Secondary Air Injection System – Relay 'A' circuit malfunction (SAI pump
powerstage fault, e.g. - SAI pump relay fault or relay not connected / open circuit /
harness damage).
P-code Description
P1412Secondary Air Injection System – Malfunction Bank 1 LH (Insufficient SAI flow
during passive test)
P1414Secondary Air Injection System – Low air flow Bank 1 LH (Insufficient SAI flow
during active test)
P1415Secondary Air Injection System – Malfunction Bank 2 RH (Insufficient SAI flow
during passive test)
P1417Secondary Air Injection System – Low air flow Bank 2 RH (Insufficient SAI flow
during active test)
Page 667 of 1529
REAR AXLE
51-2 DESCRIPTION AND OPERATION
Description
General
The rear axle consists of an axle casing with a differential unit attached to the right of the vehicle centre line. A wheel
hub is installed in each end of the axle casing and connected to the differential unit by a drive shaft.
Axle casing
The axle casing is of welded construction, with brackets on the casing exterior for attachment to the rear suspension.
A differential cover on the rear of the axle casing contains an oil level plug for checking and replenishment of the
differential unit lubricating oil. A magnetic drain plug is installed on the underside of the axle casing.
The interior of the axle casing is ventilated through a breather tube inserted in a red plastic sleeve in the top of the
casing. The open end of the breather tube is located between the chassis and the left rear wheelarch.
Differential unit
The differential unit is of the spiral bevel type, lubricated by splash oil. The unit consists of a differential carrier
attached to a pinion housing. In the pinion housing, the pinion is splined to a pinion flange which is secured with a bolt
and washer. An oil seal prevents leakage past the pinion flange.
Centralising peg
The centralising peg is a press fit in the centre of the pinion flange and provides a positive location for the rear
propellor shaft to ensure it is centralised with the flange.
Page 681 of 1529
FRONT AXLE
54-2 DESCRIPTION AND OPERATION
Description
General
The front axle consists of an axle casing with a differential unit attached to the right of the vehicle centre line. A wheel
hub is installed in a steering knuckle at each end of the axle casing and connected to the differential unit by a drive
shaft.
Axle casing
The axle casing is of welded construction, with brackets on the casing exterior for attachment to the front suspension.
Yokes at each end of the casing incorporate upper and lower ball joints for attachment of the steering knuckles.
A differential cover on the front of the axle casing contains an oil level plug for checking and replenishment of the
differential lubricating oil. A magnetic drain plug is installed on the underside of the casing. An oil seal is installed in
each end of the axle casing to prevent leakage past the drive shafts.
The interior of the axle casing is ventilated through a breather tube inserted in a red plastic sleeve in the top of the
casing. The open end of the breather tube is located in the left rear corner of the engine compartment.
Differential unit
The differential unit is of the spiral bevel type, lubricated by splash oil. The unit consists of a differential carrier
attached to a pinion housing. In the pinion housing, the pinion is splined to a drive flange which is secured with a bolt
and washer. An oil seal prevents leakage past the drive flange.
Steering knuckle
The steering knuckles are mounted on upper and lower ball joints in the yokes at the end of the axle casing. A tension
collet, in the lower mounting point of each steering knuckle, accommodates manufacturing tolerances to enable the
correct tightening of both ball joints. Lugs are incorporated on the steering knuckles for attachment of the steering
system drag link and track rod.