length LAND ROVER DISCOVERY 1999 Workshop Manual
[x] Cancel search | Manufacturer: LAND ROVER, Model Year: 1999, Model line: DISCOVERY, Model: LAND ROVER DISCOVERY 1999Pages: 1529, PDF Size: 34.8 MB
Page 64 of 1529
GENERAL DATA
04-1
GENERAL DATA
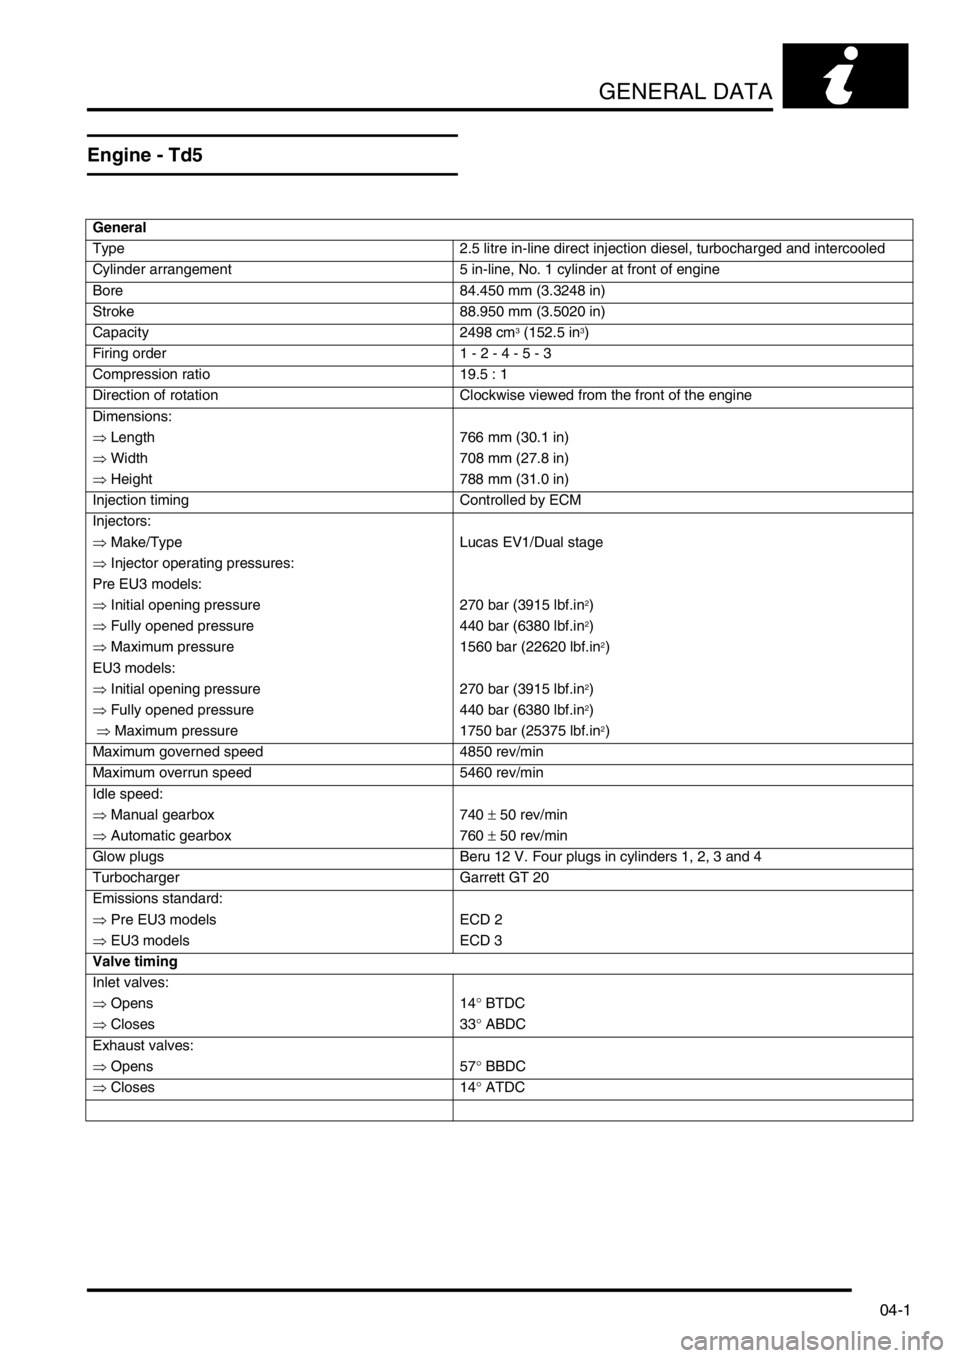
Engine - Td5
General
Type 2.5 litre in-line direct injection diesel, turbocharged and intercooled
Cylinder arrangement 5 in-line, No. 1 cylinder at front of engine
Bore 84.450 mm (3.3248 in)
Stroke 88.950 mm (3.5020 in)
Capacity 2498 cm
3 (152.5 in3)
Firing order 1 - 2 - 4 - 5 - 3
Compression ratio 19.5 : 1
Direction of rotation Clockwise viewed from the front of the engine
Dimensions:
⇒ Length 766 mm (30.1 in)
⇒ Width 708 mm (27.8 in)
⇒ Height 788 mm (31.0 in)
Injection timing Controlled by ECM
Injectors:
⇒ Make/Type Lucas EV1/Dual stage
⇒ Injector operating pressures:
Pre EU3 models:
⇒ Initial opening pressure 270 bar (3915 lbf.in
2)
⇒ Fully opened pressure 440 bar (6380 lbf.in
2)
⇒ Maximum pressure 1560 bar (22620 lbf.in
2)
EU3 models:
⇒ Initial opening pressure 270 bar (3915 lbf.in
2)
⇒ Fully opened pressure 440 bar (6380 lbf.in
2)
⇒ Maximum pressure 1750 bar (25375 lbf.in
2)
Maximum governed speed 4850 rev/min
Maximum overrun speed 5460 rev/min
Idle speed:
⇒ Manual gearbox 740 ± 50 rev/min
⇒ Automatic gearbox 760 ± 50 rev/min
Glow plugs Beru 12 V. Four plugs in cylinders 1, 2, 3 and 4
Turbocharger Garrett GT 20
Emissions standard:
⇒ Pre EU3 models ECD 2
⇒ EU3 models ECD 3
Valve timing
Inlet valves:
⇒ Opens 14° BTDC
⇒ Closes 33° ABDC
Exhaust valves:
⇒ Opens 57° BBDC
⇒ Closes 14° ATDC
Page 67 of 1529
GENERAL DATA
04-4
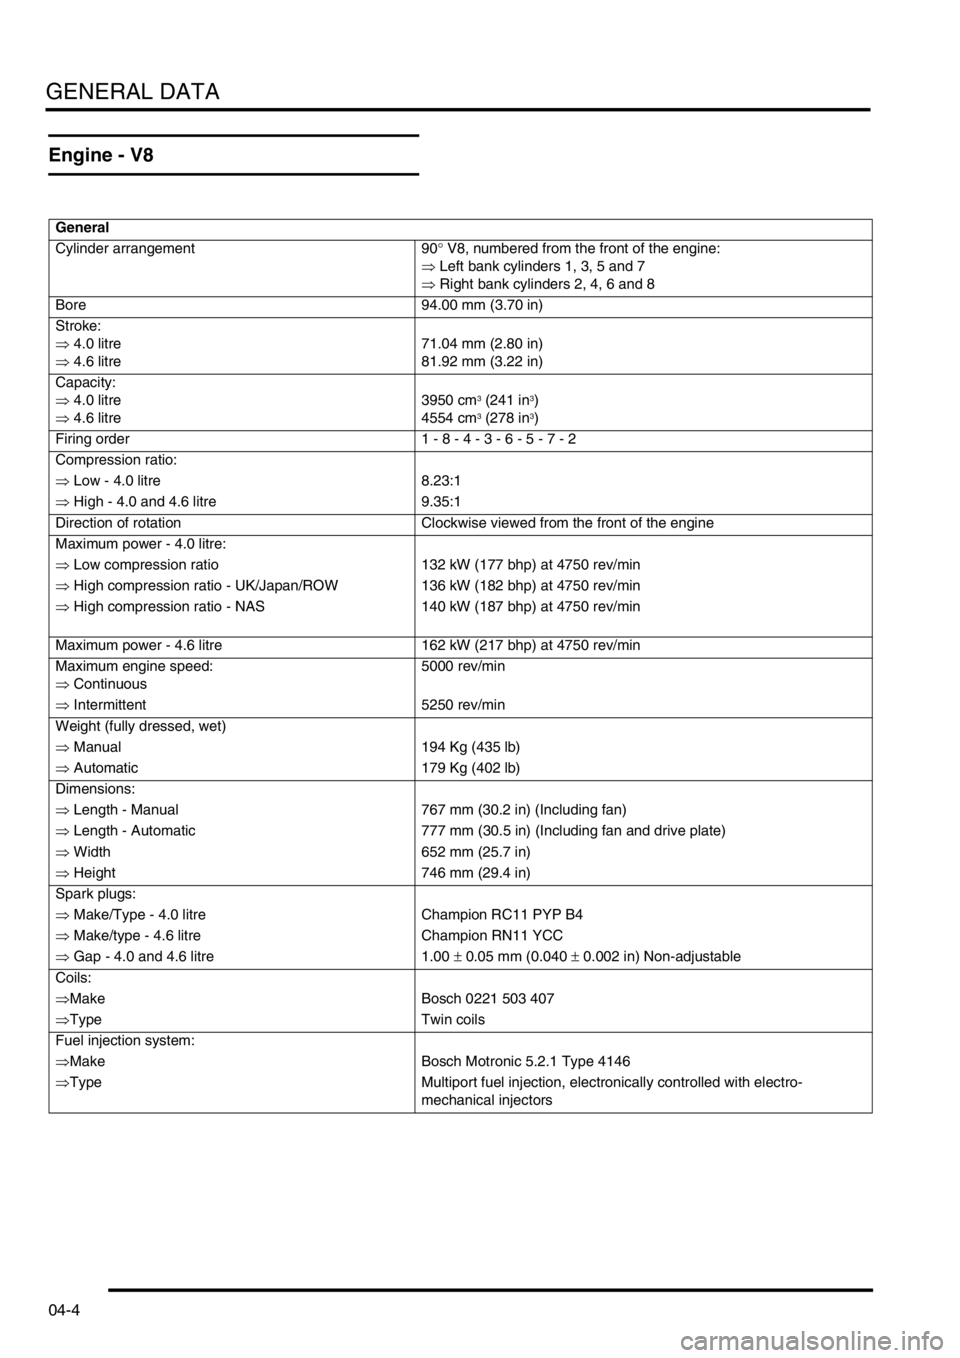
Engine - V8
General
Cylinder arrangement 90° V8, numbered from the front of the engine:
⇒ Left bank cylinders 1, 3, 5 and 7
⇒ Right bank cylinders 2, 4, 6 and 8
Bore 94.00 mm (3.70 in)
Stroke:
⇒ 4.0 litre
⇒ 4.6 litre71.04 mm (2.80 in)
81.92 mm (3.22 in)
Capacity:
⇒ 4.0 litre
⇒ 4.6 litre3950 cm
3 (241 in3)
4554 cm3 (278 in3)
Firing order 1 - 8 - 4 - 3 - 6 - 5 - 7 - 2
Compression ratio:
⇒ Low - 4.0 litre 8.23:1
⇒ High - 4.0 and 4.6 litre 9.35:1
Direction of rotation Clockwise viewed from the front of the engine
Maximum power - 4.0 litre:
⇒ Low compression ratio 132 kW (177 bhp) at 4750 rev/min
⇒ High compression ratio - UK/Japan/ROW 136 kW (182 bhp) at 4750 rev/min
⇒ High compression ratio - NAS 140 kW (187 bhp) at 4750 rev/min
Maximum power - 4.6 litre 162 kW (217 bhp) at 4750 rev/min
Maximum engine speed:
⇒ Continuous5000 rev/min
⇒ Intermittent 5250 rev/min
Weight (fully dressed, wet)
⇒ Manual 194 Kg (435 lb)
⇒ Automatic 179 Kg (402 lb)
Dimensions:
⇒ Length - Manual 767 mm (30.2 in) (Including fan)
⇒ Length - Automatic 777 mm (30.5 in) (Including fan and drive plate)
⇒ Width 652 mm (25.7 in)
⇒ Height 746 mm (29.4 in)
Spark plugs:
⇒ Make/Type - 4.0 litre Champion RC11 PYP B4
⇒ Make/type - 4.6 litre Champion RN11 YCC
⇒ Gap - 4.0 and 4.6 litre 1.00 ± 0.05 mm (0.040 ± 0.002 in) Non-adjustable
Coils:
⇒Make Bosch 0221 503 407
⇒Type Twin coils
Fuel injection system:
⇒Make Bosch Motronic 5.2.1 Type 4146
⇒Type Multiport fuel injection, electronically controlled with electro-
mechanical injectors
Page 69 of 1529

GENERAL DATA
04-6
Gudgeon pins
Diameter 23.995 - 24.000 mm (0.9447 - 0.9449 in)
Clearance in piston 0.006 - 0.015 mm (0.00024 - 0.00059 in)
Fit in connecting rod Press fit
Length 60.00 - 60.50 mm (2.362 - 2.382 in)
Pistons
Type Solid skirt, elliptical open end with offset gudgeon pin
Material Aluminium AE413P
Clearance in cylinder bore.
Measured 10 mm (0.4 in) from bottom of skirt, 90° to
gudgeon pin.0.015 - 0.045 mm (0.001 - 0.002 in)
Diameter - Grade A 93.970 - 93.985 mm (3.6996 - 3.7002 in)
Diameter - Grade B 93.986 - 94.001 mm (3.7002 - 3.7008 in)
Piston rings
Type: 2 compression, 1 oil control
⇒ Top compression ring Barrel faced nitrided steel
⇒ 2nd compression ring Tapered spherical
⇒ Oil control ring 3 piece AE Conoform
Piston ring fitted gap in cylinder bore:
⇒ Top compression ring gap 0.3 - 0.5 mm (0.012 - 0.020 in)
⇒ 2nd compression ring gap 0.40 - 0.65 mm (0.016 - 0.026 in)
⇒ Oil control ring gap 0.38 - 1.40 mm (0.015 - 0.055 in)
Piston ring width:
⇒ Top compression ring width 1.21 - 1.23 mm (0.0476 - 0.0484 in)
⇒ 2nd compression ring width 1.478 - 1.490 mm (0.0582 - 0.0587 in)
⇒ Oil control ring width 3.00 mm (0.1181 in)
Piston ring to groove clearance:
⇒ 1st and 2nd compression rings 0.05 - 0.10 mm (0.002 - 0.004 in)
Camshaft
Bearings 5
Drive Chain, 9.52 mm (0.3748 in) pitch x 54 pitches
End float 0.075 - 0.25 mm (0.002 - 0.010 in)
Tappets
Type Hydraulic self adjusting
Outside diameter 21.386 - 21.407 mm (0.8420 - 0.8427 in)
Page 70 of 1529

GENERAL DATA
04-7
Valves
Stem diameter:
⇒ Inlet 8.664 - 8.679 mm (0.3411 - 0.3417 in)
⇒ Exhaust – 4.0 litre up to engine nos. 55D 05677A;
56D 50787A; 97D 05504A
⇒ Exhaust – 4.0 litre from engine nos. 55D 05678A;
56D 50788A; 97D 05505A and all 4.6 litre8.651 - 8.666 mm (0.3406 - 0.3412 in)
8.641 to 8.656 mm (0.340 to 0.341 in)
Head diameter:
⇒ Inlet 39.75 - 40.00 mm (1.5650 - 1.5748 in)
⇒ Exhaust 34.227 - 34.481 mm (1.3475 - 1.3575 in)
Seat face angle:
⇒ Inlet 46° 25' - 46° 00'
⇒ Exhaust 46° 25' - 46° 00'
Valve face angle:
⇒ Inlet 45° 00' - 45° 30'
⇒ Exhaust 45° 00' - 45° 30'
Valve springs
Free length 48.8 mm (1.92 in)
Fitted length 40.93 mm (1.61 in)
Page 86 of 1529
GENERAL DATA
04-23
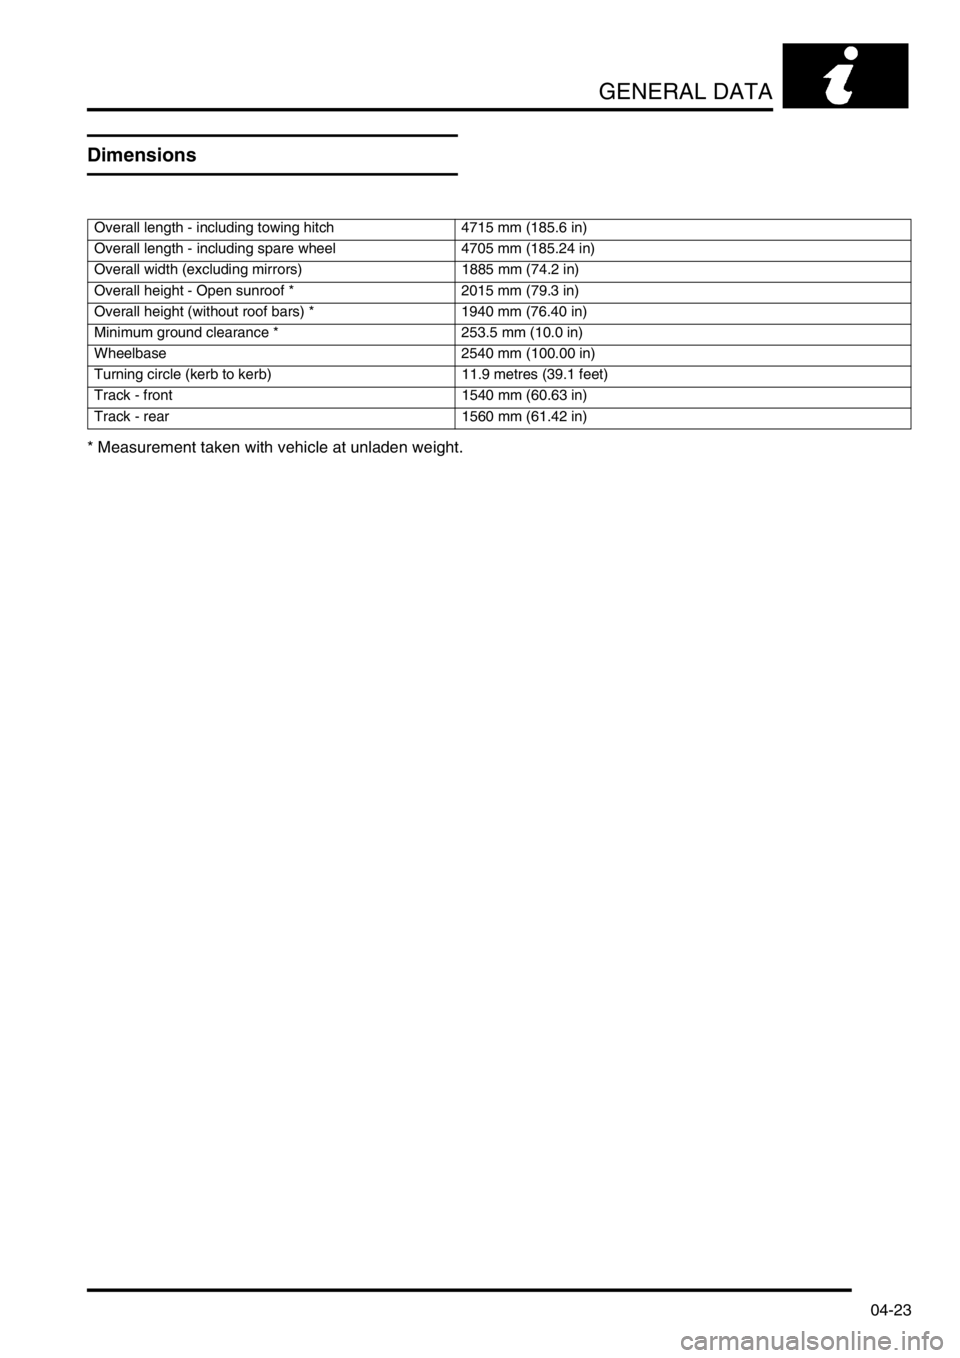
Dimensions
* Measurement taken with vehicle at unladen weight.
Overall length - including towing hitch 4715 mm (185.6 in)
Overall length - including spare wheel 4705 mm (185.24 in)
Overall width (excluding mirrors) 1885 mm (74.2 in)
Overall height - Open sunroof * 2015 mm (79.3 in)
Overall height (without roof bars) * 1940 mm (76.40 in)
Minimum ground clearance * 253.5 mm (10.0 in)
Wheelbase 2540 mm (100.00 in)
Turning circle (kerb to kerb) 11.9 metres (39.1 feet)
Track - front 1540 mm (60.63 in)
Track - rear 1560 mm (61.42 in)
Page 126 of 1529
MAINTENANCE
PROCEDURES 10-3
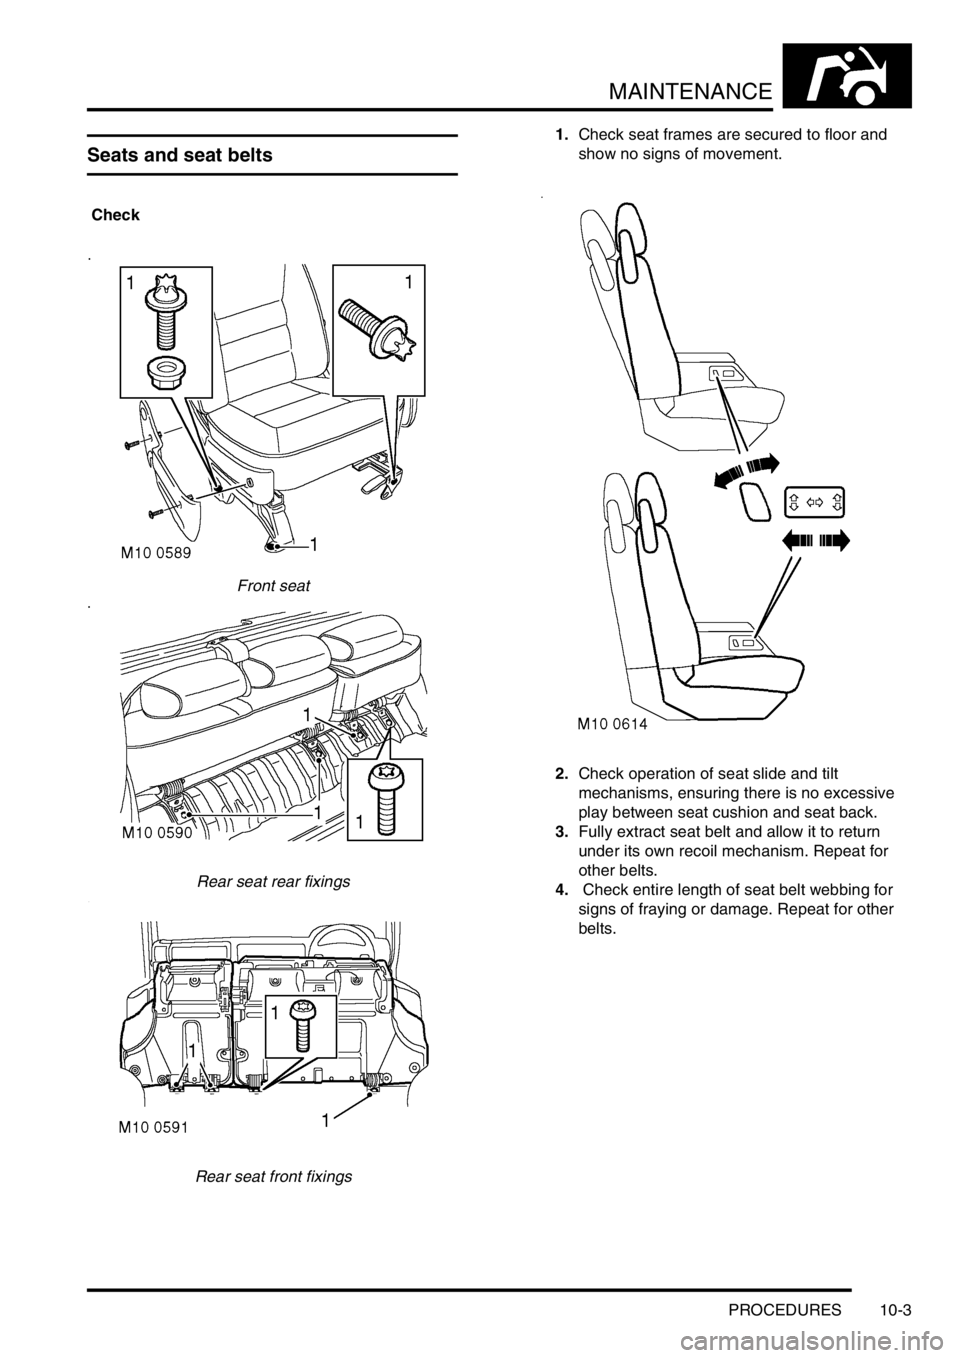
Seats and seat belts
Check
Front seat
Rear seat rear fixings
Rear seat front fixings1.Check seat frames are secured to floor and
show no signs of movement.
2.Check operation of seat slide and tilt
mechanisms, ensuring there is no excessive
play between seat cushion and seat back.
3.Fully extract seat belt and allow it to return
under its own recoil mechanism. Repeat for
other belts.
4. Check entire length of seat belt webbing for
signs of fraying or damage. Repeat for other
belts.
Page 219 of 1529
ENGINE - V8
12-2-64 OVERHAUL
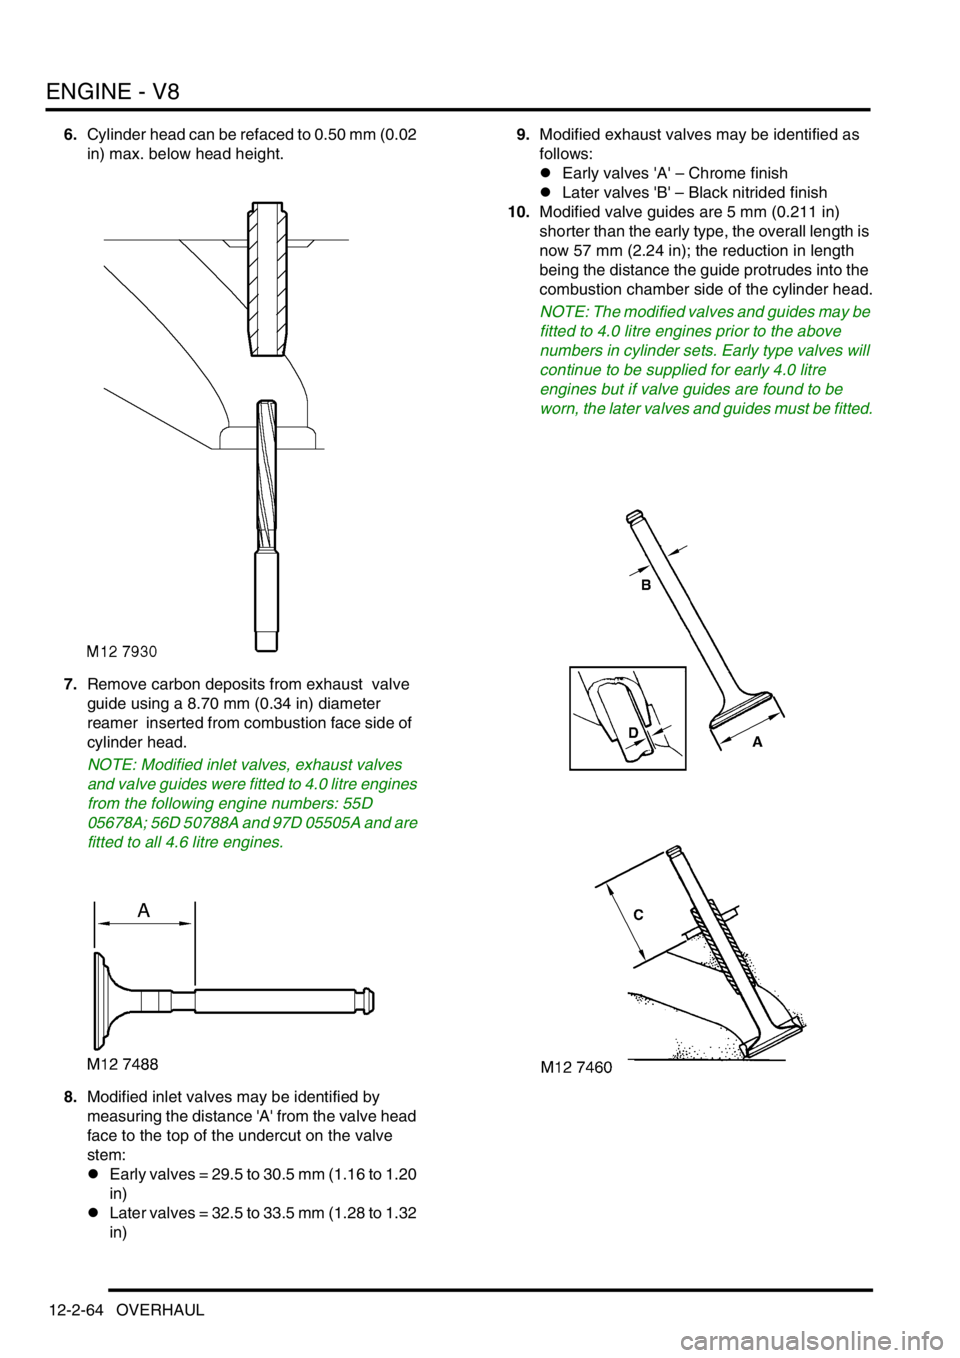
6.Cylinder head can be refaced to 0.50 mm (0.02
in) max. below head height.
7.Remove carbon deposits from exhaust valve
guide using a 8.70 mm (0.34 in) diameter
reamer inserted from combustion face side of
cylinder head.
NOTE: Modified inlet valves, exhaust valves
and valve guides were fitted to 4.0 litre engines
from the following engine numbers: 55D
05678A; 56D 50788A and 97D 05505A and are
fitted to all 4.6 litre engines.
8.Modified inlet valves may be identified by
measuring the distance 'A' from the valve head
face to the top of the undercut on the valve
stem:
lEarly valves = 29.5 to 30.5 mm (1.16 to 1.20
in)
lLater valves = 32.5 to 33.5 mm (1.28 to 1.32
in)9.Modified exhaust valves may be identified as
follows:
lEarly valves 'A' – Chrome finish
lLater valves 'B' – Black nitrided finish
10.Modified valve guides are 5 mm (0.211 in)
shorter than the early type, the overall length is
now 57 mm (2.24 in); the reduction in length
being the distance the guide protrudes into the
combustion chamber side of the cylinder head.
NOTE: The modified valves and guides may be
fitted to 4.0 litre engines prior to the above
numbers in cylinder sets. Early type valves will
continue to be supplied for early 4.0 litre
engines but if valve guides are found to be
worn, the later valves and guides must be fitted.
Page 220 of 1529
ENGINE - V8
OVERHAUL 12-2-65
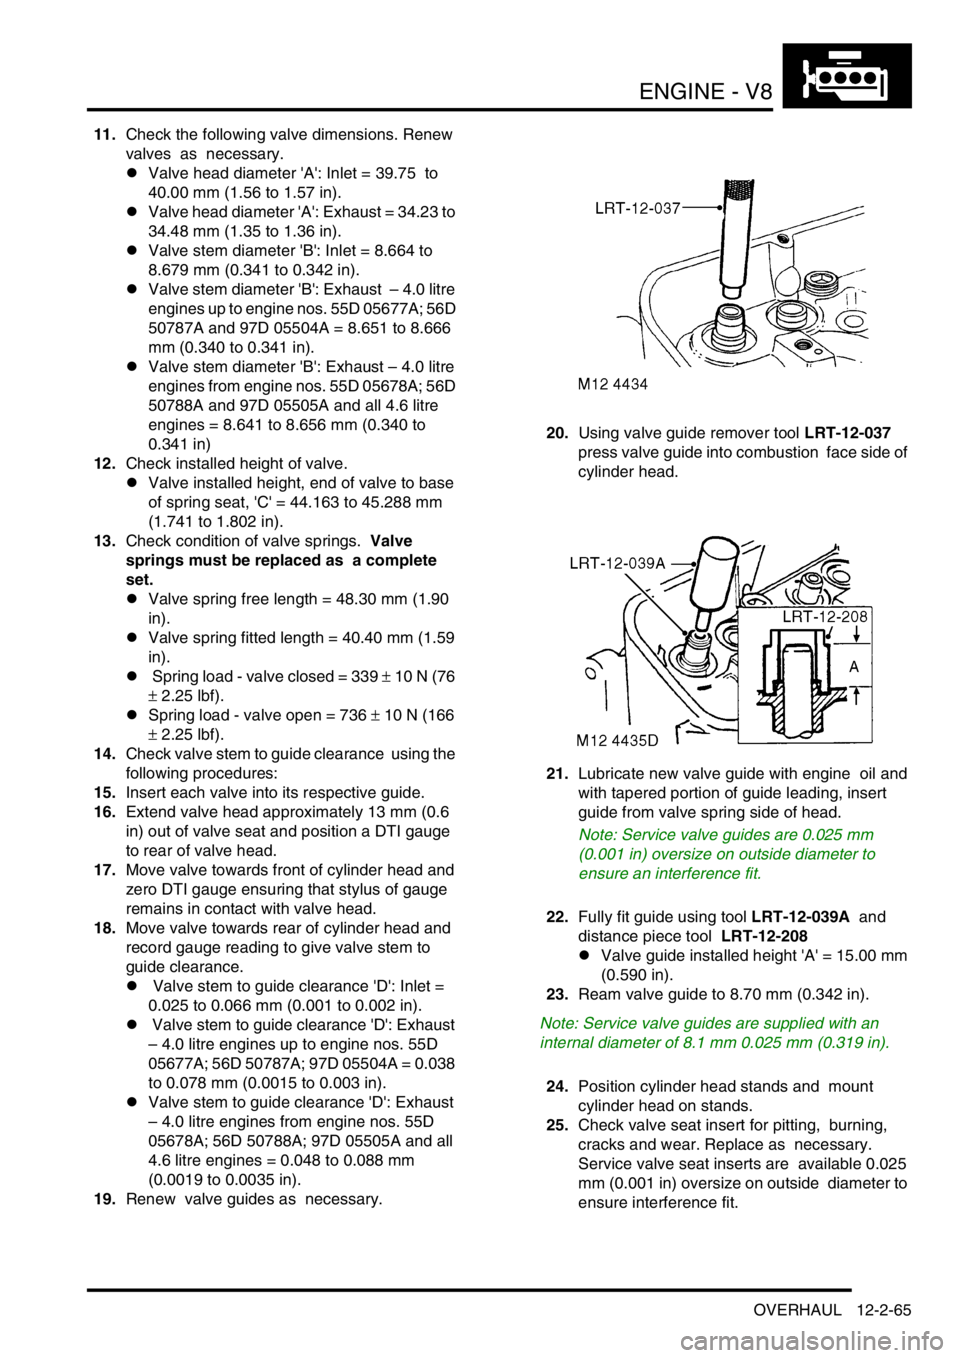
11.Check the following valve dimensions. Renew
valves as necessary.
lValve head diameter 'A': Inlet = 39.75 to
40.00 mm (1.56 to 1.57 in).
lValve head diameter 'A': Exhaust = 34.23 to
34.48 mm (1.35 to 1.36 in).
lValve stem diameter 'B': Inlet = 8.664 to
8.679 mm (0.341 to 0.342 in).
lValve stem diameter 'B': Exhaust – 4.0 litre
engines up to engine nos. 55D 05677A; 56D
50787A and 97D 05504A = 8.651 to 8.666
mm (0.340 to 0.341 in).
lValve stem diameter 'B': Exhaust – 4.0 litre
engines from engine nos. 55D 05678A; 56D
50788A and 97D 05505A and all 4.6 litre
engines = 8.641 to 8.656 mm (0.340 to
0.341 in)
12.Check installed height of valve.
lValve installed height, end of valve to base
of spring seat, 'C' = 44.163 to 45.288 mm
(1.741 to 1.802 in).
13.Check condition of valve springs. Valve
springs must be replaced as a complete
set.
lValve spring free length = 48.30 mm (1.90
in).
lValve spring fitted length = 40.40 mm (1.59
in).
l Spring load - valve closed = 339 ± 10 N (76
± 2.25 lbf).
lSpring load - valve open = 736 ± 10 N (166
± 2.25 lbf).
14.Check valve stem to guide clearance using the
following procedures:
15.Insert each valve into its respective guide.
16.Extend valve head approximately 13 mm (0.6
in) out of valve seat and position a DTI gauge
to rear of valve head.
17.Move valve towards front of cylinder head and
zero DTI gauge ensuring that stylus of gauge
remains in contact with valve head.
18.Move valve towards rear of cylinder head and
record gauge reading to give valve stem to
guide clearance.
l Valve stem to guide clearance 'D': Inlet =
0.025 to 0.066 mm (0.001 to 0.002 in).
l Valve stem to guide clearance 'D': Exhaust
– 4.0 litre engines up to engine nos. 55D
05677A; 56D 50787A; 97D 05504A = 0.038
to 0.078 mm (0.0015 to 0.003 in).
lValve stem to guide clearance 'D': Exhaust
– 4.0 litre engines from engine nos. 55D
05678A; 56D 50788A; 97D 05505A and all
4.6 litre engines = 0.048 to 0.088 mm
(0.0019 to 0.0035 in).
19.Renew valve guides as necessary. 20.Using valve guide remover tool LRT-12-037
press valve guide into combustion face side of
cylinder head.
21.Lubricate new valve guide with engine oil and
with tapered portion of guide leading, insert
guide from valve spring side of head.
Note: Service valve guides are 0.025 mm
(0.001 in) oversize on outside diameter to
ensure an interference fit.
22.Fully fit guide using tool LRT-12-039A and
distance piece tool LRT-12-208
lValve guide installed height 'A' = 15.00 mm
(0.590 in).
23.Ream valve guide to 8.70 mm (0.342 in).
Note: Service valve guides are supplied with an
internal diameter of 8.1 mm 0.025 mm (0.319 in).
24.Position cylinder head stands and mount
cylinder head on stands.
25.Check valve seat insert for pitting, burning,
cracks and wear. Replace as necessary.
Service valve seat inserts are available 0.025
mm (0.001 in) oversize on outside diameter to
ensure interference fit.
Page 224 of 1529

ENGINE - V8
OVERHAUL 12-2-69
9.Check overall dimensions of gudgeon pin.
Gudgeon pins are only supplied as an
assembly with replacement pistons.
lGudgeon pin length = 60.00 to 60.50 mm
(2.362 to 2.382 in).
lGudgeon pin diameter = 23.995 to 24.00
mm (0.9446 to 0.9448 in)
10.Measure cylinder bore wear and ovality in two
axis 40 to 50 mm (1.6 to 2 in) from top of bore.
The temperature of piston and cylinder
block must be the same to ensure accurate
measurement. Do not attempt to de-glaze
cylinder bores.
lGrade 'A' pistons: Cylinder bore = 94.00 to
94.015 mm (3.7007 to 3.7013 in).
lGrade 'B' pistons: Cylinder bore = 94.016 to
94.030 mm (3.7014 to 3.7019 in).
lMaximum ovality = 0.013 mm (0.0005 in).
11.Check alignment of connecting rods. Reassembly
1.Pistons have a 5 mm (0.2 in) offset gudgeon pin
which can be identified by an arrow mark on
the piston crown. This arrow must always point
towards the front of the engine.
2.Assemble pistons to connecting rods with
arrow on piston pointing towards domed
shaped boss on connecting rod for RH bank of
cylinders and arrow pointing away from domed
shaped boss for LH bank of cylinders.
3.Clamp hexagon body of tool LRT-12-013 in
vice.
4.Screw large nut back until flush with end of
centre screw.
5.Locate remover/replacer adapter LRT-12-126/
2 with its long spigot inside bore of hexagon
body.
6.Fit parallel sleeve, part of tool LRT-12-013,
ensuring that grooved end is towards open end
of tool LRT-12-013. Position sleeve up to
shoulder of centre screw.
7.Lubricate gudgeon pin and bores of connecting
rod and piston with graphite oil.
8.Locate connecting rod and piston to centre
screw with connecting rod entered on parallel
sleeve, part of LRT-12-013 up to the machined
groove on the sleeve.
Page 261 of 1529
EMISSION CONTROL - V8
17-2-28 DESCRIPTION AND OPERATION
The air delivery pipe is a flexible plastic type, and is connected to the air pump outlet via a plastic quick-fit connector.
The other end of the flexible plastic pipe connects to the fixed metal pipework via a short rubber hose. The part of the
flexible plastic pipe which is most vulnerable to engine generated heat is protected by heat reflective sleeving. The
metal delivery pipe has a fabricated T-piece included where the pressurised air is split for delivery to each exhaust
manifold via the SAI control valves.
The pipes from the T-piece to each of the SAI control valves are approximately the same length, so that the pressure
and mass of the air delivered to each bank will be equal. The ends of the pipes are connected to the inlet port of each
SAI control valve through short rubber hose connections.
The T-piece is mounted at the rear of the engine (by the ignition coils) and features a welded mounting bracket which
is fixed to the engine by two studs and nuts.
The foam filter in the air intake of the SAI pump provides noise reduction and protects the pump from damage due to
particulate contamination. In addition, the pump is fitted on rubber mountings to help prevent noise which is generated
by pump operation from being transmitted through the vehicle body into the passenger compartment.
If the secondary air injection (SAI) pump is found to be malfunctioning, the following fault codes may be stored in the
ECM diagnostic memory, which can be retrieved using Testbook/T4:
NOTE: Refer to 'SAI System Fault Finding' and 'Checking Malfunctions on SAI System' at the end of this section to
determine root cause of fault codes.
NOTE: The electrical test of the SAI pump powerstage only indicates that there is a problem with the relay or the
power supply to the relay. It does not indicate the state of the SAI pump itself (i.e. broken or not connected).
As a result of a SAI pump powerstage malfunction, other fault codes may also become stored in the ECM memory.
These may include the following P codes.
NOTE: A malfunction of the SAI pump powerstage is logically expected to result in both engine banks reporting the
same fault.
NOTE: Refer to 'SAI System Fault Finding' and 'Checking Malfunctions on SAI System' at the end of this section to
determine root cause of fault codes.
Secondary Air Injection (SAI) Pump Relay
The secondary air injection pump relay is located in the engine compartment fusebox. The engine control module
(ECM) is used to control the operation of the SAI pump via the SAI pump relay. Power to the coil of the relay is supplied
from the vehicle battery via the main relay and the ground connection to the coil is via the ECM.
Power to the SAI pump relay contacts is via fusible link FL2 which is located in the engine compartment fusebox.
P-code Description
P0418Secondary Air Injection System – Relay 'A' circuit malfunction (SAI pump
powerstage fault, e.g. - SAI pump relay fault or relay not connected / open circuit /
harness damage).
P-code Description
P1412Secondary Air Injection System – Malfunction Bank 1 LH (Insufficient SAI flow
during passive test)
P1414Secondary Air Injection System – Low air flow Bank 1 LH (Insufficient SAI flow
during active test)
P1415Secondary Air Injection System – Malfunction Bank 2 RH (Insufficient SAI flow
during passive test)
P1417Secondary Air Injection System – Low air flow Bank 2 RH (Insufficient SAI flow
during active test)