width LAND ROVER DISCOVERY 1999 Workshop Manual
[x] Cancel search | Manufacturer: LAND ROVER, Model Year: 1999, Model line: DISCOVERY, Model: LAND ROVER DISCOVERY 1999Pages: 1529, PDF Size: 34.8 MB
Page 35 of 1529

INTRODUCTION
01-4
λLambda
lc Low compression
LCD Liquid Crystal Display
LED Light Emitting Diode
LH Left-Hand
LHD Left-Hand Drive
LVS Liquid Vapour Separator
mMetre
µMicro
MAF Mass Air Flow
MAP Manifold Absolute Pressure
MFU Multi-Function Unit
MFL Multi-Function Logic
max. Maximum
MEMS Modular Engine Management
System
MIL Malfunction Indicator Lamp
min. Minimum
MPa MegaPascal
- Minus (tolerance)
' Minute (angle)
mm Millimetre
mph Miles per hour
MPi Multi-Point injection
MY Model Year
NAS North American Specification
(-) Negative (electrical)
Nm Newton metre
No. Number
NO
2Nitrogen Dioxide
NO
xOxides of Nitrogen
NTC Negative Temperature
Coefficient
OBD On Board Diagnostics
o.dia. Outside diameter
ORM Off-road Mode
ΩOhm
PAS Power Assisted Steering
PCV Positive Crankcase Ventilation
PDC Parking Distance Control
% Percentage
+ Plus (tolerance) or Positive
(electrical)
±Plus or minus (tolerance)
PTC Positive Temperature Coefficient
PTFE Polytetrafluorethylene
PWM Pulse Width Modulation
rRadius
:Ratio
ref Reference
RES Rover Engineering Standards
rev/min Revolutions per minute
RF Radio Frequency
RH Right-Hand
RHD Right-Hand Drive
ROM Read Only Memory
RON Research Octane Number
ROV Roll Over ValveROW Rest Of World
SAE Society of Automotive Engineers
" Second (angle)
SLABS Self Levelling and Anti-Lock
Brake System
SLS Self Levelling Suspension
SOHC Single Overhead Camshaft
sp.gr Specific gravity
SRS Supplementary Restraint System
std. Standard
synchro Synchronizer or synchromesh
TDC Top Dead Centre
TMAP Temperature, Manifold Absolute
Pressure
TP Throttle Position
TPS Throttle Position Sensor
TV Torsional Vibration
TXV Thermostatic Expansion Valve
UK United Kingdom
US United States
V Volt
Var. Variable
VIN Vehicle Identification Number
VIS Variable Intake System
VRS Variable Reluctance Sensor
VSS Vehicle Speed Signal
WWatt
Page 64 of 1529

GENERAL DATA
04-1
GENERAL DATA
Engine - Td5
General
Type 2.5 litre in-line direct injection diesel, turbocharged and intercooled
Cylinder arrangement 5 in-line, No. 1 cylinder at front of engine
Bore 84.450 mm (3.3248 in)
Stroke 88.950 mm (3.5020 in)
Capacity 2498 cm
3 (152.5 in3)
Firing order 1 - 2 - 4 - 5 - 3
Compression ratio 19.5 : 1
Direction of rotation Clockwise viewed from the front of the engine
Dimensions:
⇒ Length 766 mm (30.1 in)
⇒ Width 708 mm (27.8 in)
⇒ Height 788 mm (31.0 in)
Injection timing Controlled by ECM
Injectors:
⇒ Make/Type Lucas EV1/Dual stage
⇒ Injector operating pressures:
Pre EU3 models:
⇒ Initial opening pressure 270 bar (3915 lbf.in
2)
⇒ Fully opened pressure 440 bar (6380 lbf.in
2)
⇒ Maximum pressure 1560 bar (22620 lbf.in
2)
EU3 models:
⇒ Initial opening pressure 270 bar (3915 lbf.in
2)
⇒ Fully opened pressure 440 bar (6380 lbf.in
2)
⇒ Maximum pressure 1750 bar (25375 lbf.in
2)
Maximum governed speed 4850 rev/min
Maximum overrun speed 5460 rev/min
Idle speed:
⇒ Manual gearbox 740 ± 50 rev/min
⇒ Automatic gearbox 760 ± 50 rev/min
Glow plugs Beru 12 V. Four plugs in cylinders 1, 2, 3 and 4
Turbocharger Garrett GT 20
Emissions standard:
⇒ Pre EU3 models ECD 2
⇒ EU3 models ECD 3
Valve timing
Inlet valves:
⇒ Opens 14° BTDC
⇒ Closes 33° ABDC
Exhaust valves:
⇒ Opens 57° BBDC
⇒ Closes 14° ATDC
Page 67 of 1529

GENERAL DATA
04-4
Engine - V8
General
Cylinder arrangement 90° V8, numbered from the front of the engine:
⇒ Left bank cylinders 1, 3, 5 and 7
⇒ Right bank cylinders 2, 4, 6 and 8
Bore 94.00 mm (3.70 in)
Stroke:
⇒ 4.0 litre
⇒ 4.6 litre71.04 mm (2.80 in)
81.92 mm (3.22 in)
Capacity:
⇒ 4.0 litre
⇒ 4.6 litre3950 cm
3 (241 in3)
4554 cm3 (278 in3)
Firing order 1 - 8 - 4 - 3 - 6 - 5 - 7 - 2
Compression ratio:
⇒ Low - 4.0 litre 8.23:1
⇒ High - 4.0 and 4.6 litre 9.35:1
Direction of rotation Clockwise viewed from the front of the engine
Maximum power - 4.0 litre:
⇒ Low compression ratio 132 kW (177 bhp) at 4750 rev/min
⇒ High compression ratio - UK/Japan/ROW 136 kW (182 bhp) at 4750 rev/min
⇒ High compression ratio - NAS 140 kW (187 bhp) at 4750 rev/min
Maximum power - 4.6 litre 162 kW (217 bhp) at 4750 rev/min
Maximum engine speed:
⇒ Continuous5000 rev/min
⇒ Intermittent 5250 rev/min
Weight (fully dressed, wet)
⇒ Manual 194 Kg (435 lb)
⇒ Automatic 179 Kg (402 lb)
Dimensions:
⇒ Length - Manual 767 mm (30.2 in) (Including fan)
⇒ Length - Automatic 777 mm (30.5 in) (Including fan and drive plate)
⇒ Width 652 mm (25.7 in)
⇒ Height 746 mm (29.4 in)
Spark plugs:
⇒ Make/Type - 4.0 litre Champion RC11 PYP B4
⇒ Make/type - 4.6 litre Champion RN11 YCC
⇒ Gap - 4.0 and 4.6 litre 1.00 ± 0.05 mm (0.040 ± 0.002 in) Non-adjustable
Coils:
⇒Make Bosch 0221 503 407
⇒Type Twin coils
Fuel injection system:
⇒Make Bosch Motronic 5.2.1 Type 4146
⇒Type Multiport fuel injection, electronically controlled with electro-
mechanical injectors
Page 69 of 1529

GENERAL DATA
04-6
Gudgeon pins
Diameter 23.995 - 24.000 mm (0.9447 - 0.9449 in)
Clearance in piston 0.006 - 0.015 mm (0.00024 - 0.00059 in)
Fit in connecting rod Press fit
Length 60.00 - 60.50 mm (2.362 - 2.382 in)
Pistons
Type Solid skirt, elliptical open end with offset gudgeon pin
Material Aluminium AE413P
Clearance in cylinder bore.
Measured 10 mm (0.4 in) from bottom of skirt, 90° to
gudgeon pin.0.015 - 0.045 mm (0.001 - 0.002 in)
Diameter - Grade A 93.970 - 93.985 mm (3.6996 - 3.7002 in)
Diameter - Grade B 93.986 - 94.001 mm (3.7002 - 3.7008 in)
Piston rings
Type: 2 compression, 1 oil control
⇒ Top compression ring Barrel faced nitrided steel
⇒ 2nd compression ring Tapered spherical
⇒ Oil control ring 3 piece AE Conoform
Piston ring fitted gap in cylinder bore:
⇒ Top compression ring gap 0.3 - 0.5 mm (0.012 - 0.020 in)
⇒ 2nd compression ring gap 0.40 - 0.65 mm (0.016 - 0.026 in)
⇒ Oil control ring gap 0.38 - 1.40 mm (0.015 - 0.055 in)
Piston ring width:
⇒ Top compression ring width 1.21 - 1.23 mm (0.0476 - 0.0484 in)
⇒ 2nd compression ring width 1.478 - 1.490 mm (0.0582 - 0.0587 in)
⇒ Oil control ring width 3.00 mm (0.1181 in)
Piston ring to groove clearance:
⇒ 1st and 2nd compression rings 0.05 - 0.10 mm (0.002 - 0.004 in)
Camshaft
Bearings 5
Drive Chain, 9.52 mm (0.3748 in) pitch x 54 pitches
End float 0.075 - 0.25 mm (0.002 - 0.010 in)
Tappets
Type Hydraulic self adjusting
Outside diameter 21.386 - 21.407 mm (0.8420 - 0.8427 in)
Page 76 of 1529

GENERAL DATA
04-13
Manual gearbox - R380
Type Single helical constant mesh
Gears 5 forward, 1 reverse, all synchromesh
Gear ratios: Td5 Diesel
⇒ First 3.692 : 1
⇒ Second 2.132 : 1
⇒ Third 1.397 : 1
⇒ Fourth 1.0 : 1
⇒ Fifth 0.770 : 1
⇒ Reverse 3.536 : 1
Gear ratios: V8 Petrol
⇒ First 3.321:1
⇒ Second 2.132:1
⇒ Third 1.397:1
⇒ Fourth 1.0:1
⇒ Fifth 0.732:1
⇒ Reverse 3.536:1
Baulk ring clearance:
⇒ New 0.500 mm (0.0197 in)
⇒ Service limit 0.500 mm (0.0197 in)
⇒ Selector fork pad widths - minimum 6.5 mm (0.255 in)
First gear end float:
⇒ New 0.050 - 0.200 mm (0.0020 - 0.0079 in)
⇒ Service limit 0.327 mm (0.0129 in)
Second gear end float:
⇒ New 0.040 - 0.210 mm (0.0016 - 0.0083 in)
⇒ Service limit 0.337 mm (0.0133 in)
Third gear end float:
⇒ New 0.110 - 0.210 mm (0.0043 - 0.0083 in)
⇒ Service limit 0.337 mm (0.0133 in)
Adjust fifth / reverse hub - shim to
⇒ New 0.005 - 0.055 mm (0.0002 - 0.0022 in)
⇒ Service limit 0.055 mm (0.0022 in)
Reverse gear idler shaft clearance
⇒ New 0.040 - 0.380 mm (0.0016 - 0.0150 in)
⇒ Service limit 0.380 mm (0.0150 in)
Mainshaft end float:
⇒ New 0.000 - 0.050 mm (0.0000 - 0.0020 in)
⇒ Service limit 0.000 - 0.050 mm (0.0000 - 0.0020 in)
Layshaft end float:
⇒ New 0.000 - 0.050 mm (0.0000 - 0.0020 in)
⇒ Service limit 0.000 - 0.050 mm (0.0000 - 0.0020 in)
Page 86 of 1529

GENERAL DATA
04-23
Dimensions
* Measurement taken with vehicle at unladen weight.
Overall length - including towing hitch 4715 mm (185.6 in)
Overall length - including spare wheel 4705 mm (185.24 in)
Overall width (excluding mirrors) 1885 mm (74.2 in)
Overall height - Open sunroof * 2015 mm (79.3 in)
Overall height (without roof bars) * 1940 mm (76.40 in)
Minimum ground clearance * 253.5 mm (10.0 in)
Wheelbase 2540 mm (100.00 in)
Turning circle (kerb to kerb) 11.9 metres (39.1 feet)
Track - front 1540 mm (60.63 in)
Track - rear 1560 mm (61.42 in)
Page 129 of 1529

MAINTENANCE
10-6 PROCEDURES
Handbrake
Check
1.With the vehicle stationary, on a level surface,
apply and release handbrake and check for
correct operation.
+ BRAKES, ADJUSTMENTS,
Handbrake.
Alarm handset battery
Replace
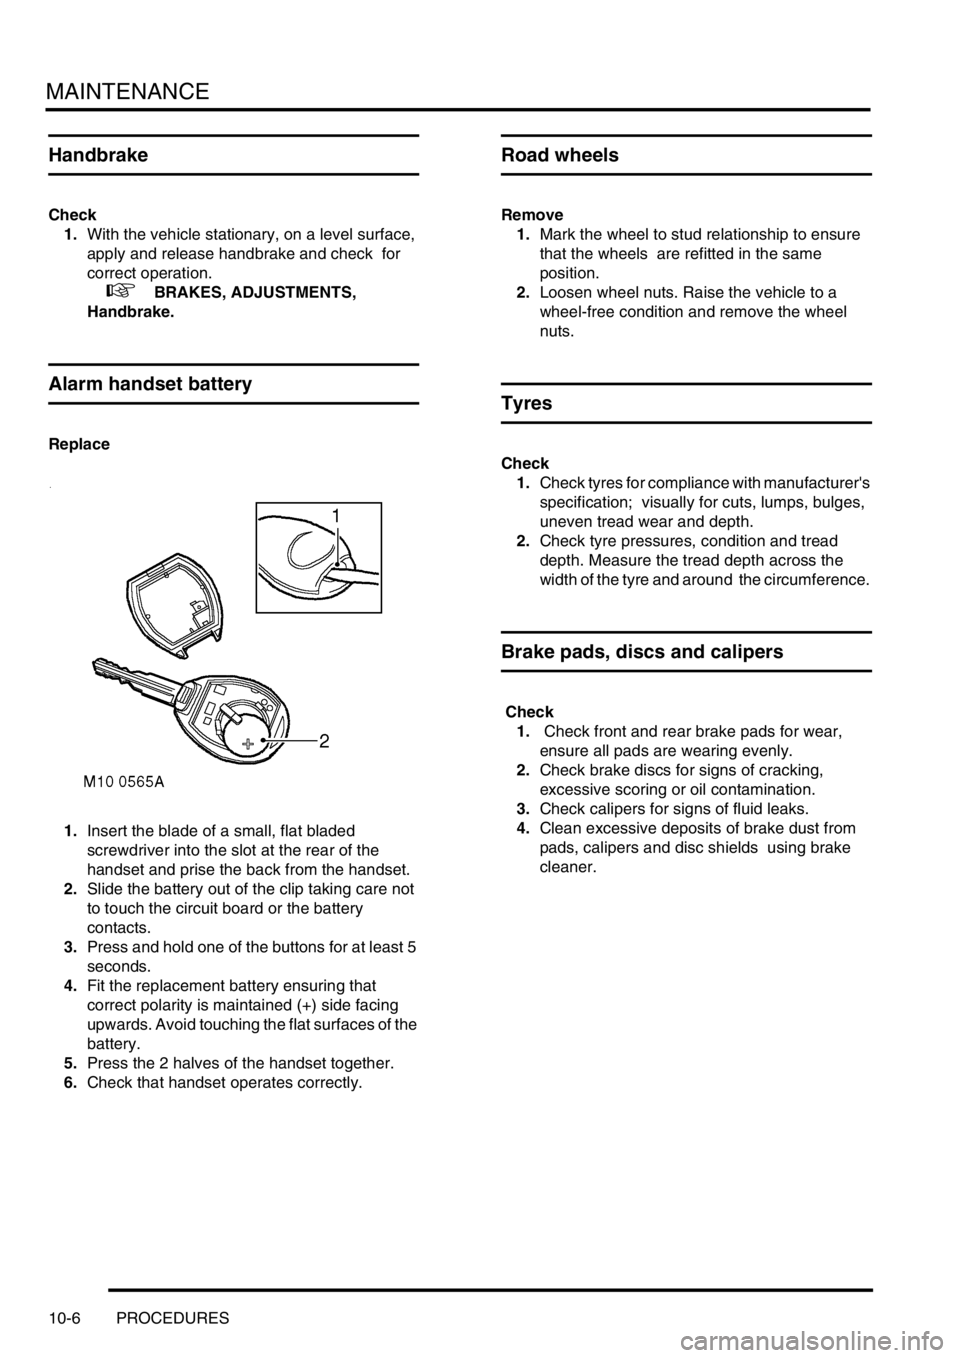
1.Insert the blade of a small, flat bladed
screwdriver into the slot at the rear of the
handset and prise the back from the handset.
2.Slide the battery out of the clip taking care not
to touch the circuit board or the battery
contacts.
3.Press and hold one of the buttons for at least 5
seconds.
4.Fit the replacement battery ensuring that
correct polarity is maintained (+) side facing
upwards. Avoid touching the flat surfaces of the
battery.
5.Press the 2 halves of the handset together.
6.Check that handset operates correctly.
Road wheels
Remove
1.Mark the wheel to stud relationship to ensure
that the wheels are refitted in the same
position.
2.Loosen wheel nuts. Raise the vehicle to a
wheel-free condition and remove the wheel
nuts.
Tyres
Check
1.Check tyres for compliance with manufacturer's
specification; visually for cuts, lumps, bulges,
uneven tread wear and depth.
2.Check tyre pressures, condition and tread
depth. Measure the tread depth across the
width of the tyre and around the circumference.
Brake pads, discs and calipers
Check
1. Check front and rear brake pads for wear,
ensure all pads are wearing evenly.
2.Check brake discs for signs of cracking,
excessive scoring or oil contamination.
3.Check calipers for signs of fluid leaks.
4.Clean excessive deposits of brake dust from
pads, calipers and disc shields using brake
cleaner.
Page 221 of 1529

ENGINE - V8
12-2-66 OVERHAUL
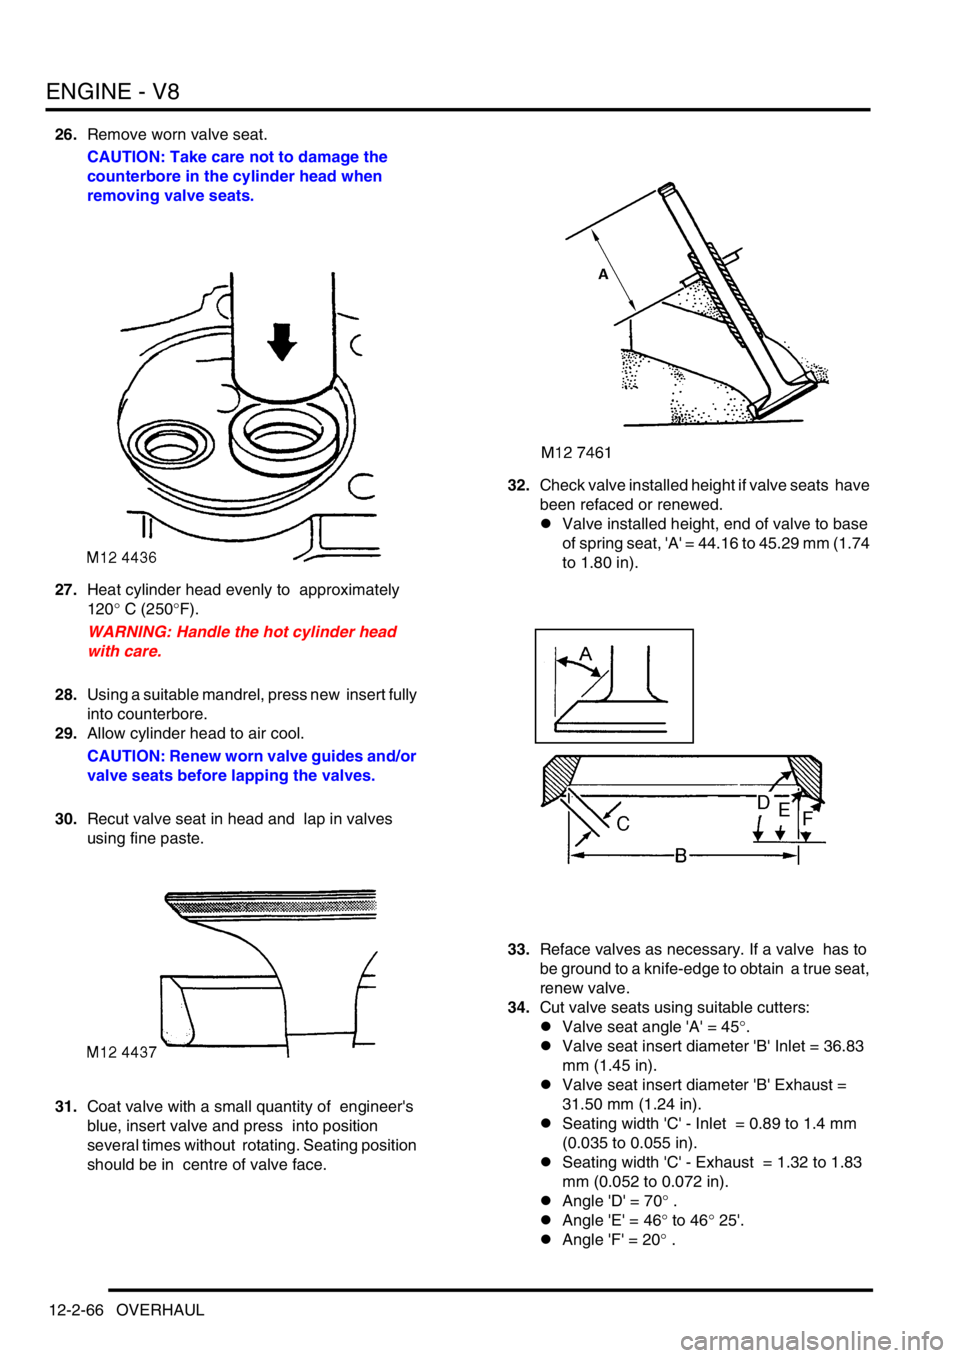
26.Remove worn valve seat.
CAUTION: Take care not to damage the
counterbore in the cylinder head when
removing valve seats.
27.Heat cylinder head evenly to approximately
120° C (250°F).
WARNING: Handle the hot cylinder head
with care.
28.Using a suitable mandrel, press new insert fully
into counterbore.
29.Allow cylinder head to air cool.
CAUTION: Renew worn valve guides and/or
valve seats before lapping the valves.
30.Recut valve seat in head and lap in valves
using fine paste.
31.Coat valve with a small quantity of engineer's
blue, insert valve and press into position
several times without rotating. Seating position
should be in centre of valve face. 32.Check valve installed height if valve seats have
been refaced or renewed.
lValve installed height, end of valve to base
of spring seat, 'A' = 44.16 to 45.29 mm (1.74
to 1.80 in).
33.Reface valves as necessary. If a valve has to
be ground to a knife-edge to obtain a true seat,
renew valve.
34.Cut valve seats using suitable cutters:
lValve seat angle 'A' = 45°.
lValve seat insert diameter 'B' Inlet = 36.83
mm (1.45 in).
lValve seat insert diameter 'B' Exhaust =
31.50 mm (1.24 in).
lSeating width 'C' - Inlet = 0.89 to 1.4 mm
(0.035 to 0.055 in).
lSeating width 'C' - Exhaust = 1.32 to 1.83
mm (0.052 to 0.072 in).
lAngle 'D' = 70° .
lAngle 'E' = 46° to 46° 25'.
lAngle 'F' = 20° .
Page 229 of 1529

ENGINE - V8
12-2-74 OVERHAUL
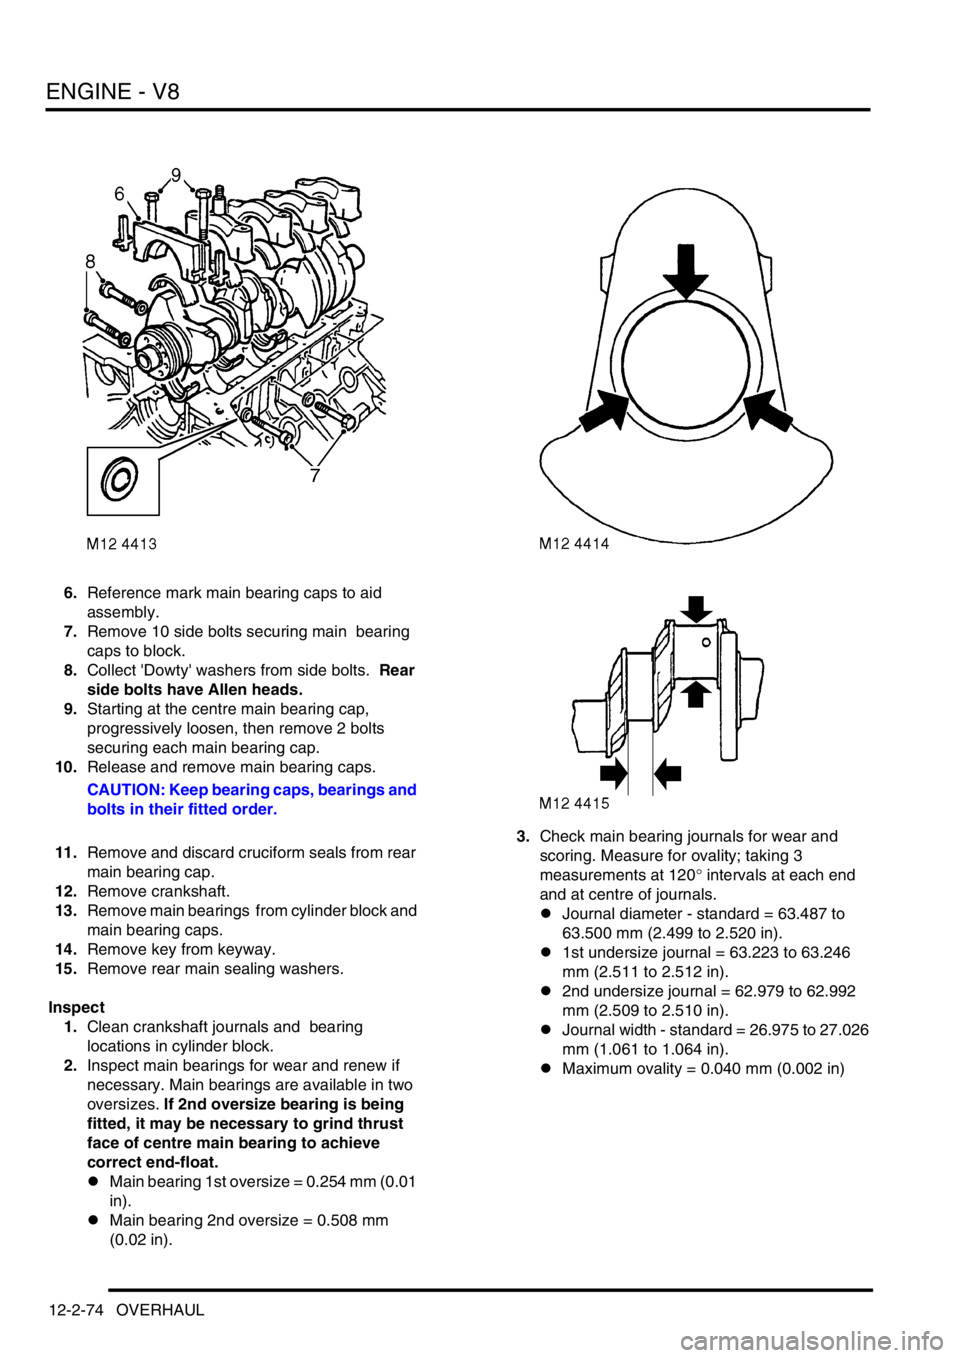
6.Reference mark main bearing caps to aid
assembly.
7.Remove 10 side bolts securing main bearing
caps to block.
8.Collect 'Dowty' washers from side bolts. Rear
side bolts have Allen heads.
9.Starting at the centre main bearing cap,
progressively loosen, then remove 2 bolts
securing each main bearing cap.
10.Release and remove main bearing caps.
CAUTION: Keep bearing caps, bearings and
bolts in their fitted order.
11.Remove and discard cruciform seals from rear
main bearing cap.
12.Remove crankshaft.
13.Remove main bearings from cylinder block and
main bearing caps.
14.Remove key from keyway.
15.Remove rear main sealing washers.
Inspect
1.Clean crankshaft journals and bearing
locations in cylinder block.
2.Inspect main bearings for wear and renew if
necessary. Main bearings are available in two
oversizes. If 2nd oversize bearing is being
fitted, it may be necessary to grind thrust
face of centre main bearing to achieve
correct end-float.
lMain bearing 1st oversize = 0.254 mm (0.01
in).
lMain bearing 2nd oversize = 0.508 mm
(0.02 in).3.Check main bearing journals for wear and
scoring. Measure for ovality; taking 3
measurements at 120° intervals at each end
and at centre of journals.
lJournal diameter - standard = 63.487 to
63.500 mm (2.499 to 2.520 in).
l1st undersize journal = 63.223 to 63.246
mm (2.511 to 2.512 in).
l2nd undersize journal = 62.979 to 62.992
mm (2.509 to 2.510 in).
lJournal width - standard = 26.975 to 27.026
mm (1.061 to 1.064 in).
lMaximum ovality = 0.040 mm (0.002 in)
Page 253 of 1529

EMISSION CONTROL - V8
17-2-20 DESCRIPTION AND OPERATION
For NAS vehicles with positive pressure, EVAP system leak detection capability, the atmosphere vent line from the
EVAP canister connects to a port on the fuel leak detection pump via a short, large bore hose which is secured to the
component ports by crimped metal clips at each end. A large bore plastic hose from the top of the leak detection pump
is routed to the RH side of the engine bay where it connects to an air filter canister. Under normal operating conditions
(when the fuel leak detection solenoid valve is not energised), the EVAP canister is able to take in clean air via the
air filter, through the pipework and past the open solenoid valve to allow normal purge operation to take place and
release any build up of EVAP system pressure to atmosphere.
The EVAP system pipes are clipped at various points along the pipe runs and tied together with tie straps at suitable
points along the runs.
The NAS and ROW EVAP canisters are of similar appearance, but use charcoal of different consistency. The ROW
vehicles use granular charcoal of 11 bwc (butane working capacity) and NAS vehicles use pelletised charcoal with a
higher absorption capacity of 15 bwc. All canisters are of rectangular shape and have capacities of 1.8 litres (3 1/8
imp. pts) with purge foam retention.
Purge Valve
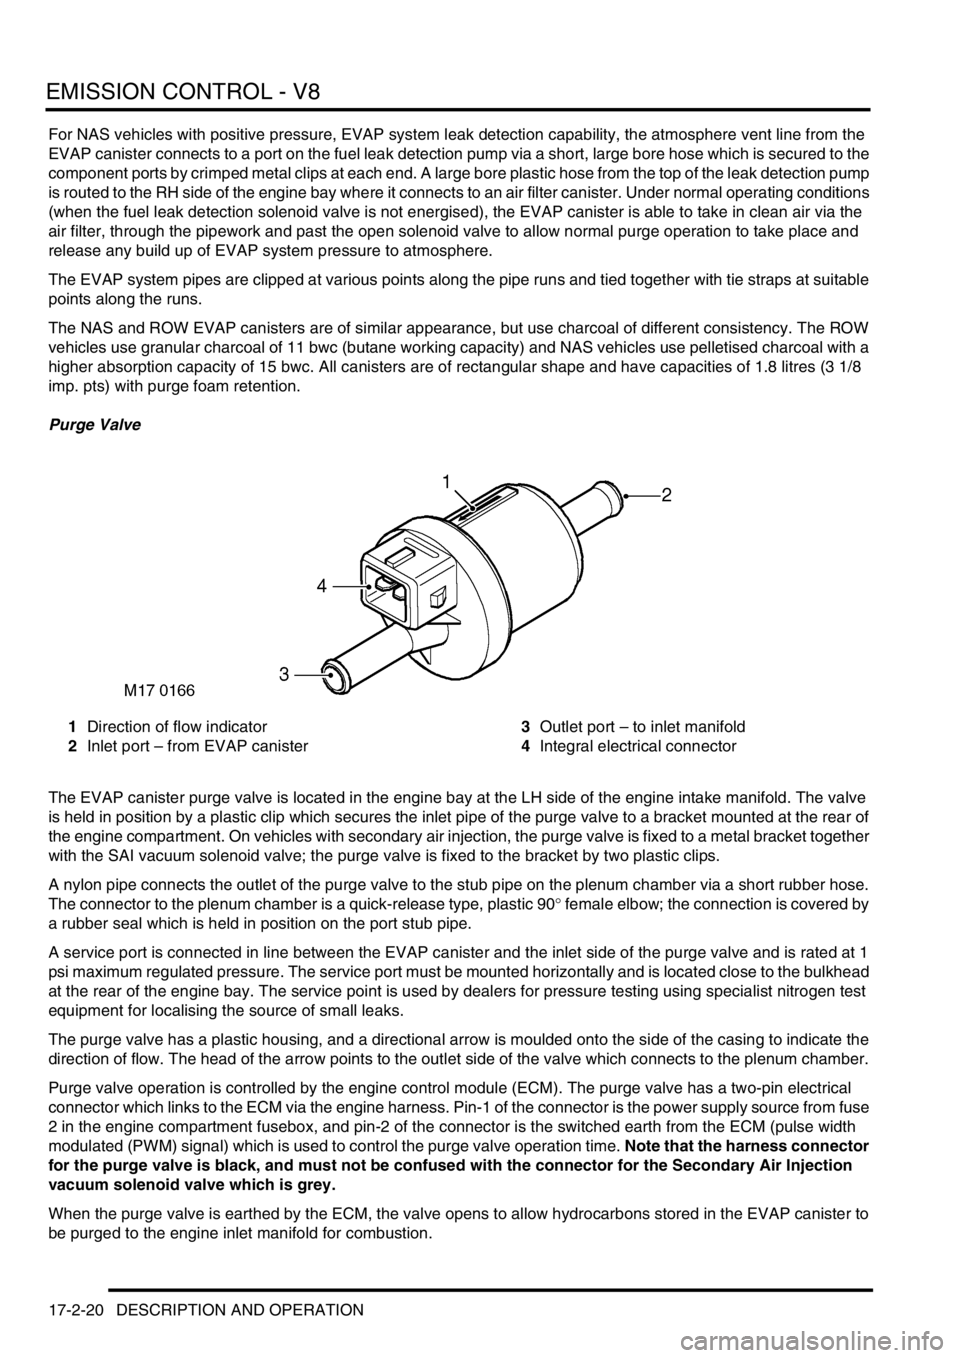
1Direction of flow indicator
2Inlet port – from EVAP canister3Outlet port – to inlet manifold
4Integral electrical connector
The EVAP canister purge valve is located in the engine bay at the LH side of the engine intake manifold. The valve
is held in position by a plastic clip which secures the inlet pipe of the purge valve to a bracket mounted at the rear of
the engine compartment. On vehicles with secondary air injection, the purge valve is fixed to a metal bracket together
with the SAI vacuum solenoid valve; the purge valve is fixed to the bracket by two plastic clips.
A nylon pipe connects the outlet of the purge valve to the stub pipe on the plenum chamber via a short rubber hose.
The connector to the plenum chamber is a quick-release type, plastic 90° female elbow; the connection is covered by
a rubber seal which is held in position on the port stub pipe.
A service port is connected in line between the EVAP canister and the inlet side of the purge valve and is rated at 1
psi maximum regulated pressure. The service port must be mounted horizontally and is located close to the bulkhead
at the rear of the engine bay. The service point is used by dealers for pressure testing using specialist nitrogen test
equipment for localising the source of small leaks.
The purge valve has a plastic housing, and a directional arrow is moulded onto the side of the casing to indicate the
direction of flow. The head of the arrow points to the outlet side of the valve which connects to the plenum chamber.
Purge valve operation is controlled by the engine control module (ECM). The purge valve has a two-pin electrical
connector which links to the ECM via the engine harness. Pin-1 of the connector is the power supply source from fuse
2 in the engine compartment fusebox, and pin-2 of the connector is the switched earth from the ECM (pulse width
modulated (PWM) signal) which is used to control the purge valve operation time. Note that the harness connector
for the purge valve is black, and must not be confused with the connector for the Secondary Air Injection
vacuum solenoid valve which is grey.
When the purge valve is earthed by the ECM, the valve opens to allow hydrocarbons stored in the EVAP canister to
be purged to the engine inlet manifold for combustion.