dimensions LAND ROVER DISCOVERY 2002 User Guide
[x] Cancel search | Manufacturer: LAND ROVER, Model Year: 2002, Model line: DISCOVERY, Model: LAND ROVER DISCOVERY 2002Pages: 1672, PDF Size: 46.1 MB
Page 311 of 1672
ENGINE - V8
12-2-68 OVERHAUL
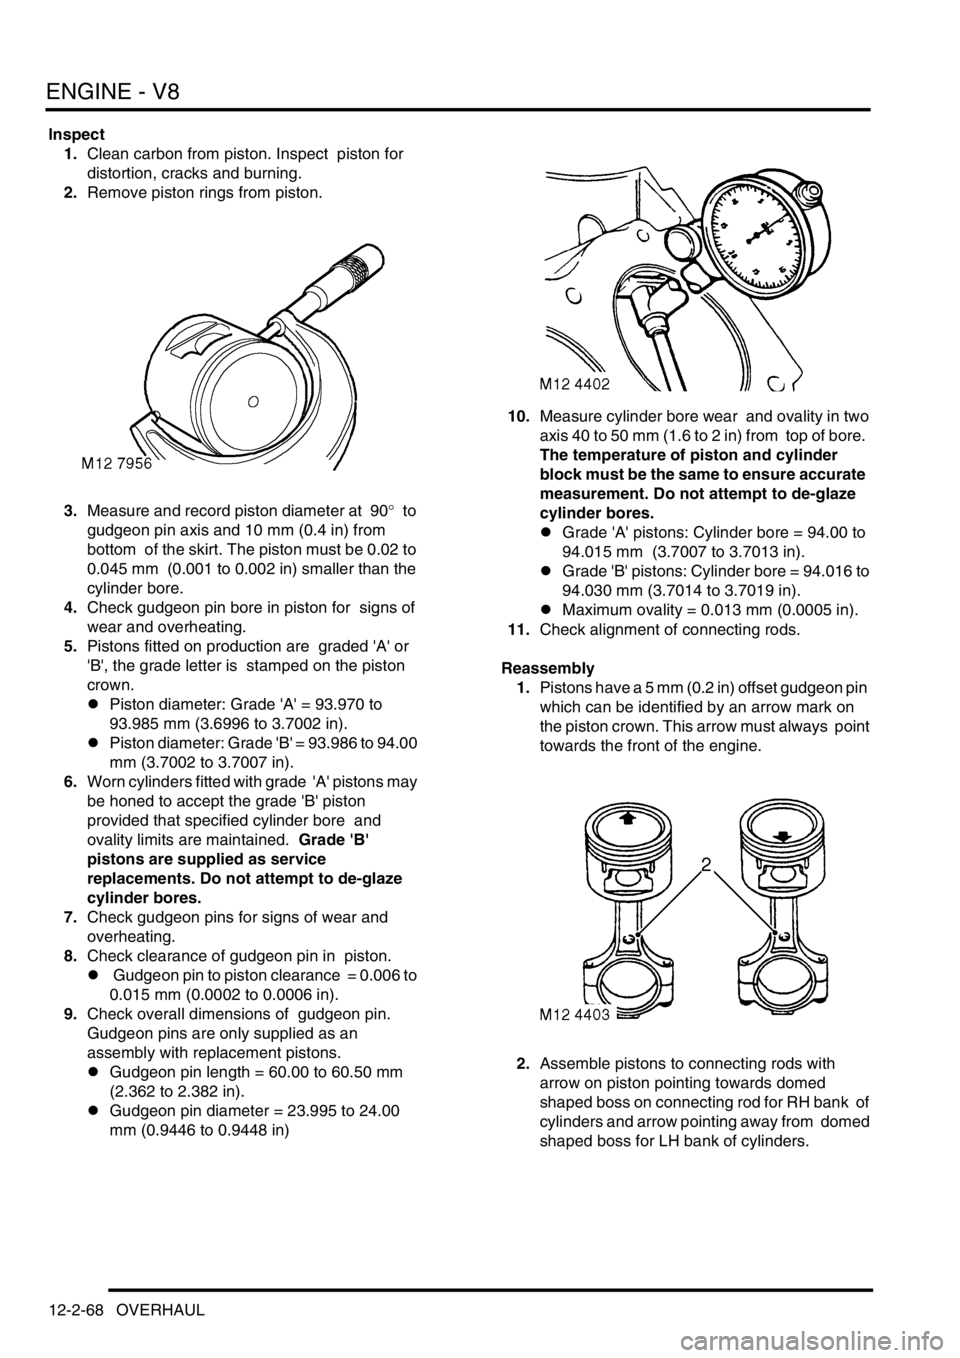
Inspect
1.Clean carbon from piston. Inspect piston for
distortion, cracks and burning.
2.Remove piston rings from piston.
3.Measure and record piston diameter at 90
° to
gudgeon pin axis and 10 mm (0.4 in) from
bottom of the skirt. The piston must be 0.02 to
0.045 mm (0.001 to 0.002 in) smaller than the
cylinder bore.
4.Check gudgeon pin bore in piston for signs of
wear and overheating.
5.Pistons fitted on production are graded 'A' or
'B', the grade letter is stamped on the piston
crown.
lPiston diameter: Grade 'A' = 93.970 to
93.985 mm (3.6996 to 3.7002 in).
lPiston diameter: Grade 'B' = 93.986 to 94.00
mm (3.7002 to 3.7007 in).
6.Worn cylinders fitted with grade 'A' pistons may
be honed to accept the grade 'B' piston
provided that specified cylinder bore and
ovality limits are maintained. Grade 'B'
pistons are supplied as service
replacements. Do not attempt to de-glaze
cylinder bores.
7.Check gudgeon pins for signs of wear and
overheating.
8.Check clearance of gudgeon pin in piston.
l Gudgeon pin to piston clearance = 0.006 to
0.015 mm (0.0002 to 0.0006 in).
9.Check overall dimensions of gudgeon pin.
Gudgeon pins are only supplied as an
assembly with replacement pistons.
lGudgeon pin length = 60.00 to 60.50 mm
(2.362 to 2.382 in).
lGudgeon pin diameter = 23.995 to 24.00
mm (0.9446 to 0.9448 in)10.Measure cylinder bore wear and ovality in two
axis 40 to 50 mm (1.6 to 2 in) from top of bore.
The temperature of piston and cylinder
block must be the same to ensure accurate
measurement. Do not attempt to de-glaze
cylinder bores.
lGrade 'A' pistons: Cylinder bore = 94.00 to
94.015 mm (3.7007 to 3.7013 in).
lGrade 'B' pistons: Cylinder bore = 94.016 to
94.030 mm (3.7014 to 3.7019 in).
lMaximum ovality = 0.013 mm (0.0005 in).
11.Check alignment of connecting rods.
Reassembly
1.Pistons have a 5 mm (0.2 in) offset gudgeon pin
which can be identified by an arrow mark on
the piston crown. This arrow must always point
towards the front of the engine.
2.Assemble pistons to connecting rods with
arrow on piston pointing towards domed
shaped boss on connecting rod for RH bank of
cylinders and arrow pointing away from domed
shaped boss for LH bank of cylinders.
Page 1201 of 1672
SEATS
76-5-16 REPAIRS
8.Release pretensioner multiplug from seat
frame and disconnect.
9. Electrically operated seats: Disconnect 2
seat motor multiplugs.
10.Remove front seat.
Refit
1.Fit front seat in vehicle.
2. Electrically operated seats: Connect seat
motor multiplugs.
3.Connect pretensioner multiplug and secure to
seat frame.
4.Fit Torx bolts and nut securing front seat to floor
and tighten to 45 Nm (33 lbf.ft).
5.Fit front seat belt lower anchorage bolt to front
seat and tighten to 32 Nm (24 lbf.ft).
6.Fit cap to lower anchorage bolt.
7.Fit lower trim casing to seat and secure with
screws and trim clip.
8.Connect battery earth lead.
Seat - third row
$% 78.10.45
Remove
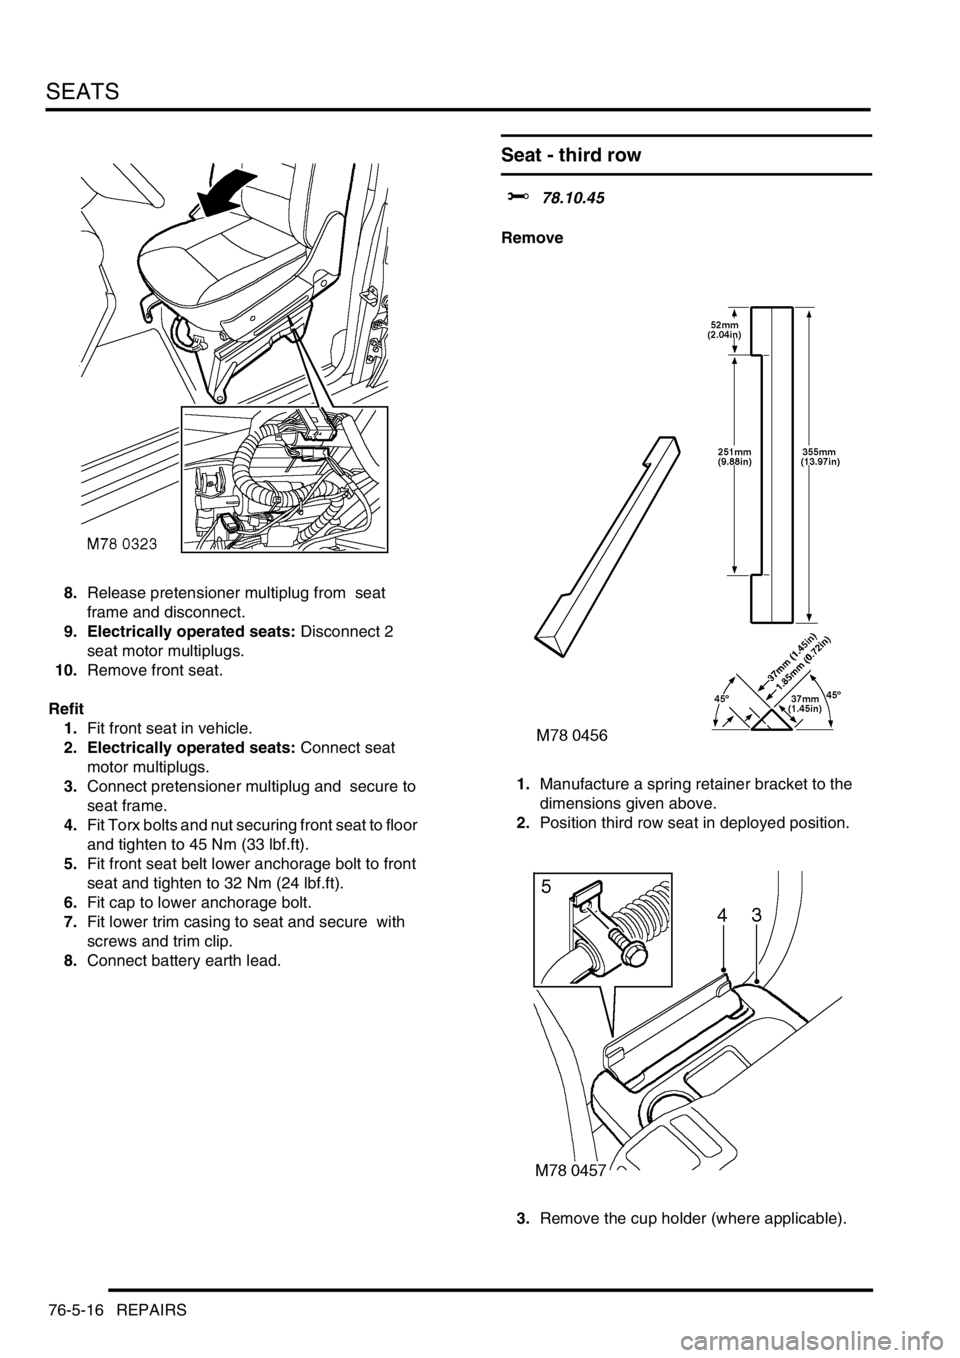
1.Manufacture a spring retainer bracket to the
dimensions given above.
2.Position third row seat in deployed position.
3.Remove the cup holder (where applicable).
Page 1234 of 1672
CHASSIS AND BODY DIMENSIONS
CHASSIS DIMENSIONS 77-1-1
CHASSIS AND BODY DIMENSIONS CHASSIS DIMENSIONS
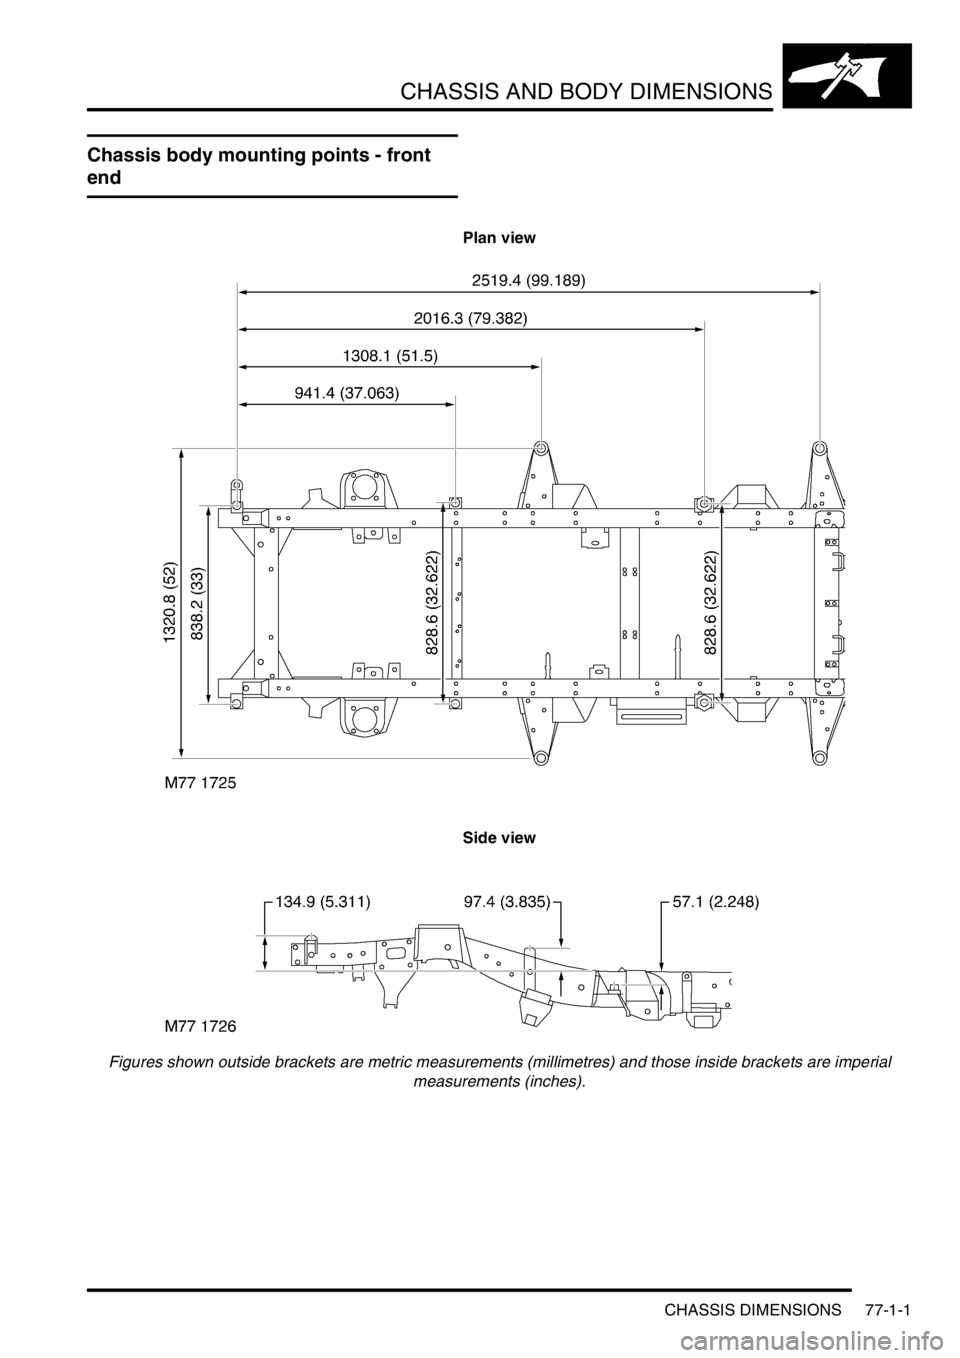
Chassis body mounting points - front
end
Plan view
Side view
Figures shown outside brackets are metric measurements (millimetres) and those inside brackets are imperial
measurements (inches).
Page 1235 of 1672
CHASSIS AND BODY DIMENSIONS
77-1-2 CHASSIS DIMENSIONS
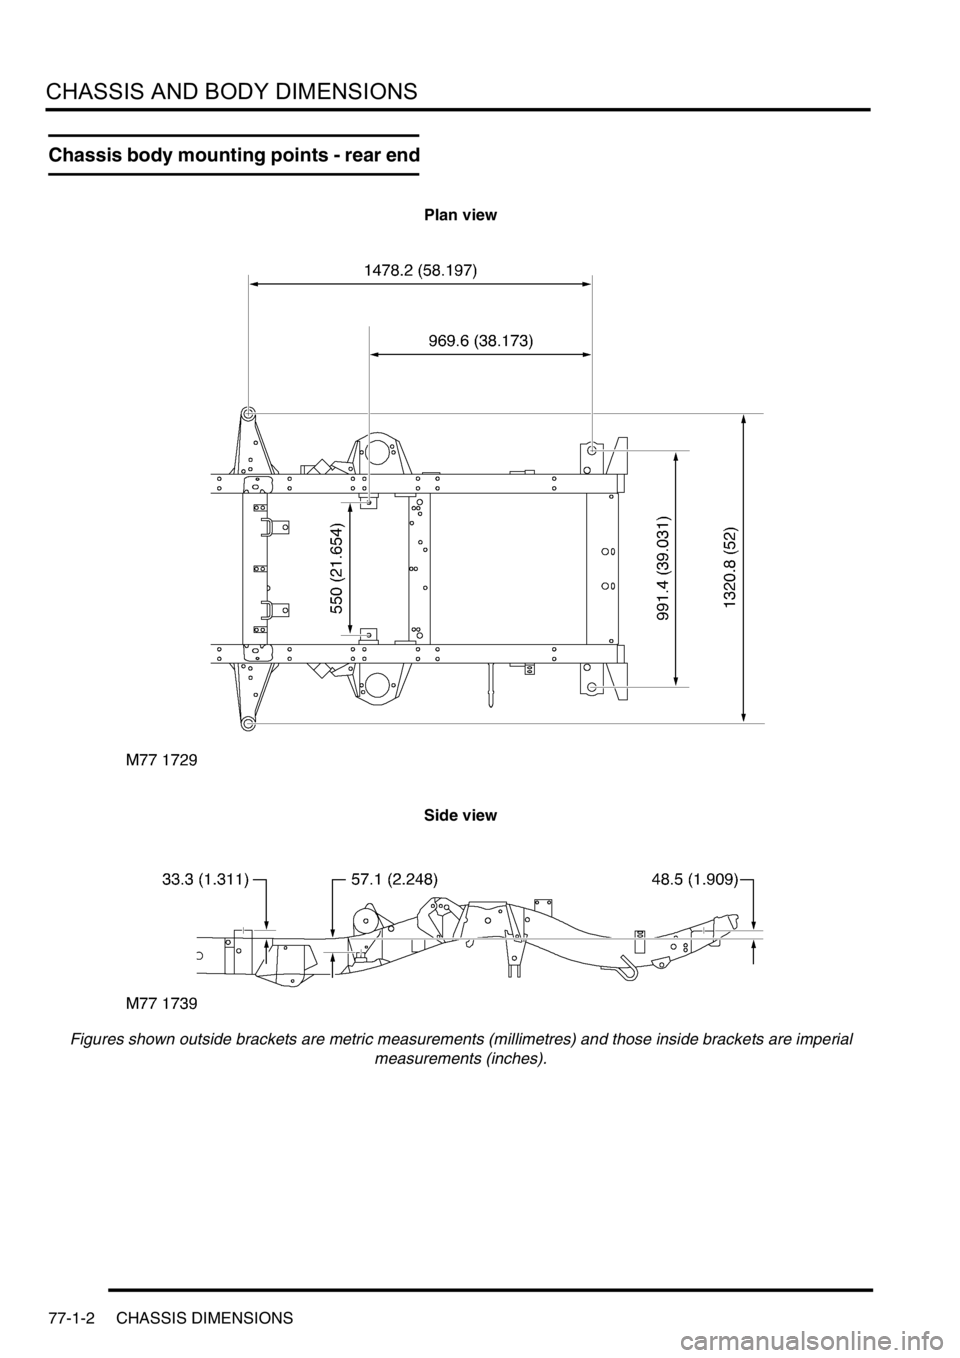
Chassis body mounting points - rear end
Plan view
Side view
Figures shown outside brackets are metric measurements (millimetres) and those inside brackets are imperial
measurements (inches).
Page 1236 of 1672
CHASSIS AND BODY DIMENSIONS
CHASSIS DIMENSIONS 77-1-3
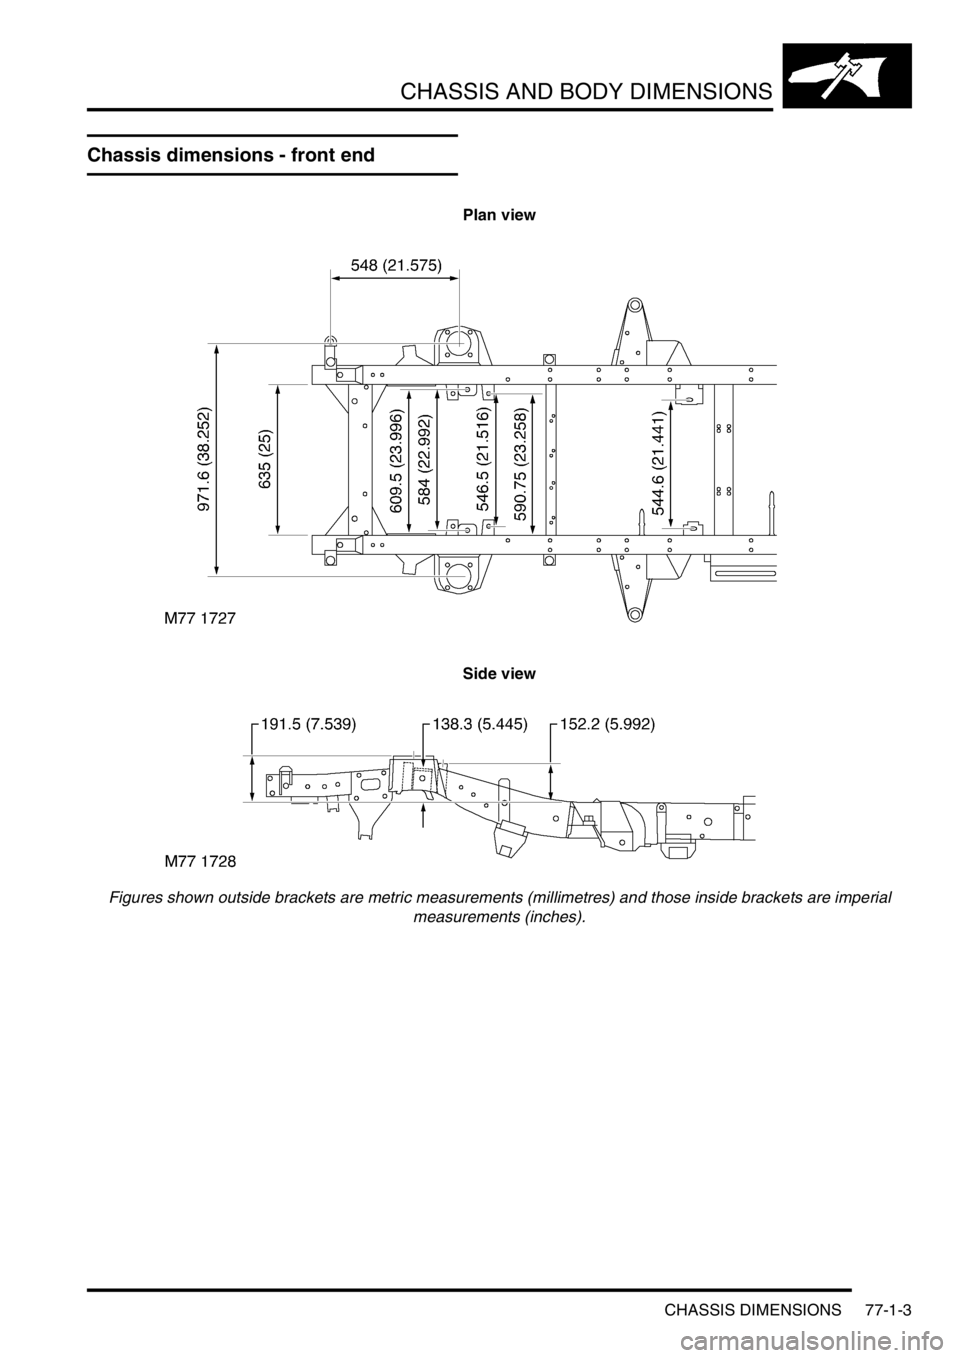
Chassis dimensions - front end
Plan view
Side view
Figures shown outside brackets are metric measurements (millimetres) and those inside brackets are imperial
measurements (inches).
Page 1237 of 1672
CHASSIS AND BODY DIMENSIONS
77-1-4 CHASSIS DIMENSIONS
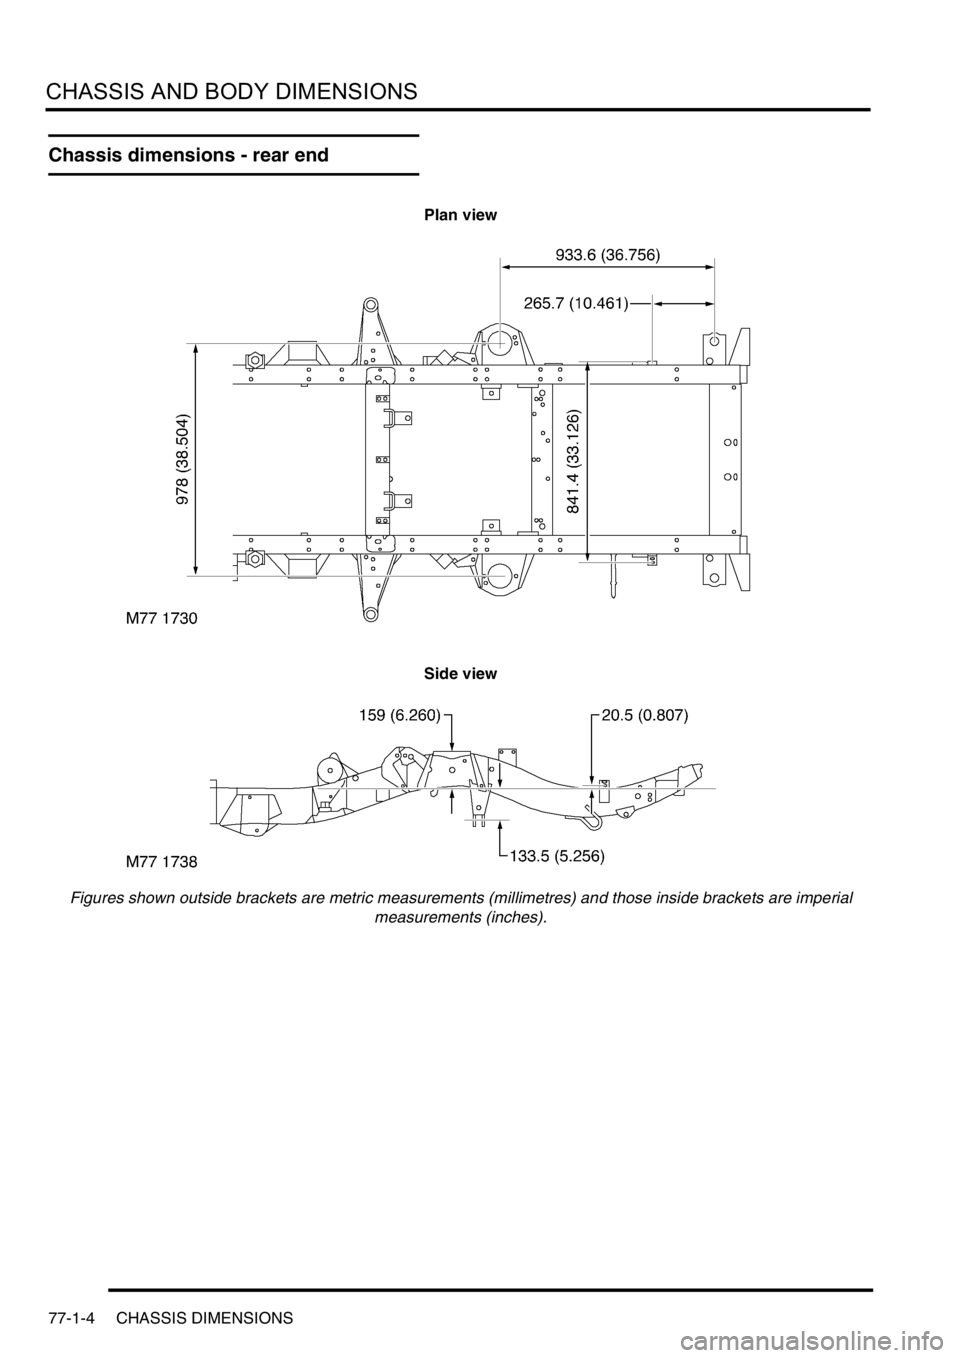
Chassis dimensions - rear end
Plan view
Side view
Figures shown outside brackets are metric measurements (millimetres) and those inside brackets are imperial
measurements (inches).
Page 1238 of 1672
CHASSIS AND BODY DIMENSIONS
BODY DIMENSIONS 77-1-5
BODY DIMENSIONS
Body Dimensions
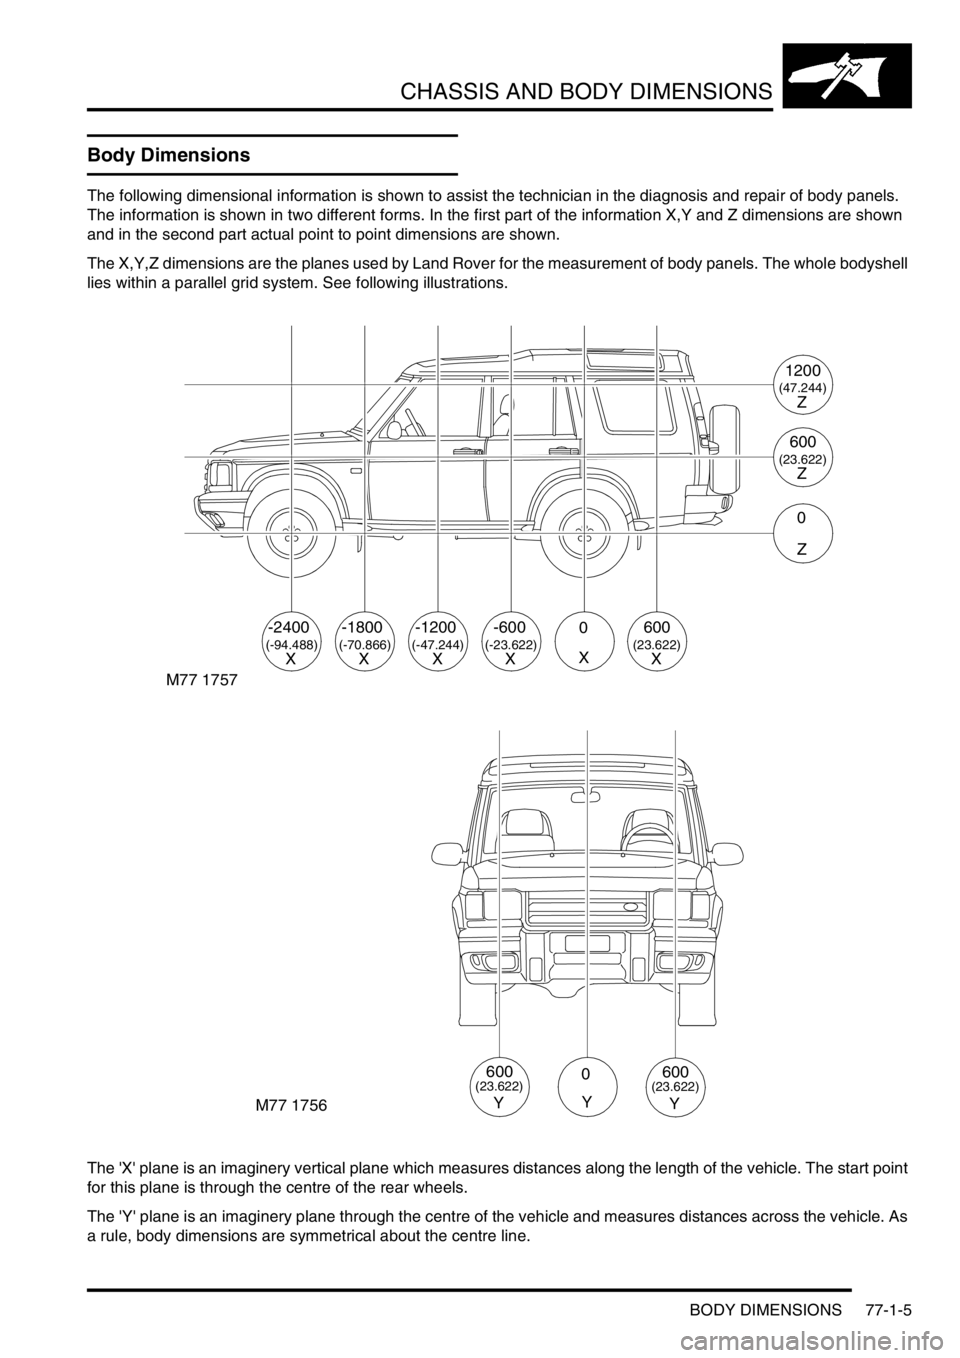
The following dimensional information is shown to assist the technician in the diagnosis and repair of body panels.
The information is shown in two different forms. In the first part of the information X,Y and Z dimensions are shown
and in the second part actual point to point dimensions are shown.
The X,Y,Z dimensions are the planes used by Land Rover for the measurement of body panels. The whole bodyshell
lies within a parallel grid system. See following illustrations.
The 'X' plane is an imaginery vertical plane which measures distances along the length of the vehicle. The start point
for this plane is through the centre of the rear wheels.
The 'Y' plane is an imaginery plane through the centre of the vehicle and measures distances across the vehicle. As
a rule, body dimensions are symmetrical about the centre line.
M77 1757
-2400
(-94.488)X
-1800
(-70.866)
-1200-6000600
(-47.244)(-23.622)(23.622)XXXXX
1200
(47.244)Z
600
(23.622)Z
0
Z
M77 1756
0
Y
600(23.622)
Y
600(23.622)
Y
Page 1239 of 1672
CHASSIS AND BODY DIMENSIONS
77-1-6 BODY DIMENSIONS
The 'Z' plane is an imaginery horizontal plane which measures distances in height of the vehicle. The start point for
this plane is through the centre of the rear wheels.
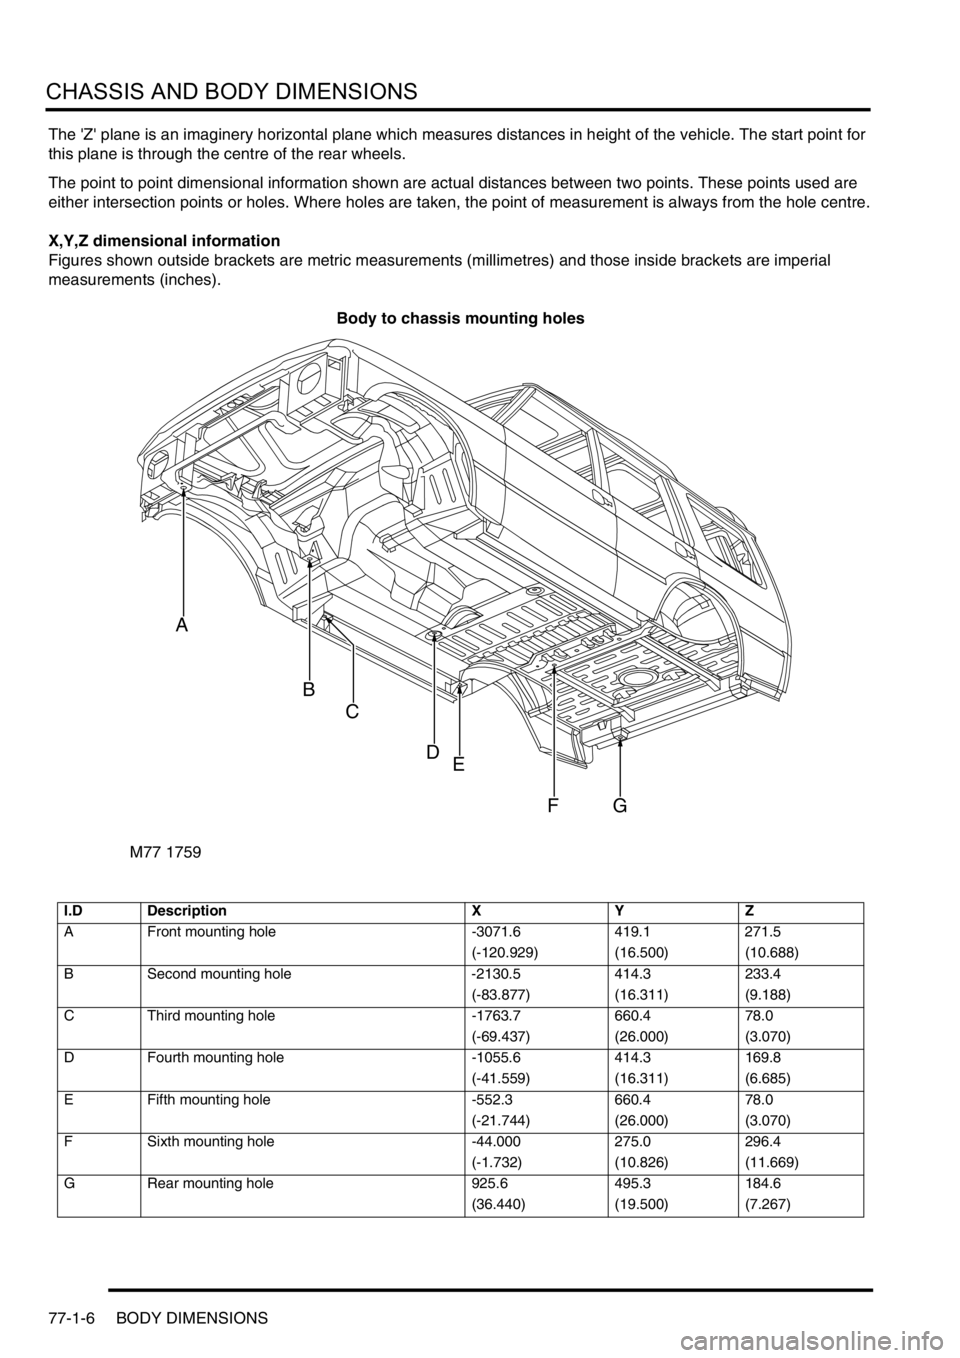
The point to point dimensional information shown are actual distances between two points. These points used are
either intersection points or holes. Where holes are taken, the point of measurement is always from the hole centre.
X,Y,Z dimensional information
Figures shown outside brackets are metric measurements (millimetres) and those inside brackets are imperial
measurements (inches).
Body to chassis mounting holes
I.D Description X Y Z
A Front mounting hole -3071.6 419.1 271.5
(-120.929) (16.500) (10.688)
B Second mounting hole -2130.5 414.3 233.4
(-83.877) (16.311) (9.188)
C Third mounting hole -1763.7 660.4 78.0
(-69.437) (26.000) (3.070)
D Fourth mounting hole -1055.6 414.3 169.8
(-41.559) (16.311) (6.685)
E Fifth mounting hole -552.3 660.4 78.0
(-21.744) (26.000) (3.070)
F Sixth mounting hole -44.000 275.0 296.4
(-1.732) (10.826) (11.669)
G Rear mounting hole 925.6 495.3 184.6
(36.440) (19.500) (7.267)
M77 1759
A
B
C
DE
FG
Page 1240 of 1672
CHASSIS AND BODY DIMENSIONS
BODY DIMENSIONS 77-1-7
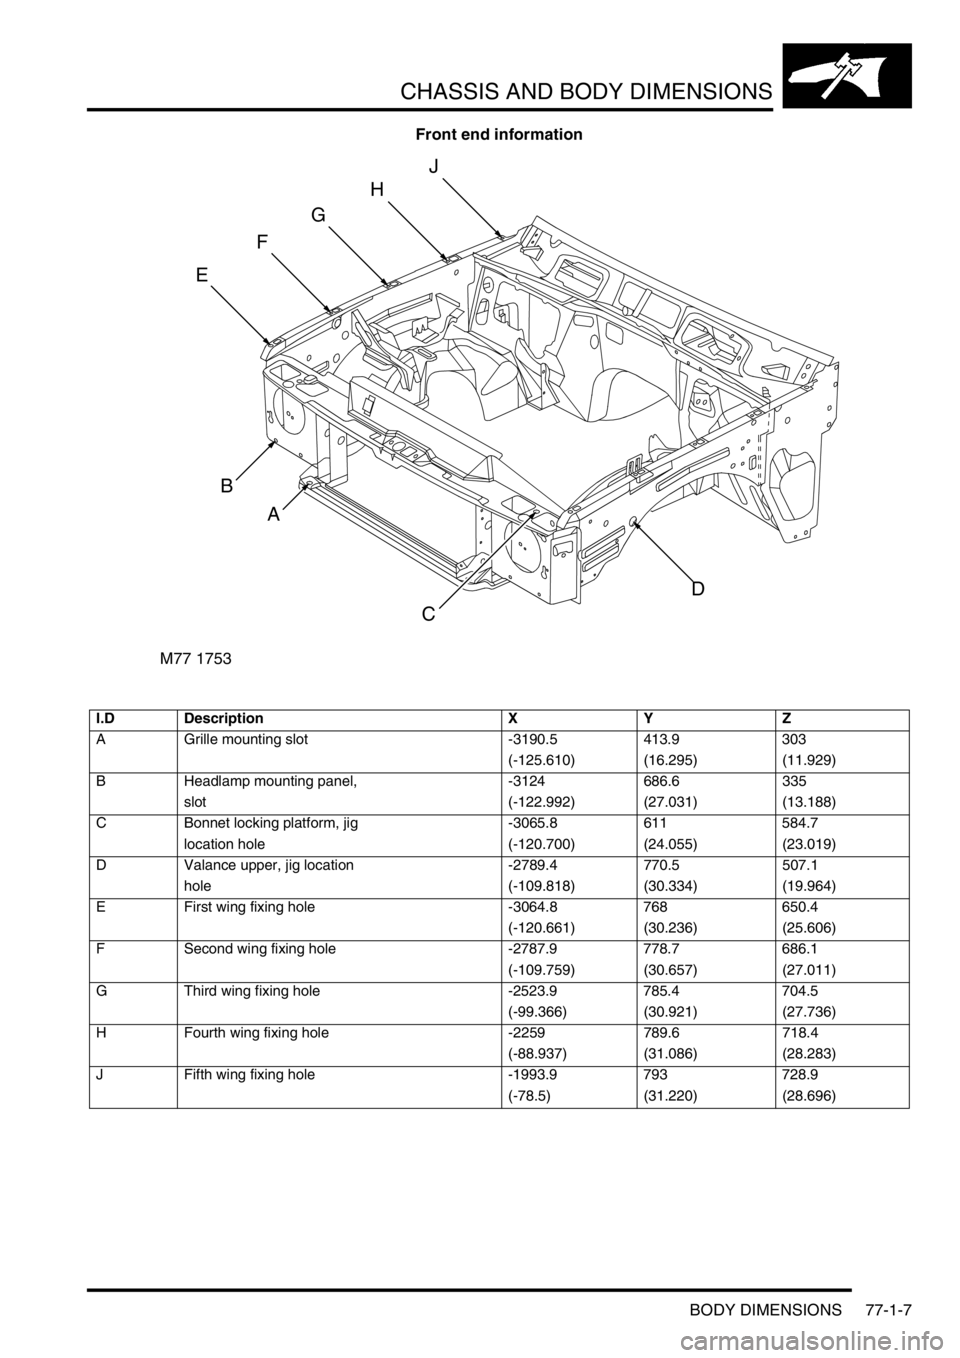
Front end information
I.D Description X Y Z
A Grille mounting slot -3190.5 413.9 303
(-125.610) (16.295) (11.929)
B Headlamp mounting panel, -3124 686.6 335
slot (-122.992) (27.031) (13.188)
C Bonnet locking platform, jig -3065.8 611 584.7
location hole (-120.700) (24.055) (23.019)
D Valance upper, jig location -2789.4 770.5 507.1
hole (-109.818) (30.334) (19.964)
E First wing fixing hole -3064.8 768 650.4
(-120.661) (30.236) (25.606)
F Second wing fixing hole -2787.9 778.7 686.1
(-109.759) (30.657) (27.011)
G Third wing fixing hole -2523.9 785.4 704.5
(-99.366) (30.921) (27.736)
H Fourth wing fixing hole -2259 789.6 718.4
(-88.937) (31.086) (28.283)
J Fifth wing fixing hole -1993.9 793 728.9
(-78.5) (31.220) (28.696)
M77 1753
B
C
D
E
F
G
H
J
A
Page 1241 of 1672
CHASSIS AND BODY DIMENSIONS
77-1-8 BODY DIMENSIONS
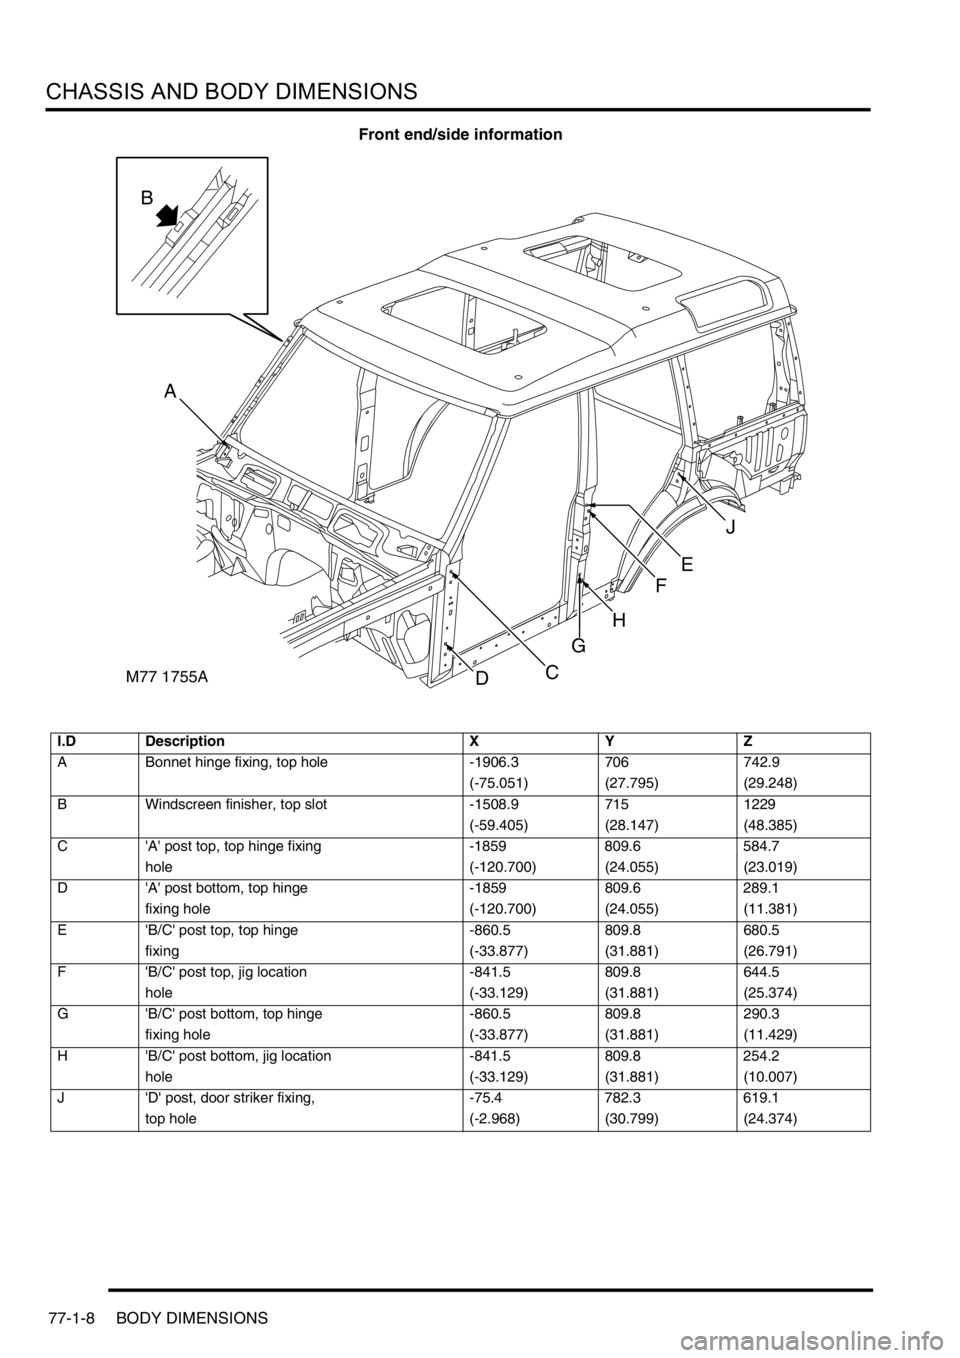
Front end/side information
I.D Description X Y Z
A Bonnet hinge fixing, top hole -1906.3 706 742.9
(-75.051) (27.795) (29.248)
B Windscreen finisher, top slot -1508.9 715 1229
(-59.405) (28.147) (48.385)
C 'A' post top, top hinge fixing -1859 809.6 584.7
hole (-120.700) (24.055) (23.019)
D 'A' post bottom, top hinge -1859 809.6 289.1
fixing hole (-120.700) (24.055) (11.381)
E 'B/C' post top, top hinge -860.5 809.8 680.5
fixing (-33.877) (31.881) (26.791)
F 'B/C' post top, jig location -841.5 809.8 644.5
hole (-33.129) (31.881) (25.374)
G 'B/C' post bottom, top hinge -860.5 809.8 290.3
fixing hole (-33.877) (31.881) (11.429)
H 'B/C' post bottom, jig location -841.5 809.8 254.2
hole (-33.129) (31.881) (10.007)
J 'D' post, door striker fixing, -75.4 782.3 619.1
top hole (-2.968) (30.799) (24.374)
M77 1755A
B
C
H
F
D
J
A
E
G