USB Lexus CT200h 2012 Navigation Manual (in English)
[x] Cancel search | Manufacturer: LEXUS, Model Year: 2012, Model line: CT200h, Model: Lexus CT200h 2012Pages: 436, PDF Size: 28.25 MB
Page 150 of 436
150
3. MEMORY POINTS
CT200h_Navi_OM76078E_(EE)
14.02.06 12:29
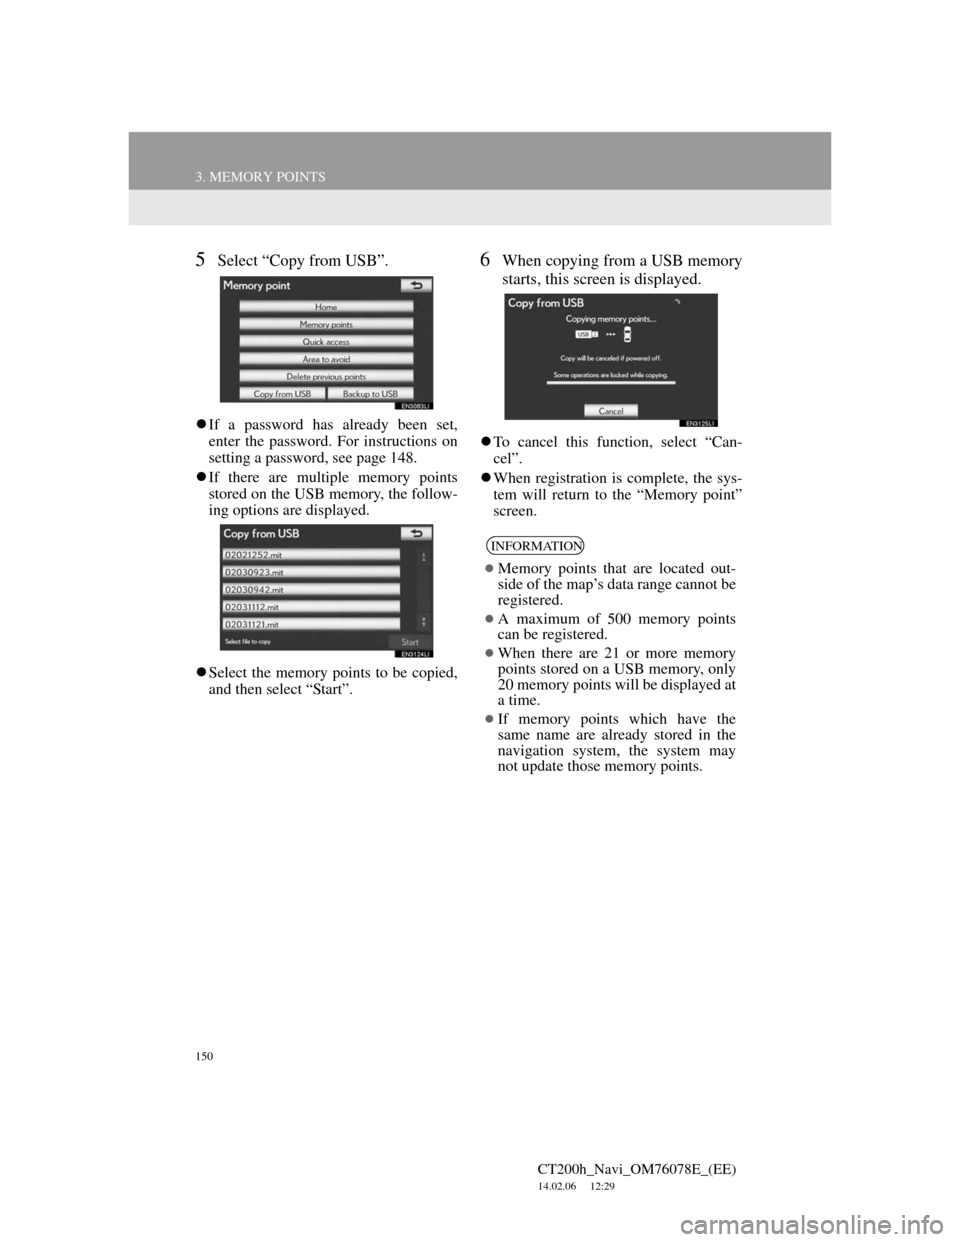
5Select “Copy from USB”.
If a password has already been set,
enter the password. For instructions on
setting a password, see page 148.
If there are multiple memory points
stored on the USB memory, the follow-
ing options are displayed.
Select the memory points to be copied,
and then select “Start”.
6When copying from a USB memory
starts, this screen is displayed.
To cancel this function, select “Can-
cel”.
When registration is complete, the sys-
tem will return to the “Memory point”
screen.
INFORMATION
Memory points that are located out-
side of the map’s data range cannot be
registered.
A maximum of 500 memory points
can be registered.
When there are 21 or more memory
points stored on a USB memory, only
20 memory points will be displayed at
a time.
If memory points which have the
same name are already stored in the
navigation system, the system may
not update those memory points.
Page 230 of 436
230
CT200h_Navi_OM76078E_(EE)
14.02.06 12:30
1. QUICK REFERENCE..................... 232
2. SOME BASICS ............................... 234
SPEECH COMMAND SYSTEM .......... 234
TURNING THE SYSTEM
ON AND OFF...................................... 235
SWITCHING BETWEEN
FUNCTIONS ....................................... 235
SELECTING SCREEN SIZE................. 236
DVD PLAYER ....................................... 237
AUX PORT ............................................ 238
USB PORT ............................................. 239
PORTABLE AUDIO DEVICE
HOLDER ............................................. 239
3. RADIO OPERATION ..................... 240
LISTENING TO THE RADIO .............. 240
PRESETTING A STATION .................. 241
SELECTING A STATION .................... 241
RDS (RADIO DATA SYSTEM) ........... 242
LISTENING TO THE DAB................... 243
1AUDIO/VIDEO SYSTEM
OPERATION
Page 231 of 436
5
231
1
2
3
4
5
6
7
CT200h_Navi_OM76078E_(EE)
14.02.06 12:30
8
9
10
4. DVD PLAYER OPERATION ......... 246
INSERTING A DISC ............................. 246
EJECTING A DISC ............................... 246
PLAYING A DISC ................................ 247
PLAYING AN AUDIO DISC............... 247
PLAYING AN MP3/WMA DISC ......... 250
OPERATING A DVD DISC ................. 254
PLAYING A DVD DISC....................... 255
DVD OPTIONS ..................................... 257
IF THE PLAYER MALFUNCTIONS... 265
DVD PLAYER AND DVD VIDEO
DISC INFORMATION ....................... 266
5. USB MEMORY OPERATION ....... 268
CONNECTING A USB MEMORY ...... 268
PLAYING A USB MEMORY............... 269
6. iPod OPERATION........................... 274
CONNECTING iPod ............................. 274
PLAYING iPod ...................................... 275
7. Bluetooth® AUDIO
OPERATION................................. 279
CONNECTING A Bluetooth®
AUDIO PLAYER ................................ 281
PLAYING Bluetooth
® AUDIO ............. 283
8. AUDIO/VIDEO REMOTE
CONTROLS
(STEERING SWITCHES) ............ 288
9. AUDIO/VIDEO SYSTEM
OPERATING HINTS ................... 290
RADIO RECEPTION ............................. 290
iPod ......................................................... 291
USB MEMORY...................................... 292
CARING FOR YOUR DVD PLAYER
AND DISC ........................................... 292
MP3/WMA FILES.................................. 295
CD-R AND CD-RW DISCS................... 297
TERMS ................................................... 297
1. AUDIO SETTINGS ........................ 299
AUDIO SETTINGS................................ 299
SOUND SETTINGS ............................... 300
RADIO SETTINGS ................................ 302
iPod SETTINGS ..................................... 303
2SETUP
For vehicles sold outside Europe, some of the functions cannot be operated while
AUDIO/VIDEO SYSTEM
Page 235 of 436
235
1. AUDIO/VIDEO SYSTEM OPERATION
5
AUDIO/VIDEO SYSTEM
CT200h_Navi_OM76078E_(EE)
14.02.06 12:30
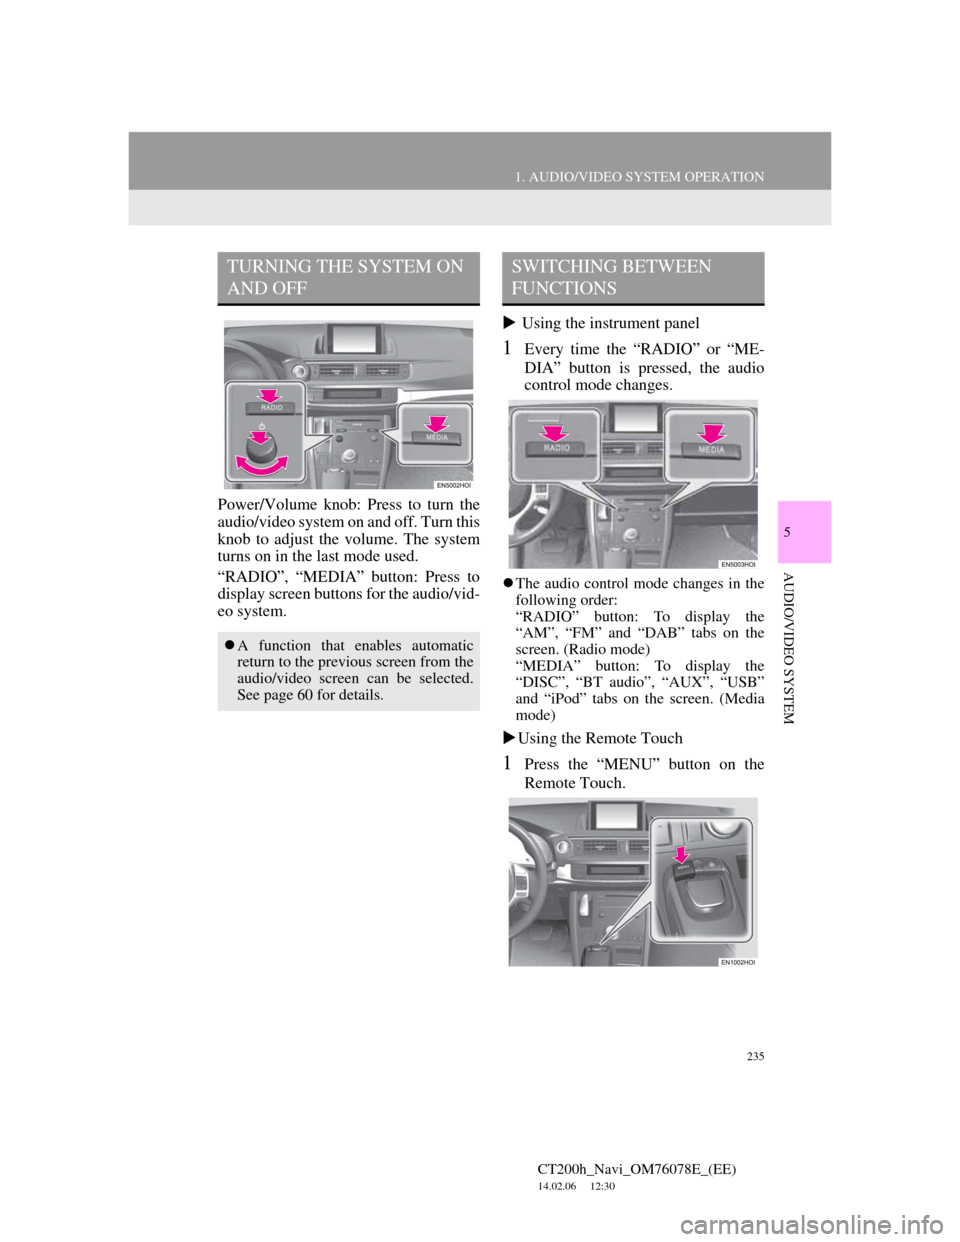
Power/Volume knob: Press to turn the
audio/video system on and off. Turn this
knob to adjust the volume. The system
turns on in the last mode used.
“RADIO”, “MEDIA” button: Press to
display screen buttons for the audio/vid-
eo system. Using the instrument panel
1Every time the “RADIO” or “ME-
DIA” button is pressed, the audio
control mode changes.
The audio control mode changes in the
following order:
“RADIO” button: To display the
“AM”, “FM” and “DAB” tabs on the
screen. (Radio mode)
“MEDIA” button: To display the
“DISC”, “BT audio”, “AUX”, “USB”
and “iPod” tabs on the screen. (Media
mode)
Using the Remote Touch
1Press the “MENU” button on the
Remote Touch.
TURNING THE SYSTEM ON
AND OFF
A function that enables automatic
return to the previous screen from the
audio/video screen can be selected.
See page 60 for details.
SWITCHING BETWEEN
FUNCTIONS
Page 239 of 436
239
1. AUDIO/VIDEO SYSTEM OPERATION
5
AUDIO/VIDEO SYSTEM
CT200h_Navi_OM76078E_(EE)
14.02.06 12:30
1Press the “MEDIA” button to
display the media control screen and
select the “USB” or “iPod” tab or
press the “MEDIA” button
repeatedly to change to USB
memory or iPod mode.
For the Remote Touch operation
method, see “SWITCHING
BETWEEN FUNCTIONS” on page
235.
USB PORT
A USB memory/iPod can be con-
nected to the USB port. For details,
see “CONNECTING A USB MEM-
ORY” on page 268 and “CON-
NECTING iPod” on page 274.
INFORMATION
When a USB memory/iPod is not
connected with the USB port, the tab
will be dimmed.
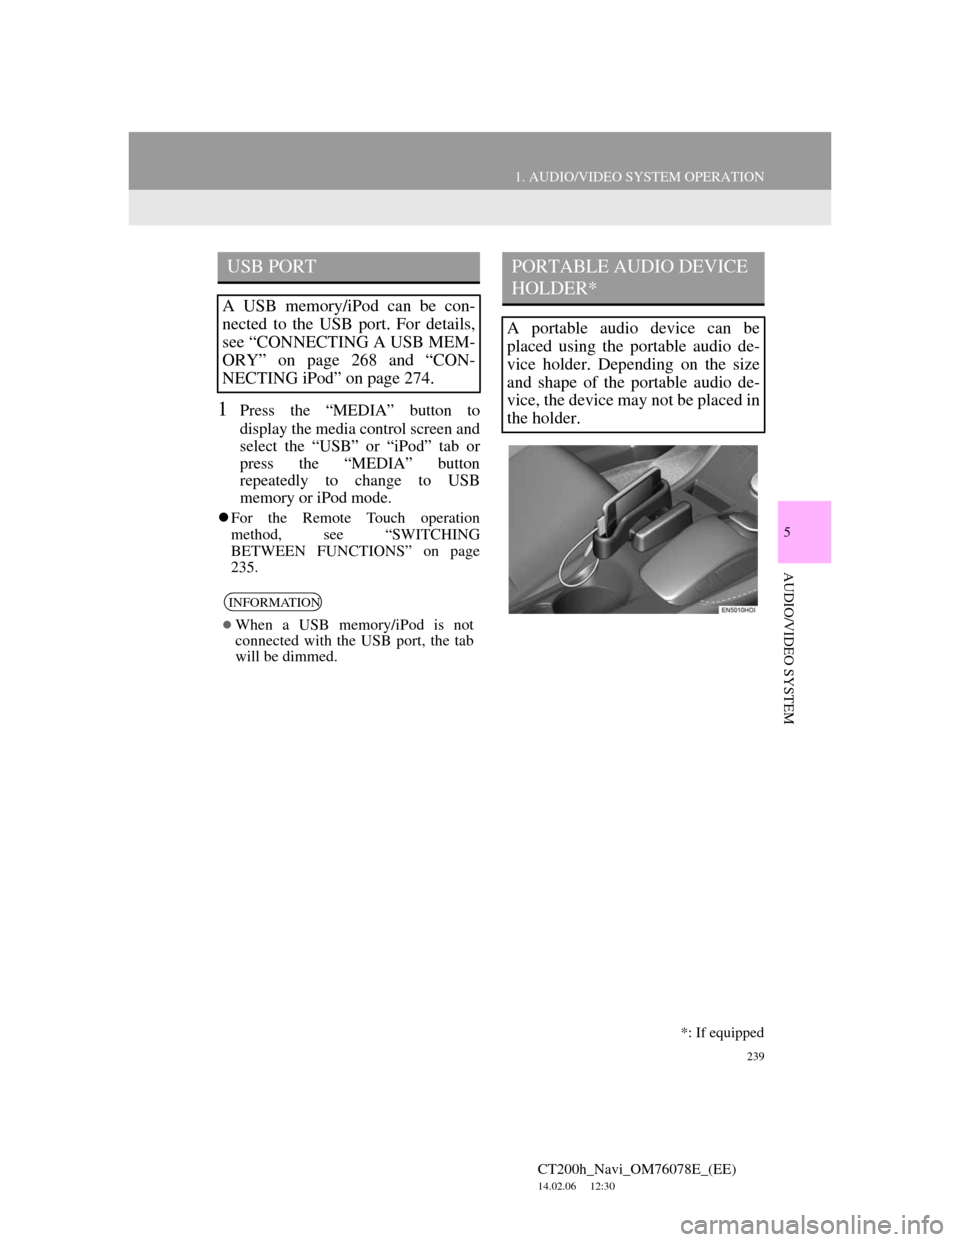
PORTABLE AUDIO DEVICE
HOLDER*
A portable audio device can be
placed using the portable audio de-
vice holder. Depending on the size
and shape of the portable audio de-
vice, the device may not be placed in
the holder.
*: If equipped
Page 268 of 436
268
1. AUDIO/VIDEO SYSTEM OPERATION
CT200h_Navi_OM76078E_(EE)
14.02.06 12:30
5. USB MEMORY OPERATION
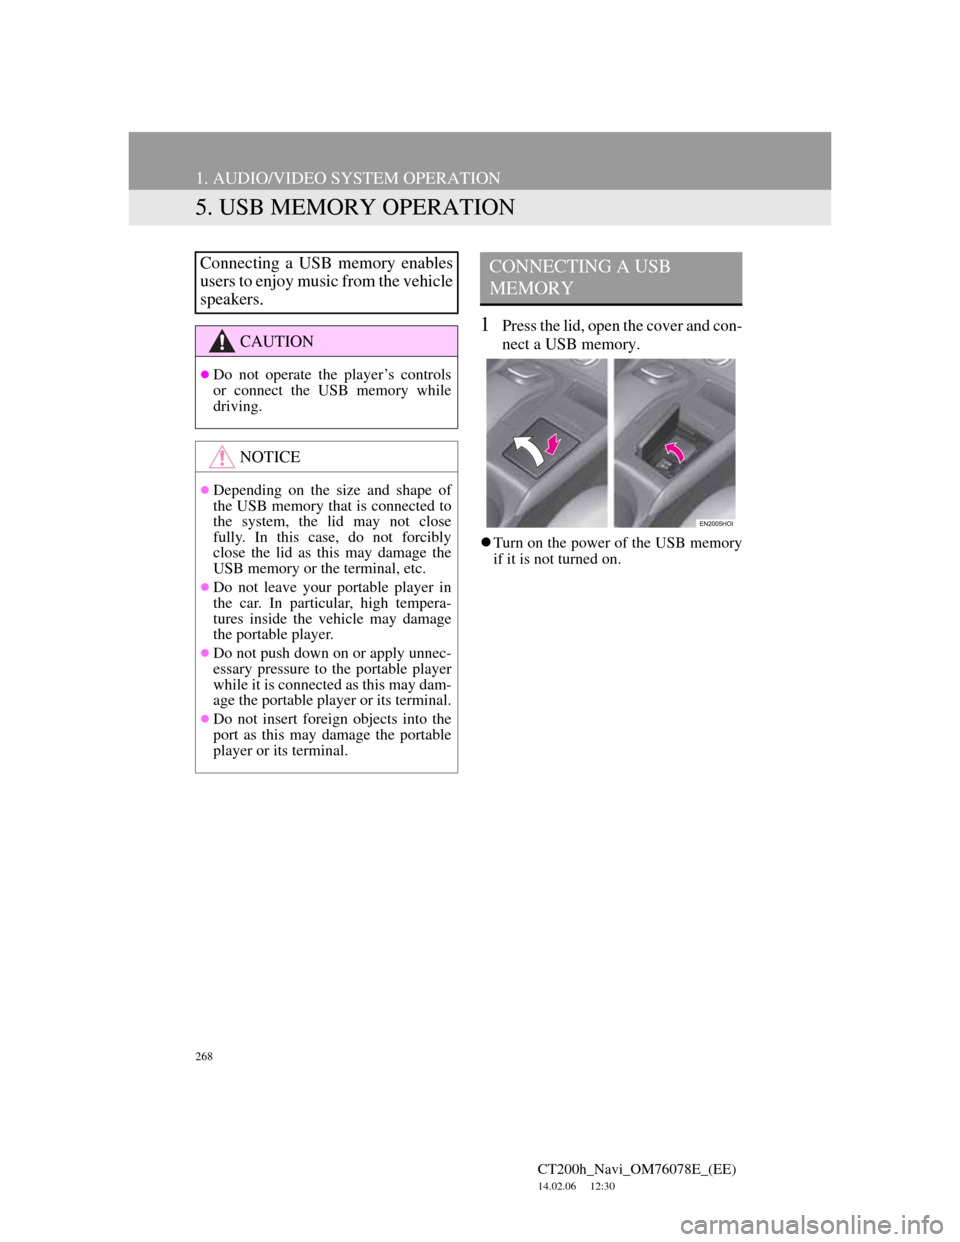
1Press the lid, open the cover and con-
nect a USB memory.
Turn on the power of the USB memory
if it is not turned on.
Connecting a USB memory enables
users to enjoy music from the vehicle
speakers.
CAUTION
Do not operate the player’s controls
or connect the USB memory while
driving.
NOTICE
Depending on the size and shape of
the USB memory that is connected to
the system, the lid may not close
fully. In this case, do not forcibly
close the lid as this may damage the
USB memory or the terminal, etc.
Do not leave your portable player in
the car. In particular, high tempera-
tures inside the vehicle may damage
the portable player.
Do not push down on or apply unnec-
essary pressure to the portable player
while it is connected as this may dam-
age the portable player or its terminal.
Do not insert foreign objects into the
port as this may damage the portable
player or its terminal.
CONNECTING A USB
MEMORY
Page 269 of 436

269
1. AUDIO/VIDEO SYSTEM OPERATION
5
AUDIO/VIDEO SYSTEM
CT200h_Navi_OM76078E_(EE)
14.02.06 12:30
1Press the “MEDIA” button if a USB
memory has already been connected.
2Select the “USB” tab or press the
“MEDIA” button repeatedly until
the “USB” tab is selected.
For the Remote Touch operation
method, see “SWITCHING
BETWEEN FUNCTIONS” on page
235.
Tag modeFolder mode
: Select to start playing the music.
: Select to pause the music.
To start playing the music again, select
.
PLAYING A USB MEMORY
PLAYING AND PAUSING A
USB MEMORY
INFORMATION
If tag information exists, the file/
folder names will be changed to track/
album names.
INFORMATION
When the USB memory is connected
and the audio source is changed to
USB memory mode, the USB mem-
ory will start playing the first file in
the first folder. If the same device is
removed and reinserted (and the con-
tents have not been changed), the
USB memory will resume playing
from the same point it was last used.
Depending on the USB memory that
is connected to the system, certain
functions may not be available.
Page 270 of 436
270
1. AUDIO/VIDEO SYSTEM OPERATION
CT200h_Navi_OM76078E_(EE)
14.02.06 12:30
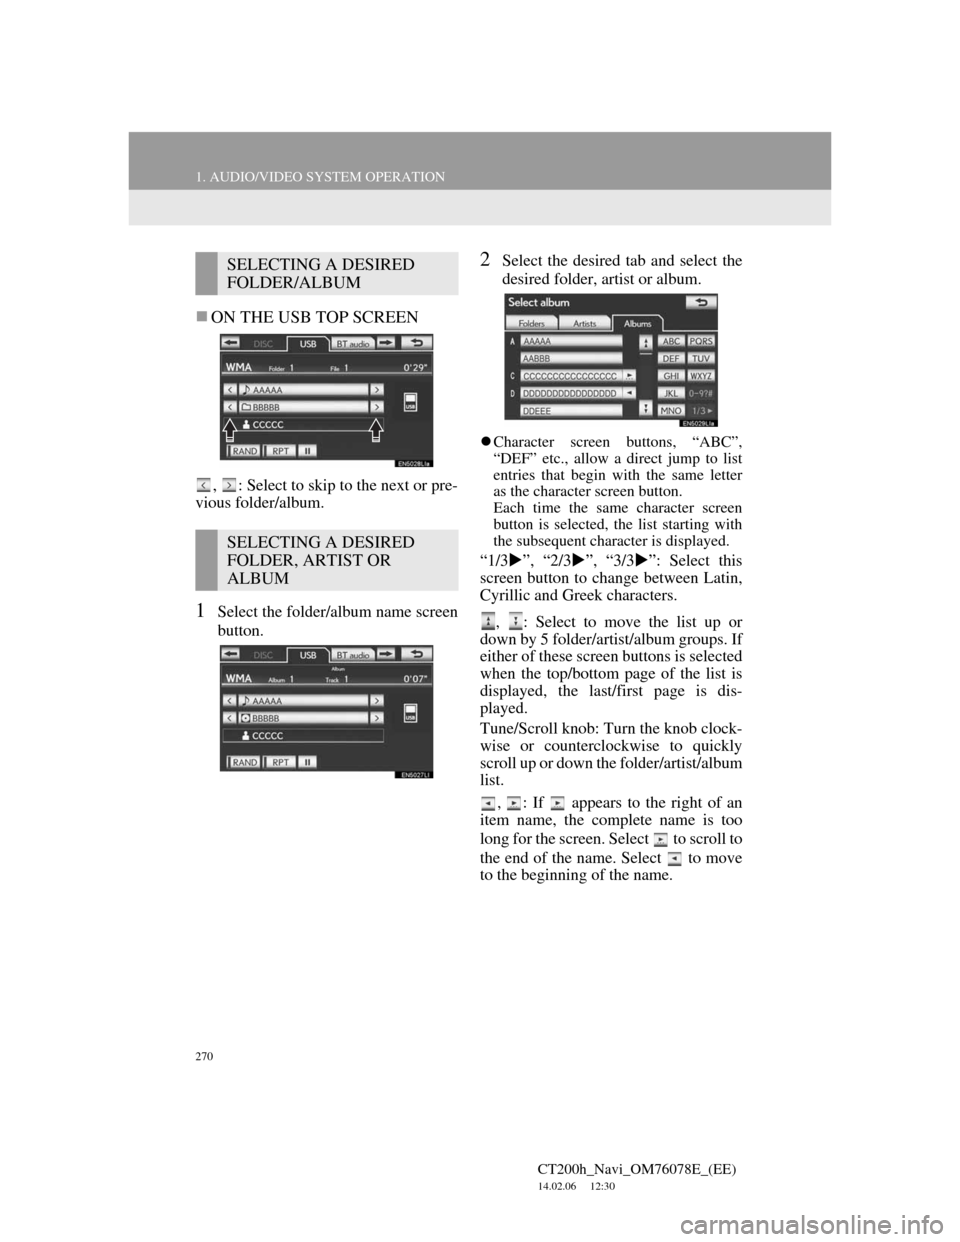
ON THE USB TOP SCREEN
, : Select to skip to the next or pre-
vious folder/album.
1Select the folder/album name screen
button.
2Select the desired tab and select the
desired folder, artist or album.
Character screen buttons, “ABC”,
“DEF” etc., allow a direct jump to list
entries that begin with the same letter
as the character screen button.
Each time the same character screen
button is selected, the list starting with
the subsequent character is displayed.
“1/3”, “2/3”, “3/3”: Select this
screen button to change between Latin,
Cyrillic and Greek characters.
, : Select to move the list up or
down by 5 folder/artist/album groups. If
either of these screen buttons is selected
when the top/bottom page of the list is
displayed, the last/first page is dis-
played.
Tune/Scroll knob: Turn the knob clock-
wise or counterclockwise to quickly
scroll up or down the folder/artist/album
list.
,
: If appears to the right of an
item name, the complete name is too
long for the screen. Select to scroll to
the end of the name. Select to move
to the beginning of the name.
SELECTING A DESIRED
FOLDER/ALBUM
SELECTING A DESIRED
FOLDER, ARTIST OR
ALBUM
Page 271 of 436
271
1. AUDIO/VIDEO SYSTEM OPERATION
5
AUDIO/VIDEO SYSTEM
CT200h_Navi_OM76078E_(EE)
14.02.06 12:30
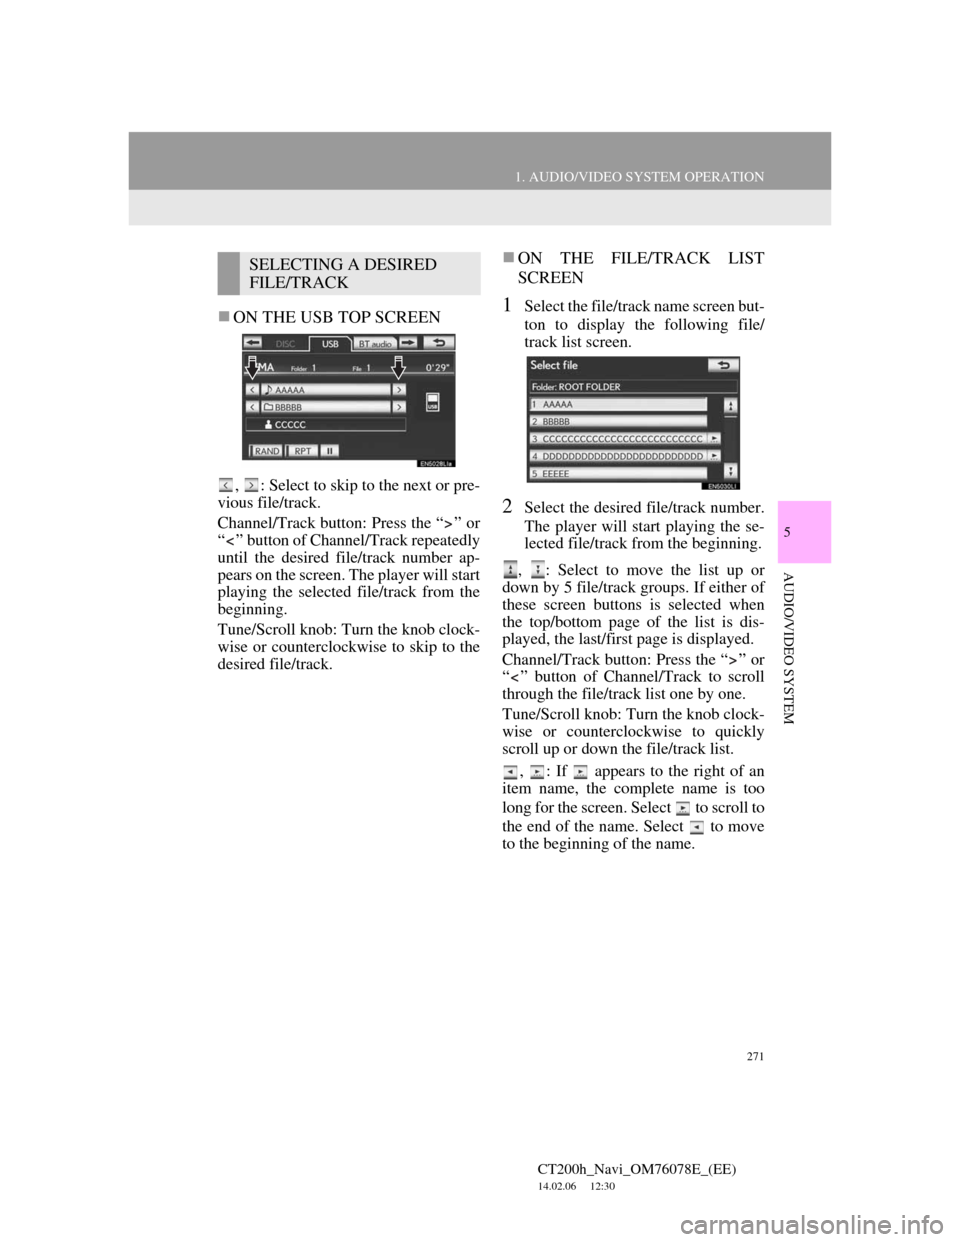
ON THE USB TOP SCREEN
, : Select to skip to the next or pre-
vious file/track.
Channel/Track button: Press the “ ” or
“ ” button of Channel/Track repeatedly
until the desired file/track number ap-
pears on the screen. The player will start
playing the selected file/track from the
beginning.
Tune/Scroll knob: Turn the knob clock-
wise or counterclockwise to skip to the
desired file/track.
ON THE FILE/TRACK LIST
SCREEN
1Select the file/track name screen but-
ton to display the following file/
track list screen.
2Select the desired file/track number.
The player will start playing the se-
lected file/track from the beginning.
, : Select to move the list up or
down by 5 file/track groups. If either of
these screen buttons is selected when
the top/bottom page of the list is dis-
played, the last/first page is displayed.
Channel/Track button: Press the “ ” or
“ ” button of Channel/Track to scroll
through the file/track list one by one.
Tune/Scroll knob: Turn the knob clock-
wise or counterclockwise to quickly
scroll up or down the file/track list.
, : If appears to the right of an
item name, the complete name is too
long for the screen. Select to scroll to
the end of the name. Select to move
to the beginning of the name.
SELECTING A DESIRED
FILE/TRACK
Page 289 of 436
289
1. AUDIO/VIDEO SYSTEM OPERATION
5
AUDIO/VIDEO SYSTEM
CT200h_Navi_OM76078E_(EE)
14.02.06 12:30
DVD player
Use the “ ” or “ ” switch to skip up or
down to a different track, file or chapter
in either direction.
To select a desired track, file or chapter:
Quickly press and release the “ ” or
“ ” switch until the desired track, file or
chapter to play is selected. To return to
the beginning of the current track, file or
chapter, press the “ ” switch once
quickly.
To select a desired folder: Press and
hold the “ ” or “ ” switch until a beep
is heard to change to the next or the pre-
vious folder. Repeat it until the desired
folder is selected.
Bluetooth
® audio player
Use the “ ” or “ ” switch to skip up or
down to a different track or album in
either direction.
To select a desired track: Quickly press
and release the “ ” or “ ” switch until
the desired track is selected. To return to
the beginning of the current track, press
the “ ” switch once quickly.
To select a desired album: Press and
hold the “ ” or “ ” switch until a beep
is heard to change to the next or the pre-
vious album. Repeat it until the desired
album is selected.USB memory/iPod
Use the “ ” or “ ” switch to skip up or
down to a different file, track, folder or
album in either direction.
To select a desired file or track: Press the
“ ” or “ ” switch until the desired file
or track is selected. To return to the be-
ginning of the current file or track, press
the “ ” switch once quickly.
To select a desired folder or album
(USB memory only): Press and hold the
“ ” or “ ” switch until a beep is heard
to change to the next or the previous
folder or album. Repeat it until the de-
sired folder or album is selected.
Volume control switch
Press the “+” side to increase the vol-
ume. The volume continues to increase
while the switch is being pressed.
Press the “-” side to decrease the vol-
ume. The volume continues to decrease
while the switch is being pressed.