steering wheel Lexus CT200h 2012 Navigation Manual (in English)
[x] Cancel search | Manufacturer: LEXUS, Model Year: 2012, Model line: CT200h, Model: Lexus CT200h 2012Pages: 436, PDF Size: 28.25 MB
Page 206 of 436
206
2. SETUP
CT200h_Navi_OM76078E_(EE)
14.02.06 12:30
THE “Speed dial” SCREEN CAN
ALSO BE DISPLAYED
From the “Speed dial” screen
1Press the “MENU” button on the
Remote Touch, then select
“Telephone”.
The “Telephone” screen can be dis-
played by pressing
on the steering
wheel.
2Select “Speed dials” on the “Tele-
phone” screen.
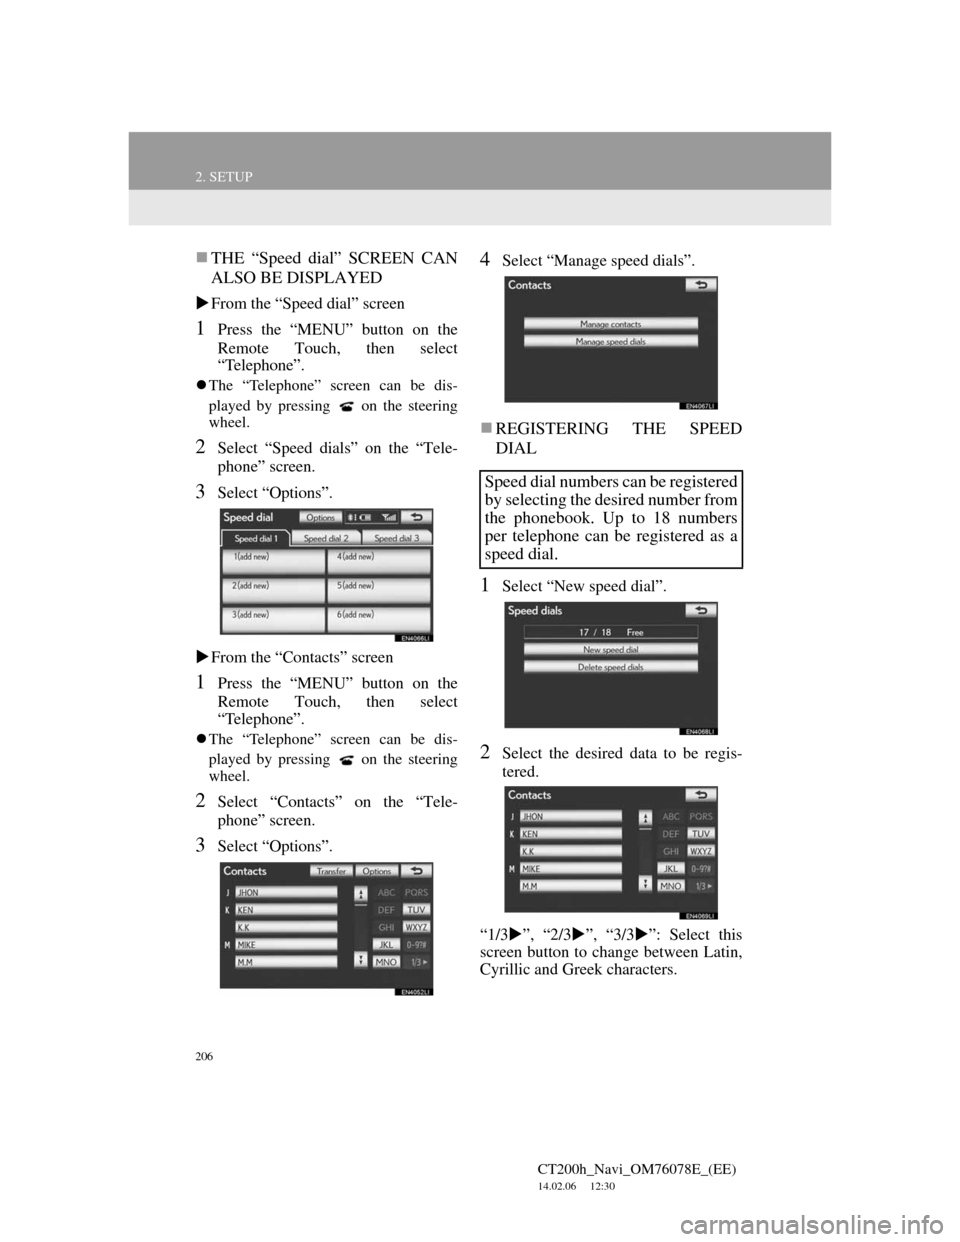
3Select “Options”.
From the “Contacts” screen
1Press the “MENU” button on the
Remote Touch, then select
“Telephone”.
The “Telephone” screen can be dis-
played by pressing
on the steering
wheel.
2Select “Contacts” on the “Tele-
phone” screen.
3Select “Options”.
4Select “Manage speed dials”.
REGISTERING THE SPEED
DIAL
1Select “New speed dial”.
2Select the desired data to be regis-
tered.
“1/3”, “2/3”, “3/3”: Select this
screen button to change between Latin,
Cyrillic and Greek characters.
Speed dial numbers can be registered
by selecting the desired number from
the phonebook. Up to 18 numbers
per telephone can be registered as a
speed dial.
Page 207 of 436
207
2. SETUP
4
TELEPHONE
CT200h_Navi_OM76078E_(EE)
14.02.06 12:30
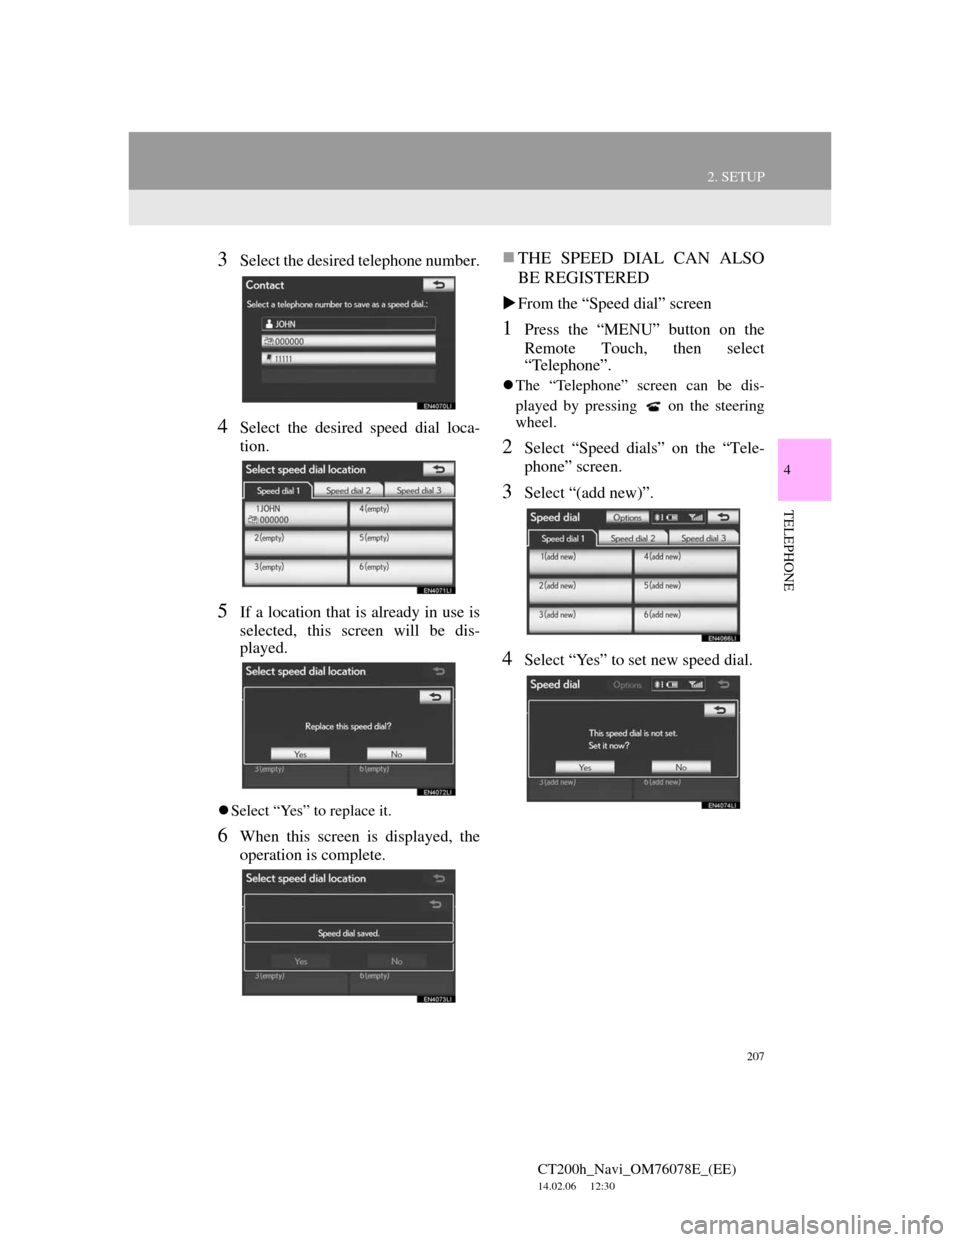
3Select the desired telephone number.
4Select the desired speed dial loca-
tion.
5If a location that is already in use is
selected, this screen will be dis-
played.
Select “Yes” to replace it.
6When this screen is displayed, the
operation is complete.
THE SPEED DIAL CAN ALSO
BE REGISTERED
From the “Speed dial” screen
1Press the “MENU” button on the
Remote Touch, then select
“Telephone”.
The “Telephone” screen can be dis-
played by pressing
on the steering
wheel.
2Select “Speed dials” on the “Tele-
phone” screen.
3Select “(add new)”.
4Select “Yes” to set new speed dial.
Page 208 of 436
208
2. SETUP
CT200h_Navi_OM76078E_(EE)
14.02.06 12:30
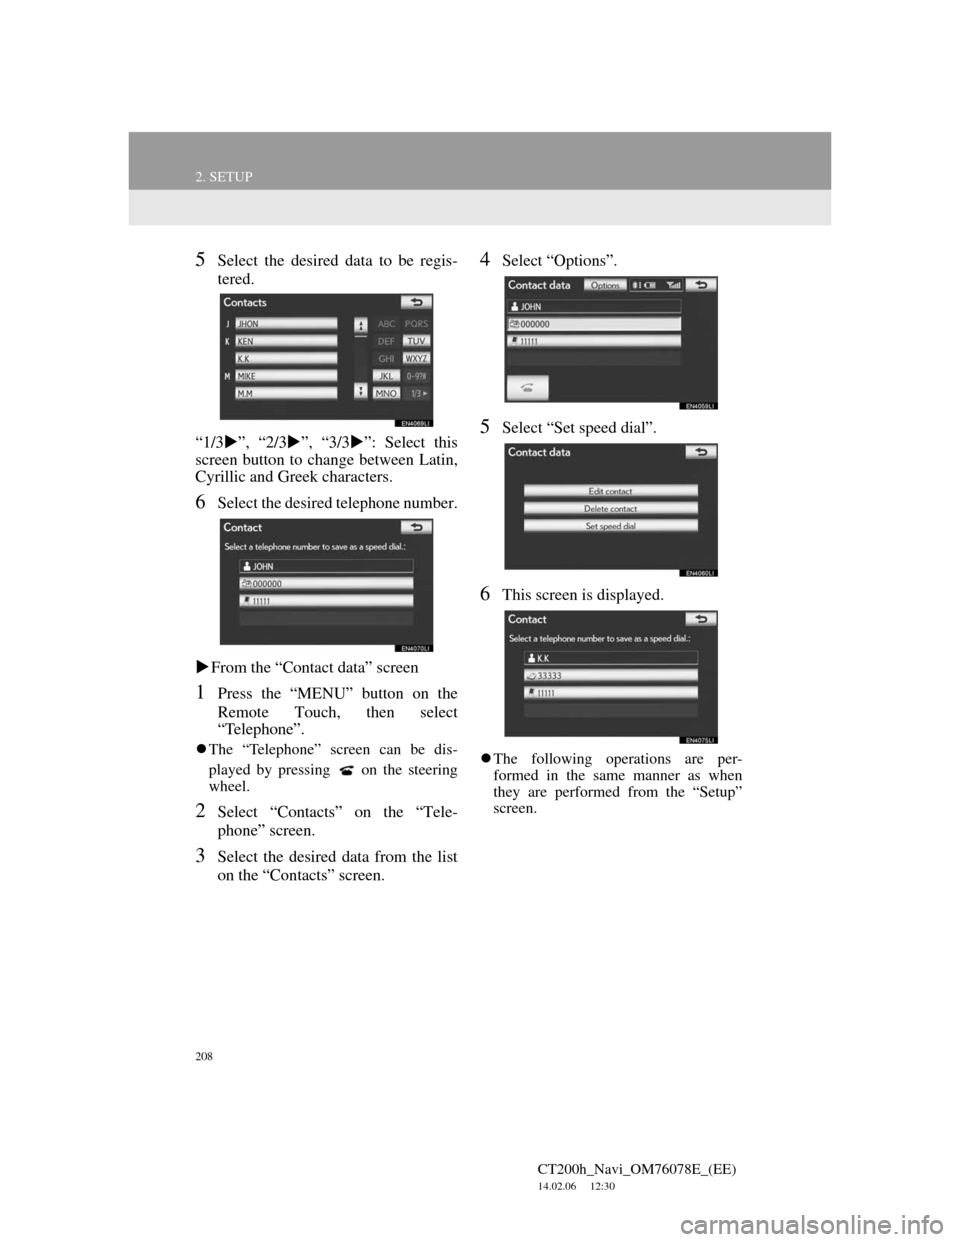
5Select the desired data to be regis-
tered.
“1/3”, “2/3”, “3/3”: Select this
screen button to change between Latin,
Cyrillic and Greek characters.
6Select the desired telephone number.
From the “Contact data” screen
1Press the “MENU” button on the
Remote Touch, then select
“Telephone”.
The “Telephone” screen can be dis-
played by pressing
on the steering
wheel.
2Select “Contacts” on the “Tele-
phone” screen.
3Select the desired data from the list
on the “Contacts” screen.
4Select “Options”.
5Select “Set speed dial”.
6This screen is displayed.
The following operations are per-
formed in the same manner as when
they are performed from the “Setup”
screen.
Page 210 of 436
210
2. SETUP
CT200h_Navi_OM76078E_(EE)
14.02.06 12:30
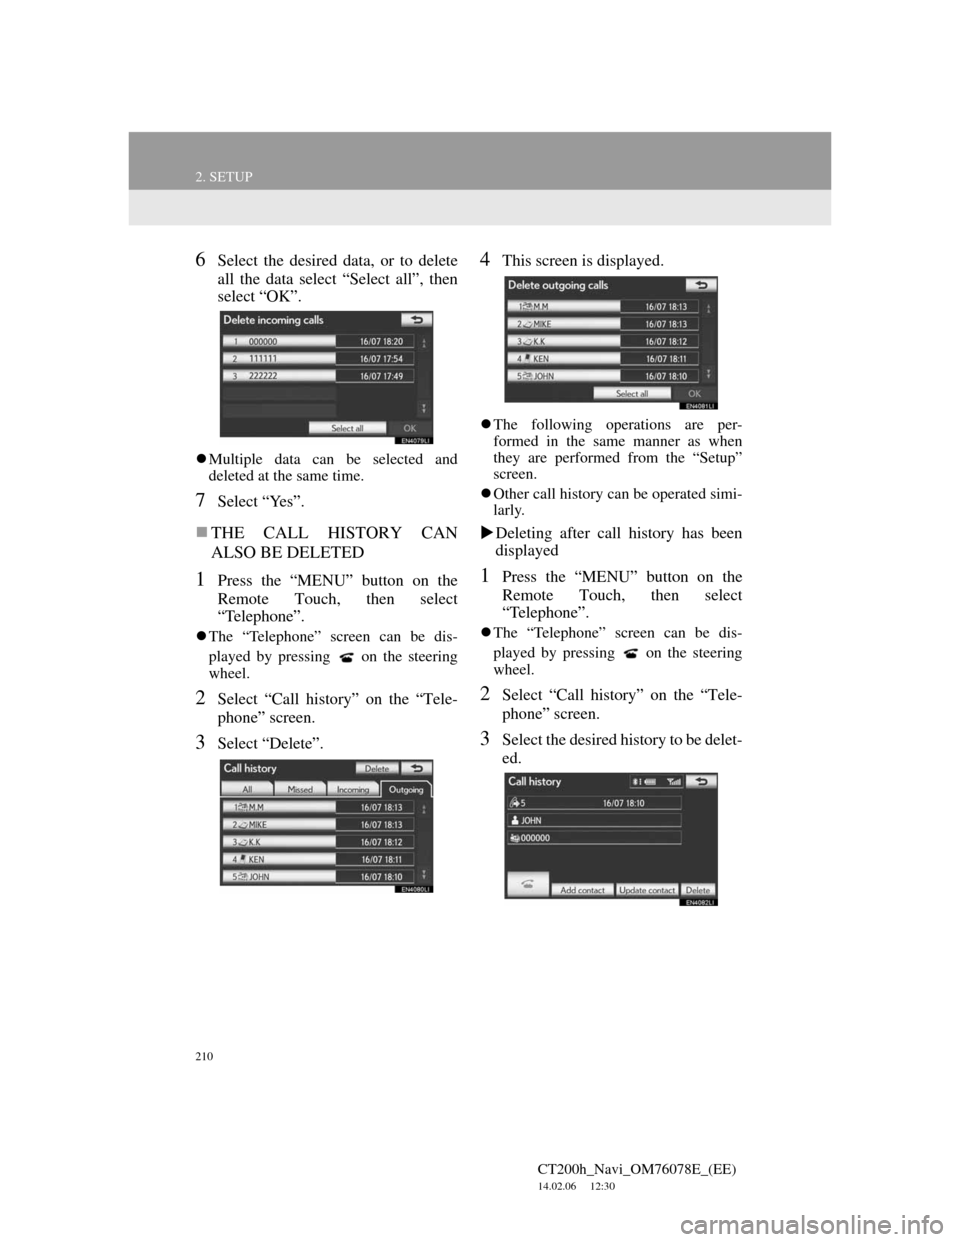
6Select the desired data, or to delete
all the data select “Select all”, then
select “OK”.
Multiple data can be selected and
deleted at the same time.
7Select “Yes”.
THE CALL HISTORY CAN
ALSO BE DELETED
1Press the “MENU” button on the
Remote Touch, then select
“Telephone”.
The “Telephone” screen can be dis-
played by pressing
on the steering
wheel.
2Select “Call history” on the “Tele-
phone” screen.
3Select “Delete”.
4This screen is displayed.
The following operations are per-
formed in the same manner as when
they are performed from the “Setup”
screen.
Other call history can be operated simi-
larly.
Deleting after call history has been
displayed
1Press the “MENU” button on the
Remote Touch, then select
“Telephone”.
The “Telephone” screen can be dis-
played by pressing
on the steering
wheel.
2Select “Call history” on the “Tele-
phone” screen.
3Select the desired history to be delet-
ed.
Page 211 of 436
211
2. SETUP
4
TELEPHONE
CT200h_Navi_OM76078E_(EE)
14.02.06 12:30
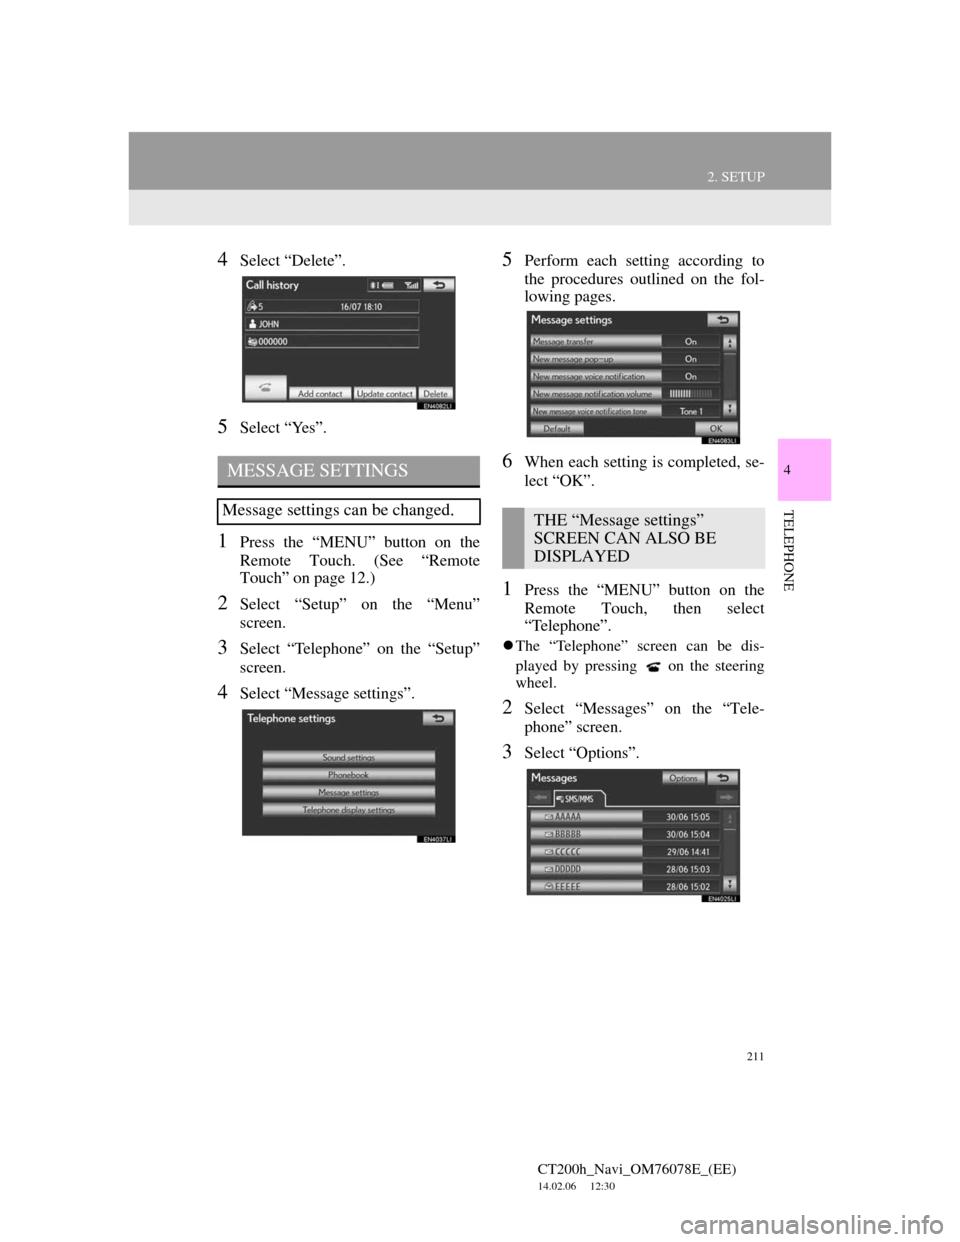
4Select “Delete”.
5Select “Yes”.
1Press the “MENU” button on the
Remote Touch. (See “Remote
Touch” on page 12.)
2Select “Setup” on the “Menu”
screen.
3Select “Telephone” on the “Setup”
screen.
4Select “Message settings”.
5Perform each setting according to
the procedures outlined on the fol-
lowing pages.
6When each setting is completed, se-
lect “OK”.
1Press the “MENU” button on the
Remote Touch, then select
“Telephone”.
The “Telephone” screen can be dis-
played by pressing
on the steering
wheel.
2Select “Messages” on the “Tele-
phone” screen.
3Select “Options”.
MESSAGE SETTINGS
Message settings can be changed.THE “Message settings”
SCREEN CAN ALSO BE
DISPLAYED
Page 217 of 436
217
2. SETUP
4
TELEPHONE
CT200h_Navi_OM76078E_(EE)
14.02.06 12:30
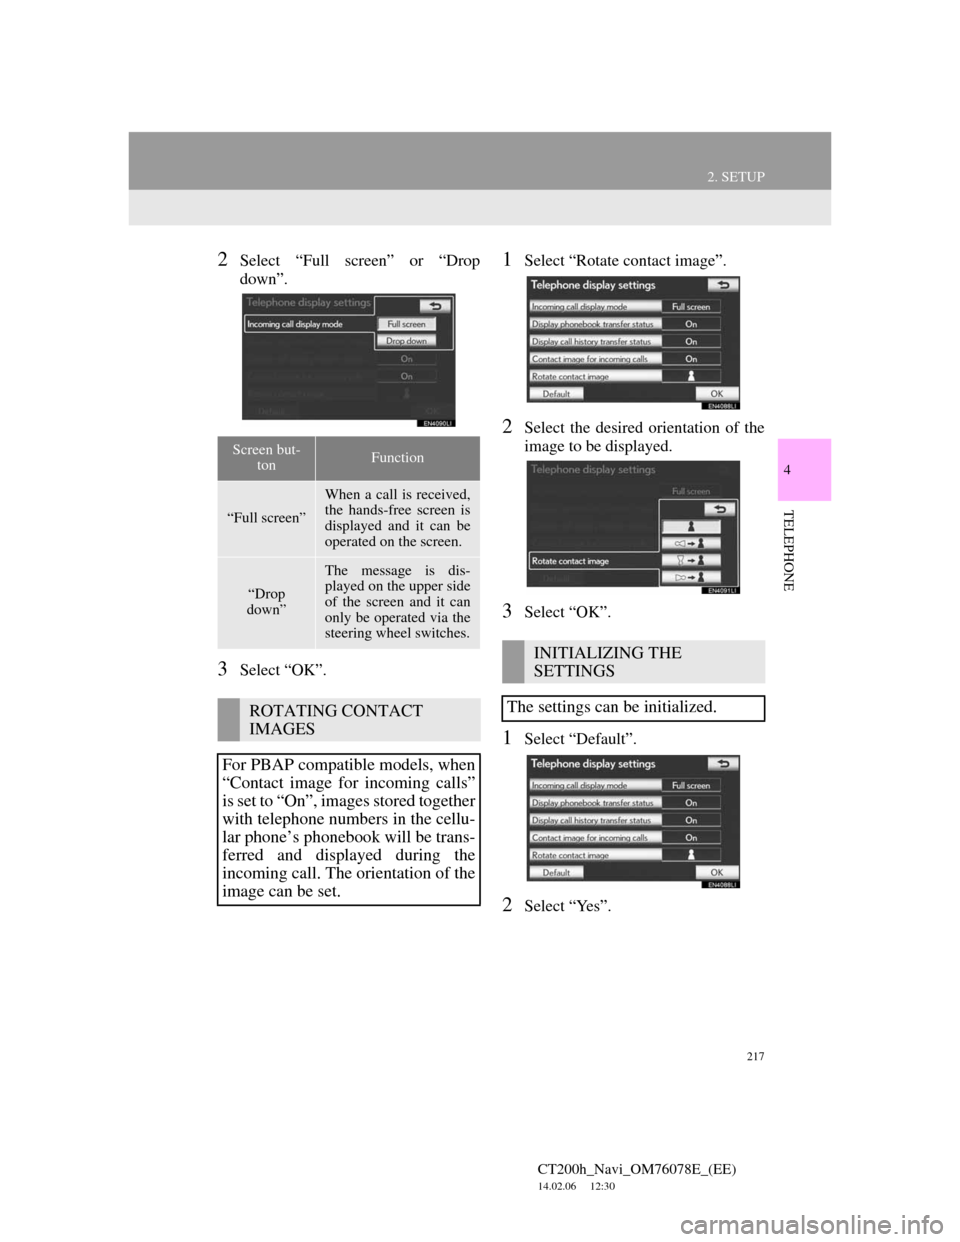
2Select “Full screen” or “Drop
down”.
3Select “OK”.
1Select “Rotate contact image”.
2Select the desired orientation of the
image to be displayed.
3Select “OK”.
1Select “Default”.
2Select “Yes”.
Screen but-
tonFunction
“Full screen”
When a call is received,
the hands-free screen is
displayed and it can be
operated on the screen.
“Drop
down”
The message is dis-
played on the upper side
of the screen and it can
only be operated via the
steering wheel switches.
ROTATING CONTACT
IMAGES
For PBAP compatible models, when
“Contact image for incoming calls”
is set to “On”, images stored together
with telephone numbers in the cellu-
lar phone’s phonebook will be trans-
ferred and displayed during the
incoming call. The orientation of the
image can be set.
INITIALIZING THE
SETTINGS
The settings can be initialized.
Page 288 of 436
288
1. AUDIO/VIDEO SYSTEM OPERATION
CT200h_Navi_OM76078E_(EE)
14.02.06 12:30
8. AUDIO/VIDEO REMOTE CONTROLS (STEERING SWITCHES)
“MODE” switch
Press the “MODE” switch to select an
audio mode. Each press changes the
mode sequentially if the desired mode
is ready to use.
To turn the audio/video system on,
press the “MODE” switch.
Press and hold the “MODE” switch to
mute/unmute or pause/resume the cur-
rent operation.“ ” switch
Radio
To select a preset station/channel:
Quickly press and release the “ ” or
“ ” switch. Repeat this to select the
next preset station/channel.
To seek a station/channel: Press and
hold the “ ” or “ ” switch until a beep
is heard. Repeat this to find the next sta-
tion/channel. If either switch is pressed
during seek mode, seeking will be can-
celed.
To seek up or down the frequency,
press and hold the switch until a beep is
heard. When you release the switch, the
radio will begin seeking up or down for
a station/channel. Repeat to find the
next station/channel.
DAB
To select a service: Quickly press and
release the “ ” or “ ” switch. Repeat
this to select the next service.
To select a channel: Press and hold the
“ ” or “ ” switch until a beep is heard.
Repeat this to find the next channel. If
either switch is pressed during seek
mode, seeking will be canceled.
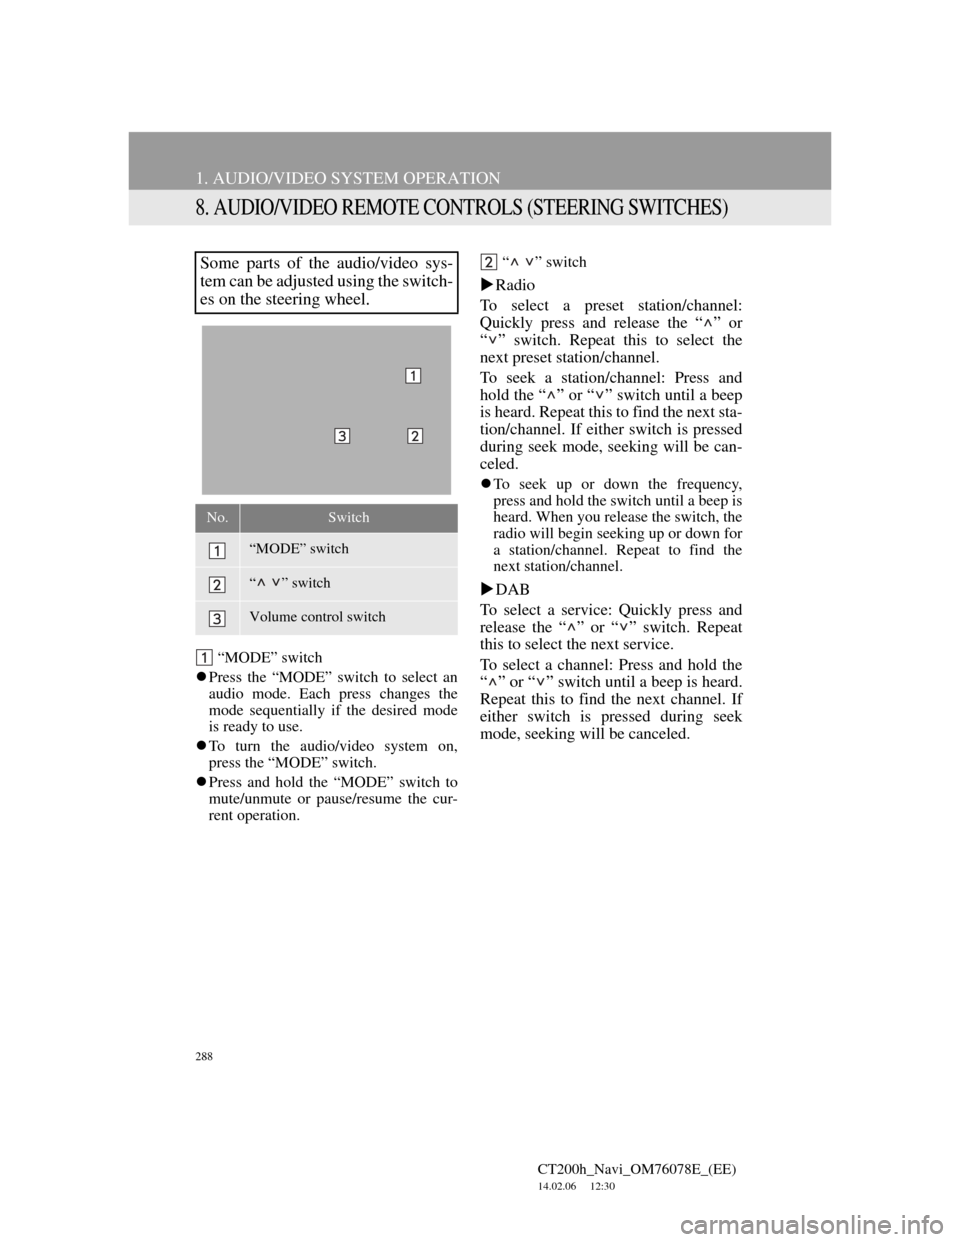
Some parts of the audio/video sys-
tem can be adjusted using the switch-
es on the steering wheel.
No.Switch
“MODE” switch
“ ” switch
Volume control switch
Page 369 of 436
369
1. LEXUS PARKING ASSIST MONITOR
CT200h_Navi_OM76078E_(EE)
14.02.06 12:30
10
PERIPHERAL MONITORING SYSTEM
CAUTION
The instructions given are only guide-
lines. When and how much to turn the
steering wheel will vary according to
traffic conditions, road surface condi-
tions, vehicle condition, etc. when
parking. It is necessary to be fully
aware of this before using the parking
assist system.
When parking, be sure to check that
the parking space will accommodate
your vehicle before maneuvering into
it.
Do not use system in the following
cases:
• On icy or slick road surfaces, or in
snow
• When using tyre chains or emer-
gency tyre(s)
• When the back door is not closed
completely
• On roads that are not flat or straight,
such as curves or slopes.
In low temperatures, the screen may
darken or the image may become
faint. The image could distort when
the vehicle is moving, or you may
become unable to see the image on
the screen. Be sure to visually check
all around the vehicle both directly
and using the mirrors before proceed-
ing.
CAUTION
If the tyre sizes are changed, the posi-
tion of the guide lines displayed on
the screen may change.
The camera uses a special lens. The
distances between objects and pedes-
trians that appear in the image dis-
played on the screen will differ from
the actual distances. (See page 390.)
Page 372 of 436
372
1. LEXUS PARKING ASSIST MONITOR
CT200h_Navi_OM76078E_(EE)
14.02.06 12:30
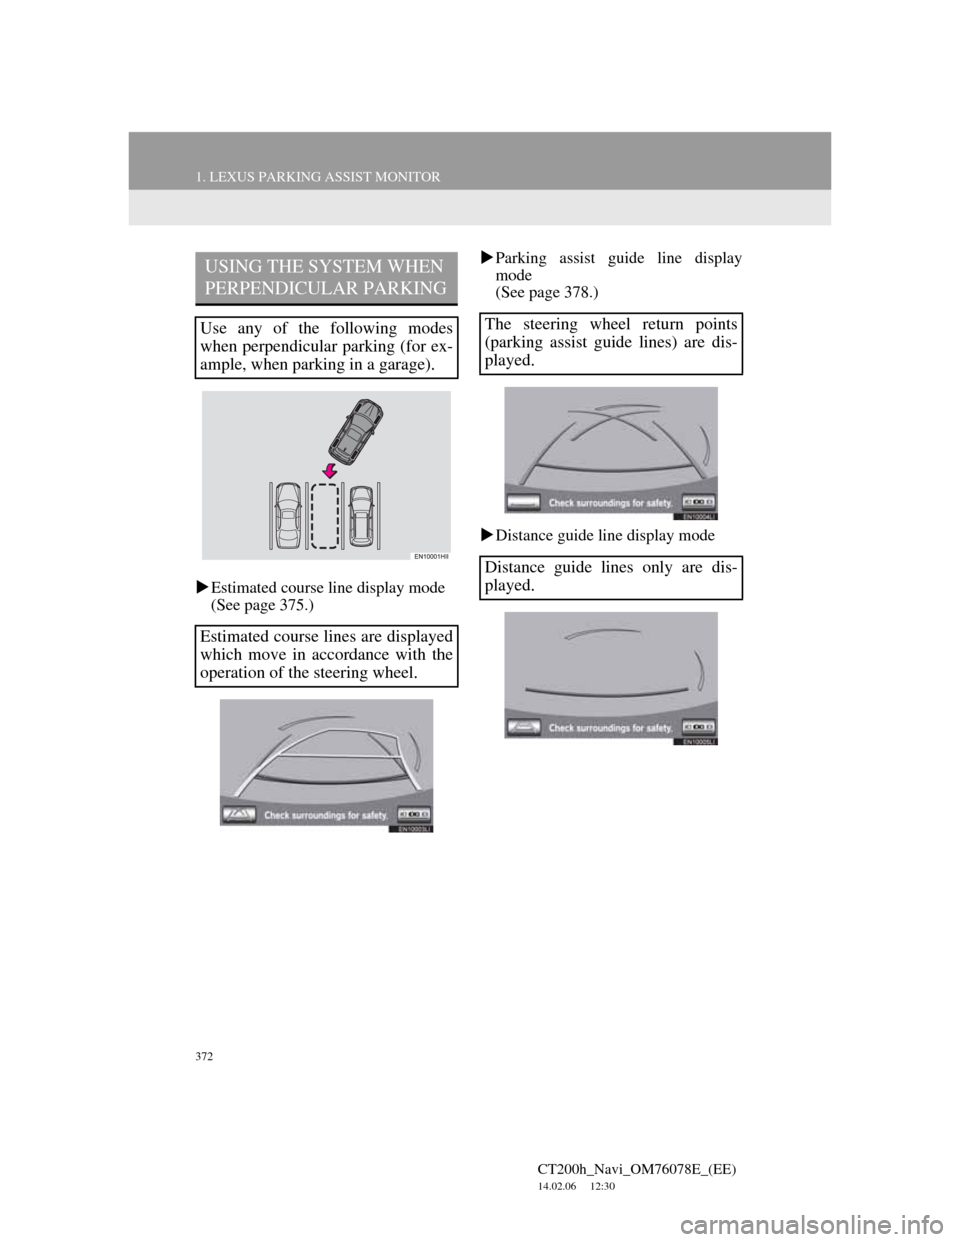
Estimated course line display mode
(See page 375.)Parking assist guide line display
mode
(See page 378.)
Distance guide line display mode
USING THE SYSTEM WHEN
PERPENDICULAR PARKING
Use any of the following modes
when perpendicular parking (for ex-
ample, when parking in a garage).
Estimated course lines are displayed
which move in accordance with the
operation of the steering wheel.The steering wheel return points
(parking assist guide lines) are dis-
played.
Distance guide lines only are dis-
played.
Page 373 of 436
373
1. LEXUS PARKING ASSIST MONITOR
CT200h_Navi_OM76078E_(EE)
14.02.06 12:30
10
PERIPHERAL MONITORING SYSTEM
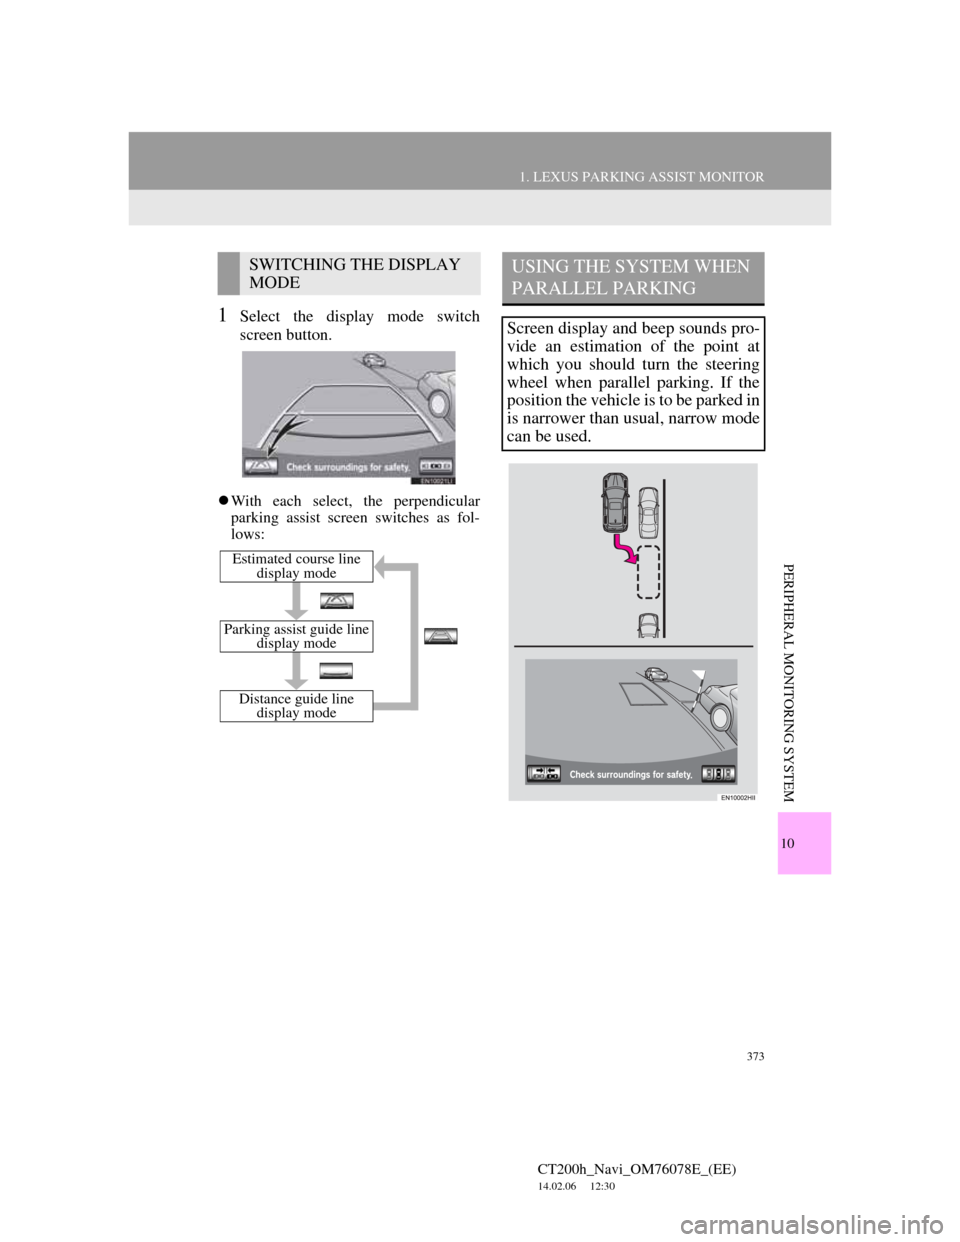
1Select the display mode switch
screen button.
With each select, the perpendicular
parking assist screen switches as fol-
lows:
SWITCHING THE DISPLAY
MODE
Distance guide line
display mode
Parking assist guide line
display mode
Estimated course line
display mode
USING THE SYSTEM WHEN
PARALLEL PARKING
Screen display and beep sounds pro-
vide an estimation of the point at
which you should turn the steering
wheel when parallel parking. If the
position the vehicle is to be parked in
is narrower than usual, narrow mode
can be used.