stop start Lexus CT200h 2012 Navigation Manual (in English)
[x] Cancel search | Manufacturer: LEXUS, Model Year: 2012, Model line: CT200h, Model: Lexus CT200h 2012Pages: 436, PDF Size: 28.25 MB
Page 102 of 436
102
1. DESTINATION SEARCH
CT200h_Navi_OM76078E_(EE)
14.02.06 12:29
3. STARTING ROUTE GUIDANCE
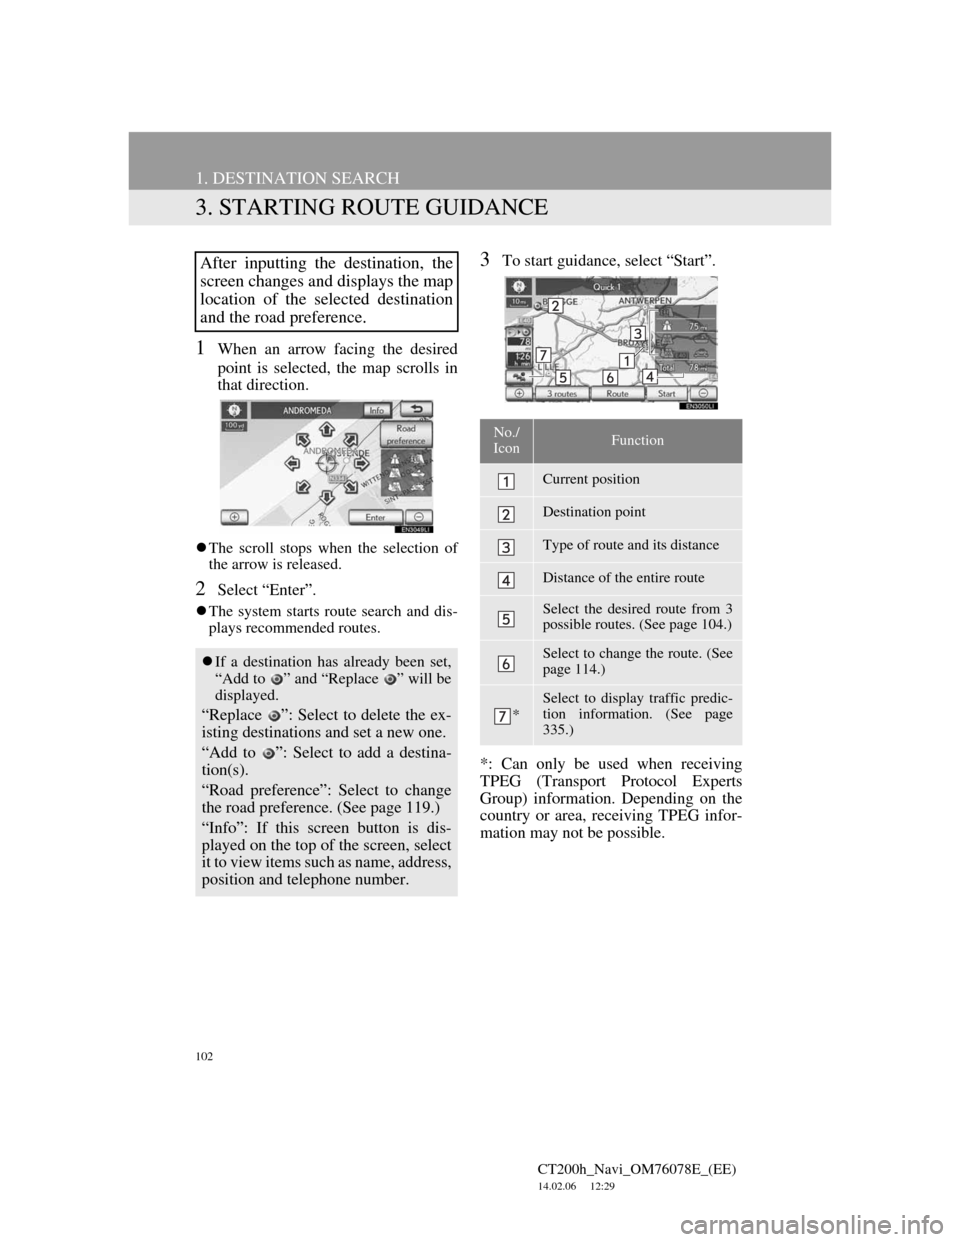
1When an arrow facing the desired
point is selected, the map scrolls in
that direction.
The scroll stops when the selection of
the arrow is released.
2Select “Enter”.
The system starts route search and dis-
plays recommended routes.
3To start guidance, select “Start”.
*: Can only be used when receiving
TPEG (Transport Protocol Experts
Group) information. Depending on the
country or area, receiving TPEG infor-
mation may not be possible.After inputting the destination, the
screen changes and displays the map
location of the selected destination
and the road preference.
If a destination has already been set,
“Add to ” and “Replace ” will be
displayed.
“Replace ”: Select to delete the ex-
isting destinations and set a new one.
“Add to ”: Select to add a destina-
tion(s).
“Road preference”: Select to change
the road preference. (See page 119.)
“Info”: If this screen button is dis-
played on the top of the screen, select
it to view items such as name, address,
position and telephone number.
No./
IconFunction
Current position
Destination point
Type of route and its distance
Distance of the entire route
Select the desired route from 3
possible routes. (See page 104.)
Select to change the route. (See
page 114.)
*
Select to display traffic predic-
tion information. (See page
335.)
Page 121 of 436
121
2. ROUTE GUIDANCE
CT200h_Navi_OM76078E_(EE)
14.02.06 12:29
3
NAVIGATION SYSTEM
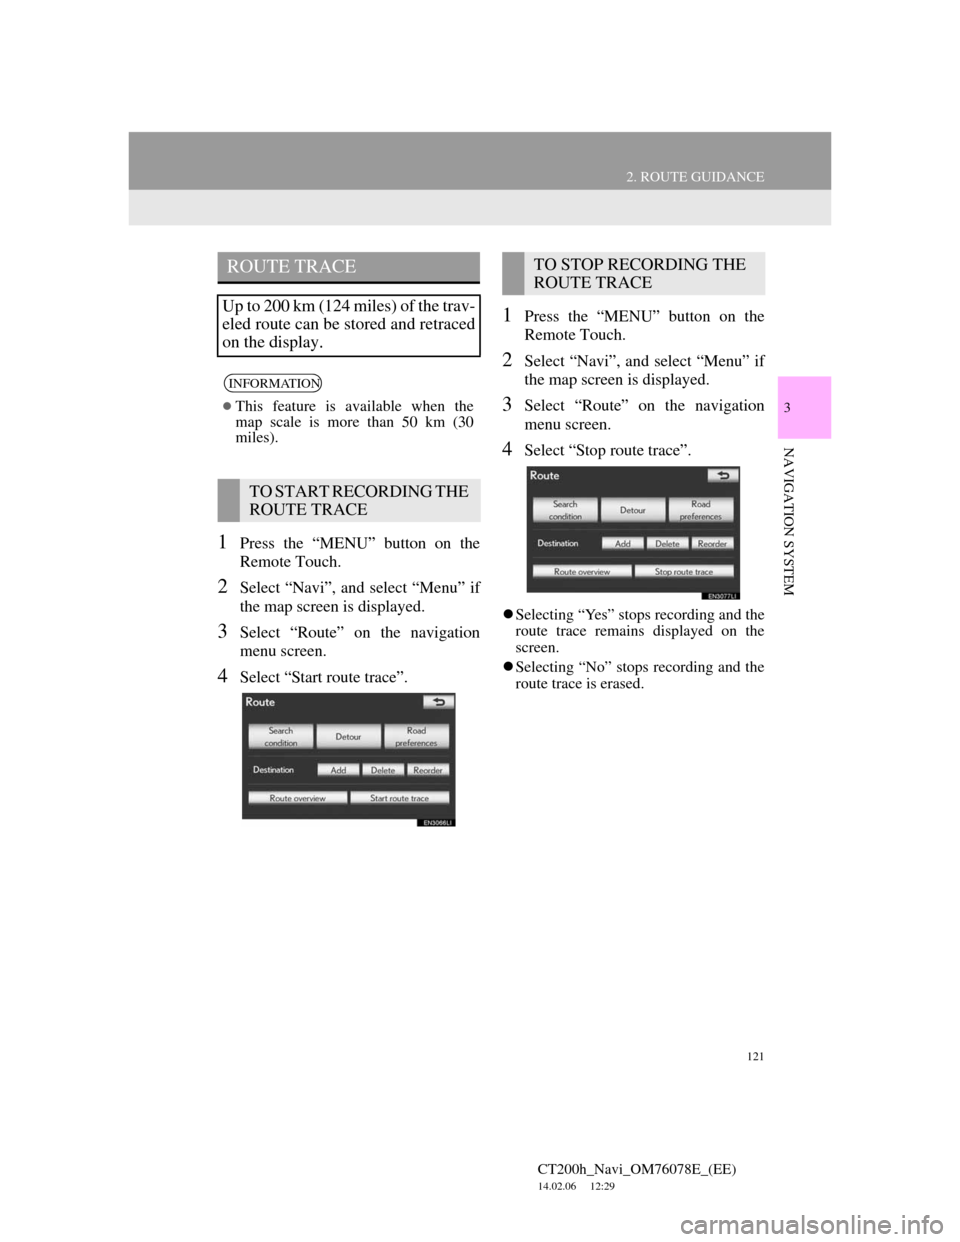
1Press the “MENU” button on the
Remote Touch.
2Select “Navi”, and select “Menu” if
the map screen is displayed.
3Select “Route” on the navigation
menu screen.
4Select “Start route trace”.
1Press the “MENU” button on the
Remote Touch.
2Select “Navi”, and select “Menu” if
the map screen is displayed.
3Select “Route” on the navigation
menu screen.
4Select “Stop route trace”.
Selecting “Yes” stops recording and the
route trace remains displayed on the
screen.
Selecting “No” stops recording and the
route trace is erased.
ROUTE TRACE
Up to 200 km (124 miles) of the trav-
eled route can be stored and retraced
on the display.
INFORMATION
This feature is available when the
map scale is more than 50 km (30
miles).
TO START RECORDING THE
ROUTE TRACE
TO STOP RECORDING THE
ROUTE TRACE
Page 192 of 436
192
1. TELEPHONE OPERATION
CT200h_Navi_OM76078E_(EE)
14.02.06 12:30
7. Bluetooth® PHONE MESSAGE FUNCTION
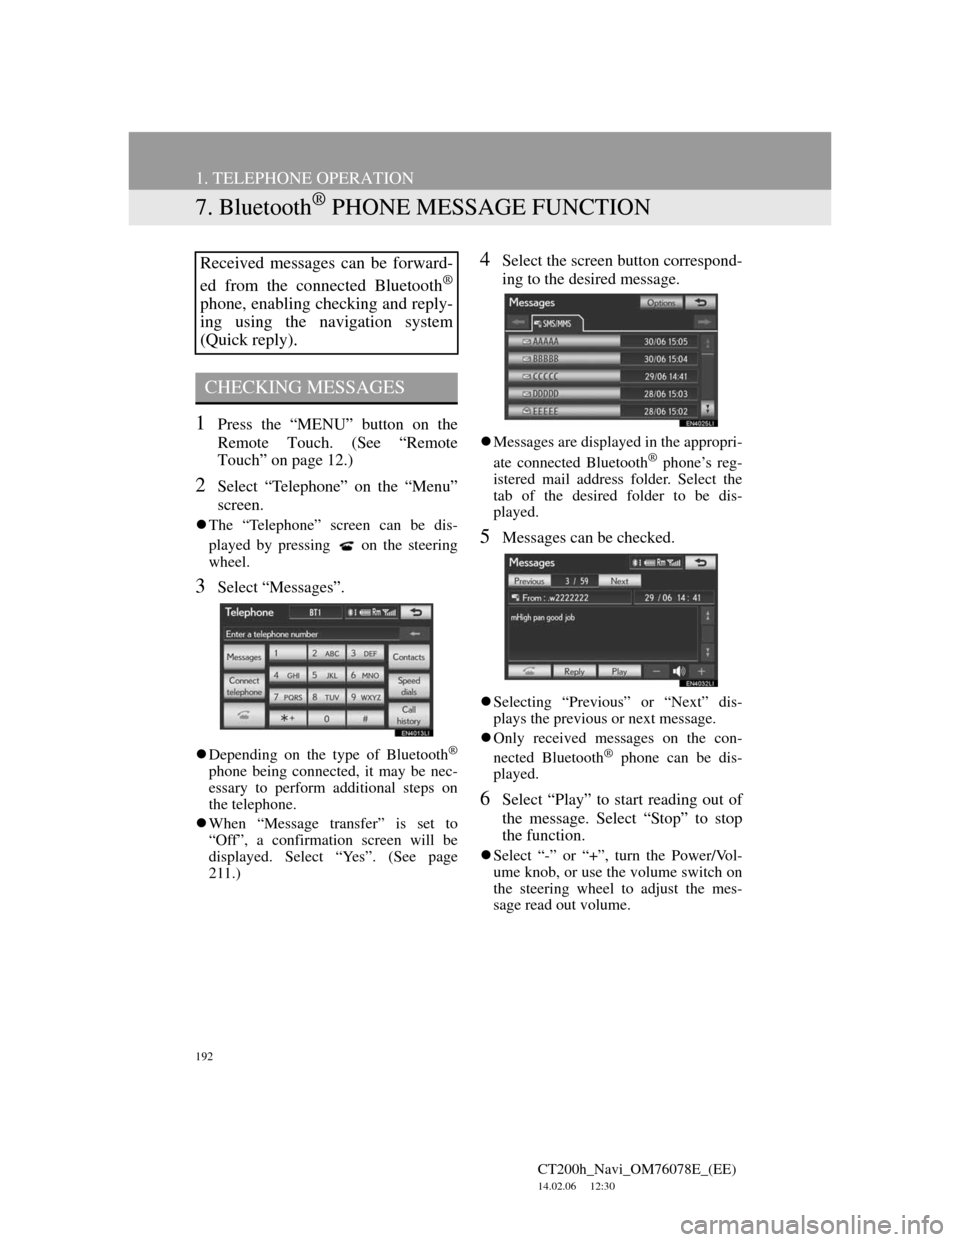
1Press the “MENU” button on the
Remote Touch. (See “Remote
Touch” on page 12.)
2Select “Telephone” on the “Menu”
screen.
The “Telephone” screen can be dis-
played by pressing
on the steering
wheel.
3Select “Messages”.
Depending on the type of Bluetooth®
phone being connected, it may be nec-
essary to perform additional steps on
the telephone.
When “Message transfer” is set to
“Off”, a confirmation screen will be
displayed. Select “Yes”. (See page
211.)
4Select the screen button correspond-
ing to the desired message.
Messages are displayed in the appropri-
ate connected Bluetooth® phone’s reg-
istered mail address folder. Select the
tab of the desired folder to be dis-
played.
5Messages can be checked.
Selecting “Previous” or “Next” dis-
plays the previous or next message.
Only received messages on the con-
nected Bluetooth
® phone can be dis-
played.
6Select “Play” to start reading out of
the message. Select “Stop” to stop
the function.
Select “-” or “+”, turn the Power/Vol-
ume knob, or use the volume switch on
the steering wheel to adjust the mes-
sage read out volume.
Received messages can be forward-
ed from the connected Bluetooth
®
phone, enabling checking and reply-
ing using the navigation system
(Quick reply).
CHECKING MESSAGES
Page 254 of 436
254
1. AUDIO/VIDEO SYSTEM OPERATION
CT200h_Navi_OM76078E_(EE)
14.02.06 12:30
PLAYING THE FILES IN ALL
THE FOLDERS ON THE DISC IN
RANDOM ORDER
1Select “RAND” repeatedly until
“FLD.RAND” appears on the
screen.
Once “FLD.RAND” appears on the
screen, the system selects a file ran-
domly from all of the existing folders.
To cancel this function, select “RAND”
again.
INFORMATION
When a file is skipped or the system
is inoperative, select “RAND” to
reset.
OPERATING A DVD DISC
The playback condition of some
DVD discs may be determined by
the DVD software producer. This
DVD player plays a disc as the soft-
ware producer intended. As such
some functions may not work prop-
erly. Be sure to read the instruction
manual that comes with the individu-
al DVD disc. For detailed informa-
tion about DVD video discs, see
“DVD PLAYER AND DVD VID-
EO DISC INFORMATION” on
page 266.
PRECAUTIONS ON DVD
VIDEO DISC
When recording with a DVD video,
audio tracks may not record in some
cases while the menu is displayed.
As audio will not play in this case,
verify that the video tracks are play-
ing and then activate playback.
When playback of a disc is complet-
ed:
If an audio CD or MP3/WMA disc is
playing, the first track or file starts.
If a DVD video is playing, playback
will stop or the menu screen will be
displayed.
The title/chapter number and play-
back time display may not appear
while playing back certain DVD vid-
eo discs.
CAUTION
Conversational speech on some
DVDs is recorded at a low volume to
emphasize the impact of sound
effects. If you adjust the volume
assuming that the conversations rep-
resent the maximum volume level
that the DVD will play, you may be
startled by louder sound effects or
when you change to a different audio
source. The louder sounds may have a
significant impact on the human body
or pose a driving hazard. Keep this in
mind when you adjust the volume.
Page 256 of 436
256
1. AUDIO/VIDEO SYSTEM OPERATION
CT200h_Navi_OM76078E_(EE)
14.02.06 12:30
CHANGING A CHAPTER
1Press the “ ” or “ ” button of Chan-
nel/Track or turn the Tune/Scroll
knob to change the chapter.
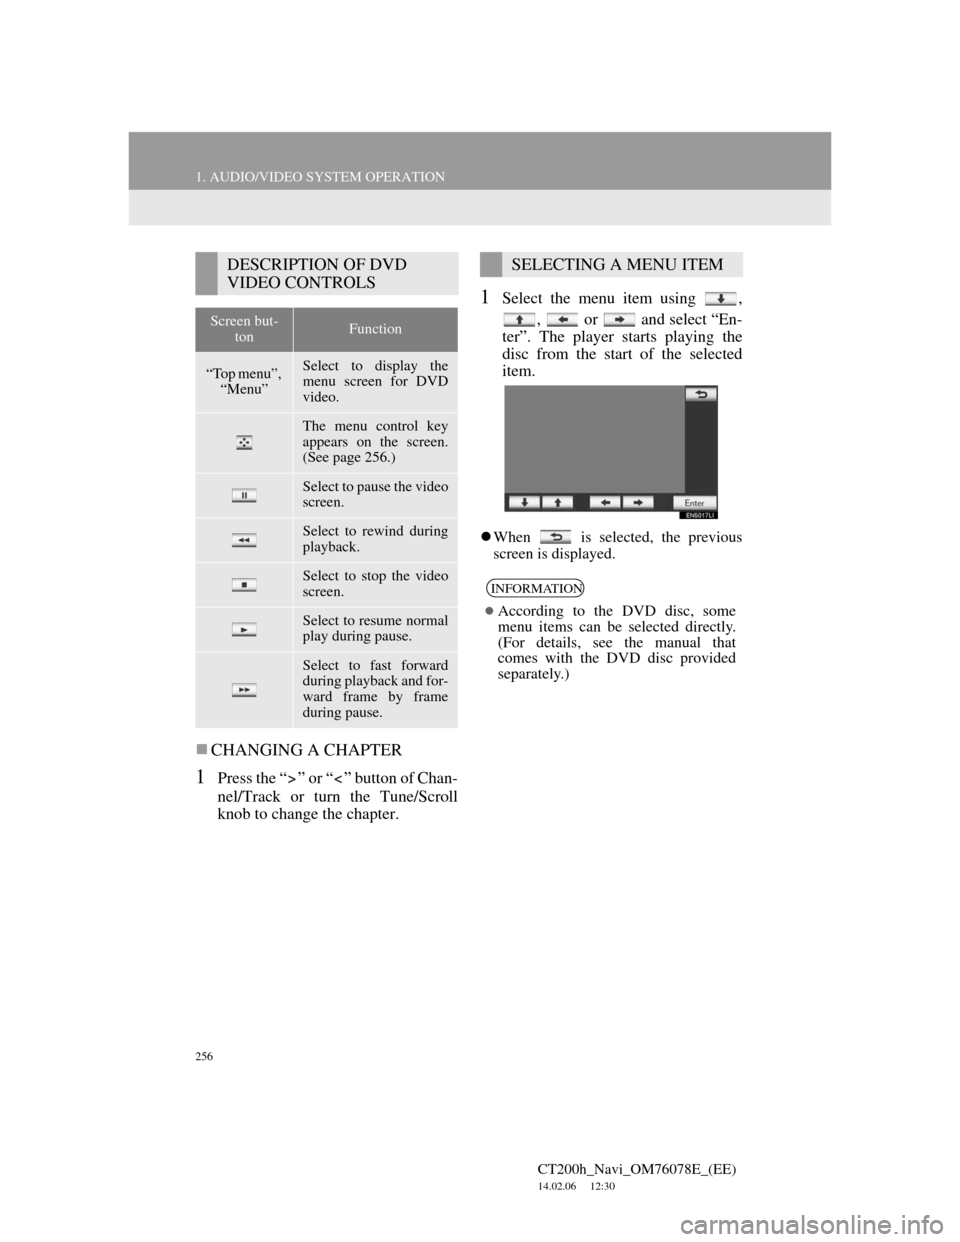
1Select the menu item using ,
, or and select “En-
ter”. The player starts playing the
disc from the start of the selected
item.
When is selected, the previous
screen is displayed.
DESCRIPTION OF DVD
VIDEO CONTROLS
Screen but-
tonFunction
“Top menu”,
“Menu”Select to display the
menu screen for DVD
video.
The menu control key
appears on the screen.
(See page 256.)
Select to pause the video
screen.
Select to rewind during
playback.
Select to stop the video
screen.
Select to resume normal
play during pause.
Select to fast forward
during playback and for-
ward frame by frame
during pause.
SELECTING A MENU ITEM
INFORMATION
According to the DVD disc, some
menu items can be selected directly.
(For details, see the manual that
comes with the DVD disc provided
separately.)
Page 308 of 436
308
1. AIR CONDITIONING SYSTEM OPERATION
CT200h_Navi_OM76078E_(EE)
14.02.06 12:30
2. SOME BASICS
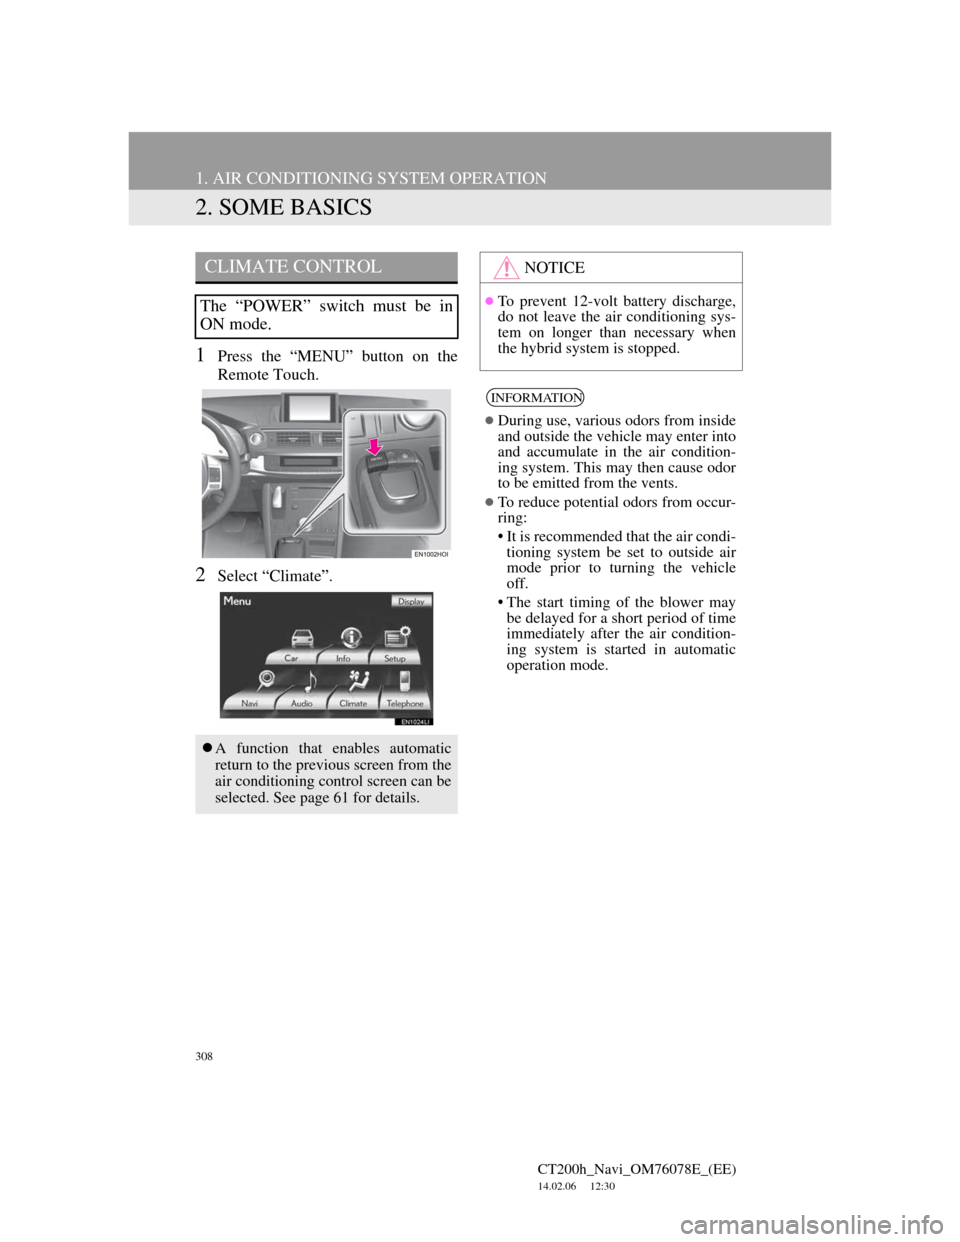
1Press the “MENU” button on the
Remote Touch.
2Select “Climate”.
CLIMATE CONTROL
The “POWER” switch must be in
ON mode.
A function that enables automatic
return to the previous screen from the
air conditioning control screen can be
selected. See page 61 for details.
NOTICE
To prevent 12-volt battery discharge,
do not leave the air conditioning sys-
tem on longer than necessary when
the hybrid system is stopped.
INFORMATION
During use, various odors from inside
and outside the vehicle may enter into
and accumulate in the air condition-
ing system. This may then cause odor
to be emitted from the vents.
To reduce potential odors from occur-
ring:
• It is recommended that the air condi-
tioning system be set to outside air
mode prior to turning the vehicle
off.
• The start timing of the blower may
be delayed for a short period of time
immediately after the air condition-
ing system is started in automatic
operation mode.
Page 318 of 436
318
1. AIR CONDITIONING SYSTEM OPERATION
CT200h_Navi_OM76078E_(EE)
14.02.06 12:30
In order to prevent the windshield from
fogging up when the outside air is cold,
the following may occur:
• Outside air mode does not switch to
recirculated air mode.
• The dehumidification function oper-
ates.
• The operation cancels after approxi-
mately 1 minute.
In rainy weather, the windows may fog
up. Press the windshield air flow but-
ton.
In extremely humid weather, the win-
dows may fog up.
The pollens are filtered out even if
/ micro dust and pollen filter but-
ton is turned off.
In the following situations, the correct
outside temperature may not be dis-
played, or the display may take longer
than normal to change.
• When stopped, or driving at low
speeds (less than 20 km/h)
• When the outside temperature has
changed suddenly (at the entrance/exit
of a garage, tunnel, etc.)
The dehumidification function may not
operate even when “A/C” is selected.During use, various odors from inside
and outside the vehicle may enter into
and accumulate in the air conditioning
system. This may then cause odor to be
emitted from the vents.
To reduce potential odors from occur-
ring:
• It is recommended that the air condi-
tioning system be set to outside air
mode prior to turning the vehicle off.
• The start timing of the blower may be
delayed for a short period of time
immediately after the air conditioning
system is started in automatic mode.
The air conditioning filter may clog
after long use. The filter may need to be
replaced if the air flow of the air condi-
tioner and heater experiences extreme
reductions in operating efficiency, or if
the windows fog up easily. (For details,
refer to “Owner’s Manual”.)
Settings can be changed. (For details,
refer to “Owner’s Manual”.)
POLLEN REMOVAL MODE
OUTSIDE TEMPERATURE
WHEN THE OUTSIDE
TEMPERATURE FALLS TO
NEARLY 0°C
AIR CONDITIONING ODORS
AIR CONDITIONING FILTER
CUSTOMIZATION
Page 384 of 436
384
1. LEXUS PARKING ASSIST MONITOR
CT200h_Navi_OM76078E_(EE)
14.02.06 12:30
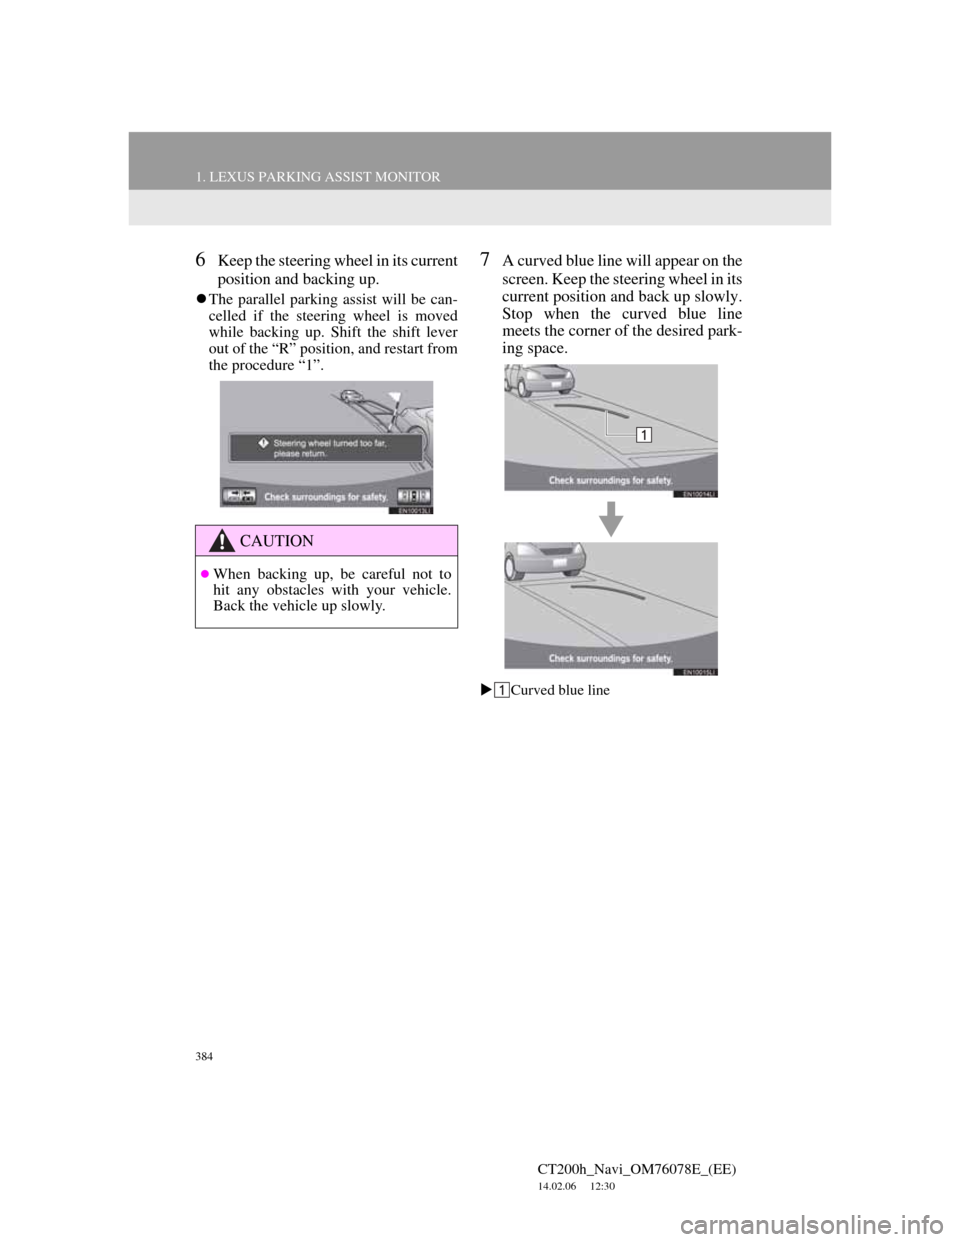
6Keep the steering wheel in its current
position and backing up.
The parallel parking assist will be can-
celled if the steering wheel is moved
while backing up. Shift the shift lever
out of the “R” position, and restart from
the procedure “1”.
7A curved blue line will appear on the
screen. Keep the steering wheel in its
current position and back up slowly.
Stop when the curved blue line
meets the corner of the desired park-
ing space.
Curved blue line
CAUTION
When backing up, be careful not to
hit any obstacles with your vehicle.
Back the vehicle up slowly.