headlights Lexus CT200h 2012 (in English) User Guide
[x] Cancel search | Manufacturer: LEXUS, Model Year: 2012, Model line: CT200h, Model: Lexus CT200h 2012Pages: 710
Page 549 of 710
547
4-3. Do-it-yourself maintenance
4
Maintenance and care
CT200h_OM_OM76067E_(EE)
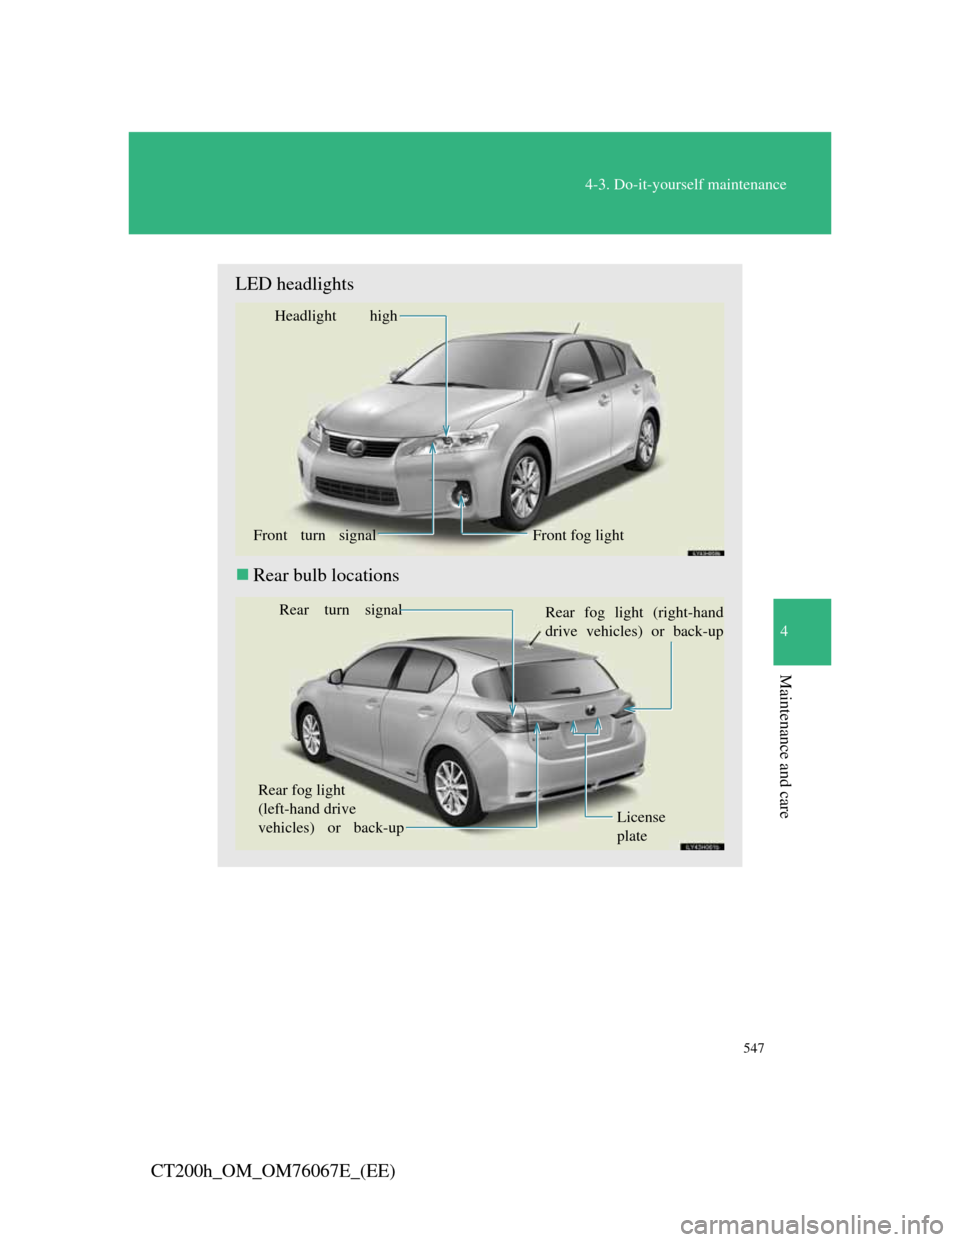
LED headlights
Rear bulb locations
Headlight high
Front turn signal Front fog light
Rear turn signal
Rear fog light
(left-hand drive
vehicles) or back-upRear fog light (right-hand
drive vehicles) or back-up
License
plate
Page 550 of 710
548
4-3. Do-it-yourself maintenance
CT200h_OM_OM76067E_(EE)
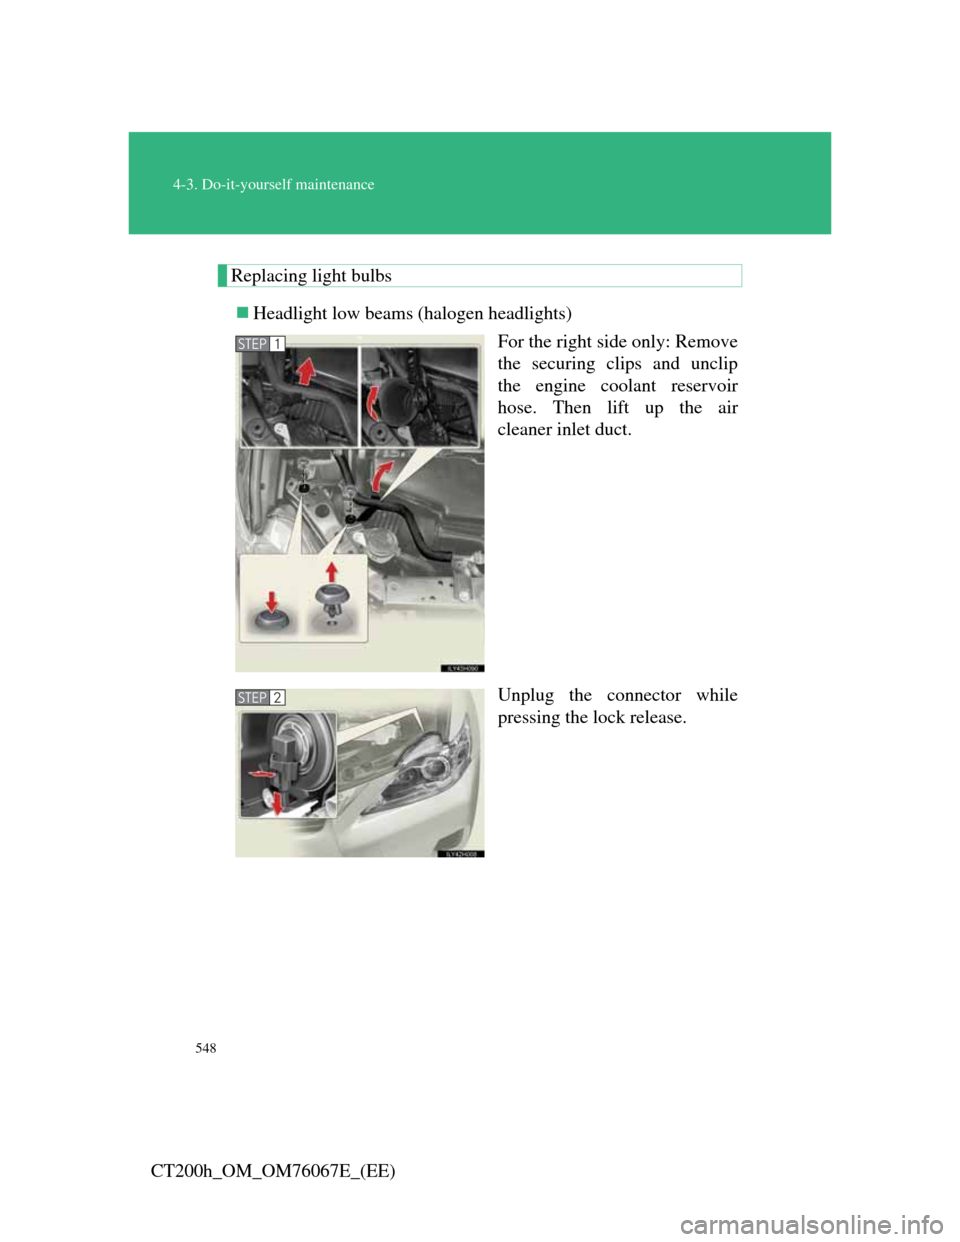
Replacing light bulbs
Headlight low beams (halogen headlights)
For the right side only: Remove
the securing clips and unclip
the engine coolant reservoir
hose. Then lift up the air
cleaner inlet duct.
Unplug the connector while
pressing the lock release.
STEP1
STEP2
Page 551 of 710
549
4-3. Do-it-yourself maintenance
4
Maintenance and care
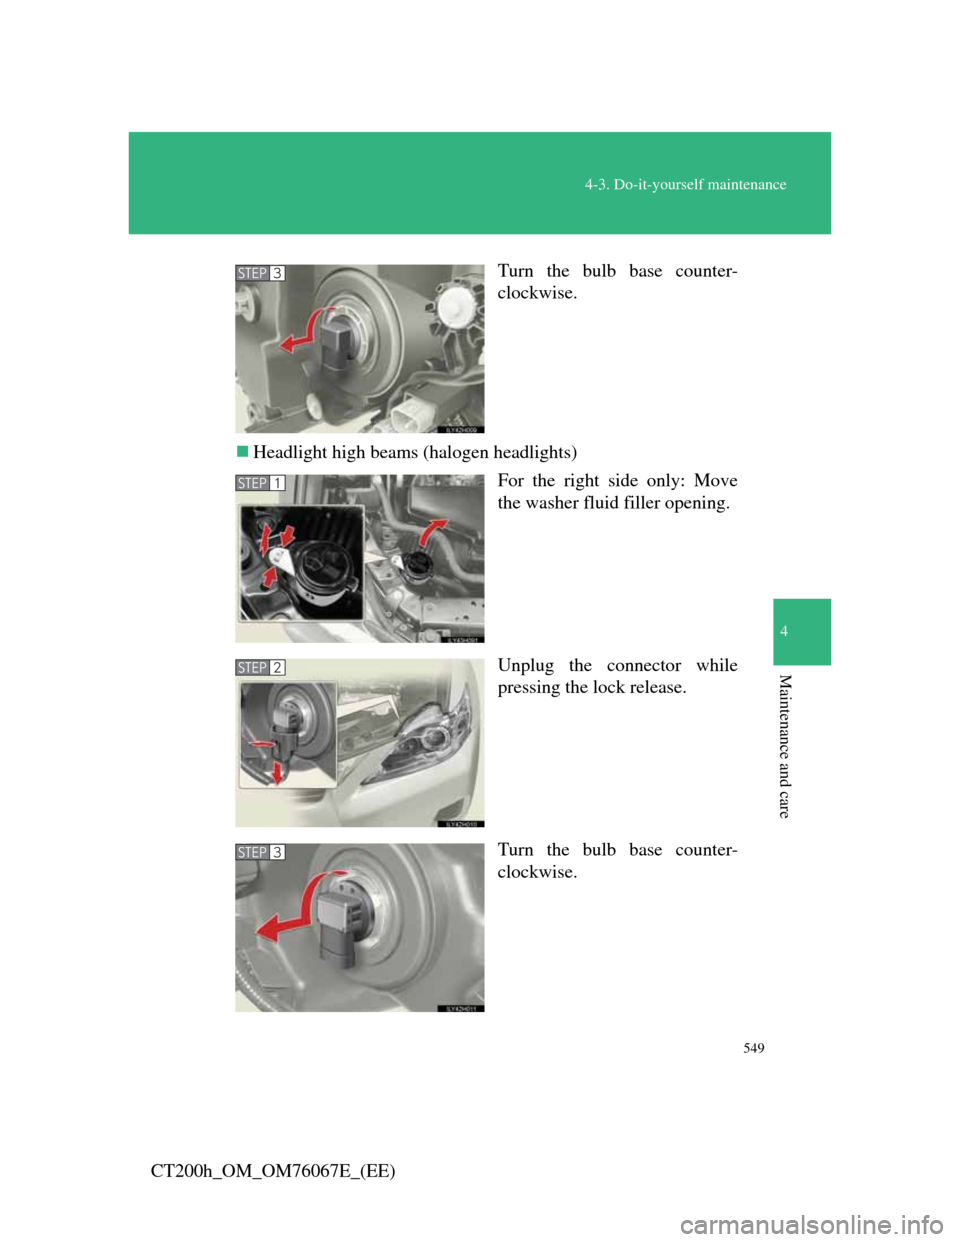
CT200h_OM_OM76067E_(EE)Turn the bulb base counter-
clockwise.
Headlight high beams (halogen headlights)
For the right side only: Move
the washer fluid filler opening.
Unplug the connector while
pressing the lock release.
Turn the bulb base counter-
clockwise.
STEP3
STEP1
STEP2
STEP3
Page 552 of 710
550
4-3. Do-it-yourself maintenance
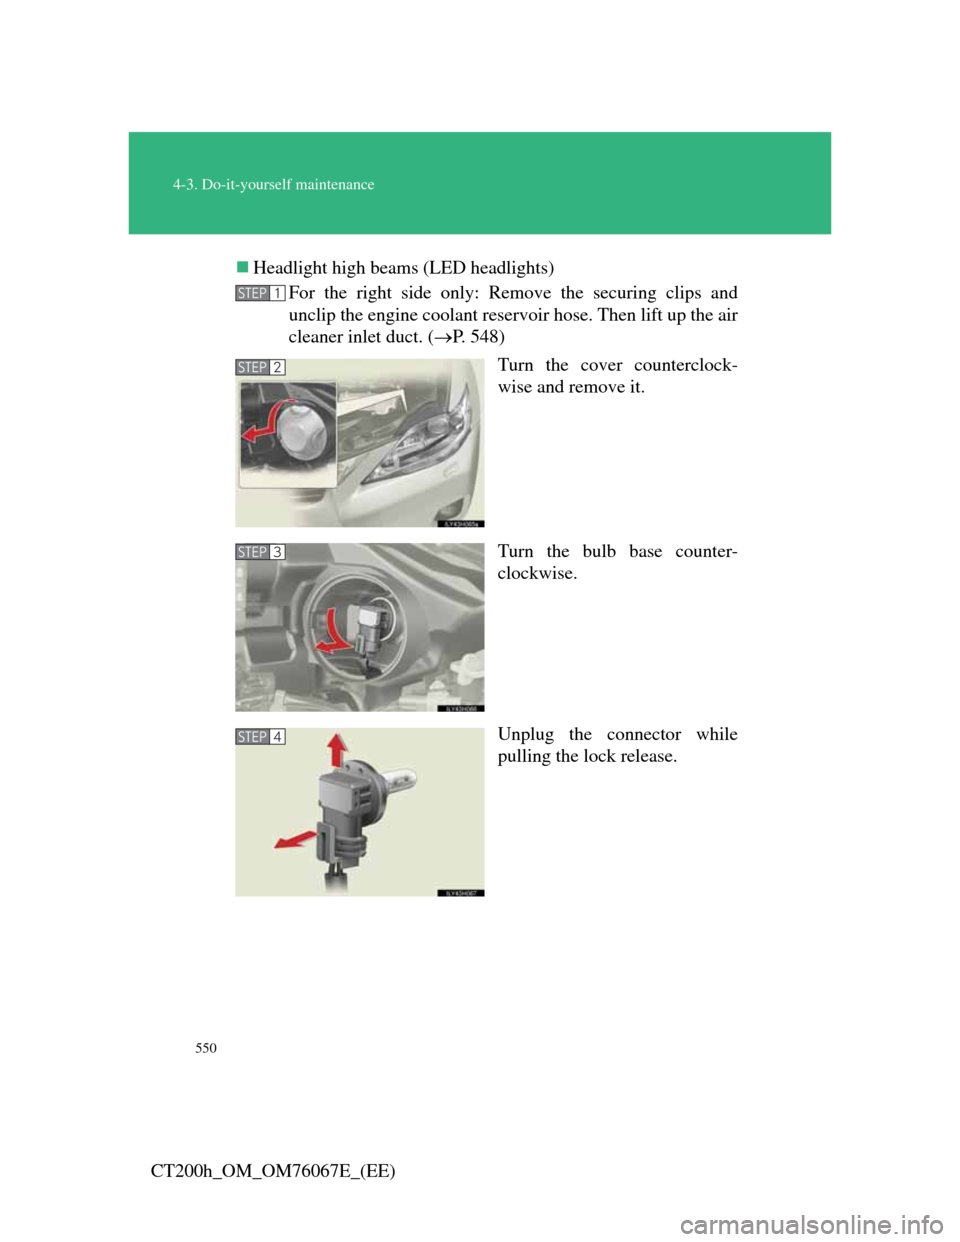
CT200h_OM_OM76067E_(EE)Headlight high beams (LED headlights)
For the right side only: Remove the securing clips and
unclip the engine coolant reservoir hose. Then lift up the air
cleaner inlet duct. (P. 548)
Turn the cover counterclock-
wise and remove it.
Turn the bulb base counter-
clockwise.
Unplug the connector while
pulling the lock release.
STEP1
STEP2
STEP3
STEP4
Page 554 of 710
552
4-3. Do-it-yourself maintenance
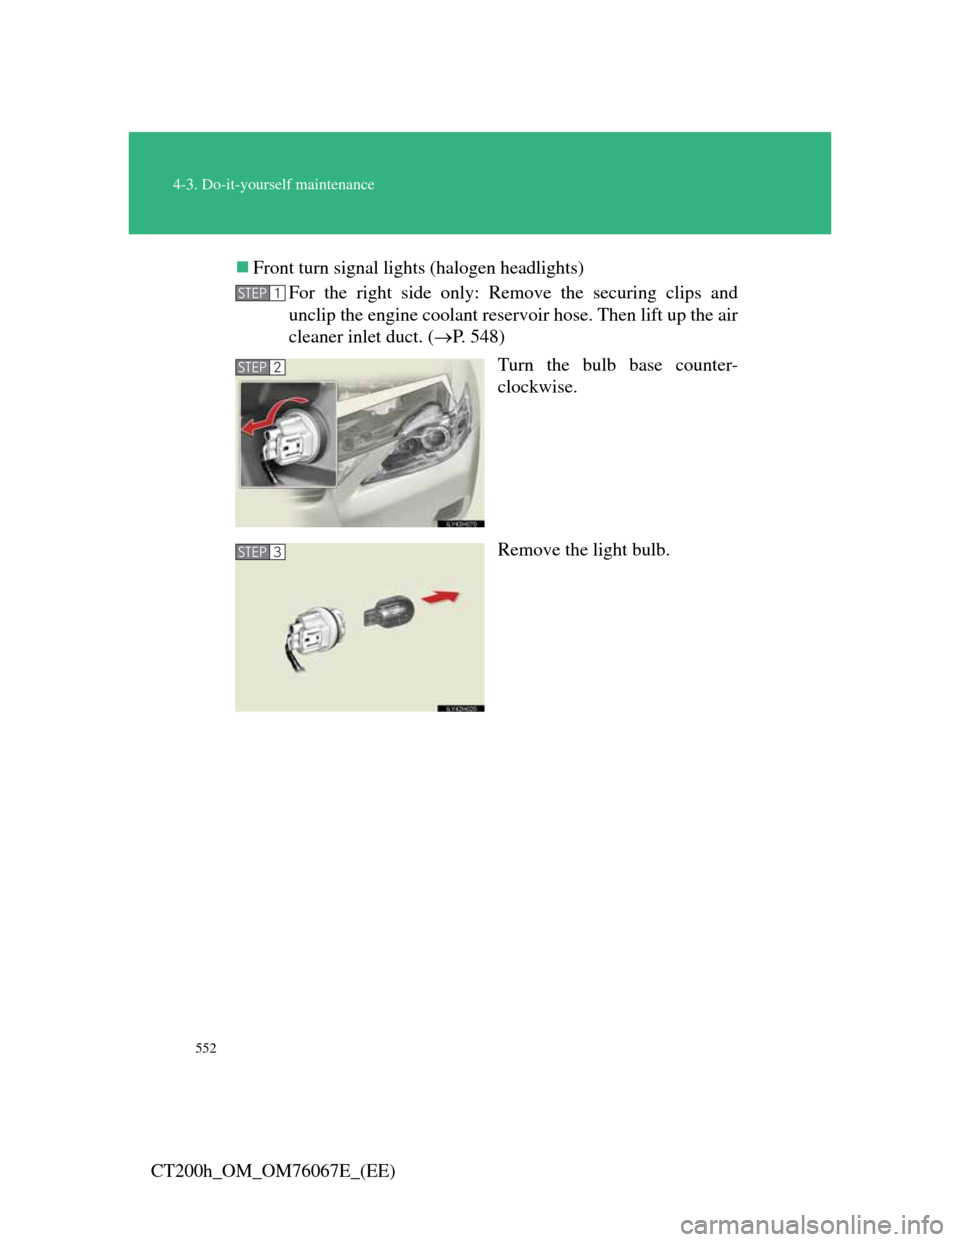
CT200h_OM_OM76067E_(EE)Front turn signal lights (halogen headlights)
For the right side only: Remove the securing clips and
unclip the engine coolant reservoir hose. Then lift up the air
cleaner inlet duct. (P. 548)
Turn the bulb base counter-
clockwise.
Remove the light bulb.
STEP1
STEP2
STEP3
Page 555 of 710
553
4-3. Do-it-yourself maintenance
4
Maintenance and care
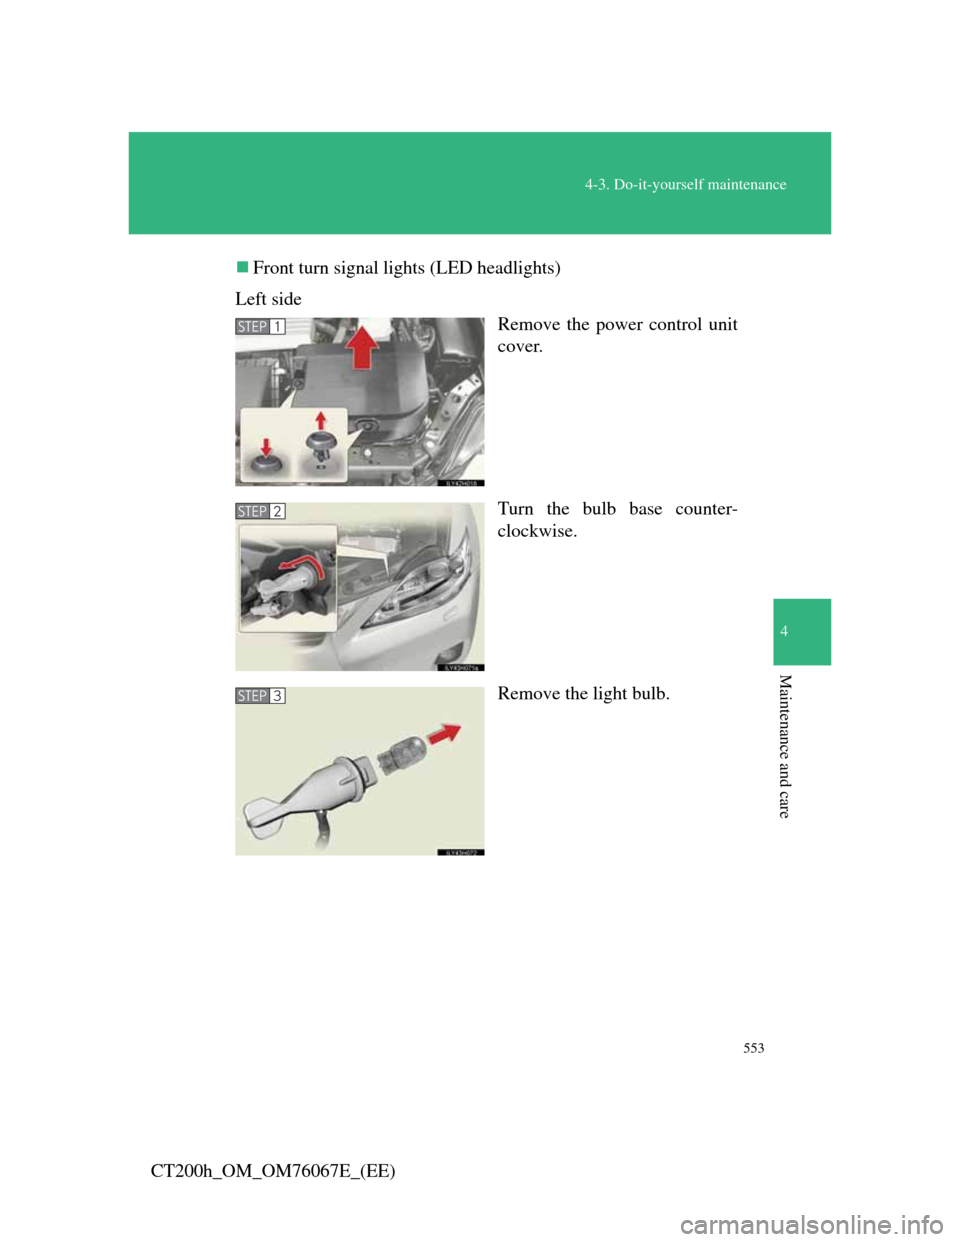
CT200h_OM_OM76067E_(EE)Front turn signal lights (LED headlights)
Left side
Remove the power control unit
cover.
Turn the bulb base counter-
clockwise.
Remove the light bulb.
STEP1
STEP2
STEP3
Page 561 of 710
559
4-3. Do-it-yourself maintenance
4
Maintenance and care
CT200h_OM_OM76067E_(EE)
LED lights
The headlight low beams (LED type), front position lights, daytime running
lights, side turn signal lights, stop/tail lights and high mounted stoplight
consist of a number of LEDs. If any of the LEDs burn out, take your vehicle
to any authorized Lexus dealer or repairer, or another duly qualified and
equipped professional to have the light replaced.
Condensation build-up on the inside of the lens
Contact any authorized Lexus dealer or repairer, or another duly qualified
and equipped professional for more information in the following situations.
Temporary condensation build-up on the inside of the headlight lens does
not indicate a malfunction.
Large drops of water have built up on the inside of the lens.
Water has built up inside the headlight.
When replacing light bulbs
P. 5 4 4
CAUTION
Replacing light bulbs
Turn off the lights. Do not attempt to replace the bulb immediately after
turning off the lights.
The bulbs become very hot and may cause burns.
Do not touch the glass portion of the light bulb with bare hands. Hold the
bulb by the plastic or metal portion.
If the bulb is scratched or dropped, it may blow out or crack.
Fully install light bulbs and any parts used to secure them. Failure to do so
may result in heat damage, fire, or water entering the headlight unit. This
may damage the headlights or cause condensation to build up on the lens.
To prevent damage or fire
Make sure bulbs are fully seated and locked.
Page 629 of 710
5
627
5-2. Steps to take in an emergency
When trouble arises
CT200h_OM_OM76067E_(EE)
If the hybrid system will not start
Reasons for the hybrid system not starting vary depending on the situ-
ation. Check the following and perform the appropriate procedure:
The hybrid system will not start even though the correct start-
ing procedure is being followed. (P. 198)
One of the following may be the cause of the problem:
The electronic key may not be functioning properly.
* (P.
630)
There may not be sufficient fuel in the vehicle’s tank.
Refuel the vehicle.
There may be a malfunction in the immobilizer system.
*
(P. 135)
There may be a malfunction in the P position control sys-
tem.
* (P. 202, 580)
*: It may not be possible to shift the shift position other than P.
The interior lights and headlights are dim, or the horn does not
sound or sounds at a low volume.
One of the following may be the cause of the problem:
The 12-volt battery may be discharged. (P. 508)
The 12-volt battery terminal connections may be loose or
Page 630 of 710
628
5-2. Steps to take in an emergency
CT200h_OM_OM76067E_(EE)
Emergency start function
When the hybrid system does not start, the following steps can be
used as an interim measure to start the hybrid system if the
“POWER” switch is functioning normally:
Set the parking brake.
Turn the “POWER” switch to ACCESSORY mode.
Press and hold the “POWER” switch for about 15 seconds
while depressing the brake pedal firmly.
Even if the hybrid system can be started using the above steps, the
system may be malfunctioning. Have the vehicle inspected by any
authorized Lexus dealer or repairer, or another duly qualified and
equipped professional.
The interior lights and headlights do not turn on, or the horn
does not sound.
One of the following may be the cause of the problem:
One or both of the 12-volt battery terminals may be discon-
nected.
The 12-volt battery may be discharged. (P. 508)
Contact any authorized Lexus dealer or repairer, or another duly
qualified and equipped professional if the problem cannot be
repaired, or if repair procedures are unknown.
STEP1
STEP2
STEP3
Page 638 of 710
636
5-2. Steps to take in an emergency
CT200h_OM_OM76067E_(EE)
Starting the hybrid system when the 12-volt battery is discharged
The hybrid system cannot be started by push-starting.
To prevent 12-volt battery discharge
Turn off the headlights and the audio system while the hybrid system is
off.
Turn off any unnecessary electrical components when the vehicle is run-
ning at a low speed for an extended period, such as in heavy traffic.
When the 12-volt battery is removed or discharged
The hybrid system may not start. (P. 5 1 1 )
If the 12-volt battery discharges while the shift position is in P, it may not
be possible to shift the shift position to other positions. In this case, the
vehicle cannot be towed without lifting both front wheels because the
front wheels will be locked. (P. 563)
When the 12-volt battery is reconnected, start the hybrid system and
confirm that the shift position can be changed to each position using the
shift position indicator.
Make sure that the key is not inside the vehicle when recharging or
replacing the 12-volt battery. The key may be locked in the vehicle if the
alarm is activated. (P. 142)
Charging the 12-volt battery
The electricity stored in the 12-volt battery will discharge gradually even
when the vehicle is not in use, due to natural discharge and the draining
effects of certain electrical appliances. If the vehicle is left for a long time,
the 12-volt battery may discharge, and the hybrid system may be unable to
start. (The 12-volt battery recharges automatically while the hybrid system
is operating.)