check oil Lexus CT200h 2013 Owner's Manual (in English)
[x] Cancel search | Manufacturer: LEXUS, Model Year: 2013, Model line: CT200h, Model: Lexus CT200h 2013Pages: 688
Page 17 of 688
17Pictorial index
CT200h_OM_OM76102E_(EE)
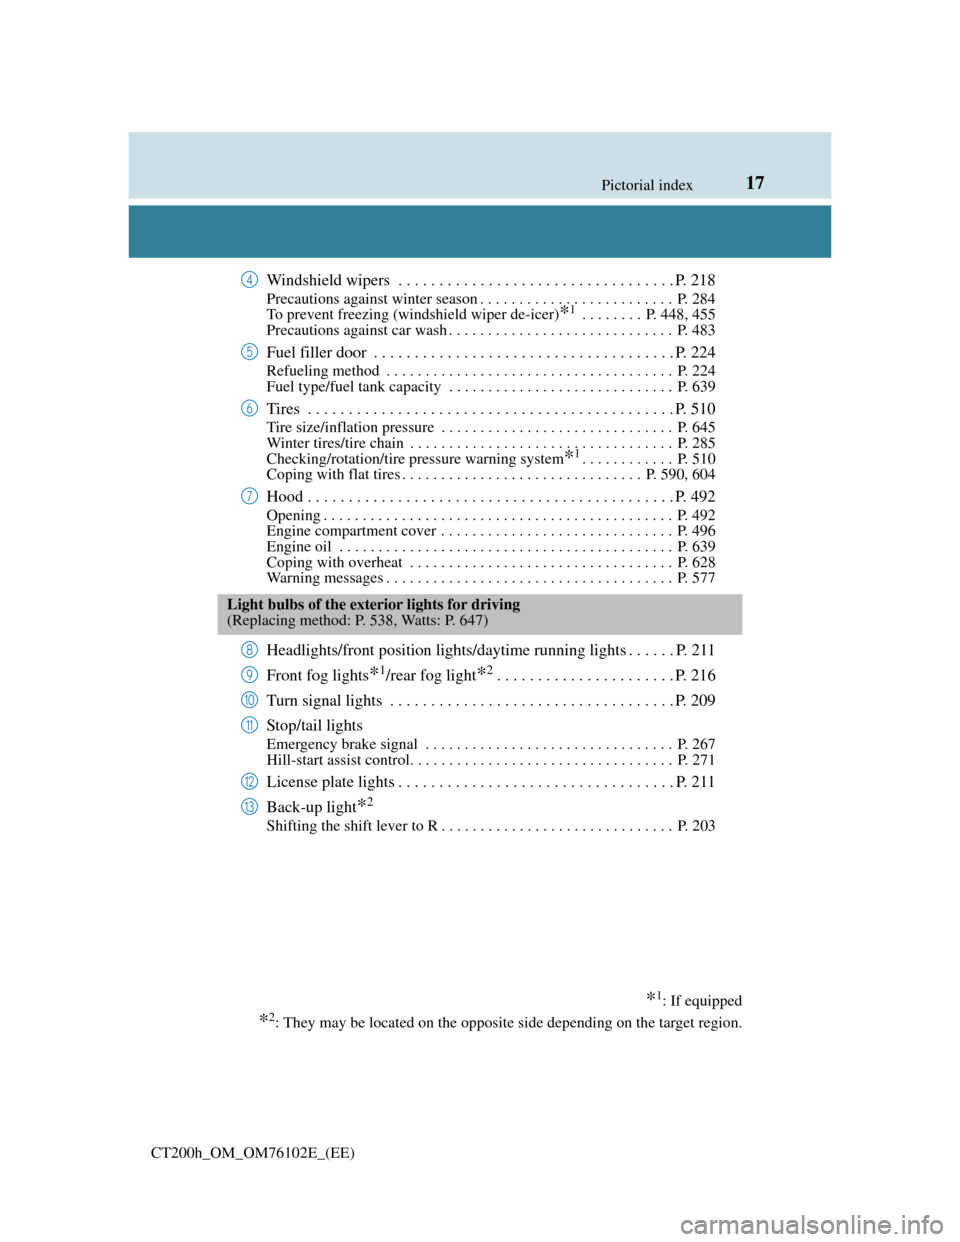
Windshield wipers . . . . . . . . . . . . . . . . . . . . . . . . . . . . . . . . . . P. 218
Precautions against winter season . . . . . . . . . . . . . . . . . . . . . . . . . P. 284
To prevent freezing (windshield wiper de-icer)
*1 . . . . . . . . P. 448, 455
Precautions against car wash . . . . . . . . . . . . . . . . . . . . . . . . . . . . . P. 483
Fuel filler door . . . . . . . . . . . . . . . . . . . . . . . . . . . . . . . . . . . . . P. 224
Refueling method . . . . . . . . . . . . . . . . . . . . . . . . . . . . . . . . . . . . . P. 224
Fuel type/fuel tank capacity . . . . . . . . . . . . . . . . . . . . . . . . . . . . . P. 639
Tires . . . . . . . . . . . . . . . . . . . . . . . . . . . . . . . . . . . . . . . . . . . . . P. 510
Tire size/inflation pressure . . . . . . . . . . . . . . . . . . . . . . . . . . . . . . P. 645
Winter tires/tire chain . . . . . . . . . . . . . . . . . . . . . . . . . . . . . . . . . . P. 285
Checking/rotation/tire pressure warning system
*1. . . . . . . . . . . . P. 510
Coping with flat tires . . . . . . . . . . . . . . . . . . . . . . . . . . . . . . . P. 590, 604
Hood . . . . . . . . . . . . . . . . . . . . . . . . . . . . . . . . . . . . . . . . . . . . . P. 492
Opening . . . . . . . . . . . . . . . . . . . . . . . . . . . . . . . . . . . . . . . . . . . . . P. 492
Engine compartment cover . . . . . . . . . . . . . . . . . . . . . . . . . . . . . . P. 496
Engine oil . . . . . . . . . . . . . . . . . . . . . . . . . . . . . . . . . . . . . . . . . . . P. 639
Coping with overheat . . . . . . . . . . . . . . . . . . . . . . . . . . . . . . . . . . P. 628
Warning messages . . . . . . . . . . . . . . . . . . . . . . . . . . . . . . . . . . . . . P. 577
Headlights/front position lights/daytime running lights . . . . . . P. 211
Front fog lights
*1/rear fog light*2. . . . . . . . . . . . . . . . . . . . . . P. 216
Turn signal lights . . . . . . . . . . . . . . . . . . . . . . . . . . . . . . . . . . . P. 209
Stop/tail lights
Emergency brake signal . . . . . . . . . . . . . . . . . . . . . . . . . . . . . . . . P. 267
Hill-start assist control. . . . . . . . . . . . . . . . . . . . . . . . . . . . . . . . . . P. 271
License plate lights . . . . . . . . . . . . . . . . . . . . . . . . . . . . . . . . . . P. 211
Back-up light
*2
Shifting the shift lever to R . . . . . . . . . . . . . . . . . . . . . . . . . . . . . . P. 203
4
5
6
7
Light bulbs of the exterior lights for driving
(Replacing method: P. 538, Watts: P. 647)
*1: If equipped
*2: They may be located on the opposite side depending on the target region.
8
9
10
11
12
13
Page 193 of 688
1934-1. Before driving
4
Driving
CT200h_OM_OM76102E_(EE)
NOTICE
When driving the vehicle
Do not depress the accelerator and brake pedals at the same time during driv-
ing, as this may restrain driving torque.
Do not use the accelerator pedal or depress the accelerator and brake pedals at
the same time to hold the vehicle on a hill.
When parking the vehicle
Always shift the shift position to P. Failure to do so may cause the vehicle to
move or the vehicle may accelerate suddenly if the accelerator pedal is acciden-
tally depressed.
Avoiding damage to vehicle parts
Do not turn the steering wheel fully in either direction and hold it there for an
extended period of time.
Doing so may damage the power steering motor.
When driving over bumps in the road, drive as slowly as possible to avoid
damaging the wheels, underside of the vehicle, etc.
If you get a flat tire while driving
A flat or damaged tire may cause the following situations. Hold the steering
wheel firmly and gradually depress the brake pedal to slow down the vehicle.
It may be difficult to control your vehicle.
The vehicle will make abnormal sounds or vibrations.
The vehicle will lean abnormally.
Information on what to do in case of a flat tire (P. 590, 604)
When encountering flooded roads
Do not drive on a road that has flooded after heavy rain etc. Doing so may
cause the following serious damage to the vehicle:
Engine stalling
Short in electrical components
Engine damage caused by water immersion
In the event that you drive on a flooded road and the vehicle is flooded, be sure
to have any authorized Lexus dealer or repairer, or another duly qualified and
equipped professional check the following:
Brake function
Changes in quantity and quality of oil and fluid used for the engine, transmis-
sion, etc.
Lubricant condition for the bearings and suspension joints (where possible),
and the function of all joints, bearings, etc.
If the P position control system is damaged by flooding, it may not be possible
to shift the shift position to P, or from P to other positions. When the shift posi-
tion cannot be changed from P to any other position, the front wheels will lock,
and you will be unable to tow the vehicle with the front wheels on the ground,
as the front wheels may be locked. In this case, transport the vehicle with both
front wheels or all four wheels lifted.
Page 286 of 688
2844-6. Driving tips
CT200h_OM_OM76102E_(EE)
Winter driving tips
Use fluids that are appropriate to the prevailing outside temperatures.
•Engine oil
• Engine/power control unit coolant
•Washer fluid
Have a service technician inspect the condition of the 12-volt battery.
Have the vehicle fitted with four snow tires or purchase a set of tire
chains for the front tires.
Ensure that all tires are the same size and brand, and that chains match the size
of the tires.
Perform the following according to the driving conditions:
Do not try to forcibly open a window or move a wiper that is frozen.
Pour warm water over the frozen area to melt the ice. Wipe away the
water immediately to prevent it from freezing.
To ensure proper operation of the climate control system fan, remove
any snow that has accumulated on the air inlet vents in front of the
windshield.
Check for and remove any excess ice or snow that may have accumu-
lated on the exterior lights, vehicle’s roof, chassis, around the tires or
on the brakes.
Remove any snow or mud from the bottom of your shoes before get-
ting in the vehicle.
Carry out the necessary preparations and inspections before driving the
vehicle in winter. Always drive the vehicle in a manner appropriate to the
prevailing weather conditions.
Pre-winter preparations
Before driving the vehicle
Page 484 of 688
4807-1. Maintenance and care
CT200h_OM_OM76102E_(EE)
Cleaning and protecting the vehicle exterior
Working from top to bottom, liberally apply water to the vehicle body,
wheel wells and underside of the vehicle to remove any dirt and dust.
Wash the vehicle body using a sponge or soft cloth, such as a chamois.
For hard-to-remove marks, use car wash soap and rinse thoroughly
with water.
Wipe away any water.
Wax the vehicle when the waterproof coating deteriorates.
If water does not bead on a clean surface, apply wax when the vehicle body is
cool.
Self-restoring coat
The vehicle body has a self-restoring coating that is resistant to small surface
scratches caused in a car wash etc.
The coating lasts for 5 to 8 years after the coating has been performed.
The restoration time differs depending on the depth of the scratch and outside
temperature. The restoration time may become shorter when the coating is
warmed by applying warm water.
Deep scratches caused by keys or coins cannot be restored.
Do not use wax that contain abrasives.
Automatic car washes
Fold the mirrors before washing the vehicle. Start washing from the front of the
vehicle. Make sure to extend the mirrors before driving.
Brushes used in automatic car washes may scratch the vehicle surface and harm
your vehicle’s paint.
Rear spoiler may not be washable in some automatic car washes. There may
also be an increased risk of damage to vehicle.
High pressure car washes
Do not allow the nozzles of the car wash to come within close proximity of the
windows.
Before using the car wash, check that the fuel filler door on your vehicle is
closed properly.
Perform the following to protect the vehicle and maintain it in prime con-
dition:
Page 501 of 688
4977-3. Do-it-yourself maintenance
CT200h_OM_OM76102E_(EE)
7
Maintenance and care
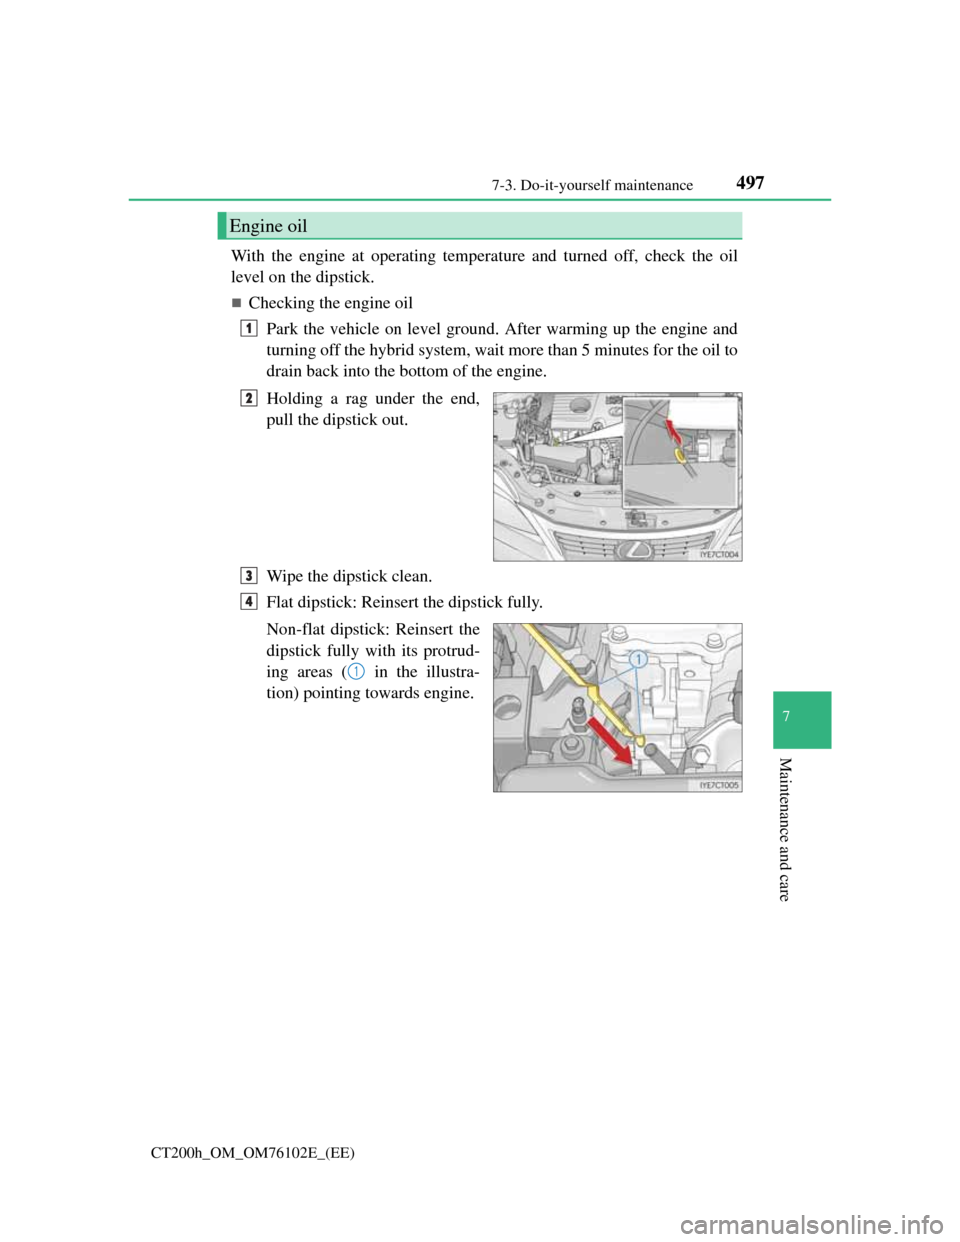
With the engine at operating temperature and turned off, check the oil
level on the dipstick.
Checking the engine oil
Park the vehicle on level ground. After warming up the engine and
turning off the hybrid system, wait more than 5 minutes for the oil to
drain back into the bottom of the engine.
Holding a rag under the end,
pull the dipstick out.
Wipe the dipstick clean.
Flat dipstick: Reinsert the dipstick fully.
Non-flat dipstick: Reinsert the
dipstick fully with its protrud-
ing areas ( in the illustra-
tion) pointing towards engine.
Engine oil
1
2
3
4
1
Page 502 of 688
4987-3. Do-it-yourself maintenance
CT200h_OM_OM76102E_(EE)
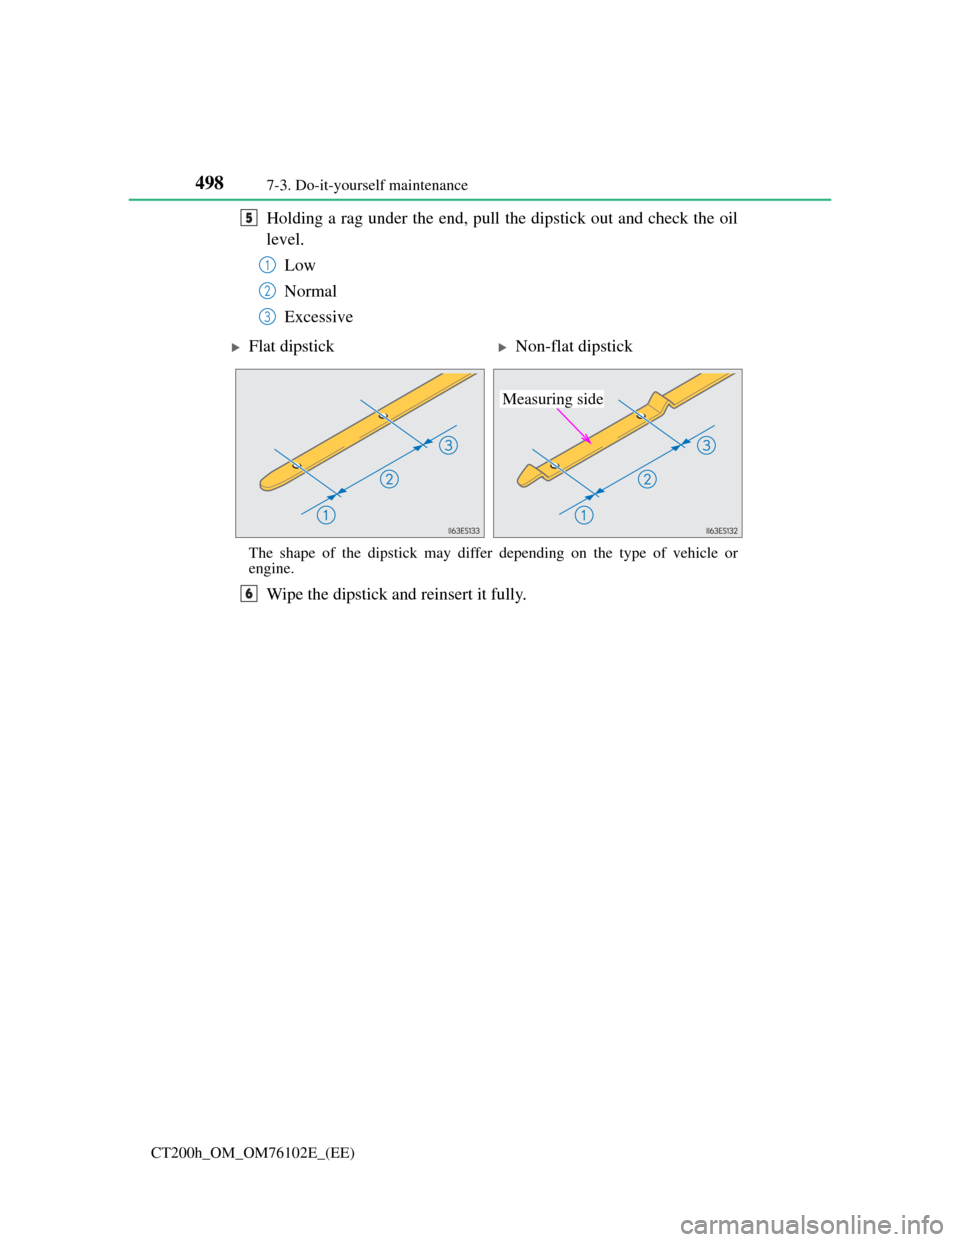
Holding a rag under the end, pull the dipstick out and check the oil
level.
Low
Normal
Excessive
The shape of the dipstick may differ depending on the type of vehicle or
engine.
Wipe the dipstick and reinsert it fully.
5
1
2
3
Flat dipstickNon-flat dipstick
Measuring side
6
Page 503 of 688
4997-3. Do-it-yourself maintenance
CT200h_OM_OM76102E_(EE)
7
Maintenance and care
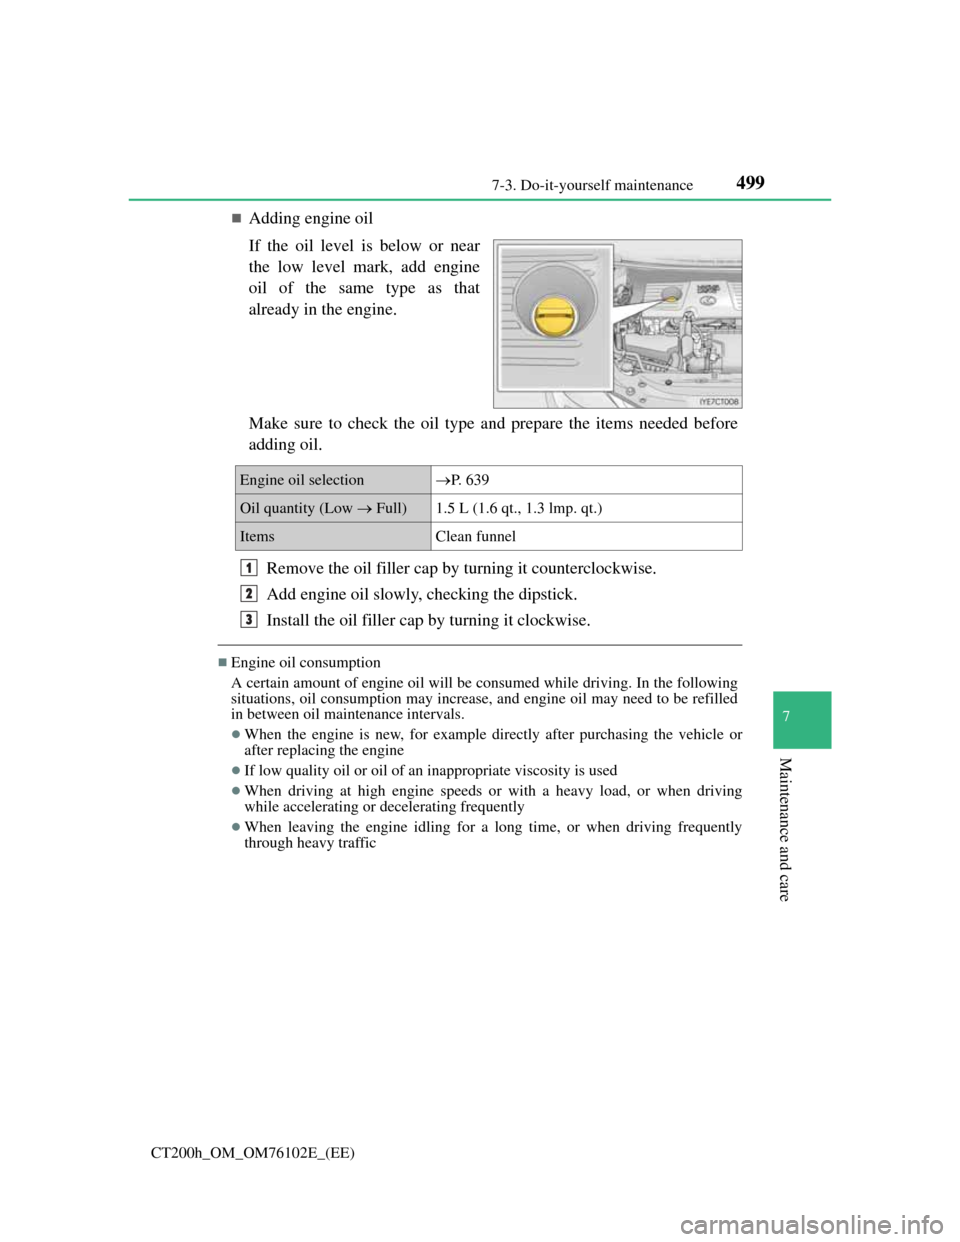
Adding engine oil
If the oil level is below or near
the low level mark, add engine
oil of the same type as that
already in the engine.
Make sure to check the oil type and prepare the items needed before
adding oil.
Remove the oil filler cap by turning it counterclockwise.
Add engine oil slowly, checking the dipstick.
Install the oil filler cap by turning it clockwise.
Engine oil consumption
A certain amount of engine oil will be consumed while driving. In the following
situations, oil consumption may increase, and engine oil may need to be refilled
in between oil maintenance intervals.
When the engine is new, for example directly after purchasing the vehicle or
after replacing the engine
If low quality oil or oil of an inappropriate viscosity is used
When driving at high engine speeds or with a heavy load, or when driving
while accelerating or decelerating frequently
When leaving the engine idling for a long time, or when driving frequently
through heavy traffic
Engine oil selectionP. 6 3 9
Oil quantity (Low Full)1.5 L (1.6 qt., 1.3 lmp. qt.)
ItemsClean funnel
1
2
3
Page 504 of 688
5007-3. Do-it-yourself maintenance
CT200h_OM_OM76102E_(EE)
WA R N I N G
Used engine oil
Used engine oil contains potentially harmful contaminants which may cause
skin disorders such as inflammation and skin cancer, so care should be taken
to avoid prolonged and repeated contact. To remove used engine oil from
your skin, wash thoroughly with soap and water.
Dispose of used oil and filters only in a safe and acceptable manner. Do not
dispose of used oil and filters in household trash, in sewers or onto the
ground. Call any authorized Lexus dealer or repairer, or another duly quali-
fied and equipped professional, service station or auto parts store for informa-
tion concerning recycling or disposal.
Do not leave used engine oil within the reach of children.
NOTICE
To prevent serious engine damage
Check the oil level on a regular basis.
When replacing the engine oil
Be careful not to spill engine oil on the vehicle components.
Avoid overfilling, or the engine could be damaged.
Check the oil level on the dipstick every time you refill the vehicle.
Be sure the engine oil filler cap is properly tightened.
Page 561 of 688
5577-3. Do-it-yourself maintenance
CT200h_OM_OM76102E_(EE)
7
Maintenance and care
WA R N I N G
Replacing light bulbs
Be sure to stop the hybrid system and turn off the lights. Do not attempt to
replace the bulb immediately after turning off the lights.
The bulbs become very hot and may cause burns.
Do not touch the glass portion of the light bulb with bare hands. When it is
unavoidable to hold the glass portion, use and hold with a clean dry cloth to
avoid getting moisture and oils on the bulb.
Also, if the bulb is scratched or dropped, it may blow out or crack.
Fully install light bulbs and any parts used to secure them. Failure to do so
may result in heat damage, fire, or water entering the headlight unit. This may
damage the headlights or cause condensation to build up on the lens.
Do not attempt to repair or disassemble light bulbs, connectors, electric cir-
cuits or component parts.
Doing so may result in death or serious injury due to electric shock.
To prevent damage or fire
Make sure bulbs are fully seated and locked.
Check the wattage of the bulb before installing to prevent heat damage.
NOTICE
When replacing the outer foot lights
If the front window is stopping you from conducting the replace operation
properly, open the window on the side you are working on to allow you enough
space to work. Continuing the operation without giving yourself enough space
to work could lead you to scratch the vehicle.
Page 643 of 688
639
9 9-1. Specifications
Vehicle specifications
CT200h_OM_OM76102E_(EE)
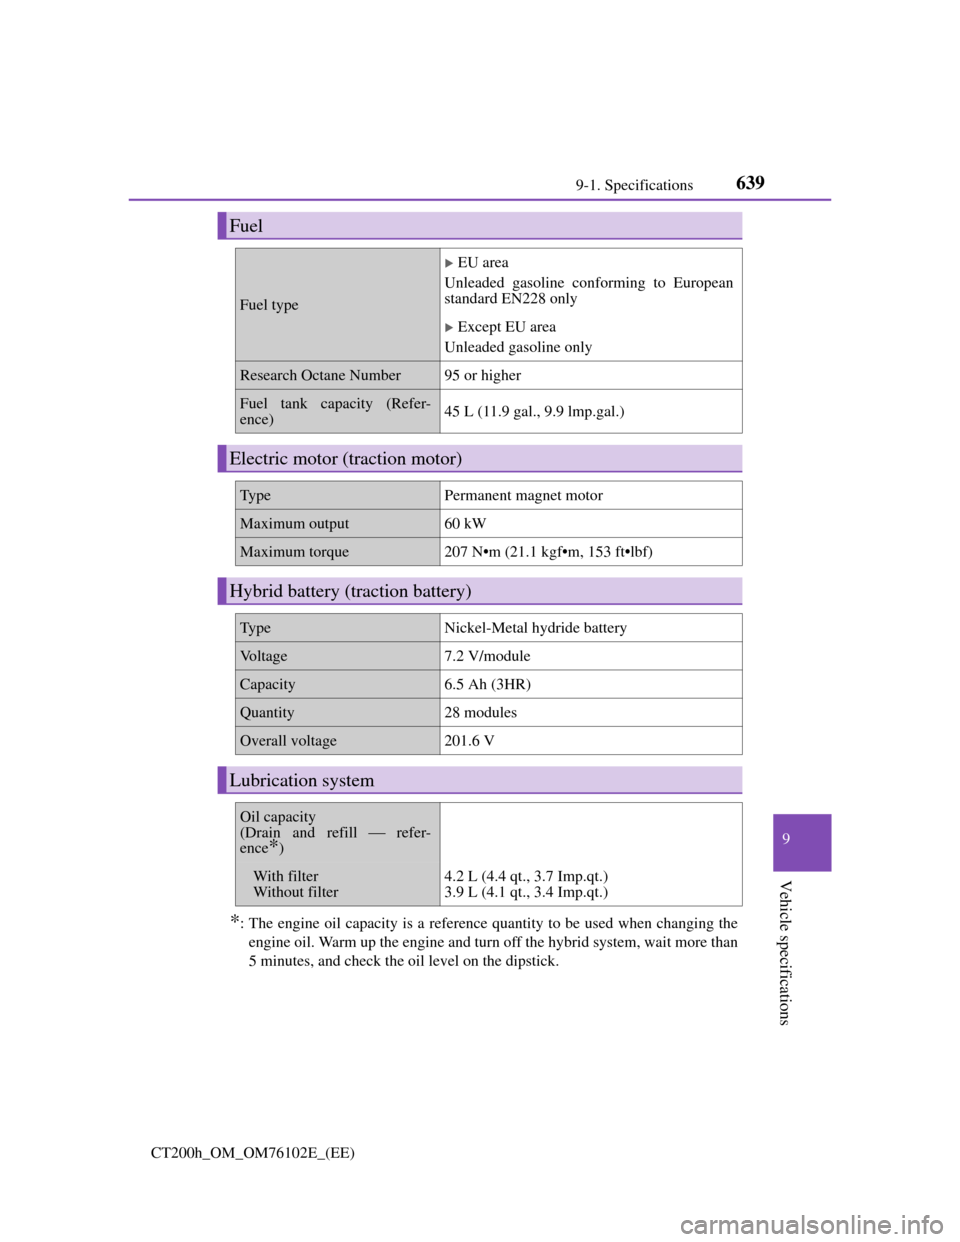
*: The engine oil capacity is a reference quantity to be used when changing the
engine oil. Warm up the engine and turn off the hybrid system, wait more than
5 minutes, and check the oil level on the dipstick.
Fuel
Fuel type
EU area
Unleaded gasoline conforming to European
standard EN228 only
Except EU area
Unleaded gasoline only
Research Octane Number95 or higher
Fuel tank capacity (Refer-
ence)45 L (11.9 gal., 9.9 lmp.gal.)
Electric motor (traction motor)
TypePermanent magnet motor
Maximum output60 kW
Maximum torque207 N•m (21.1 kgf•m, 153 ft•lbf)
Hybrid battery (traction battery)
TypeNickel-Metal hydride battery
Voltage7.2 V/module
Capacity6.5 Ah (3HR)
Quantity28 modules
Overall voltage201.6 V
Lubrication system
Oil capacity
(Drain and refill refer-
ence
*)
With filter
Without filter4.2 L (4.4 qt., 3.7 Imp.qt.)
3.9 L (4.1 qt., 3.4 Imp.qt.)