Signal Lexus CT200h 2016 (in English) Owner's Guide
[x] Cancel search | Manufacturer: LEXUS, Model Year: 2016, Model line: CT200h, Model: Lexus CT200h 2016Pages: 632, PDF Size: 8.5 MB
Page 446 of 632
446
CT200h_OM_OM76197U_(U)6-4. Using the other interior features
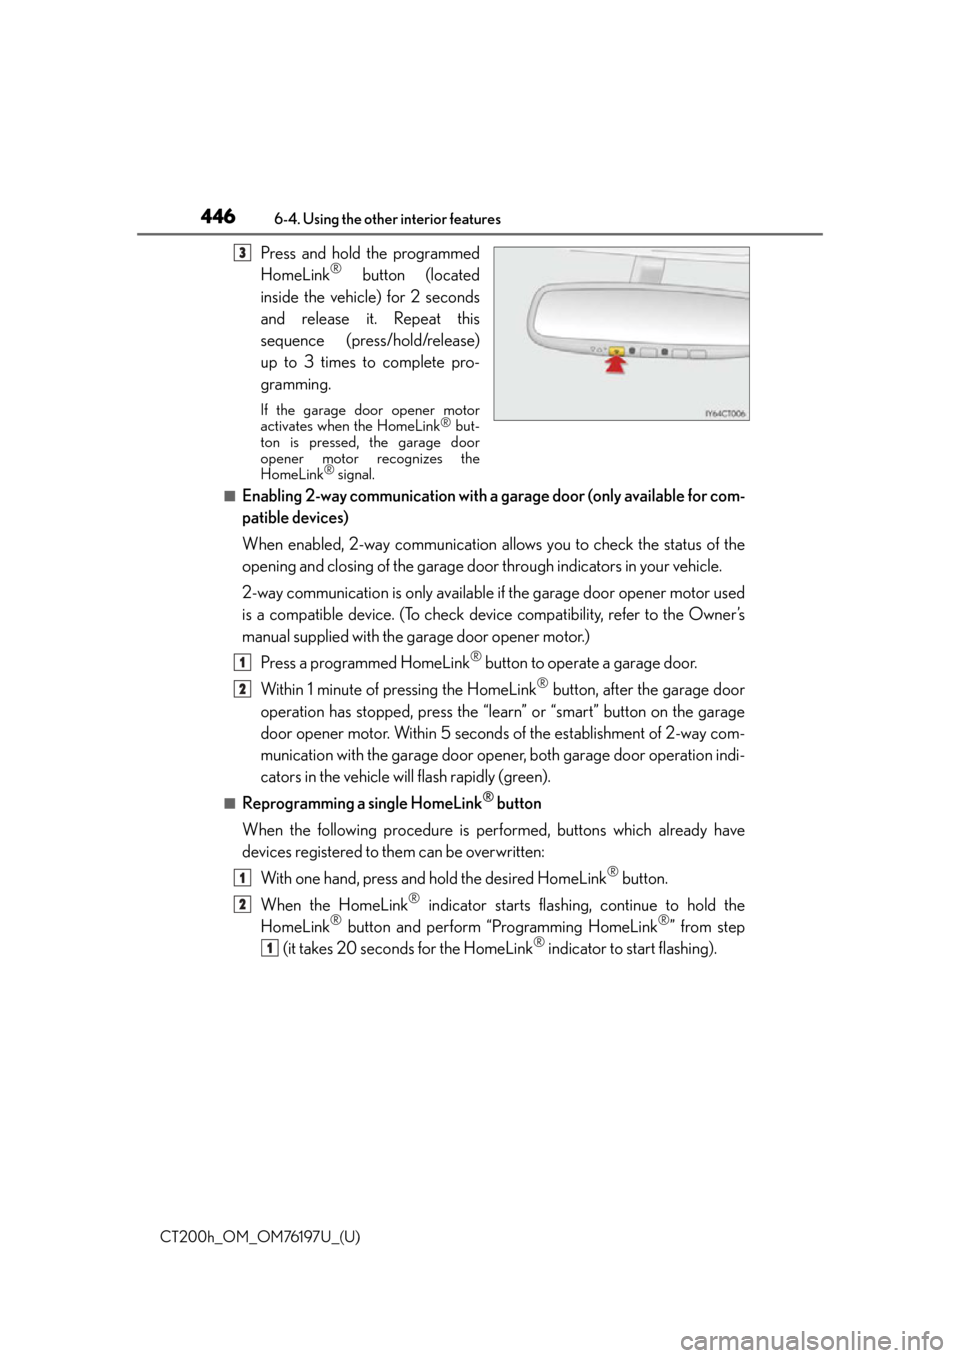
Press and hold the programmed
HomeLink® button (located
inside the vehicle) for 2 seconds
and release it. Repeat this
sequence (press/hold/release)
up to 3 times to complete pro-
gramming.
If the garage door opener motor
activates when the HomeLink® but-
ton is pressed, the garage door
opener motor recognizes the
HomeLink
® signal.
■Enabling 2-way communication with a garage door (only available for com-
patible devices)
When enabled, 2-way communication allows you to check the status of the
opening and closing of the garage door through indicators in your vehicle.
2-way communication is only available if the garage door opener motor used
is a compatible device. (To check devi ce compatibility, refer to the Owner’s
manual supplied with the garage door opener motor.)
Press a programmed HomeLink
® button to operate a garage door.
Within 1 minute of pressing the HomeLink
® button, after the garage door
operation has stopped, press the “learn” or “smart” button on the garage
door opener motor. Within 5 second s of the establishment of 2-way com-
munication with the garage door opener, both garage door operation indi-
cators in the vehicle will flash rapidly (green).
■Reprogramming a single HomeLink® button
When the following procedure is performed, buttons which already have
devices registered to them can be overwritten: With one hand, press and hold the desired HomeLink
® button.
When the HomeLink
® indicator starts flashing , continue to hold the
HomeLink® button and perform “Programming HomeLink®” from step
(it takes 20 seconds for the HomeLink® indicator to start flashing).
3
1
2
1
2
1
Page 447 of 632
CT200h_OM_OM76197U_(U)
4476-4. Using the other interior features
6
Interior features
Press the appropriate HomeLink® button. The HomeLink® indicator light
should turn on.
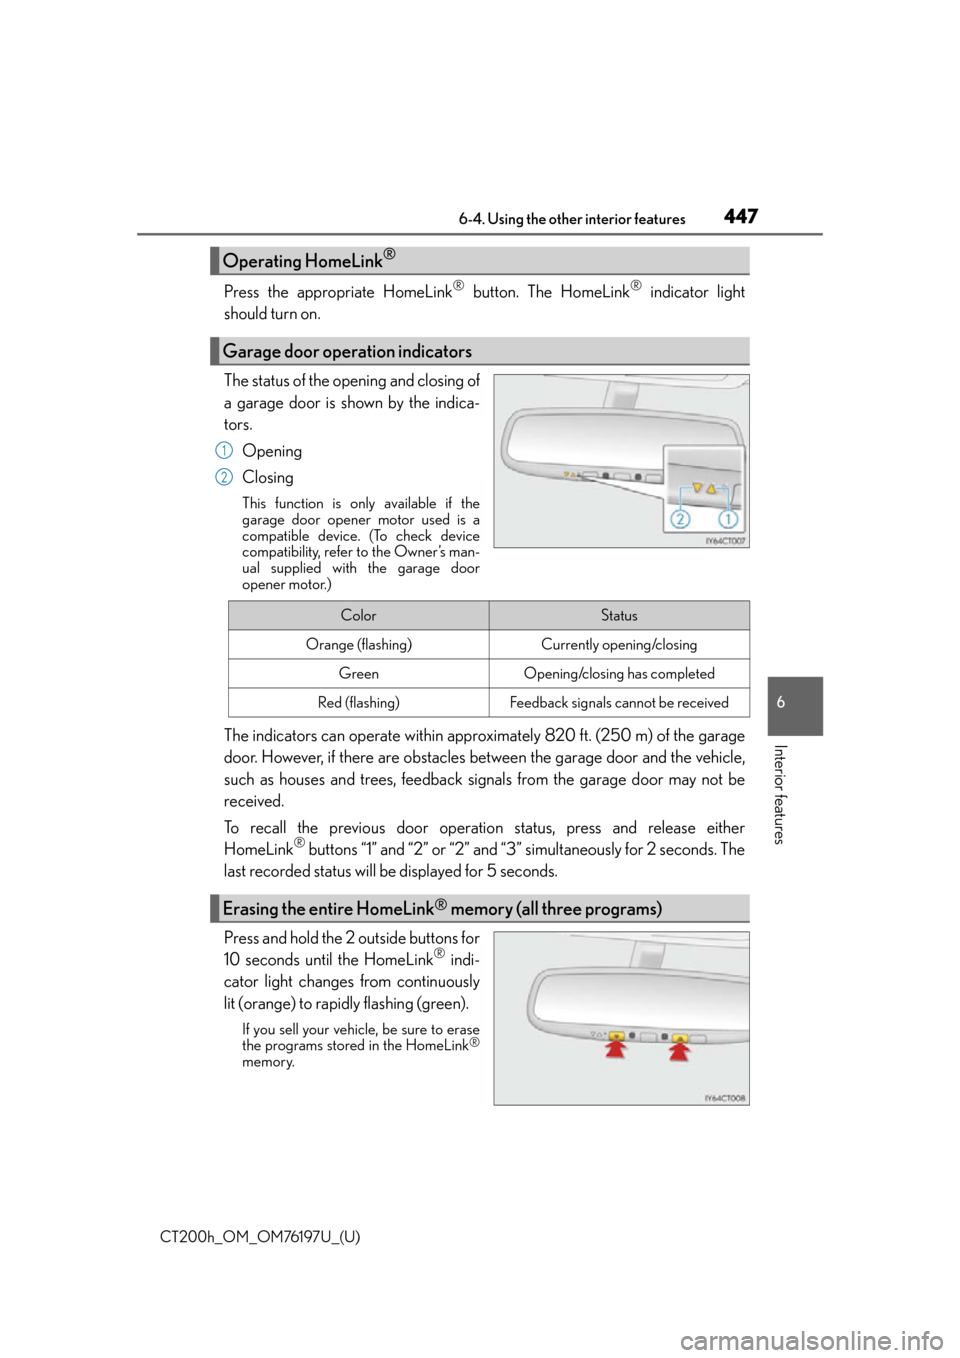
The status of the opening and closing of
a garage door is shown by the indica-
tors.
Opening
Closing
This function is only available if the
garage door opener motor used is a
compatible device. (To check device
compatibility, refer to the Owner’s man-
ual supplied with the garage door
opener motor.)
The indicators can operate within approximately 820 ft. (250 m) of the garage
door. However, if there are obstacles between the garage door and the vehicle,
such as houses and trees, feedback signals from the garage door may not be
received.
To recall the previous door operation status, press and release either
HomeLink
® buttons “1” and “2” or “2” and “3” simultaneously for 2 seconds. The
last recorded status will be displayed for 5 seconds.
Press and hold the 2 outside buttons for
10 seconds until the HomeLink
® indi-
cator light changes from continuously
lit (orange) to rapidly flashing (green).
If you sell your vehicle, be sure to erase
the programs stored in the HomeLink®
memory.
Operating HomeLink®
Garage door operation indicators
1
2
ColorStatus
Orange (flashing)Currently opening/closing
GreenOpening/closing has completed
Red (flashing)Feedback signals cannot be received
Erasing the entire HomeLink® memory (all three programs)
Page 456 of 632
456
CT200h_OM_OM76197U_(U)6-4. Using the other interior features
Subscribers have the following Safety Connect services available:
●Automatic Collision Notification*
Helps drivers receive necessary response from emergency service providers.
(
P. 4 5 7 )
*: U.S. Patent No. 7,508,298 B2
●Stolen Vehicle Location
Helps drivers in the event of vehicle theft. ( P. 4 5 7 )
●Emergency Assistance Button (SOS)
Connects drivers to resp onse-center support. (P. 4 5 7 )
●Enhanced Roadside Assistance
Provides drivers various on-road assistance. ( P. 4 5 8 )
After you have signed the Telematics Subscription Service Agreement and are
enrolled, you can begin receiving services.
A variety of subscription terms is available for purchase. Contact your Lexus
dealer, call 1-800-25-LEXUS (1-800-255-3987) or push the “SOS” button in
your vehicle for further subscription details.
■Safety Connect Services Information
●Phone calls using the vehicles Bluetooth® technology will not be possible during Safety
Connect.
●Contact with the Safety Conne ct response center is dependent upon the telematics
device being in operative condition, cellul ar connection availability, and GPS satellite
signal reception, which can limit the ability to reach the response center or receive
emergency service support. Enrollment an d Telematics Subscription Service Agree-
ment required. A variety of subscription terms is available; charges vary by subscription
term selected.
●Automatic Collision Notification, Emergency Assistance and Stolen Vehicle Location
will function in the United States, including Hawaii and Alaska, and in Canada, and
Enhanced Roadside Assistance will function in the United States (except Hawaii) and in
Canada. No Safety Connect services will function outside of the United States in coun-
tries other than Canada.
●Safety Connect services are not subject to section 255 of the Telecommunications Act
and the device is not TTY compatible.
■Languages
The Safety Connect resp onse center will offer support in multiple languages. The Safety
Connect system will offer voice prompts in English and Spanish. Please indicate your lan-
guage of choice when enrolling.
■When contacting the response center
You may be unable to contact the resp onse center if the network is busy.
Services
Subscription
Page 458 of 632
458
CT200h_OM_OM76197U_(U)6-4. Using the other interior features
■Enhanced Roadside Assistance
Enhanced Roadside Assistance adds GP
S data to the already included war-
ranty-based Lexus roadside service.
Subscribers can press the “SOS” button to reach a Safety Connect response-
center agent, who can help with a wide range of needs, such as: towing, flat
tire, fuel delivery, etc. For a description of the Roadside Assistance services
and their limitations, please see the Safety Connect Terms and Conditions,
which are available at Lexus.com.
Important! Read this informatio n before using Safety Connect.
■Exposure to radio frequency signals
The Safety Connect system installed in your vehicle is a low-power radio
transmitter and receiver. It receives and also sends out radio frequency (RF)
signals.
In August 1996, the Federal Communications Commission (FCC) adopted
RF exposure guidelines with safety levels for mobile wireless phones. Those
guidelines are consistent with the safe ty standards previously set by the fol-
lowing U.S. and international standards bodies.
●ANSI (American National Stan dards Institute) C95.1 [1992]
●NCRP (National Council on Radiation Protection and Measurement)
Report 86 [1986]
●ICNIRP (International Commission on Non-Ionizing Radiation Protection)
[1996]
Those standards were based on comprehensive and periodic evaluations of
the relevant scientific literature. Over 120 scientists, engineers, and physi-
cians from universities, and governme nt health agencies and industries
reviewed the available body of research to develop the ANSI Standard
(C95.1).
The design of Safety Connect complies wi th the FCC guidelines in addition to
those standards.
Safety information for Safety Connect
Page 494 of 632

494
CT200h_OM_OM76197U_(U)7-3. Do-it-yourself maintenance
■Situations in which the tire pressure warning system may not operate properly
●In the following cases, the tire pressure warning system may not operate properly.
• If non-genuine Lexus wheels are used.
• A tire has been replaced with a tire that is not an OE (Original Equipment) tire.
• A tire has been replaced with a tire that is not of the specified size.
• Tire chains etc. are equipped.
• Lock nuts are equipped.
• An auxiliary-supported run-flat tire is equipped.
• If a window tint that affects the radio wave signals is installed.
• If there is a lot of snow or ice on the vehicle, particularly around the wheels or wheel
housings.
• If the tire inflation pressure is extremely higher than the specified level.
• If wheel without the tire pressure warning valve and transmitter is used.
• If the ID code on the tire pressure warning valves and transmitters is not registered in the tire pressure warning computer.
●Performance may be affected in the following situations.
• Near a TV tower, electric power plant, gas station, radio station, large display, air-
port or other facility th at generates strong radio waves or electrical noise
• When carrying a portable radio, cellular phone, cordless phone or other wireless
communication device
●When the vehicle is parked, the time taken for the warning to start or go off could be
extended.
●When tire inflation pressure declines rapidly for example when a tire has burst, the
warning may not function.
■The initialization operation
●Make sure to carry out initialization af ter adjusting the tire inflation pressure.
Also, make sure the tires are cold before carry ing out initialization or tire inflation pres-
sure adjustment.
●If you have accidentally turned the power swit ch off during initialization, it is not neces-
sary to press the reset switch again as init ialization will restart automatically when the
power switch has been turned to ON mode for the next time.
●If you accidentally press the reset switch when initialization is not necessary, adjust the
tire inflation pressure to the specified level when the tires are co ld, and conduct initial-
ization again.
■When initialization of the tire pressure warning system has failed
Initialization can be completed in a few minutes. However, in the following cases, the set-
tings have not been recorded and the system will not operate properly. If repeated
attempts to record tire inflation pressure settings are unsuccessful, have the vehicle
inspected by your Lexus dealer.
●When operating the tire pressure warning reset switch, the tire pressure warning light
does not blink 3 times.
●After carrying out the initialization procedure, the tire pressure warning light blinks for 1
minute then stays on after driving for 20 minutes.
Page 509 of 632
509
CT200h_OM_OM76197U_(U)7-3. Do-it-yourself maintenance
7
Maintenance and care
Light bulbs
Check the wattage of the light bulb to be replaced. (
P. 5 7 9 )
P. 4 7 9
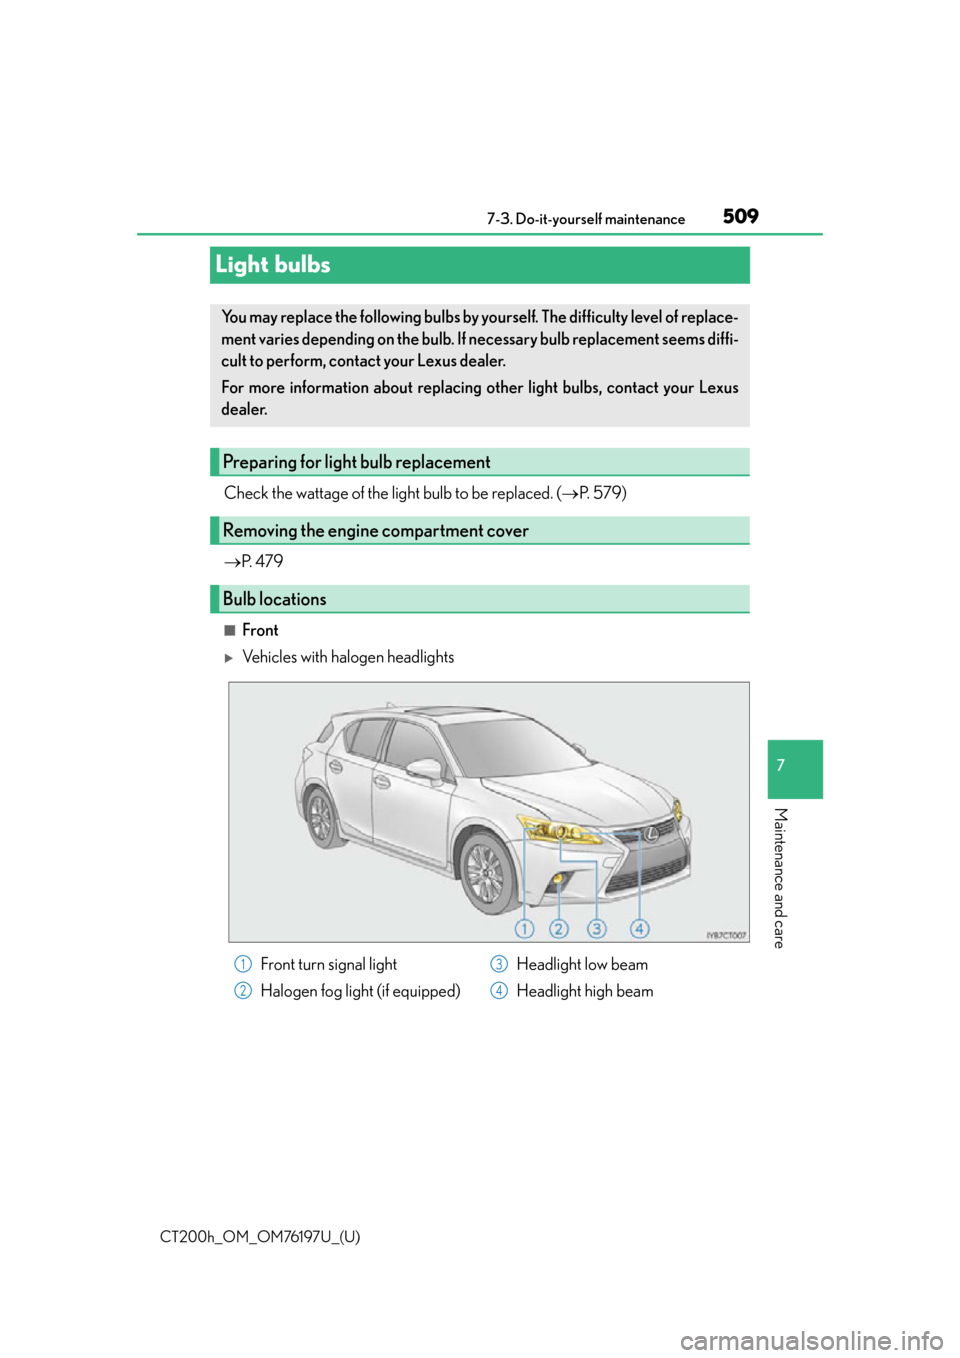
■Front
Vehicles with halogen headlights
You may replace the following bulbs by yourself. The difficulty level of replace-
ment varies depending on the bulb. If necessary bulb replacement seems diffi-
cult to perform, contact your Lexus dealer.
For more information about replacing other light bulbs, contact your Lexus
dealer.
Preparing for light bulb replacement
Removing the engine compartment cover
Bulb locations
Front turn signal light
Halogen fog light (if equipped) Headlight low beam
Headlight high beam1
2
3
4
Page 510 of 632
510
CT200h_OM_OM76197U_(U)7-3. Do-it-yourself maintenance
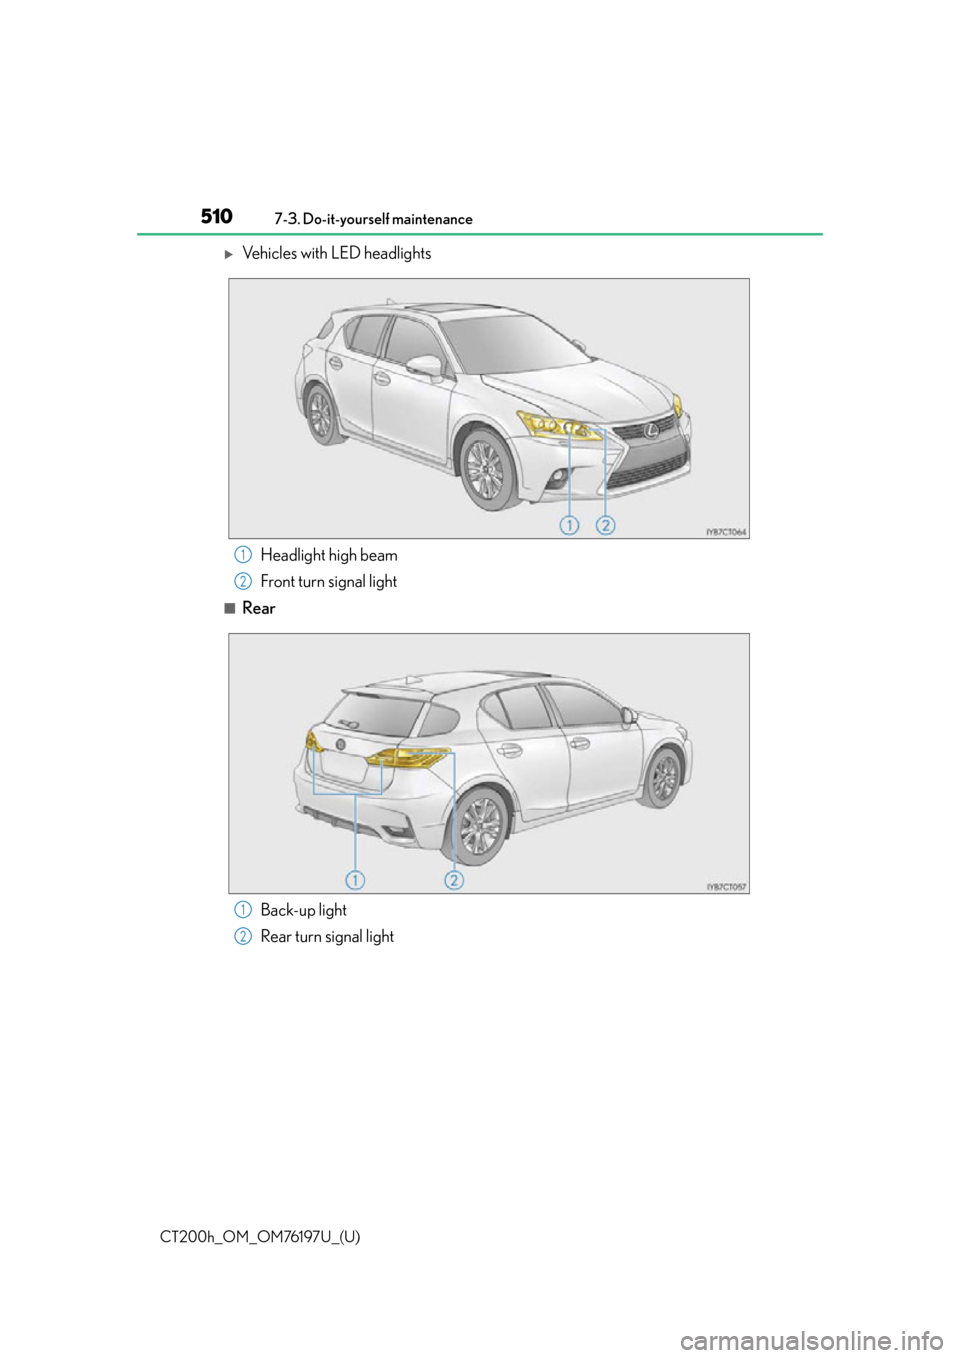
Vehicles with LED headlights
Headlight high beam
Front turn signal light
■RearBack-up light
Rear turn signal light
1
2
1
2
Page 516 of 632
516
CT200h_OM_OM76197U_(U)7-3. Do-it-yourself maintenance
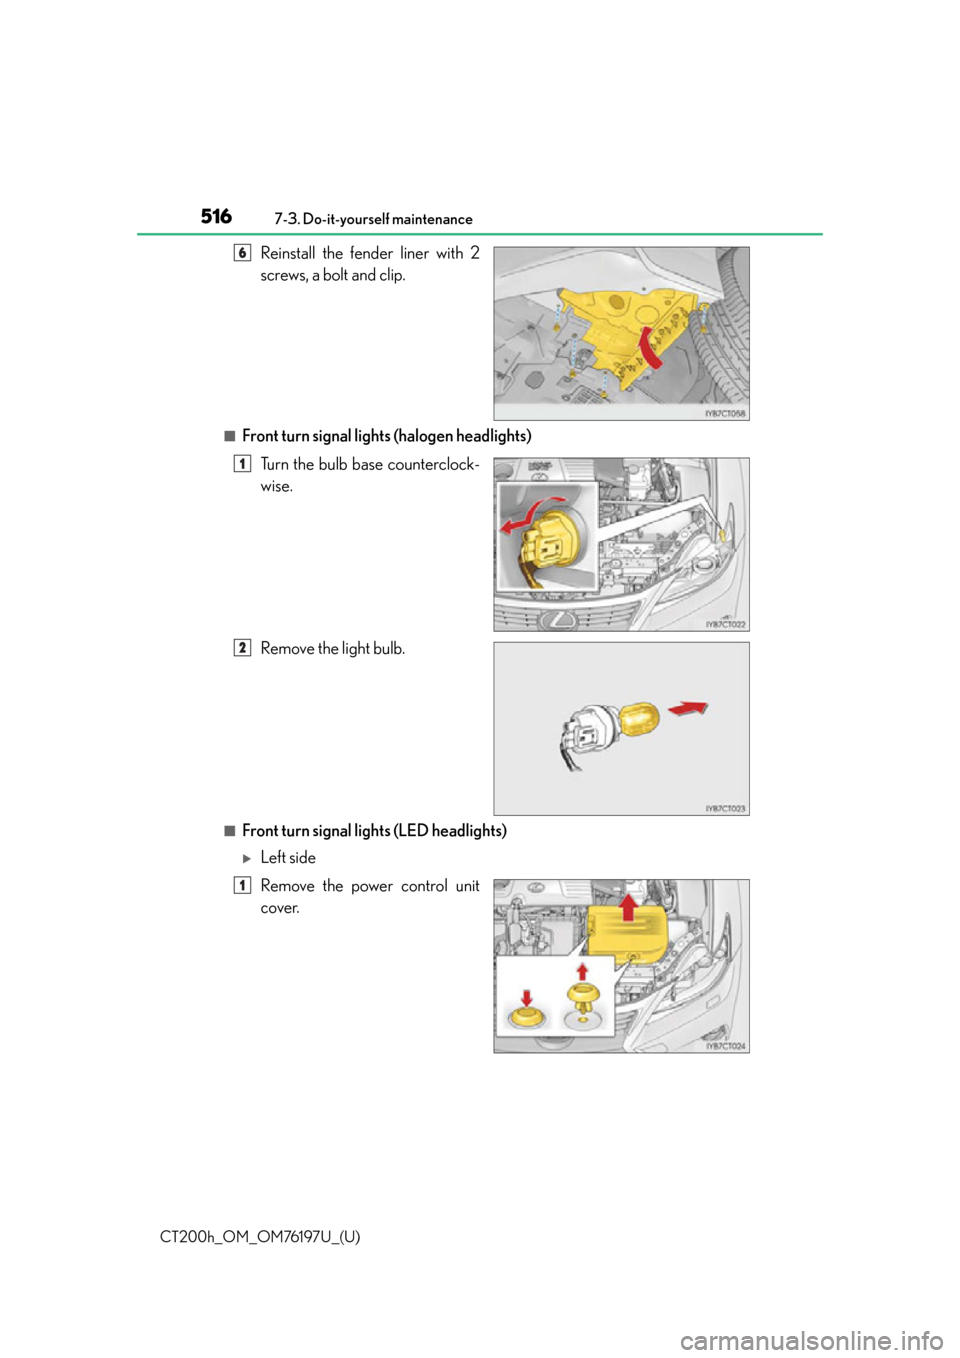
Reinstall the fender liner with 2
screws, a bolt and clip.
■Front turn signal lights (halogen headlights)
Turn the bulb base counterclock-
wise.
Remove the light bulb.
■Front turn signal lights (LED headlights)
Left side
Remove the power control unit
cover.
6
1
2
1
Page 518 of 632
518
CT200h_OM_OM76197U_(U)7-3. Do-it-yourself maintenance
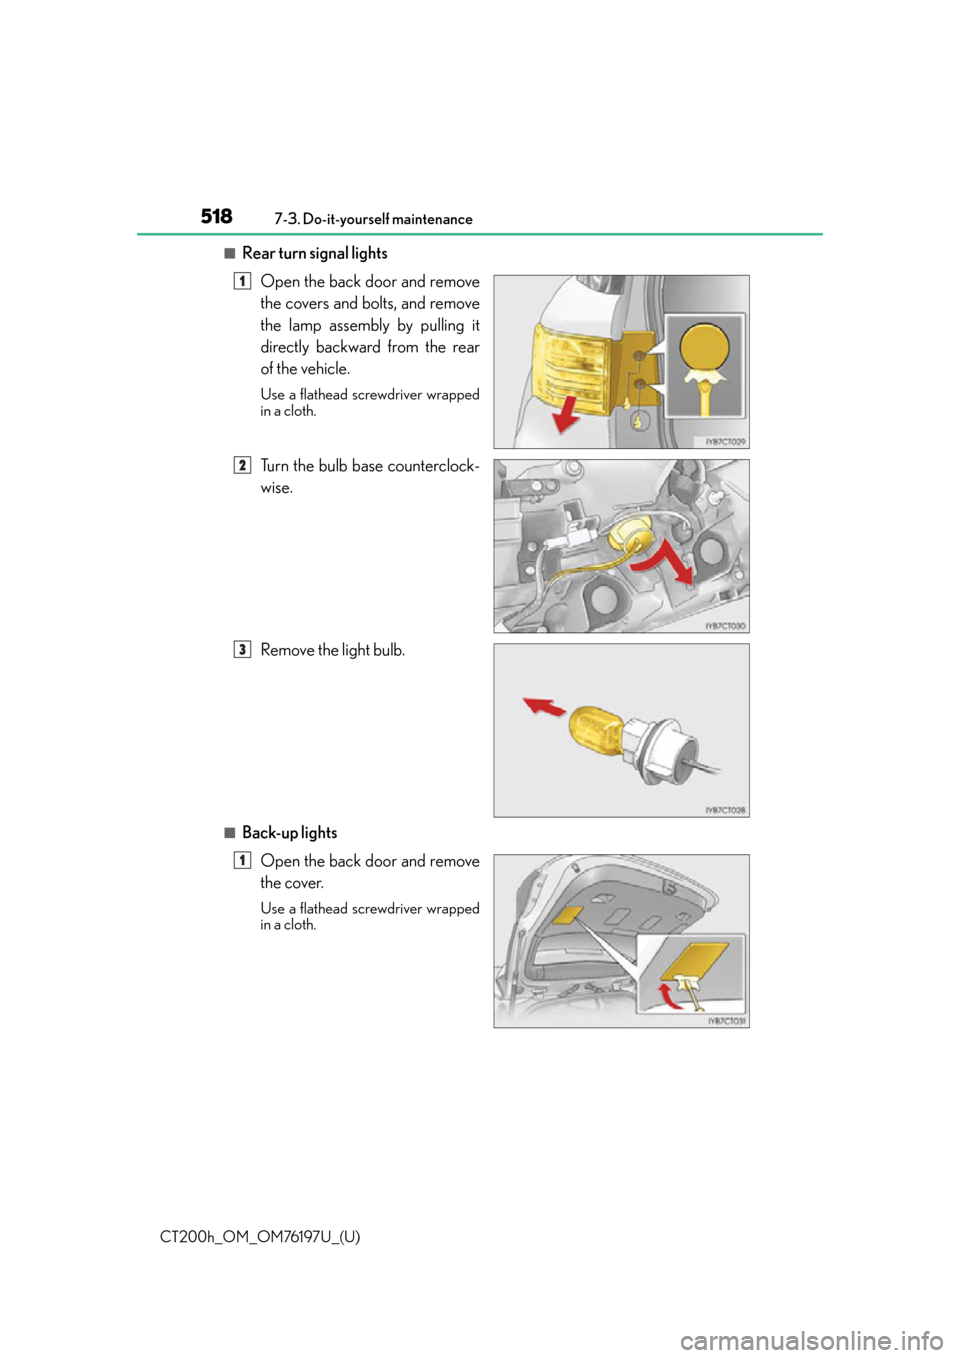
■Rear turn signal lights
Open the back door and remove
the covers and bolts, and remove
the lamp assembly by pulling it
directly backward from the rear
of the vehicle.
Use a flathead screwdriver wrapped
in a cloth.
Turn the bulb base counterclock-
wise.
Remove the light bulb.
■Back-up lightsOpen the back door and remove
the cover.
Use a flathead screwdriver wrapped
in a cloth.
1
2
3
1
Page 519 of 632
CT200h_OM_OM76197U_(U)
5197-3. Do-it-yourself maintenance
7
Maintenance and care
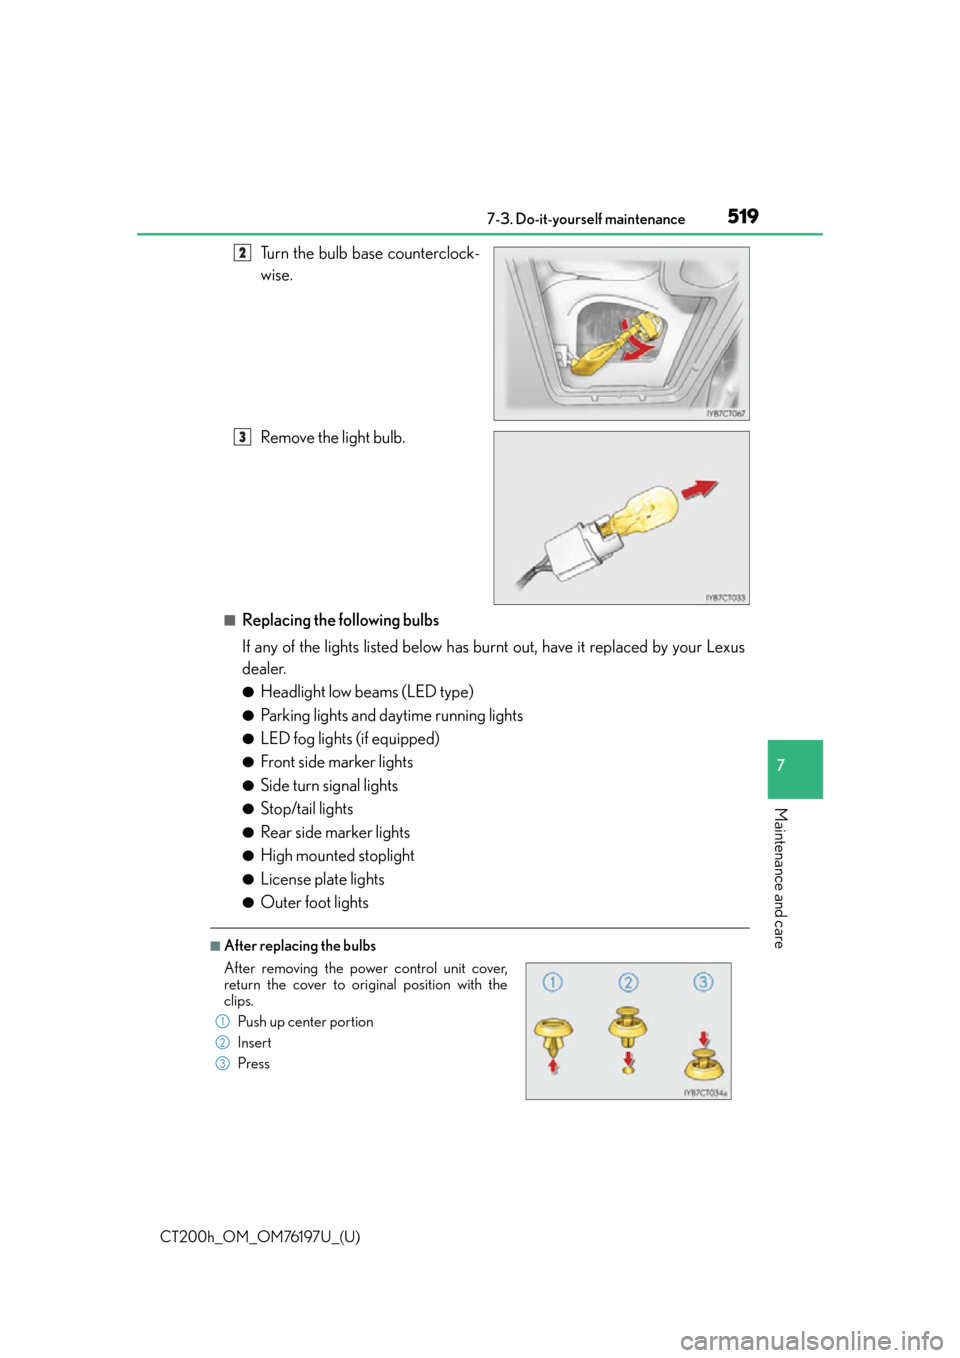
Turn the bulb base counterclock-
wise.
Remove the light bulb.
■Replacing the following bulbs
If any of the lights listed below has burnt out, have it replaced by your Lexus
dealer.
●Headlight low beams (LED type)
●Parking lights and daytime running lights
●LED fog lights (if equipped)
●Front side marker lights
●Side turn signal lights
●Stop/tail lights
●Rear side marker lights
●High mounted stoplight
●License plate lights
●Outer foot lights
■After replacing the bulbs
2
3
After removing the power control unit cover,
return the cover to original position with the
clips.Push up center portion
Insert
Press
1
2
3