remote control Lexus ES300h 2016 (OM33B71U) Owner's Guide
[x] Cancel search | Manufacturer: LEXUS, Model Year: 2016, Model line: ES300h, Model: Lexus ES300h 2016Pages: 600, PDF Size: 8.59 MB
Page 146 of 600

146
ES300h_OM_OM33B71U_(U)3-5. Opening, closing the windows and moon roof
■When the window cannot be opened or closed
When the jam protection function or catch
protection function operates unusually and
the door window cannot be open ed or closed, perform the following operations with the
power window switch of that door.
●Stop the vehicle. With the power switch in ON mode, within 4 seconds of the jam pro-
tection function or catch protection func tion activating, continuously operate the
power window switch in the one-touch closing direction or one-touch opening direc-
tion so that the door window can be opened and closed.
●If the door window cannot be opened and closed even when performing the above
operations, perform the following proc edure for function initialization.
Turn the power switch to ON mode.
Pull and hold the power window switch in the one-touch closing direction and com-
pletely close the door window.
Release the power window switch for a moment and then resume pulling and hold-
ing the switch in the one-touch closing direction for approximately 4 seconds.
Press and hold the power window switch in the one-touch opening direction. After
the door window is complete ly opened, continue holding the switch for an additional
1 second or more.
Pull and hold the power window switch in the one-touch closing direction again.
After the door window is completely clos ed, continue holding the switch for a fur-
ther 1 second or more.
If you release the switch while the window is moving, start again from the beginning.
If the window reverses and cannot be fully cl osed or opened, have the vehicle inspected
by your Lexus dealer.
■Door lock linked window operation
●The power windows can be opened an d closed using the mechanical key.* ( P. 5 2 1 )
●The power windows can be opened us ing the wireless remote control.* ( P. 1 0 8 )
*: These settings must be customized at your Lexus dealer.
■When the 12-volt battery is disconnected
The window lock switch is disabled. If nece ssary, press the window lock switch after
reconnecting the 12-volt battery.
■Power windows open warning buzzer
The buzzer sounds and a message is shown on the multi-information display in the instru-
ment cluster when the power switch is turned off and the driver’s door is opened with the
power windows open.
■Customization
Settings (e.g. linked door lock operation) can be changed.
(Customizable features: P. 5 5 5 )
1
2
3
4
5
Page 149 of 600

ES300h_OM_OM33B71U_(U)
1493-5. Opening, closing the windows and moon roof
3
Operation of each component
■The moon roof can be operated when
The power switch is in ON mode.
■Operating the moon roof after turning the hybrid system off
The moon roof can be operated for approximately 45 seconds after the power switch is
turned to ACCESSORY mode or turned off. It cannot, however, be operated once either
front door is opened.
■Jam protection function
If an object is detected between the moon roof and the frame while the moon roof is clos-
ing or tilting down, travel is stoppe d and the moon roof opens slightly.
■Sunshade
The sunshade can be opened and closed manually. However, the sunshade will open
automatically when the moon roof is opened.
■Door lock linked moon roof operation
●The moon roof can be opened and closed using the mechanical key.* ( P. 5 2 1 )
●The moon roof can be opened us ing the wireless remote control.* ( P. 1 0 8 )
*: These settings must be customized at your Lexus dealer.
Page 242 of 600
242
ES300h_OM_OM33B71U_(U)4-5. Using the driving support systems
You can change the buzzer sounds volume
and the screen operating conditions.
Lexus Display Audio system
Press the “MENU” button on the Lexus Display Audio controller, and then
select “Setup” on the screen.
Select “Vehicle”, and then select “LEXUS Park Assist” on the screen.
Select the desired item.
Navigation system
Press the “MENU” button on the Remote Touch, and then select “Setup” on
the screen.
Select “Vehicle”, and then select “LEXUS Park Assist Settings” on the screen.
Select the desired item.
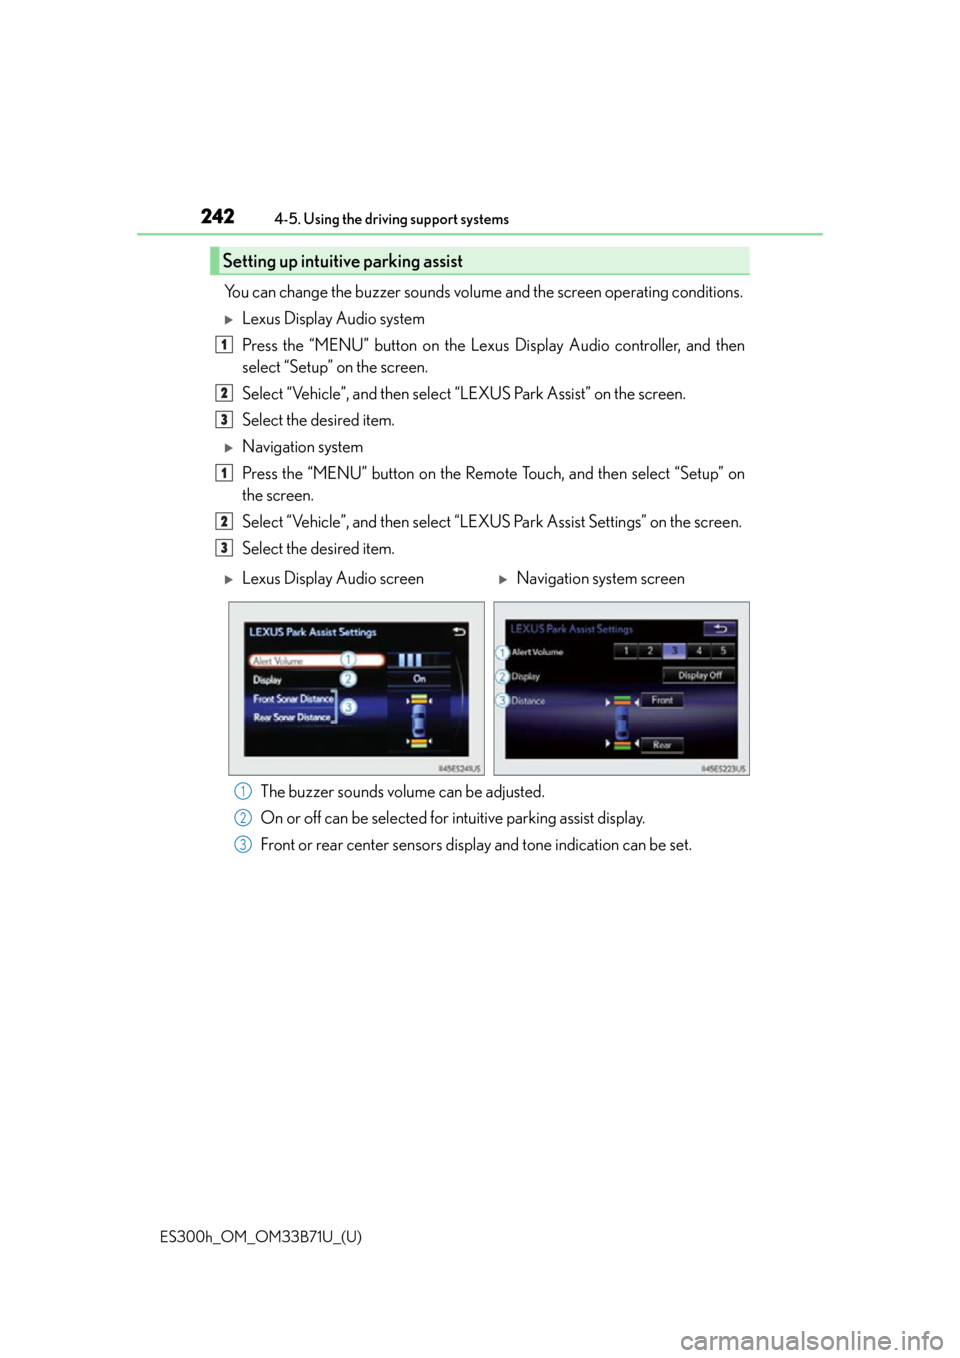
The buzzer sounds volume can be adjusted.
On or off can be selected for intuitive parking assist display.
Front or rear center sensors disp lay and tone indication can be set.
Setting up intuitive parking assist
1
2
3
1
2
3
Lexus Display Audio screenNavigation system screen
1
2
3
Page 368 of 600

3685-11. Bluetooth®
ES300h_OM_OM33B71U_(U)
■Compatible models
The Bluetooth® audio system supports portable audio players with the following specifi-
cations
●Bluetooth® specifications:
Ver. 2.0 or higher (Recommended: Ver. 3.0 +EDR or higher)
●Profiles:
• A2DP (Advanced Audio Distribution Profile) Ver. 1.0, or higher (Recommended: Ver. 1.2 or higher)
This is a profile to transmit stereo audio or high quality sound to the audio system.
• AVRCP (Audio/Video Remote Control Profile) Ver. 1.0 or higher (Recommended: Ver. 1.4 or higher)
This is a profile to allow remote control the A/V equipment.
However, please note that some functions may be limited depending on the type of por-
table audio player connected.
The hands-free system supports cellular phones with the following specifications.
●Bluetooth® specification:
Ver. 2.0 or higher (Recommended: Ver. 3.0 +EDR or higher)
●Profiles:
• HFP (Hands Free Profile) Ver. 1.0 or higher (Recommended: Ver. 1.6 or higher) This is a profile to allow ha nds-free phone calls using a cellular phone or head set. It
has outgoing and incoming call functions.
• OPP (Object Push Profile) Ver. 1.1 or higher (Recommended: Ver. 1.2) This is a profile to transfer phonebook data. When a Bluetooth
® compatible cellular
phone has both PBAP and OPP, OPP cannot be used.
• PBAP (Phone Book Access Profile) Ver. 1.0 or higher (Recommended: Ver. 1.1) This is a profile to tr ansfer phonebook data.
• MAP (Message Access Profile) Ver.1.0 or higher
This is a profile to using phone message.
If the cellular phone does not support HFP, you cannot register it with the hands-free sys-
tem. OPP, PBAP or MAP services must be selected individually.
■Reconnecting the portable audio player
If the portable audio player is disconnected due to poor reception when the power
switch is in ACCESSORY or ON mode, the system automatically reconnects the porta-
ble audio player.
If you have switched off the portable audio player yourself, follow the instructions below
to reconnect:
●Select the portable audio player again
●Enter the portable audio player
■When you sell your car
Be sure to delete your personal data. ( P. 300)
Page 382 of 600
382
ES300h_OM_OM33B71U_(U)5-12. Other function
LEXUS Enform Remote
After you sign the Telematics Subscription Service Agreement, download the
Lexus Enform Remote app from your cellular phone’s app store, and register
within the app (or enroll and
complete registration at the dealer), you can begin
using these services. ( P. 422)
A variety of subscription terms are available. Contact your Lexus dealer, or call 1-
800-25-LEXUS (1-800-255-3987) fo r further subscription details.
■Availability of service
Lexus Enform Remote is available in the contiguous United States, Washington D.C. and
Alaska.
■Lexus Enform Remote Information
●Lexus Enform Remote should only be used by authorized users.
●Laws in some communities may require that the vehicle be within view of the user when
operating Lexus Enform Remote.
In some states, use of Lexus Enform Remote may violate state or local laws. Before
using Lexus Enform Remote, check your state and local laws.
●Any malfunction of the Lexus should be repaired by your Lexus dealer.
●Lexus Enform Remote is designed to work at temperatures above -22 F (-30 C). This
specification is related to the Lexus Enform Remote operation, but is dependent on the
vehicle’s operating temperature range which may be different.
●Content is subject to change without notice.
●Some features of the Lexus Enform Remote may not be available on some models.
●Additional information can be found at www.lexus.com/enform/.
●Availability of functions of the Lexus Enform service is dependent on network reception
level.
■Safety information for Lexus Enform Remote
P. 4 2 5
: If equipped
Lexus Enform Remote is a cellular phone application that lets you view and
remotely control certain aspects of your vehicle.
For details about the functions and serv ices of this application, refer to
http://www.lexus.com/enform/
.
Function of the Lexus Enform Remote is achieved by using an embedded
cellular device in the vehicle (DCM: Data Communication Module).
Subscription
Page 384 of 600
384
ES300h_OM_OM33B71U_(U)6-1. Using the air conditioning system and defogger
Automatic air conditioning system
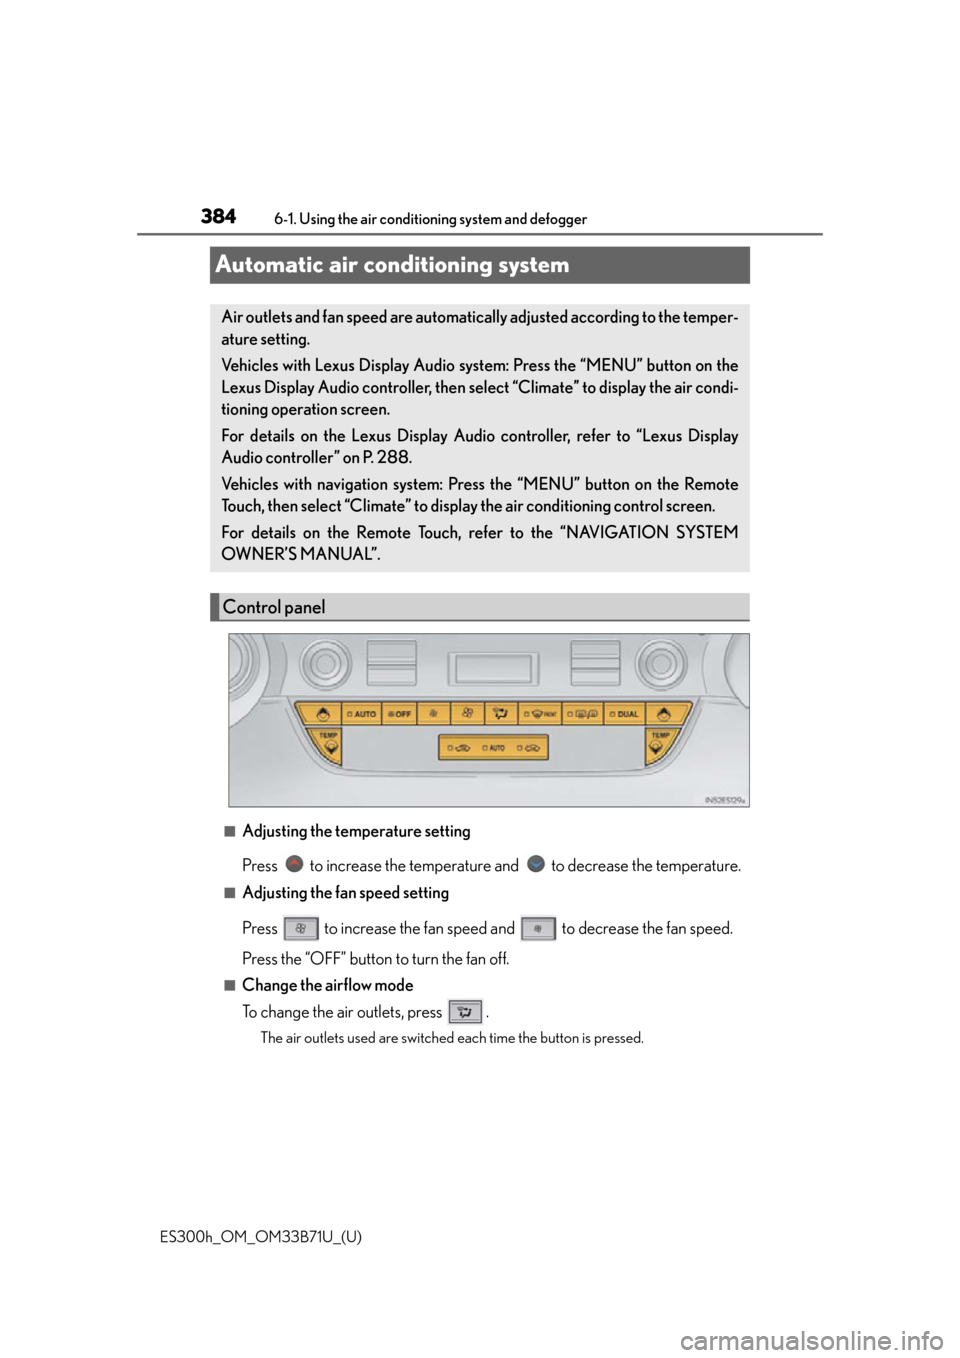
■Adjusting the temperature setting
Press to increase the temperature and to decrease the temperature.
■Adjusting the fan speed setting
Press to increase the fan speed and to decrease the fan speed.
Press the “OFF” button to turn the fan off.
■Change the airflow mode
To change the air outlets, press .
The air outlets used are switched each time the button is pressed.
Air outlets and fan speed are automatica
lly adjusted according to the temper-
ature setting.
Vehicles with Lexus Display Audio sy stem: Press the “MENU” button on the
Lexus Display Audio controller, then select “Climate” to display the air condi-
tioning operation screen.
For details on the Lexus Display Audio controller, refer to “Lexus Display
Audio controller” on P. 288.
Vehicles with navigation system: Press the “MENU” button on the Remote
Touch, then select “Climate” to display the air conditioning control screen.
For details on the Remote Touch, refer to the “NAVIGATION SYSTEM
OWNER’S MANUAL”.
Control panel
Page 386 of 600
3866-1. Using the air conditioning system and defogger
ES300h_OM_OM33B71U_(U)
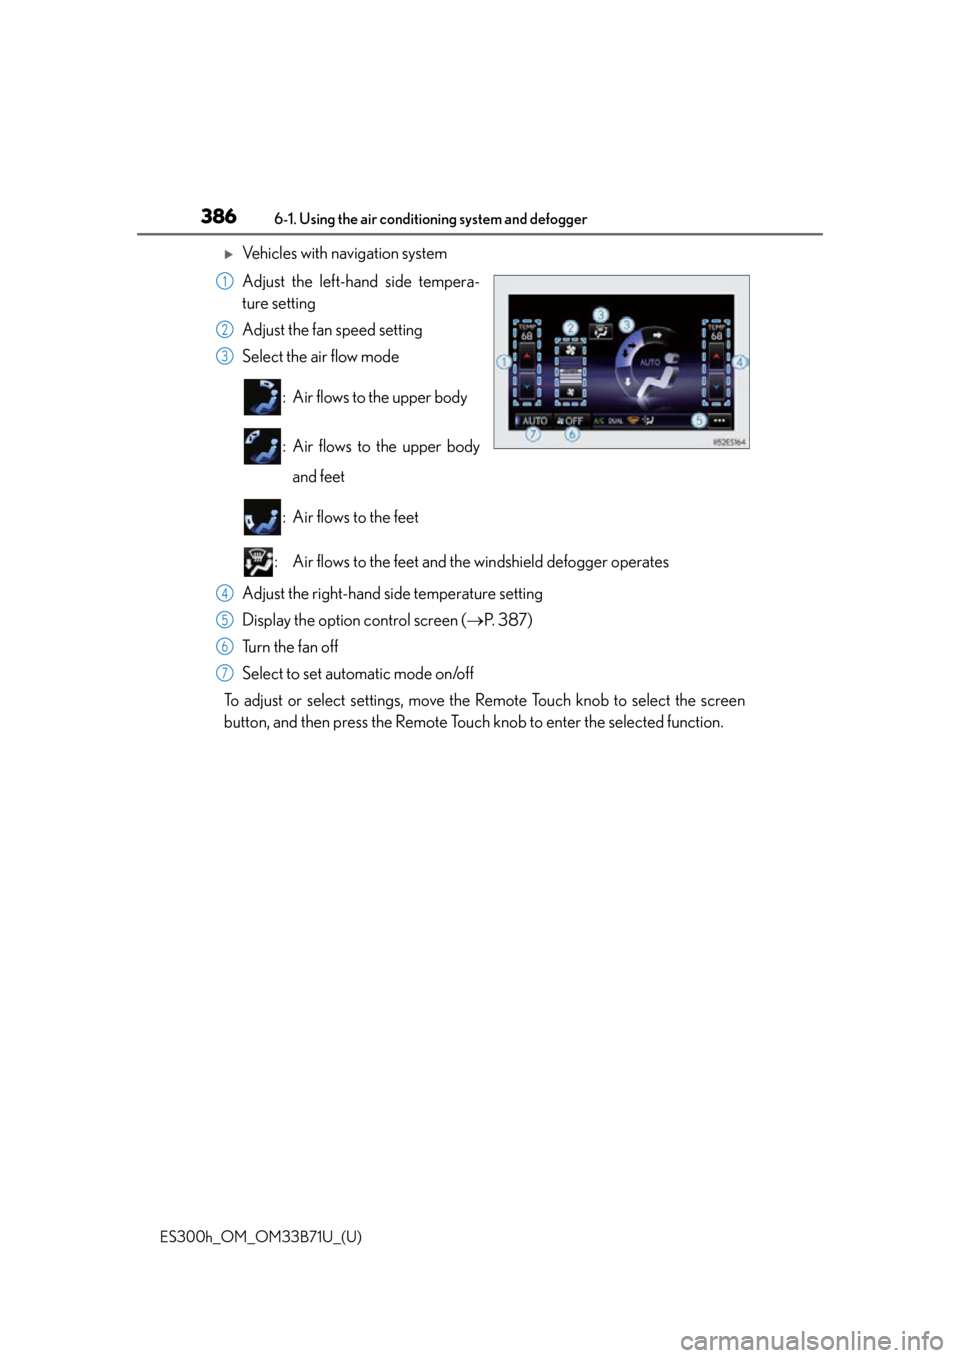
Vehicles with navigation system
Adjust the left-hand side tempera-
ture setting
Adjust the fan speed setting
Select the air flow mode : Air flows to the upper body
: Air flows to the upper bodyand feet
: Air flows to the feet
: Air flows to the feet and the windshield defogger operates
Adjust the right-hand side temperature setting
Display the option control screen ( P. 3 8 7 )
Tu r n t h e f a n o f f
Select to set automatic mode on/off
To adjust or select settings, move the Remote Touch knob to select the screen
button, and then press the Remote Touch knob to enter the selected function.
1
2
3
4
5
6
7
Page 411 of 600
411
ES300h_OM_OM33B71U_(U)6-4. Using the other interior features
6
Interior features
Garage door opener
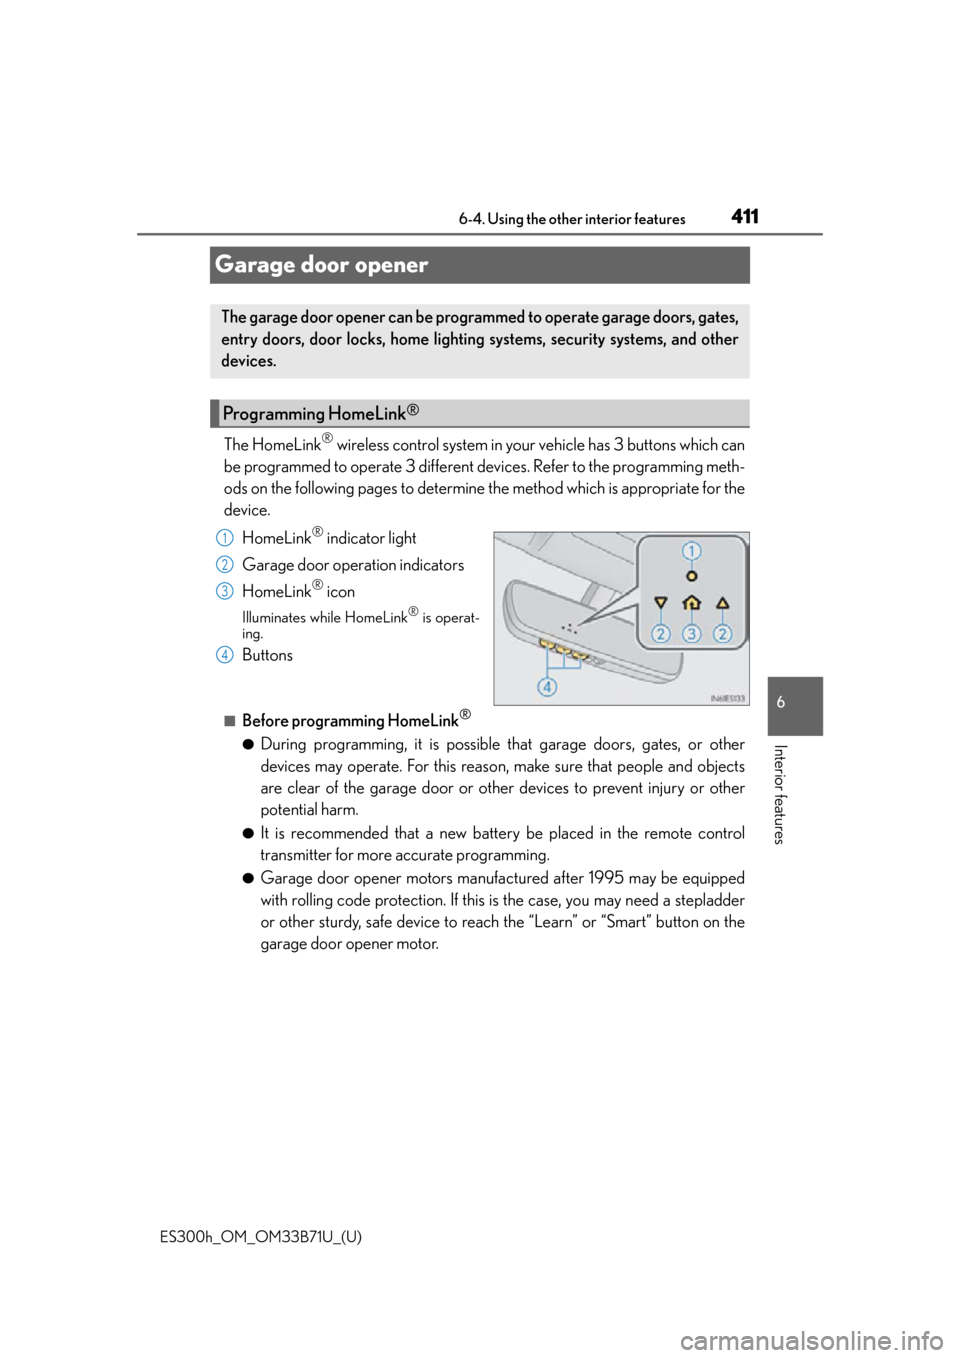
The HomeLink® wireless control system in your vehicle has 3 buttons which can
be programmed to operate 3 different devices. Refer to the programming meth-
ods on the following pages to determine the method which is appropriate for the
device.
HomeLink
® indicator light
Garage door operation indicators
HomeLink
® icon
Illuminates while HomeLink® is operat-
ing.
Buttons
■Before programming HomeLink®
●During programming, it is possible that garage doors, gates, or other
devices may operate. For this reason, make sure that people and objects
are clear of the garage door or other devices to prevent injury or other
potential harm.
●It is recommended that a new battery be placed in the remote control
transmitter for more accurate programming.
●Garage door opener motors manufactured after 1995 may be equipped
with rolling code protection. If this is the case, you may need a stepladder
or other sturdy, safe device to reach the “Learn” or “Smart” button on the
garage door opener motor.
The garage door opener can be programmed to operate garage doors, gates,
entry doors, door locks, home lighting systems, security systems, and other
devices.
Programming HomeLink®
1
2
3
4
Page 412 of 600
412
ES300h_OM_OM33B71U_(U)6-4. Using the other interior features
■Programming HomeLink®
Press and release the HomeLink® button you want to program and check
that the HomeLink® indicator light flashes (orange).
Perform within 60 seconds of , or the indicator light will stop flashing and
programming will not be able to be completed.
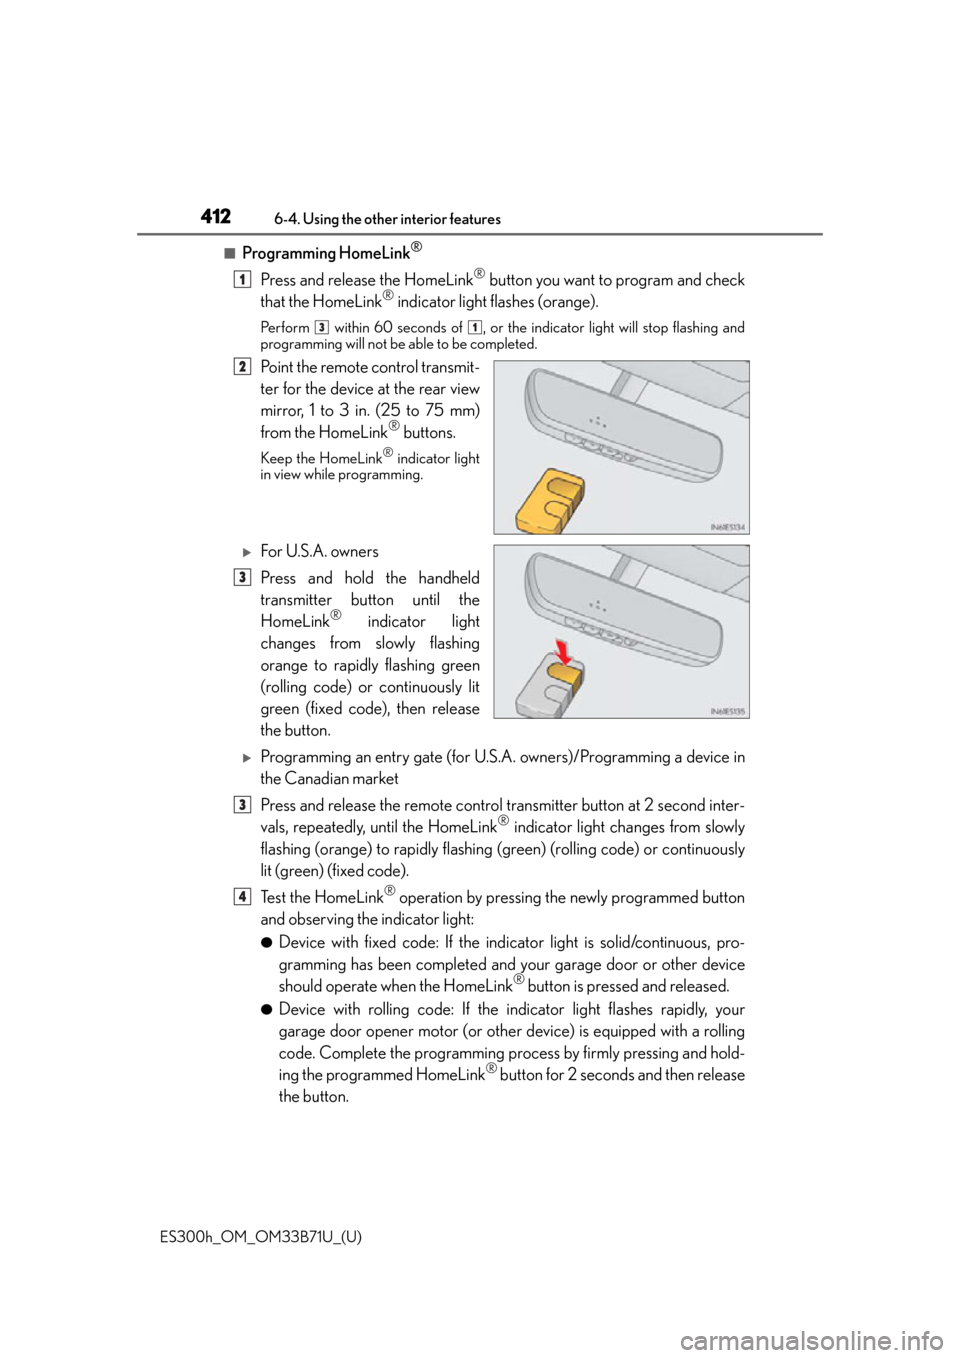
Point the remote control transmit-
ter for the device at the rear view
mirror, 1 to 3 in. (25 to 75 mm)
from the HomeLink
® buttons.
Keep the HomeLink® indicator light
in view while programming.
For U.S.A. owners
Press and hold the handheld
transmitter button until the
HomeLink
® indicator light
changes from slowly flashing
orange to rapidly flashing green
(rolling code) or continuously lit
green (fixed code), then release
the button.
Programming an entry gate (for U.S. A. owners)/Programming a device in
the Canadian market
Press and release the remote control transmitter button at 2 second inter-
vals, repeatedly, until the HomeLink
® indicator light changes from slowly
flashing (orange) to rapidly flashing (green) (rolling code) or continuously
lit (green) (fixed code).
Te s t t h e H o m e L i n k
® operation by pressing the newly programmed button
and observing the indicator light:
●Device with fixed code: If the indi cator light is solid/continuous, pro-
gramming has been completed and your garage door or other device
should operate when the HomeLink
® button is pressed and released.
●Device with rolling code: If the indicator light flashes rapidly, your
garage door opener motor (or other device) is equipped with a rolling
code. Complete the programming process by firmly pressing and hold-
ing the programmed HomeLink
® button for 2 seconds and then release
the button.
1
31
2
3
3
4
Page 417 of 600

ES300h_OM_OM33B71U_(U)
4176-4. Using the other interior features
6
Interior features
WA R N I N G
■When programming a garage door or other remote control device
The garage door or other device may operate, so ensure people and objects are out of
danger to prevent potential harm.
■Conforming to federal safety standards
Do not use the HomeLink® compatible transceiver with any garage door opener or
device that lacks safety stop and reverse fe atures as required by federal safety stan-
dards.
This includes any garage door that canno t detect an interfering object. A door or
device without these features increases the risk of death or serious injury.
■When operating or programming HomeLink®
Never allow a child to operate or play with the HomeLink® buttons.