light Lexus ES300h 2018 Owner's Manual (OM33D45U)
[x] Cancel search | Manufacturer: LEXUS, Model Year: 2018, Model line: ES300h, Model: Lexus ES300h 2018Pages: 608, PDF Size: 10.67 MB
Page 399 of 608
399
ES300h_OM_OM33D45U_(U)6-3. Using the storage features
6
Interior features
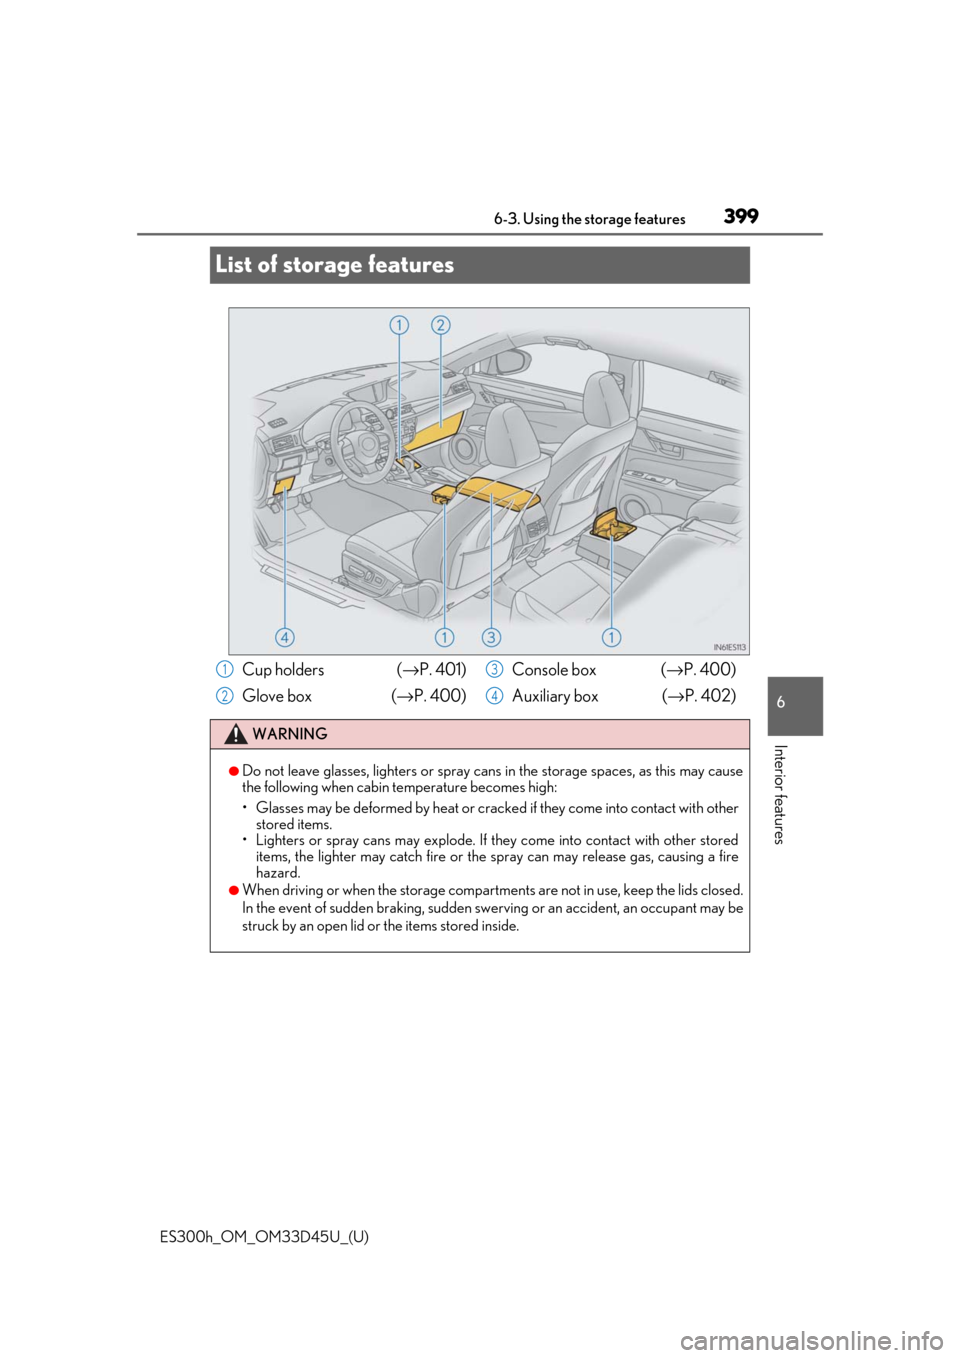
List of storage features
Cup holders (
→P. 401)
Glove box (→ P. 400)Console box (→
P. 400)
Auxiliary box ( →P. 402)
WARNING
●Do not leave glasses, lighters or spray cans in the storage spaces, as this may cause
the following when cabin temperature becomes high:
• Glasses may be deformed by heat or cracke d if they come into contact with other
stored items.
• Lighters or spray cans may explode. If they come into contact with other stored
items, the lighter may catch fire or the spray can may release gas, causing a fire
hazard.
●When driving or when the storage compartments are not in use, keep the lids closed.
In the event of sudden braking, sudden sw erving or an accident, an occupant may be
struck by an open lid or the items stored inside.
1
2
3
4
Page 400 of 608
400
ES300h_OM_OM33D45U_(U)6-3. Using the storage features
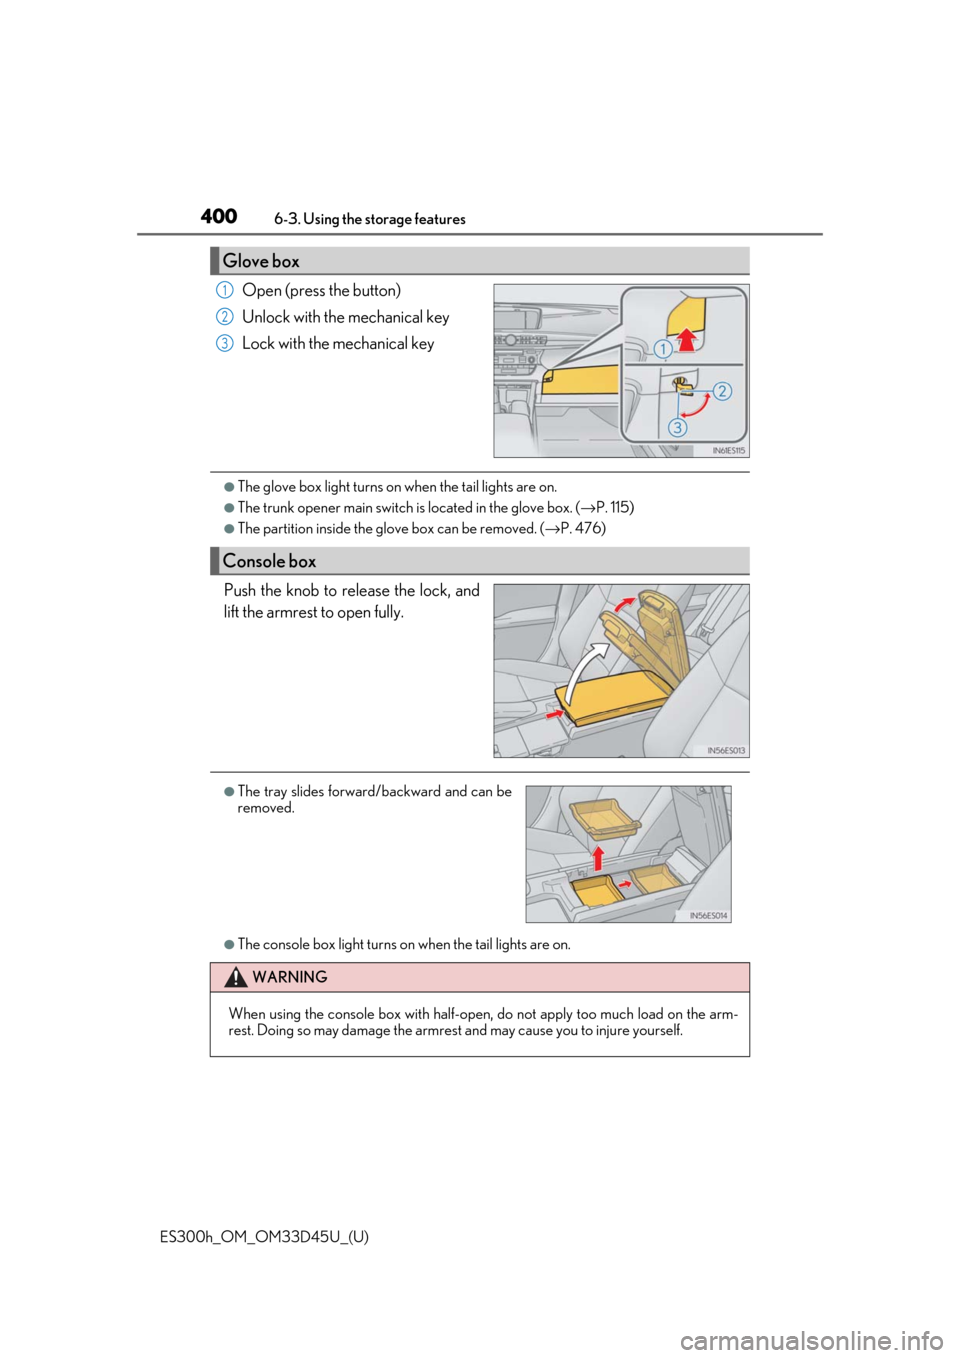
Open (press the button)
Unlock with the mechanical key
Lock with the mechanical key
●The glove box light turns on when the tail lights are on.
●The trunk opener main switch is
located in the glove box. (→P. 115)
●The partition inside the glove box can be removed. ( →P. 476)
Push the knob to release the lock, and
lift the armrest to open fully.
●The console box light turns on when the tail lights are on.
Glove box
1
2
3
Console box
●The tray slides forward/backward and can be
removed.
WARNING
When using the console box with half-open, do not apply too much load on the arm-
rest. Doing so may damage the armrest and may cause you to injure yourself.
Page 405 of 608
405
ES300h_OM_OM33D45U_(U)6-4. Using the other interior features
6
Interior features
Other interior features
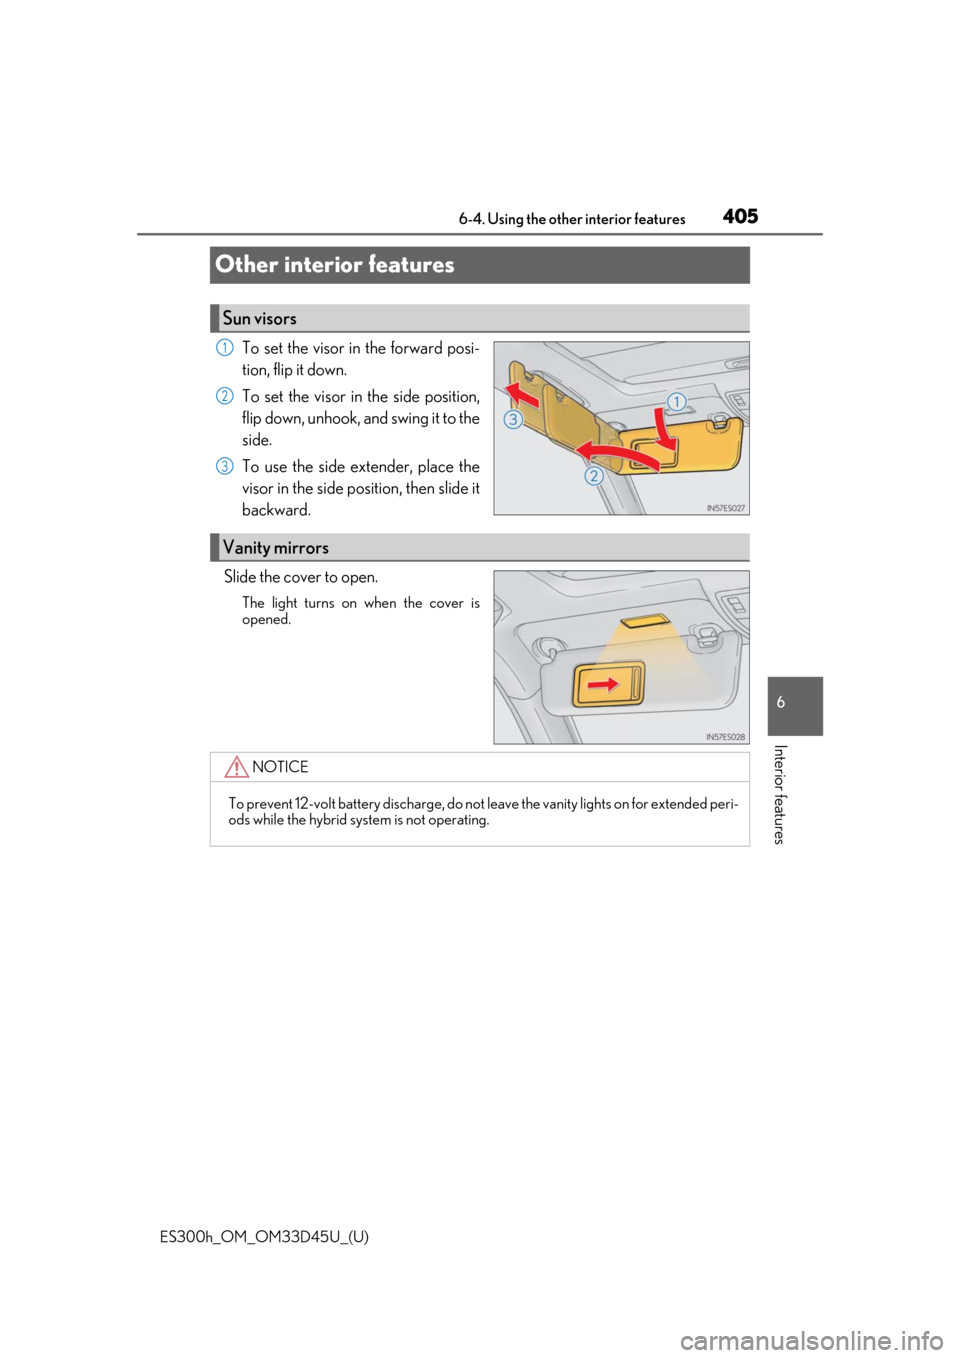
To set the visor in the forward posi-
tion, flip it down.
To set the visor in the side position,
flip down, unhook, and swing it to the
side.
To use the side extender, place the
visor in the side position, then slide it
backward.
Slide the cover to open.
The light turns on when the cover is
opened.
Sun visors
1
2
3
Vanity mirrors
NOTICE
To prevent 12-volt battery discharge, do not leave the vanity lights on for extended peri-
ods while the hybrid system is not operating.
Page 411 of 608
411
ES300h_OM_OM33D45U_(U)6-4. Using the other interior features
6
Interior features
Garage door opener
The HomeLink® wireless control system in your vehicle has 3 buttons which can
be programmed to operate 3 different de vices. Refer to the programming meth-
ods on the following pages to determine the method which is appropriate for the
device.
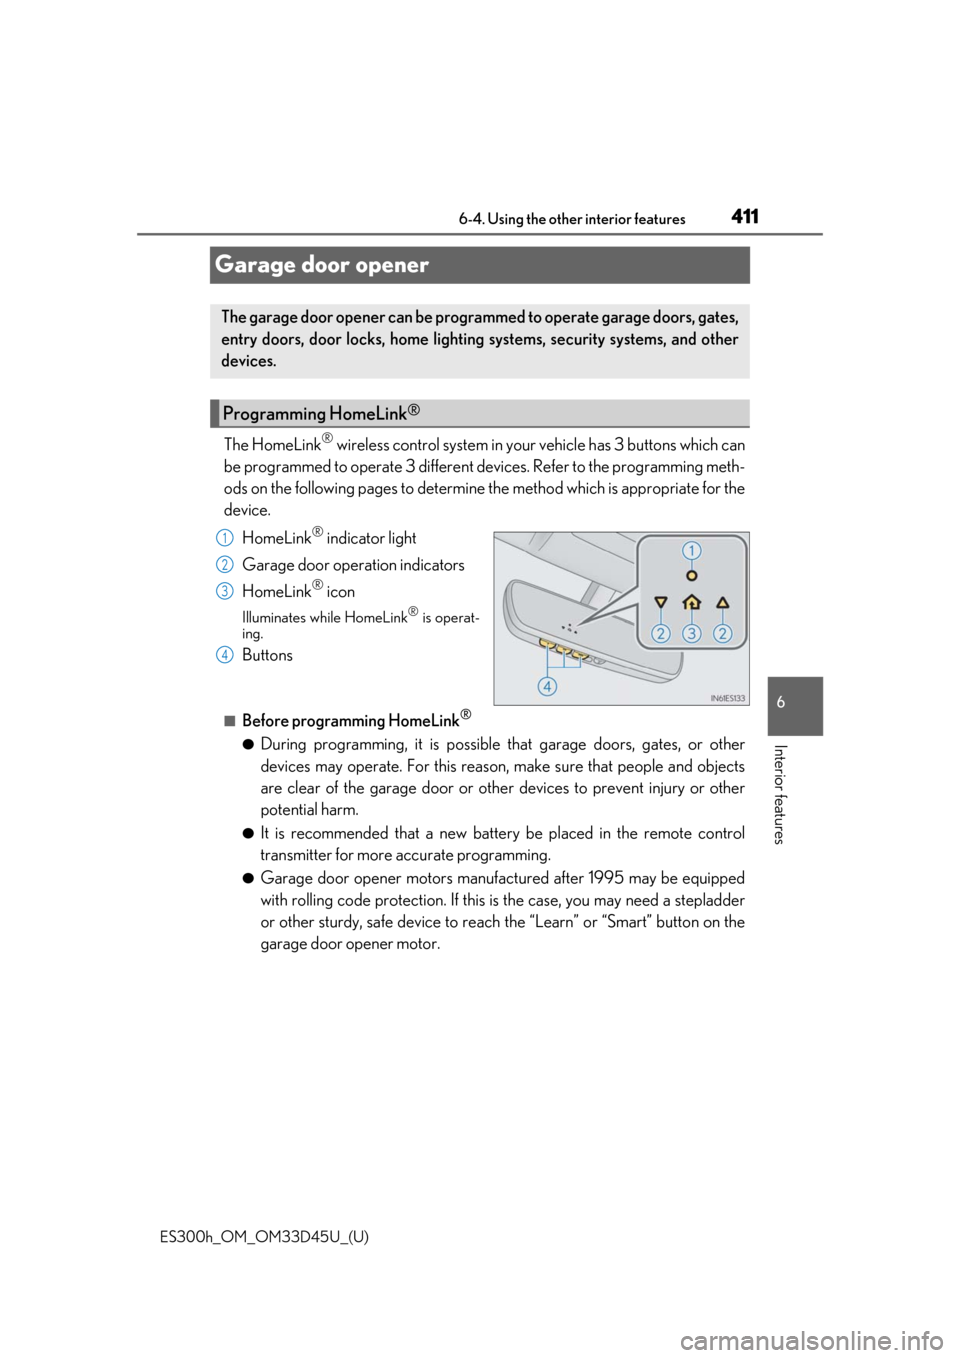
HomeLink
® indicator light
Garage door operation indicators
HomeLink
® icon
Illuminates while HomeLink® is operat-
ing.
Buttons
■Before programming HomeLink®
●During programming, it is possible that garage doors, gates, or other
devices may operate. For this reason, make sure that people and objects
are clear of the garage door or othe r devices to prevent injury or other
potential harm.
●It is recommended that a new batter y be placed in the remote control
transmitter for more accurate programming.
●Garage door opener motors manufa ctured after 1995 may be equipped
with rolling code protection. If this is the case, you may need a stepladder
or other sturdy, safe device to reach the “Learn” or “Smart” button on the
garage door opener motor.
The garage door opener can be programmed to operate garage doors, gates,
entry doors, door locks, home lightin g systems, security systems, and other
devices.
Programming HomeLink®
1
2
3
4
Page 412 of 608
412
ES300h_OM_OM33D45U_(U)6-4. Using the other interior features
■Programming HomeLink®
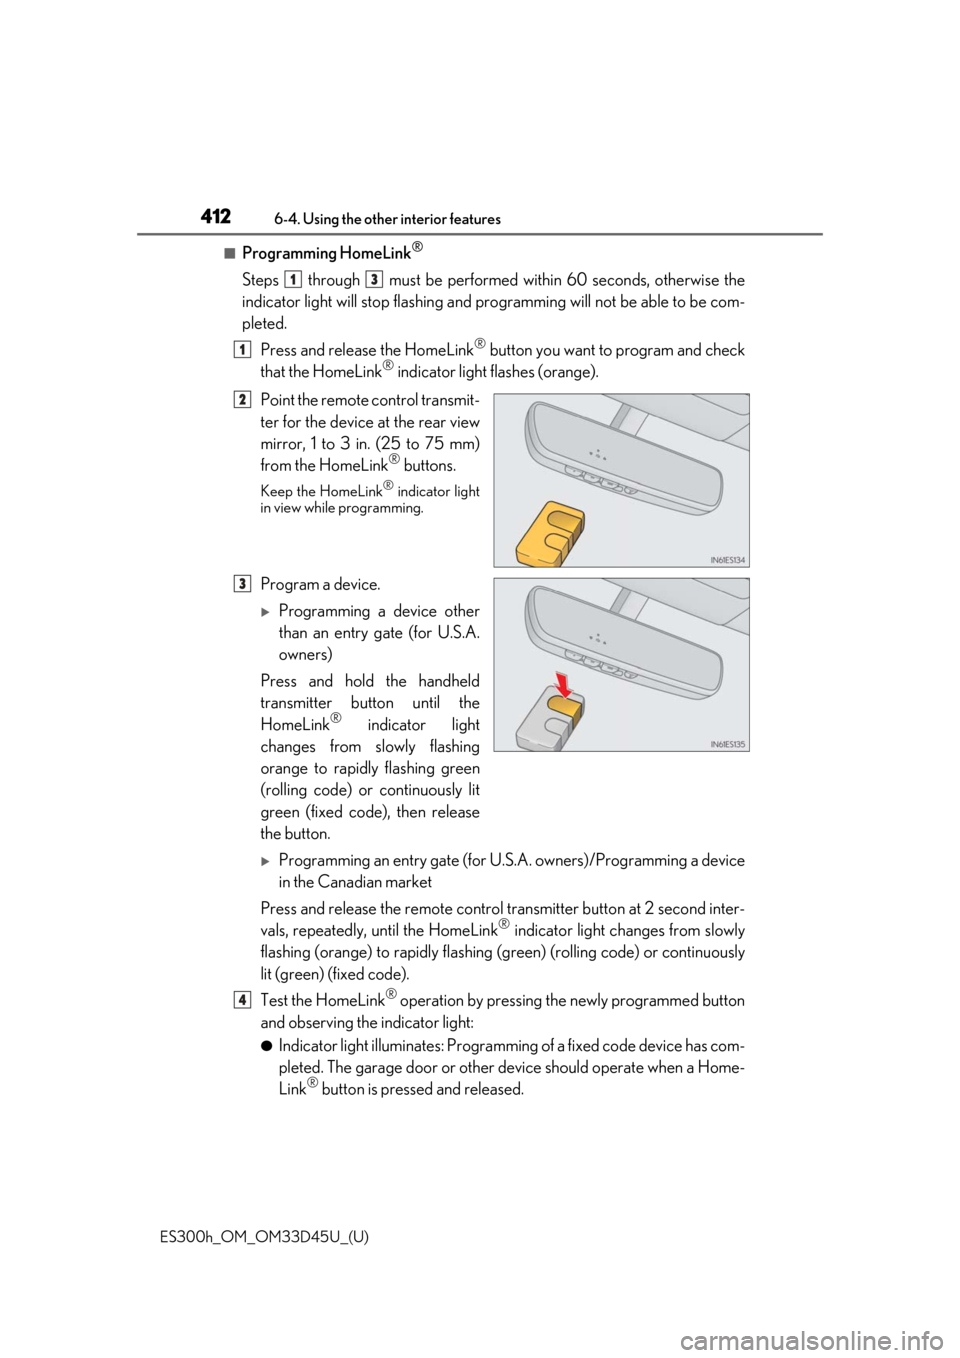
Steps through must be performed
within 60 seconds, otherwise the
indicator light will stop flashing and pr ogramming will not be able to be com-
pleted.
Press and release the HomeLink
® button you want to program and check
that the HomeLink® indicator light flashes (orange).
Point the remote control transmit-
ter for the device at the rear view
mirror, 1 to 3 in. (25 to 75 mm)
from the HomeLink
® buttons.
Keep the HomeLink® indicator light
in view while programming.
Program a device.
Programming a device other
than an entry gate (for U.S.A.
owners)
Press and hold the handheld
transmitter button until the
HomeLink
® indicator light
changes from slowly flashing
orange to rapidly flashing green
(rolling code) or continuously lit
green (fixed code), then release
the button.
Programming an entry gate (for U. S.A. owners)/Programming a device
in the Canadian market
Press and release the remote control transm itter button at 2 second inter-
vals, repeatedly, until the HomeLink
® indicator light changes from slowly
flashing (orange) to rapidly flashing (green) (rolling code) or continuously
lit (green) (fixed code).
Test the HomeLink
® operation by pressing the newly programmed button
and observing the indicator light:
●Indicator light illuminates: Programming of a fixed code device has com-
pleted. The garage door or other de vice should operate when a Home-
Link
® button is pressed and released.
13
1
2
3
4
Page 413 of 608
ES300h_OM_OM33D45U_(U)
4136-4. Using the other interior features
6
Interior features
●Indicator light flashes rapidly: The garage door opener motor or other
device is equipped with a rolling code. To complete programming, firmly
press and hold the HomeLink
® button for 2 seconds then release it.
●If the garage door or other device does not operate, proceed to “Pro-
gramming a rollin g code system”.
Repeat the steps above to program anot her device for any of the remaining
HomeLink
® buttons.
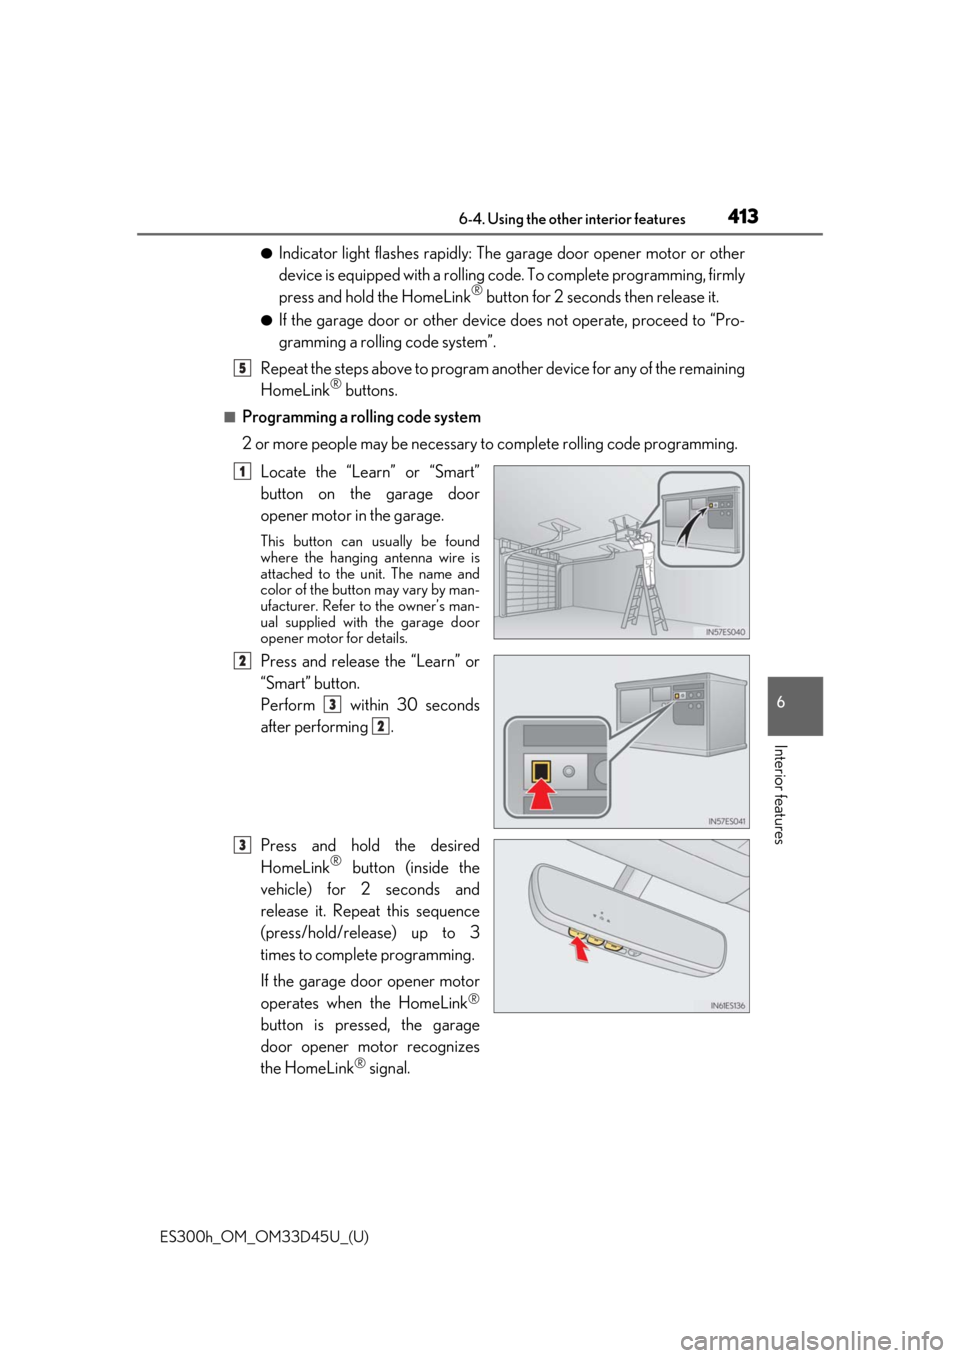
■Programming a rolling code system
2 or more people may be necessary to complete rolling code programming.
Locate the “Learn” or “Smart”
button on the garage door
opener motor in the garage.
This button can usually be found
where the hanging antenna wire is
attached to the unit. The name and
color of the button may vary by man-
ufacturer. Refer to the owner’s man-
ual supplied with the garage door
opener motor for details.
Press and release the “Learn” or
“Smart” button.
Perform within 30 seconds
after performing .
Press and hold the desired
HomeLink
® button (inside the
vehicle) for 2 seconds and
release it. Repeat this sequence
(press/hold/release) up to 3
times to complete programming.
If the garage door opener motor
operates when the HomeLink
®
button is pressed, the garage
door opener motor recognizes
the HomeLink
® signal.
5
1
2
3
2
3
Page 414 of 608
414
ES300h_OM_OM33D45U_(U)6-4. Using the other interior features
■Enabling 2-way communication with a garage door (only available for com-
patible devices)
When enabled, 2-way communication allo
ws you to check the status of the
opening and closing of a garage door through indicators in your vehicle.
2-way communication is only available if the garage door opener motor used
is a compatible device. (To check devi ce compatibility, refer to www.Home-
Link.com.)
Within 5 seconds after programming the garage door opener has been
completed, if the garage door op ener motor is trained to HomeLink
®,
both garage door operation indicator s will flash rapidly (green) and the
light on the garage door opener moto r will blink twice, indicating that 2-
way communication is enabled.
If the indicators do not flash, perform and within the first 10 presses of
the HomeLink
® button after programming has been completed.
Press a programmed HomeLink
® button to operate a garage door.
Within 1 minute of pressing the HomeLink
® button, after the garage door
operation has stopped, press the “Learn” or “Smart” button on the garage
door opener motor. Within 5 seconds of the establishment of 2-way com-
munication with the garage door opener, both garage door operation indi-
cators in the vehicle will flash rapidly (green) and the light on the garage
door opener motor will blink twice, indicating that 2-way communication is
enabled.
■Reprogramming a single HomeLink® button
When the following procedure is performed, buttons which already have
devices registered to them can be overwritten: With one hand, press and hold the desired HomeLink
® button.
When the HomeLink
® indicator starts flashing (orange), continue to hold
the HomeLink® button and perform “Programming HomeLink®” (it
takes 20 seconds for the HomeLink® indicator to start flashing).
Press the appropriate HomeLink
® button. The HomeLink® indicator light
should turn on.
Operating HomeLink®
1
23
2
3
1
2
1
Page 415 of 608
ES300h_OM_OM33D45U_(U)
4156-4. Using the other interior features
6
Interior features
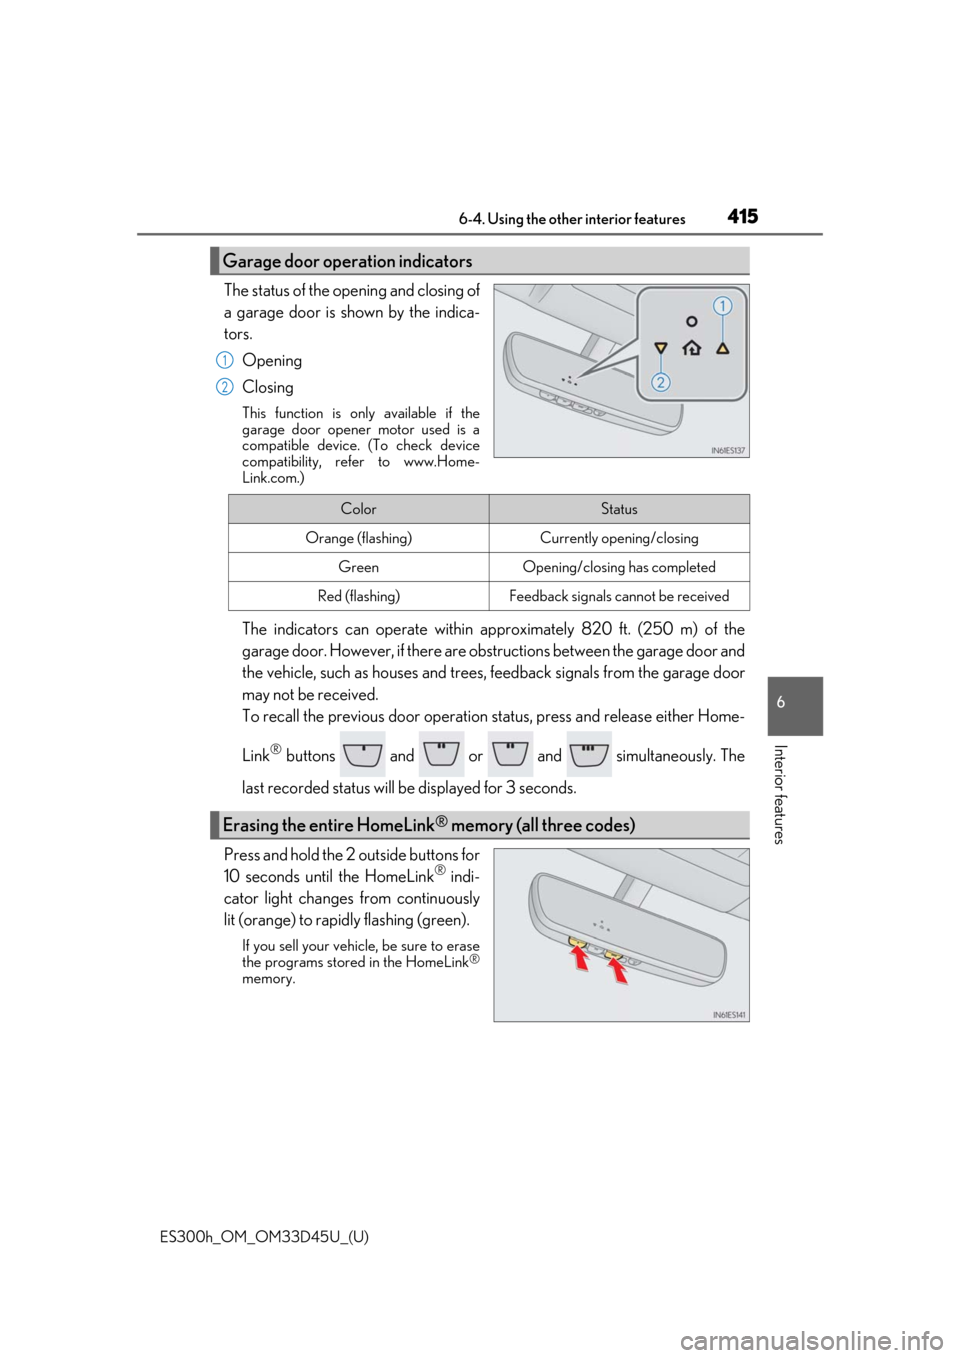
The status of the opening and closing of
a garage door is shown by the indica-
tors.Opening
Closing
This function is only available if the
garage door opener motor used is a
compatible device. (To check device
compatibility, refer to www.Home-
Link.com.)
The indicators can operate within ap proximately 820 ft. (250 m) of the
garage door. However, if there are obst ructions between the garage door and
the vehicle, such as houses and trees, feedback signals from the garage door
may not be received.
To recall the previous door operation status, press and release either Home-
Link
® buttons and or and simultaneously. The
last recorded status will be displayed for 3 seconds.
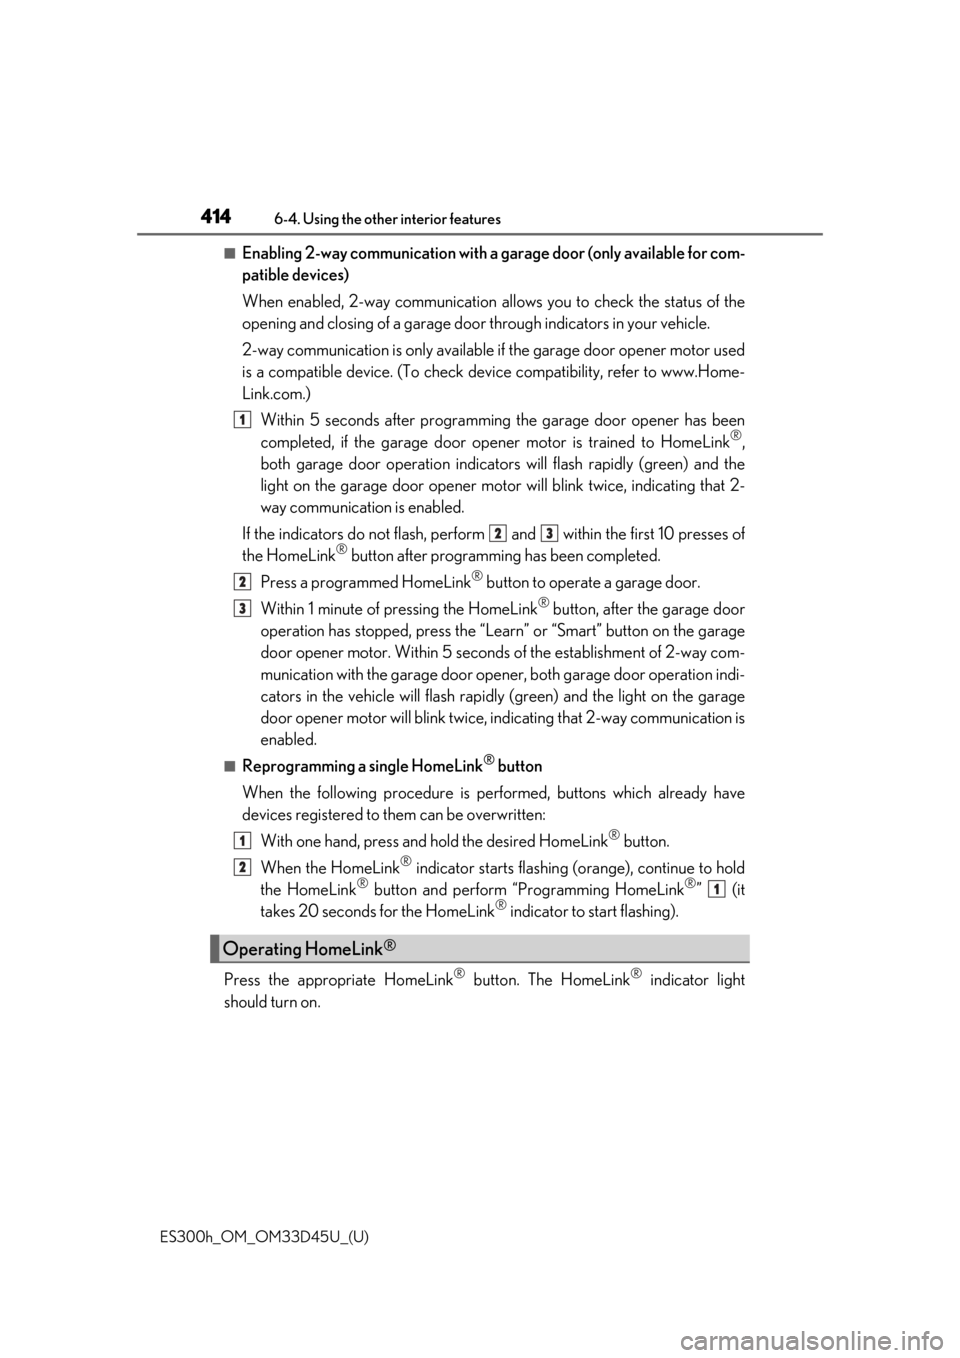
Press and hold the 2 outside buttons for
10 seconds until the HomeLink
® indi-
cator light changes from continuously
lit (orange) to rapidly flashing (green).
If you sell your vehicle, be sure to erase
the programs stored in the HomeLink®
memory.
Garage door operation indicators
1
2
ColorStatus
Orange (flashing)Currently opening/closing
GreenOpening/closing has completed
Red (flashing)Feedback signals cannot be received
Erasing the entire HomeLink® memory (all three codes)
Page 422 of 608

422
ES300h_OM_OM33D45U_(U)6-4. Using the other interior features
LEXUS Enform Safety Connect∗
“SOS” button
LED light indicators
Microphone
∗: If equipped
Safety Connect is a subscription-based telematics service that uses Global
Positioning System (GPS) data and embe
dded cellular technology to provide
safety and security features to subscribers. Safety Connect is supported by
Lexus’ designated response center, wh ich operates 24 hours per day, 7 days
per week.
Safety Connect service is available by su bscription on select, telematics hard-
ware-equipped vehicles.
By using the Safety Connect service, you are agreeing to be bound by the
Telematics Subscription Service Agre ement and its Terms and Conditions, as
in effect and amended from time to time, a current copy of which is available
at Lexus.com. All use of the Safety Co nnect service is subject to such then-
applicable Terms and Conditions.
System components
1
2
3
Page 424 of 608

424
ES300h_OM_OM33D45U_(U)6-4. Using the other interior features
When the power switch is turned to ON mode, the red indicator light comes on
for 2 seconds then turns off.
Afterward, the green indicator light comes on, indi-
cating that the service is active.
The following indicator light patterns indicate specific system usage conditions:
●Green indicator light on = Active service
●Green indicator light flashing = Safety Connect call in process
●Red indicator light (except at vehicle start-up) = System malfunction (contact
your Lexus dealer)
●No indicator light (off) = Safety Connect service not active
■Automatic Collision Notification
In case of either airbag deployment or severe rear-end collision, the system is
designed to automatically call the re sponse center. The responding agent
receives the vehicle’s location and attempts to speak with the vehicl\
e occu-
pants to assess the level of emergency. If the occupants are unable to commu-
nicate, the agent automatically treats the call as an emergency, contacts the
nearest emergency services provider to describe the situation, and requests
that assistance be sent to the location.
■Stolen Vehicle Location
If your vehicle is stolen, Safety Conn ect can work with local authorities to
assist them in locating and recovering the vehicle. After filing a police report,
call the Safety Connect response ce nter at 1-800-25-LEXUS (1-800-255-
3987) and follow the prompts for Safety Connect to initiate this service.
In addition to assisting law enforcemen t with recovery of a stolen vehicle,
Safety-Connect-equipped vehicle locatio n data may, under certain circum-
stances, be shared with third parties to locate your vehicle. Further informa-
tion is available at Lexus.com.
■Emergency Assistance Button (“SOS”)
In the event of an emergency on the ro ad, push the “SOS” button to reach the
Safety Connect response center. Th e answering agent will determine your
vehicle’s location, assess the emergency, and dispatch the necessary assis-
tance required.
If you accidentally press the “SOS” button, tell the response-center agent that you
are not experiencing an emergency.
Safety Connect LED light Indicators
Safety Connect services